This page describes how to install and configure NextGen gateway in different target environments.
Please refer OpsRamp’s Collector Bootstrap Tool for general guidelines on how to install and register NextGen gateway.
Note
You must download the collector bootstrap tool before you can proceed with the NextGen gateway installation.The NextGen gateway can be installed in two environments:
- Install NextGen gateway on kubernetes environment
- Install NextGen gateway using ISO/OVA on a virtualized environment (VMWare ESX/KVM)
Installation of NextGen gateway on Kubernetes environment
Pre-requisites
To deploy a NextGen cluster in your kubernetes environment, make sure your environment meets these requirements:
- Helm 3.8.2 or higher
- Kubernetes (K3S or K8S) - 1.20.x - 1.17.x or higher
- 8 GB Memory (Recommended)
- 50 GB Disk (Recommended)
- Windows/Linux/Mac OS
- AMD64/ARM64 Arch
- Download the OpsRamp Collector Bootstrap Tool.
Refer the article on how to download the OpsRamp Collector Bootstrap Tool.
Installation steps
You are now ready to install the NextGen gateway in your Kubernetes environment using the following CLI syntax.
Use the following command to install the gateway:
opsramp-collector-start install -e k8s --url {OpsRamp Server URL} --key {Gateway unique authentication token}Installing gateway in a kubernetes environment:

Please follow the steps described in this section if you are unsure of how to install kubernetes in your target system. The collector bootstrap tool has the built-in capability to install the Rancher k3s and other tools needed to setup both a single and multi-node kubernetes cluster environment across a set of VMs or bare-metal machines.
Successful gateway registration
Once the CLI returns successfully, navigate to Setup > Resource > Management Profile to check if the Gateway registered successfully.
Gateway connection status: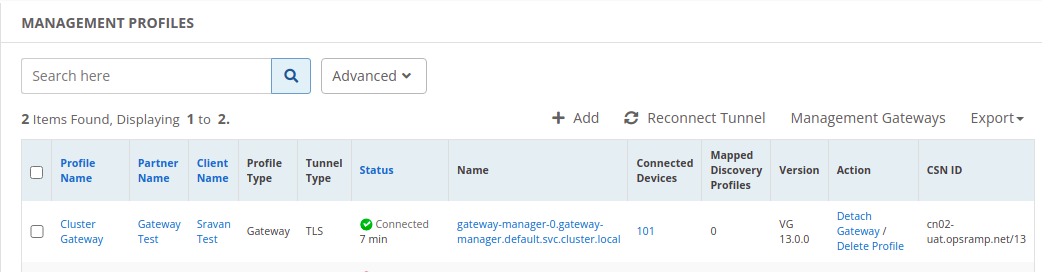
Uninstallation steps
Use the below command to uninstall the NextGen gateway in Kubernetes. To uninstall the gateway, this collector needs sudo privileges.
sudo opsramp-collector-start uninstall -e kubernetesOn successful uninstallation will show the response as below:
Installation of NextGen gateway using ISO or OVA
ISO and OVA are only applicable for the Kubernetes environment and Ubuntu/Linux operating system.
ISO installation:
- Download the ISO URL: https://opsramp-gateway.s3.us-east-2.amazonaws.com/NextgenGW/VG_2004_1.3.2-nextgen_202212152134.iso
- Install the ISO: To install the ISO on your local computer, follow the instructions in Gateway Deployment for Vmware using ISO .
OVA installation:
- Download the OVA URL: https://opsramp-gateway.s3.us-east-2.amazonaws.com/NextgenGW/OpsRampNextgenGW-132.ova
- Install the OVA: To install the OVA on your local computer, follow the instructions in Gateway Deployment for Vmware using OVA .
Once the gateway is provisioned its recommended to set the hostname as a best practice to have unique hostname in the network.
Update hostname:
Use the below command to update the hostname:
opsramp-collector-start setup updatehostname <new hostname>On successful hostname update, will show the response as below:
Gateway initialization:
Run the following command to install the k3s environment in the gateway:
opsramp-collector-start setup --helpSingle-node deployment:
Run the following command to install the k3s for single node gateway:
opsramp-collector-start setup initOn successful k3s installed, will show the response as below:

Check k3s status:

Follow the instructions in OpsRamp Collector Bootstrap Tool for NextGen Gateway registration.
FAQ’s
How do I add proxy settings to Node?
Step-1: Add the proxy settings to /etc/environments.
HTTP_PROXY=
HTTPS_PROXY=
NO_PROXY=localhost,127.0.0.1,10.43.0.1,<NODE_IPs>Step-4: The proxy settings listed above will also be added to
/etc/system/systemd/k3s.service.env.How do I change proxy settings at the node level after installing k3s?
Step-1: Edit the proxy settings in /etc/system/systemd/k3s.service.env file.
Step-2: Now, use the following command to restart the k3s service:
systemctl restart k3s