Metrics in OpsRamp Monitoring allow you to track resource performance and system health. This section covers how to manage metrics, understand their formats, and use export/import features for efficient monitoring.
Create a Metric
To create a metric,
Login to OpsRamp portal.
Navigate to Setup > Account.
Click the Monitoring card. The following page is displayed.
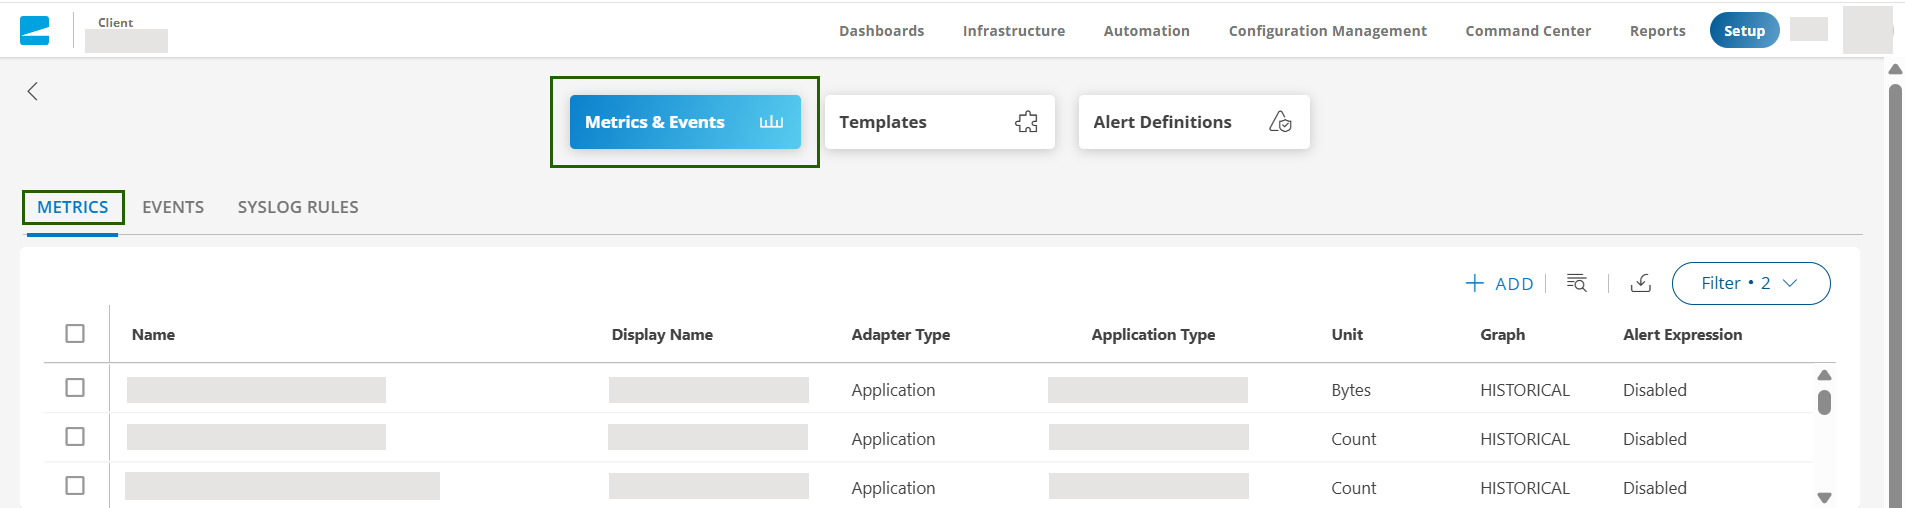
In the Metrics tab, click +ADD. The ADD METRIC page is displayed.
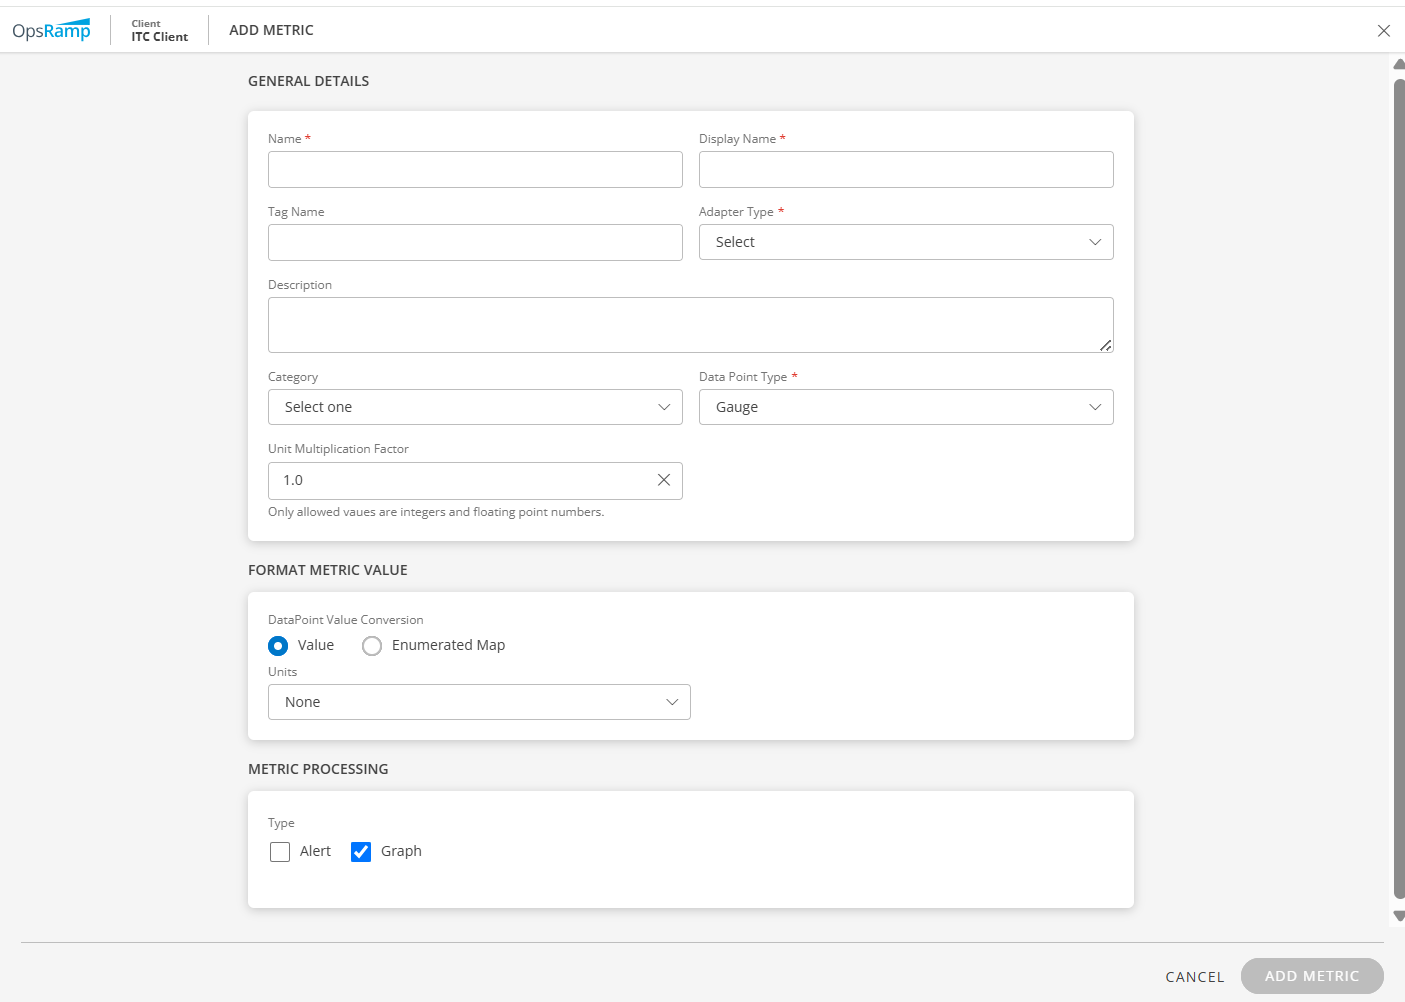
Enter the following field details:
Section Field Description General Details Name Unique name for the metric. For example, apache_tomcat_webapps_count_.Display Name Enter Display Name. For example, System Drive Free Space. Tag Name User-defined tags for better filtering. Adapter Type Select from: - Application: Also select values for Application Type and Attribute.
- JMX: Enter a value for the Class/Attribute path.
- Derived Metric: Select a metric from the Metric Query drop-down list in Query Builder. See Derived Metrics for more details.
Description Provide additional details for the metric. Category Select the appropriate category for the metric. Data Point type Value chosen to plot data in the graph. Unit Multiplication Factor Value chosen to multiply a value based on the chosen unit. Format Metric Value DataPoint Value Conversion Options are: Value:To populate data using values. Select the appropriate unit from the Units drop-down.Enumerated Map: To populate alert and graph details after adding the states such as Up or Down. The screen displays a section where you can add the state descriptions and select Alerts and Graphs to populate data.
Query Builder (for Derived Metric type only) Frequency The time interval to run the query. Metric Processing Type Select Alert and/or Graph checkboxes for metric processing type.
Alert allows you to setup a warning or critical alert based on the metric, threshold, and repetition.
You can also decide how to display the alert details by adding a format in Alert Subject and Alert Content fields.Query Builder(for Derived Metric type only) Frequency The time interval to run the query. Metric Query Query expression used to retrieve and aggregate metric data. Query Result Results returned by the metric query. Labels Map (for Derived Metric type only) Name and Value Click +ADD LABEL to add details about label maps. Click ADD METRIC. The metric is added and is available in the metrics list.
Metric name format
The following are acceptable formats for a metric name:
- Metric names should not contain a dot (.), instead use an underscore (_) between the words.
system.cpu.usageis not validsystem_cpu_usageis valid - A metric name can have a maximum of ten underscores “_”. A metric name cannot start or end with an underscore.
- A metric name can contain numeric values (0-9), but cannot start with a numeric value.
- A metric name should be case-insensitive.
- The length of the metric name should be less than or equal to 255, including underscores.
Graphs with New Metrics data
The following table details the graphs.
View details
| Property | Expected Behaviour | Workaround / Details |
|---|---|---|
| Graphs plotting frequency Vs Monitoring Frequency | The graph shows raw samples based on default step value: 1min i..e the plotting frequency for graphs irrespective of configured monitoring frequency. |
|
| Graphs plotting behavior |
| To avoid plotting gaps, ensure that the metric collection frequency matches the default graphing frequency or adjust the graphing frequency to match the metric collection intervals which is less than or equal to 5 minutes. The recommend monitoring frequency for any metric should be <= 5 minutes |
| Visualize Real-time data | The data points for new metric graph data are calculatedly plotted every 1 min except at the frequency time-interval. In order to view real-time data, the metric graphs offer displaying the actual timestamps when the data was collected.Status and availability metrics need to show when data collection stopped, indicating a resource or service outage. | Graph > Expand Info section > shows “Real Time Data” option. |
| Metrics Details | In the new metrics system, templates that describe the relationship between different metrics are not available. User might see the legacy metrics name while detailing, which is expected behavior and these will be slowly transitioned to show in the new metric nomenclature. | To view the relationships between template and metrics, navigate to the Monitors tab where detailed information is provided. |
| Default Time Period for Graphs | Default time-period has been set as 1 Hour from the existing 4 Hr window | Default Time-period is now set 1H |
| Multiple metrics | The new metric visualization supports only a single metric graph data. | The new metric visualization doesn’t support multiple metric graph data visualization due pagination and hence not available. |
View Metrics
You can view the list of all metrics in the Metrics page.
The following table provides details of each field.
| Attributes | Description |
|---|---|
| Name | Unique name for the metric. |
| Display Name | Display name for the metric. |
| Adaptor Type | Collector type that you want to use to gather metric data. |
| Application Type | Technology associated with the metric. |
| Unit | Metric value unit. |
| Graph | Configured critical or warning expressions. |
| Alert Expression (Warning/Critical) | The configured critical or warning expressions. |
| Description | Metric description. |
Export a metric
The Export functionality allows you to save a metric in CSV or JSON format. Follow these steps to export a metric:
In the Metrics tab, search for the metric(s) you want to export.
Select the metric(s) and click Export.
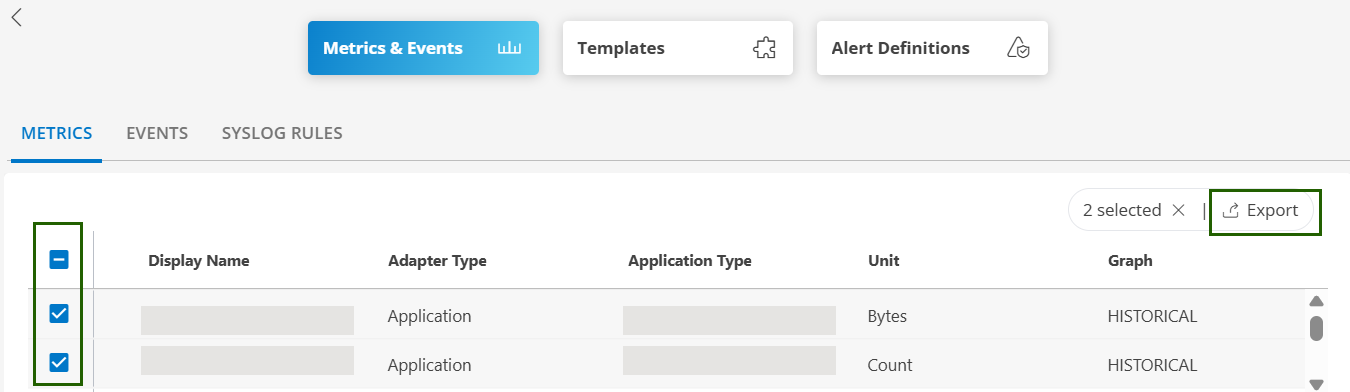
The metric is exported.
Note
If no specific metric(s) are selected before exporting, all the available metrics in the scope will be exported, by default.
Import a metric
The Import functionality allows you to import a CSV or JSON formatted metric file as a metric. Follow these steps to import a metric:
In the Metrics tab, click the Import icon and then click Upload.
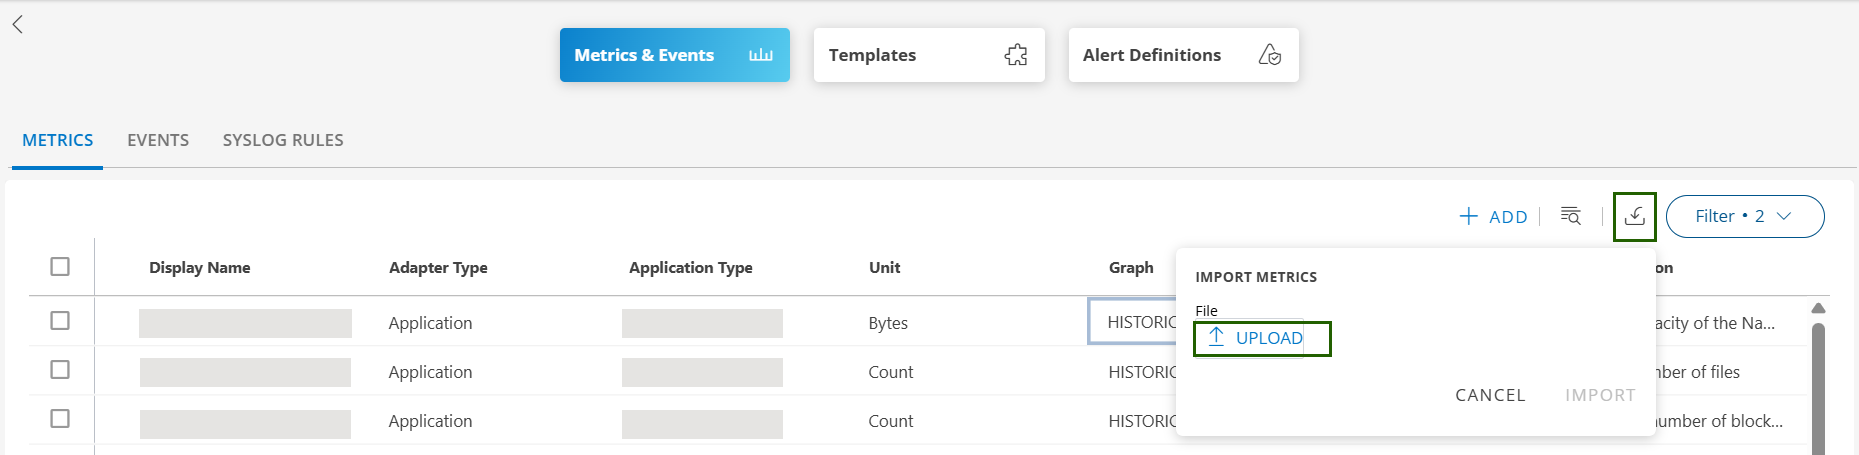
Select a file to upload. Supported file formats are JSON or CSV.
Click Import. The metric is imported and the details are shown in the Import Metrics page.
If the import fails, a message is displayed with the reason for the failure.
Info
The metrics are exported or imported based on the scope. If you export metrics at the partner scope, the partner specific metrics are only exported. The client specific metrics are not exported.Delete a Metric
Permissions
- You must have permission to manage metrics.
Note
The metric must be the one that you created. Global metrics cannot be deleted.Follow these steps to delete a custom metric:
- Navigate to Setup > Account.
- Navigate to Monitoring > Metrics & Events card.
- On the Metrics listing page, search for the metric you want to delete.
- Move hover over the row and click the ellipsis (…) icon.
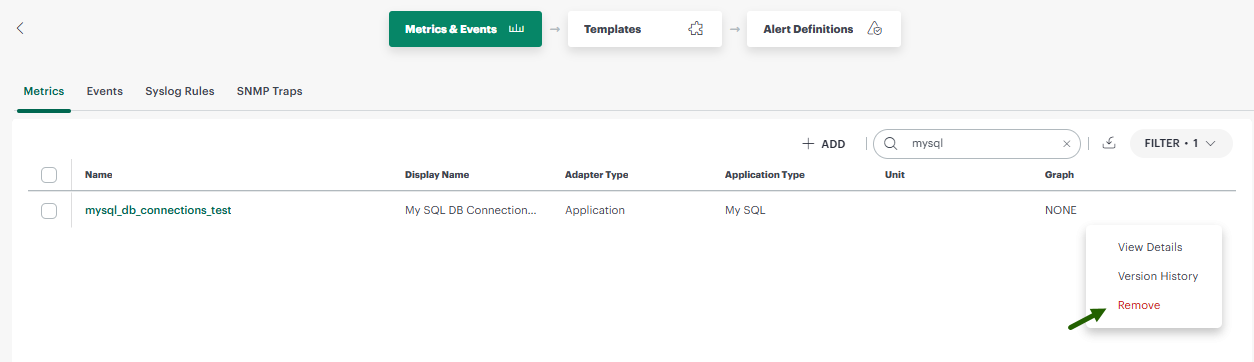
- Select Remove.
Before deletion, OpsRamp checks for dependencies to avoid disrupting existing monitoring configurations.If there are dependencies, the following window appears:
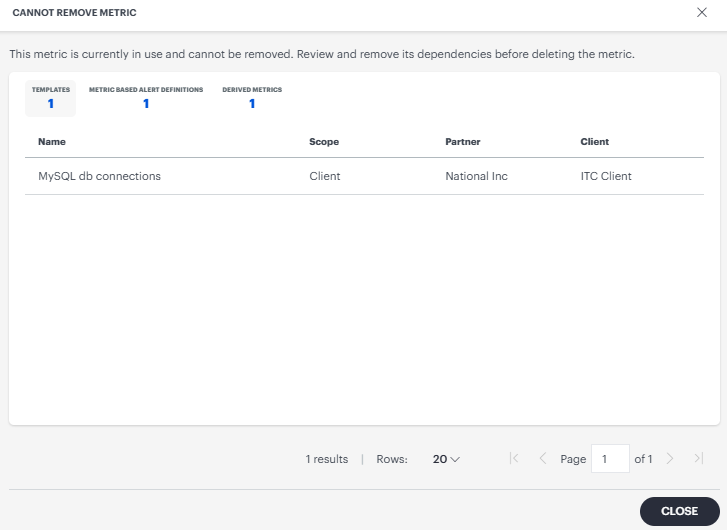
- Click on each dependency item to view details. The dependencies are listed in the following areas:
- Templates
- Metric-based alert definitions
- Derived metrics
- Review and remove its dependencies before deleting the metric, to avoid disrupting monitoring and alerting workflows.
- Click on each dependency item to view details. The dependencies are listed in the following areas:
If there are no dependencies, the metric is deleted and a confirmation message appears.
Version History
Configuration version history provides a record of changes made to a metric. You can use it to review the current configuration, compare it with an earlier version, and restore a previous version.
Version history is enabled by default for metrics. A version is created when a metric is created or updated.
Permissions
Your access to version history is based on your permissions for the metric:
- To view version history, you must have permission to view the metric.
- To restore a version, you must have permission to modify or update the metric.
Why use version history?
Updating a metric, including its category, data point type, thresholds, or other settings, can change when warning and critical alerts are triggered on the resources that use the metric. For example, an unintended change to a metric’s data point type or threshold can cause alerts to trigger incorrectly, generating excessive notifications or false alarms, or can cause genuine issues to go undetected on the resources that use the metric.
Use version history to:
- View snapshots of a metric configuration.
- Identify values that changed between versions.
- Compare the current version with an earlier version.
- Compare two older versions.
- Restore a suitable earlier version.
View version history
View the version history of a metric to review its current configuration and previously saved versions.
Follow these steps to view a metric’s version history:
- In the Metrics tab, search for the metric whose version history you want to view.
- Mouse hover over the row and click the ellipsis (…) icon.
- Select Version History. The Version History page appears with the current metric configuration, by default. The dropdown lists the versions with timestamp.
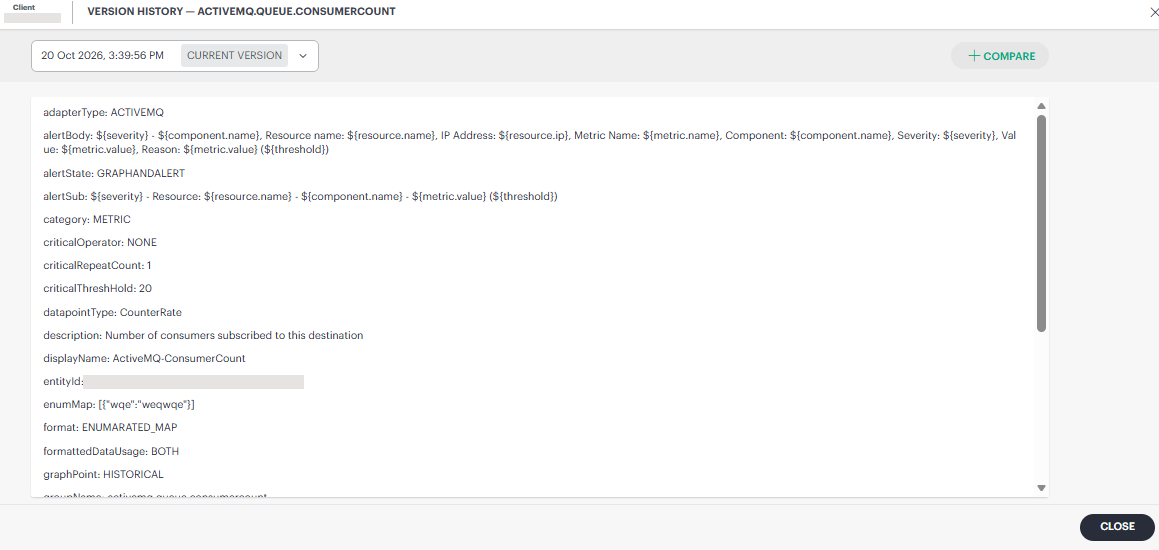
- Clicking the dropdown lists the available earlier versions.
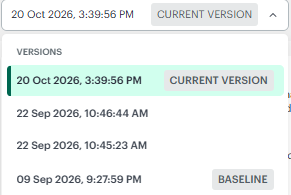
You can click the versions in the dropdown to review the changes. The selected version displays the metric configuration, allowing you to compare it with the current version and identify any values that changed.
Compare versions
Compare metric versions to see how changes affect warning and critical alerts. This comparison helps you find what caused unexpected alerts and decide whether to restore an earlier version.
Follow these steps to compare versions:
- In the Metrics tab, search for the metric whose version you want to compare.
- Mouse hover over the row and click the ellipsis (…) icon.
- Select Version History. The Version History page appears with the current metric configuration, by default.
- Click +Compare at the top right corner of the page.
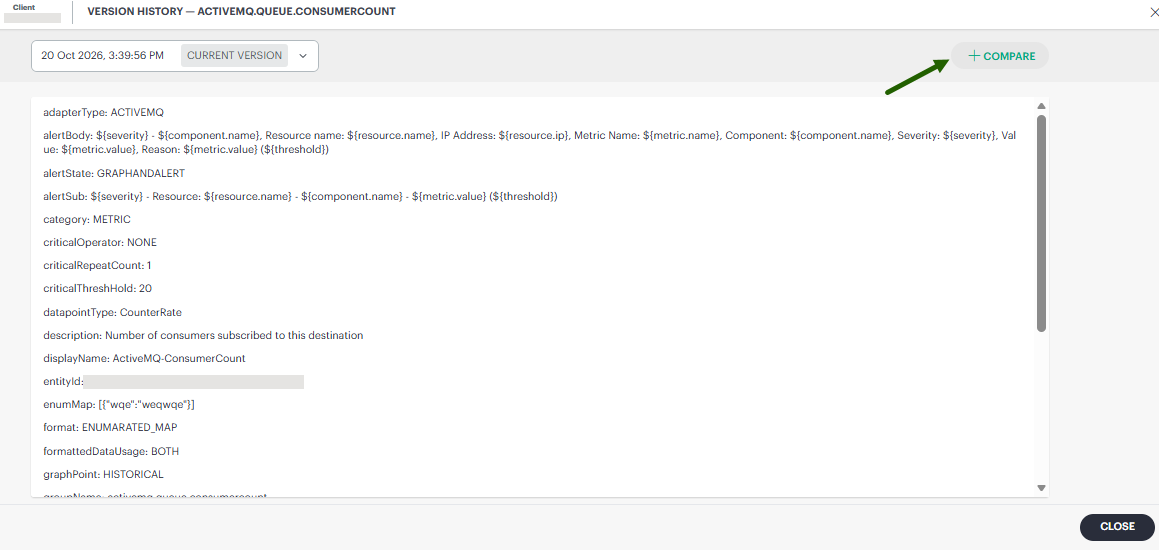
By default, the system compares the current version with the version immediately preceding it.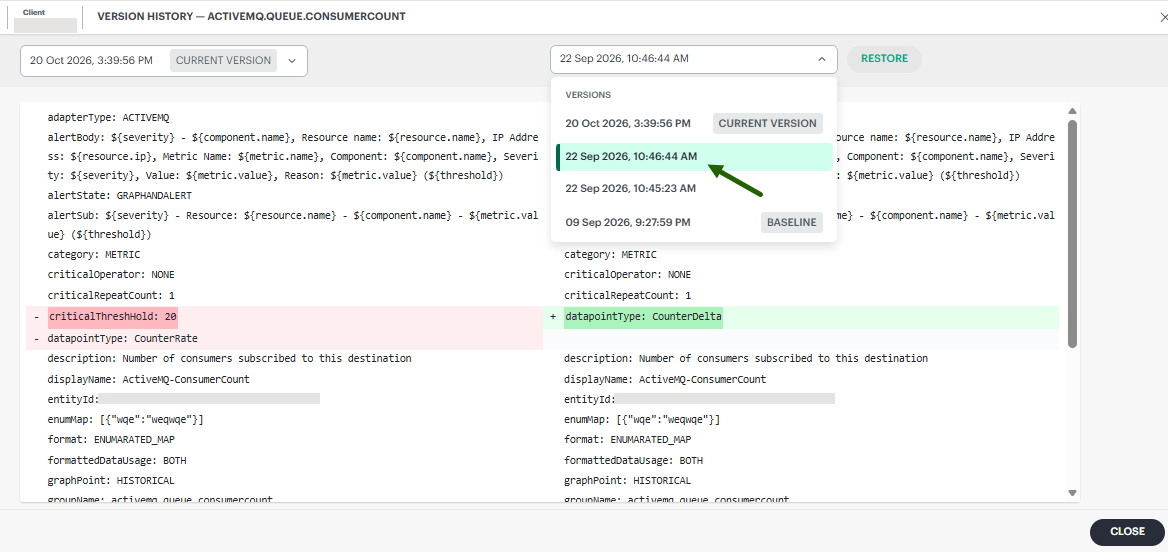
The comparison highlights the changes made. Review the differences between the configuration values.
- You can select another older version to compare with the current version, or compare two older versions.
Comparison helps you determine which change might have caused unexpected alerts.
Restore a version
Restore an earlier version of a metric when you need to revert recent configuration changes. The restored configuration becomes the current version while preserving the existing version history.
Follow these steps to restore a version:
- In the Metrics tab, search for the metric.
- Mouse hover over the row and click the ellipsis (…) icon.
- Select Version History. The Version History page appears with the current metric configuration, by default.
- Click +Compare at the top right corner of the page.
By default, the system compares the current version with the version immediately preceding it. - From the dropdown on the right, select the version you want to restore.
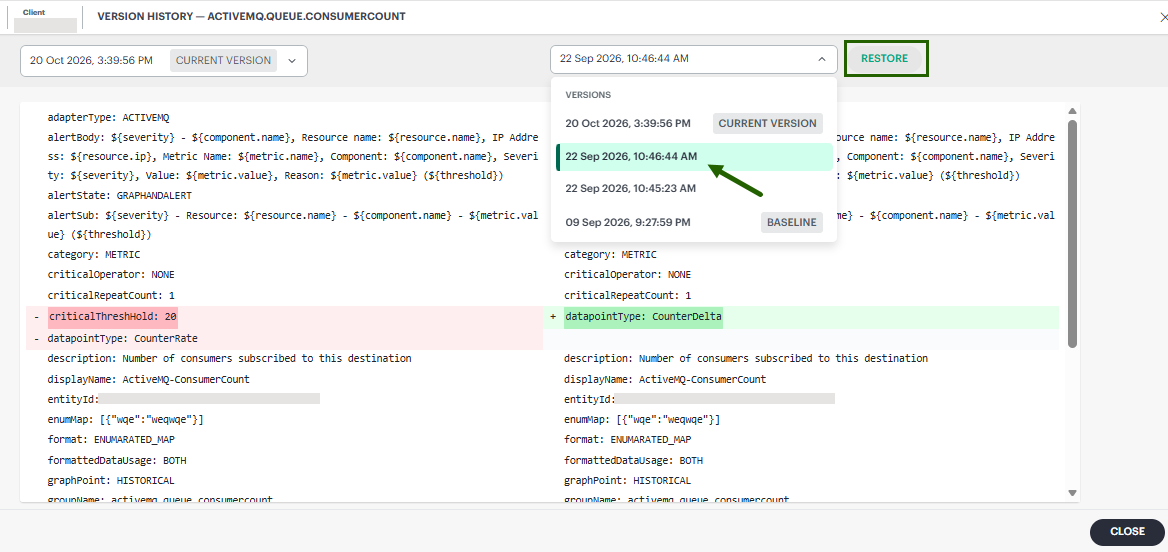
- Click Restore. A confirmation message appears.
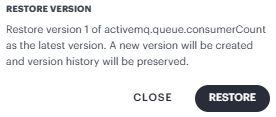
- Review the message and click Restore.
Restoring a version creates a new version. Existing versions remain in the version history. After the operation is complete, the restored values become the current configuration.
Note
The time required to apply a restored configuration can vary. A configuration that must be applied to a device might take longer to complete.Version retention and deleted metrics
Version history is retained only while the metric exists.
Important
Deleting a metric also removes its version history. You cannot view or restore versions of a deleted metric. Version history is not a backup or recovery mechanism for deleted configurations.
Existing audit logs remain available through the applicable audit or logging features, but deleted configuration snapshots are not available through Version history.