This section walks you through creating and deploying a process under the Automation category using Process Automation 2.0 in OpsRamp. It provides a process definition example and highlights commonly used definition tools. The example focuses on automating a resource patching workflow and includes the following steps:
- A Timer Start Event triggers the process at scheduled intervals.
- Once triggered, a resource patch script is executed.
- If the script completes successfully, the patch is validated.
- If the script fails, an alert is generated to notify the appropriate team.
- Upon successful validation, an email notification is sent to the DevOps team.
The visualization below demonstrates a simple automation process that you will create in this tutorial. Task and event names are for illustration purpose only, you can modify them to suit your specific requirements.

While following this tutorial, refer to the Process Definition Reference for detailed information about each component type and the properties available for customization.
Prerequisites
Ensure the Remediation and Automation package is enabled for your client account.
Step 1: Create the Process Definition
To add a new process definition,
- Click + ADD. The ADD PROCESS DEFINITION page is displayed.
- In the BASIC DETAILS tab, enter the required details and select Category as Automation.
- Click Next. The WORKFLOW tab is displayed.
Step 2: Configure the Start Events
Every process must begin with a StartEvent, which defines how the process is triggered. You can choose between a Timer Start Event or an Alert Start Event.This example demonstrates a Timer Start Event:
Click the Create StartEvent symbol from the component tools menu and place it on the canvas.
Click the Change type (wrench) icon and select Timer Start Event.
Click the Timer Start Event symbol to display the start event properties.
In the Properties view, enter a start event Name. The ID property is automatically populated.
Click Start Date and select a calendar date and time of day as the starting condition for the automated patch process. Click OK to continue through each dialog.
Choose an Ends option to specify the end of automated patch processing. Select from:
- Never ends
- ends After a number of occurrences
- ends On a specific date and time
From Recurrence Pattern, select the frequency unit (e.g., minutes, hours, days, weeks, months) and then enter the event frequency in Repeats Every.
The following options are available:
Recurrence Pattern Repeats Every
(Choose Value)Description Minute 1 to 60 minutes Select the number of minutes to trigger the event after the specified time. Hourly 1 to 24 hours Select the Hourly recurrence to trigger the event after the specified number of hours. Daily 1 to 365 days Set the frequency for the event to trigger after the specified number of days. Weekly Sunday, Monday, Tuesday, Wednesday, Thursday, Friday, Saturday Select one or more weekdays on which you want to trigger the event. For example, select Tuesday and Thursday and the time as 6 PM. The event is triggered every Tuesday and Thursday at 6 PM. Monthly 1 to 12 months Set the frequency on a monthly basis. For example, select 2 as the recurrence value. The event is triggered after two months from the date and time specified in the Start Date edit window.
Understanding of Recurrence Patterns
A recurrence pattern is a schedule that defines when a task should be repeated. If a task is configured to run at specific intervals (e.g., 5, 10, 15, 20, 25, 30, 35, 40, 45 minutes etc.) following the UTC time offset. Here’s how it will works:
- Behavior
Task execution begins at deployment and aligns with the configured interval. For example, if a task is set to run every 40 minutes, it will execute starting from the nearest time that is a multiple of 40 minutes past the hour. Example:- If the start time is 00:36, execution times will be:
00:40, 01:20, 02:00, 02:40, and so on.
- If the start time is 00:36, execution times will be:
- UI Representation
Although the tasks execute based on UTC time, the execution times displayed in the UI are converted to the user’s preferred time zone. This helps users easily understand the schedule in their local context.
Example with Timezone Conversion:- Task Interval: 40 minutes.
- Execution Times (UTC): 00:00, 00:40, 01:20, 02:00, 02:40, etc.
- Displayed in User’s Timezone (UTC+2): 02:00, 02:40, 03:20, 04:00, 04:40, etc.
*The same logic applies to other recurrence patterns such as: hourly, daily, weekly, and monthly.
Step 3: Add the Task and Configure Task Properties
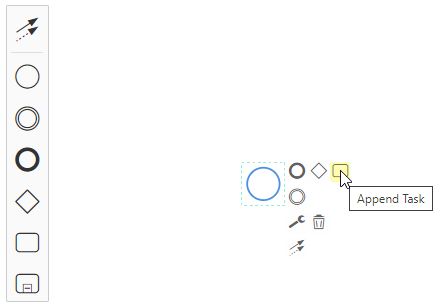
- Click the Create Task icon in the component tools menu and place the task onto the canvas. Alternatively, select the StartEvent symbol you just placed and click the Append Task icon to add a task.
- For each new component, either select and place it from the component tools menu or select an existing component on the canvas and choose the next component in the workflow. Adding components from existing ones automatically connects them.
- For the task, click the Change type icon and choose Script Task.
- Click the task symbol on the canvas to display the task properties.
- Enter the task Name. The name appears in the task symbol as you type. The task ID fills in automatically.
- Select Agent or Agentless as the script platform.
- Click the Script Name edit box and select a script from the list.
- For Resource ID, enter a $ character to display the available input sources for the task. Choose the timer start event resource.
For example, if you name the timer start eventPatch Start Timer, selectPatch Start Timerfrom the list of available input sources. In this case, you see only one available input source.
Note
When working on tasks related to tags or custom attributes, choose the multi-instance option as tag data usually comes in collections. Once element variables are defined from this collection, you can selecttagName and tagValues tokens. This same approach is applicable to sub-processes.- Select Default user or Other user as the user with run script privilege.
Step 4: Add the Gateways
Use a gateway to specify workflow branching. An exclusive gateway provides conditional branching and a parallel gateway provides for concurrent processing paths.
- Click the on-canvas script task and select the Append Gateway icon. This renders an exclusive gateway component by default.
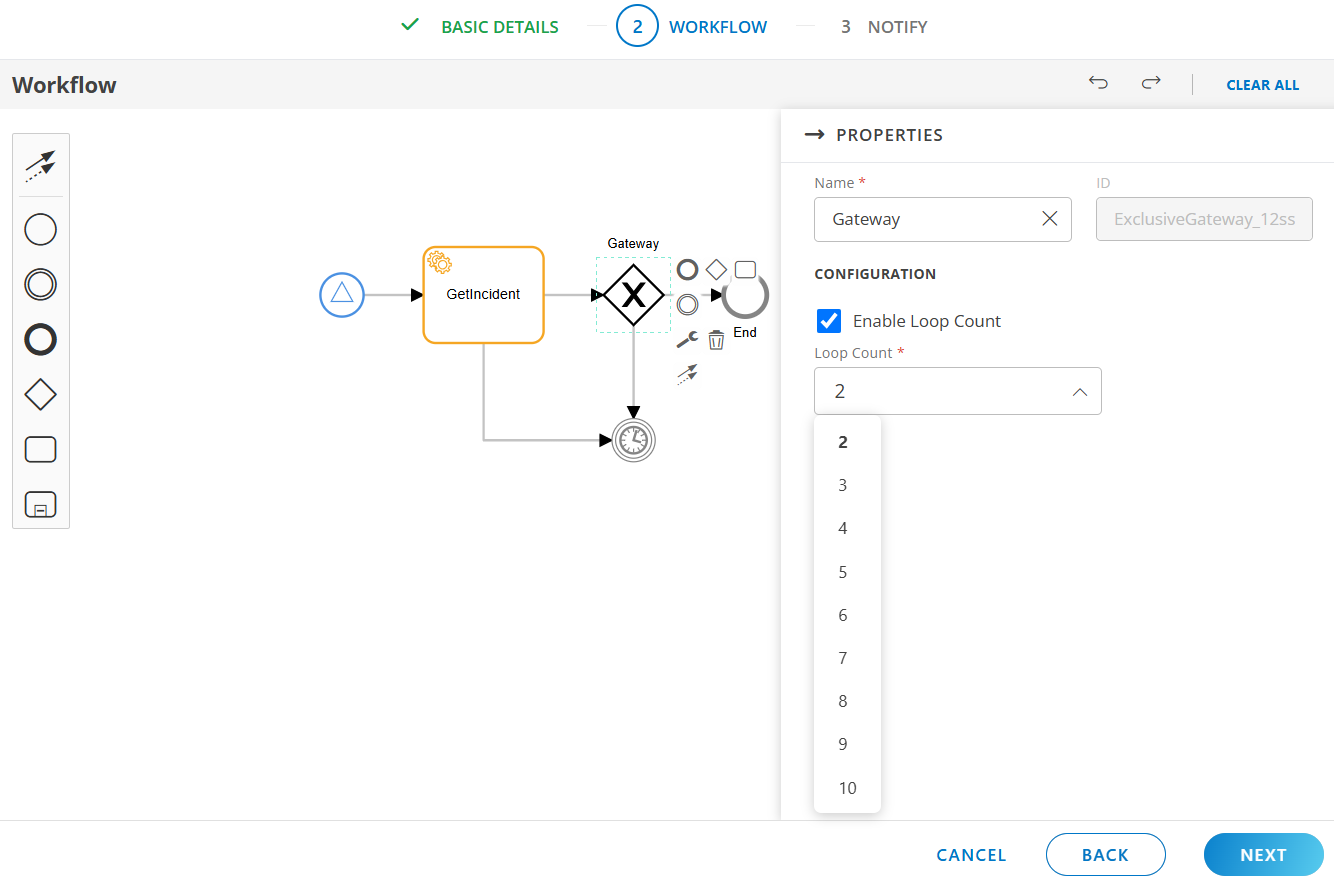
- Click the gateway component to edit the properties.
- Enter a Name property. The ID property is automatically populated.
- Enable the option Enable Loop Count and select the values from the drop down to configure the repeat count value.
Note
If the sub-process is set as a multi-instance, thetagName and tagValues tokens will be accessible throughout the entire sub-process.Step 5: Configure the Conditional Tasks
Define two tasks, one for each gateway path. The task that executes depends on satisfying the gateway conditions.
For the first task, define the task to handle a successful patch operation:
- Click the gateway component and select the Append Task icon. This renders a task for post-patch validation.
- For the task, click the Change type icon and choose Script Task.
- Click the task symbol on the canvas to display the task properties.
- Enter the task Name. The task ID is automatically populated.
- Select Agent or Agentless as the script platform.
- Click the Script Name edit box and select from the list of available scripts.
- For Resource ID, enter a $ character to display the list of available input sources to the task. Choose the name of the patching script task previously defined.
- Select Default user or Other user as the user with run script privilege.
For the second task, define the task to handle a failed patch operation:
Click the gateway component, again, and select the Append Task icon. This renders a task to create an alert if the patch operation failed.
For the task, click the Change type icon and choose Service Task to create the alert.
Click the task symbol on the canvas to display the task properties.
Enter the task Name. The task ID is automatically populated.
From the Service menu, select a Platform Service for the alert notification.
From the Task menu, select Create Alert.
Enter the required alert information.
You can manually enter the information in each field or enter $ to display the list of valid values. For example, the Create Alert option requires a Current State value. Enter $ to display the possible process states. Choose the name of the first task created in this example because that is where the patch operation failed.
Step 6: Configure the Boundary Event
Use the Create Intermediate/Boundary Event to define intermediate start, stop, or timer events.
To define the Boundary Event, follow the below steps:
- From the component tools menu, click the Create StartEvent symbol and drag it to the canvas.
- Click the Create StartEvent and select the Append Task.
- Click the Append Task and select the Append EndEvent.
- From the component tools menu, click the Create Task symbol and drag it to the canvas.
- Connect the Create StartEvent and Create Task using sequence arrow.
- Connect the Create Task and Append EndEvent using sequence arrow.
- Click the Create Task > Wrench Icon and then select the Service Task.
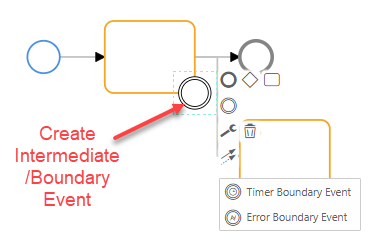
- From the component tools menu, click the Create Intermediate/Boundary Event symbol and drag it to one of the Append Task corners.
- Click the Create Intermediate/Boundary Event > Wrench Icon and choose one of the following options:
- Timer Boundary Event
- Error Boundary Event
- Now, define the Service Task properties and click Save & Deploy.
Step 7: Add the Completion Task and End Events
After successful patch validation, a sent-type task is needed to send an email notification to DevOps.
- Click the previously created validation task and select the Append Task icon.
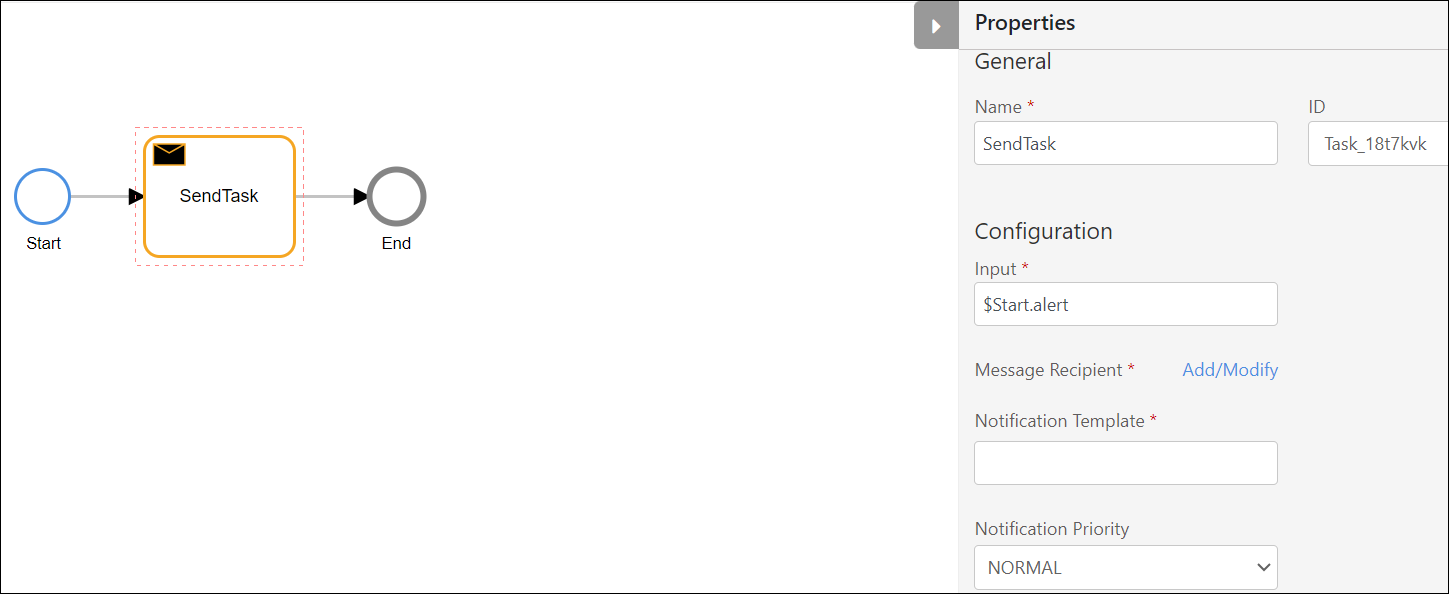
- For the newly created task, click the Change type icon and choose Send Task.
- Click the task symbol on the canvas to display the send task properties.
- Enter the task Name. The task ID is automatically populated.
- For the Input field, enter a $ character to display the list of available input sources. Choose the name of the patch validation task previously defined.
- To specify the Message Recipient, click Add/Modify.
- Select a recipient from the list and click Add.
- Select the Notification Template that has been created. Refer the Document for instructions on how to create a notification templates.
Note
- To view automation related data under Setup > Notifications > Templates, you need to enable the Process Automation Add-on for the partner/client.
- The SendTask feature uses Notification Templates created in the Setup > Notifications > Templates section. The data saved in these templates is sent in email notifications. Templates are categorized by input types such as Alert, Incident, Resource, Task, and JSON Object. Users can select available tokens based on the chosen input type.
For JSON objects, if the user does not select any Integration & Event name, the only supported token is$output.
- Select a Notification Priority.
Complete the process definition by defining an EndEvent.
- Click the email notification task and select the Append EndEvent icon.
- Click the end event symbol on the canvas to display the event properties.
- Enter the event Name. The task ID is automatically populated.
Connect the failed path handler task to the end event:
- From the component tools menu, select Activate the global connect tool connector.
- Click the script task defined to create an alert.
- Click the EndEvent symbol. This renders a connector between the task and end event.
- Click the connector and in the Properties view enter a connector Name.
Click Save or Save & Deploy to save or save and deploy the new process definition. All required properties must be specified and a complete process workflow must be defined before you can save the definition.
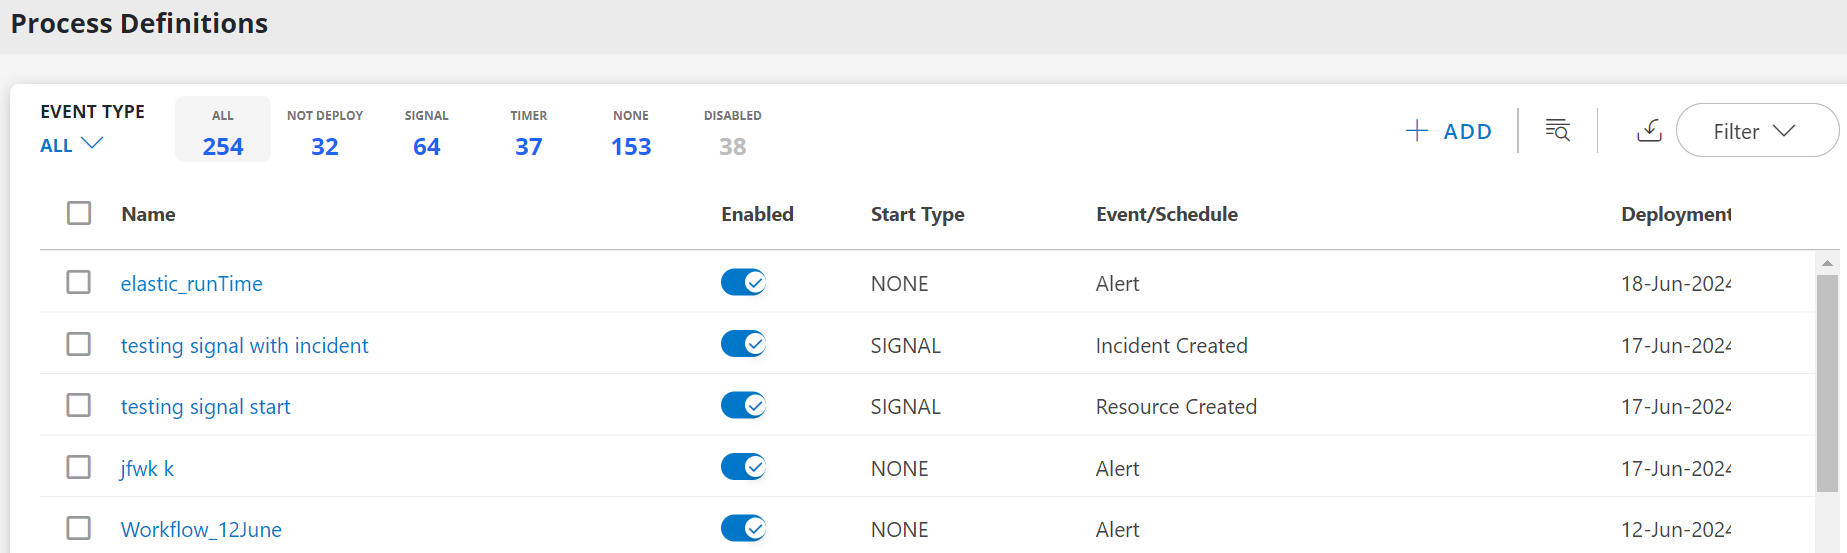
Once the defined process is saved, it will be available on the Process Definitions home page.