Overview
Compliance is a metric that provides the number of uninstalled patches on a device. This refers to the number of resources that have been effectively patched or remediated against security threats. The distribution and deployment of patches accomplish nothing if your devices are not compliant.
Automated patch management makes the process of patch compliance more accessible for organizations of any size. Automated patching solutions make it possible for users to patch across all devices regardless of the operating system, location, or third-party application from a single interface.
OpsRamp Patch Management can help your organization to meet regulatory compliance requirements by detecting and remediating non-compliant endpoints using an automated patch management system, assisting with regular software upgrades, establishing system health detection policy, and recognizing patching regulatory standards, and providing visibility over all endpoints through robust reporting features.
Following are reasons why compliance with patch management is so important:
- Enhance Security
- Boost Efficiency
- Enable Remote Working
- Prevent Reputation loss
Create New Patch Compliance at Client Level
To create new patch compliance at client level, follow the below steps:
- Login to OpsRamp Portal.
- Select a client from the All Clients list.
- Go to Configuration Management > Patch Management.
- On the left side of this page, click the Menu bar icon and then Compliance.
- Click + ADD to create a new patch configuration.
Let’s get started on creating a new patch compliance. You must fill out the necessary information on the following three pages:
- Resource Selection
- Patch Selection
- Schedule
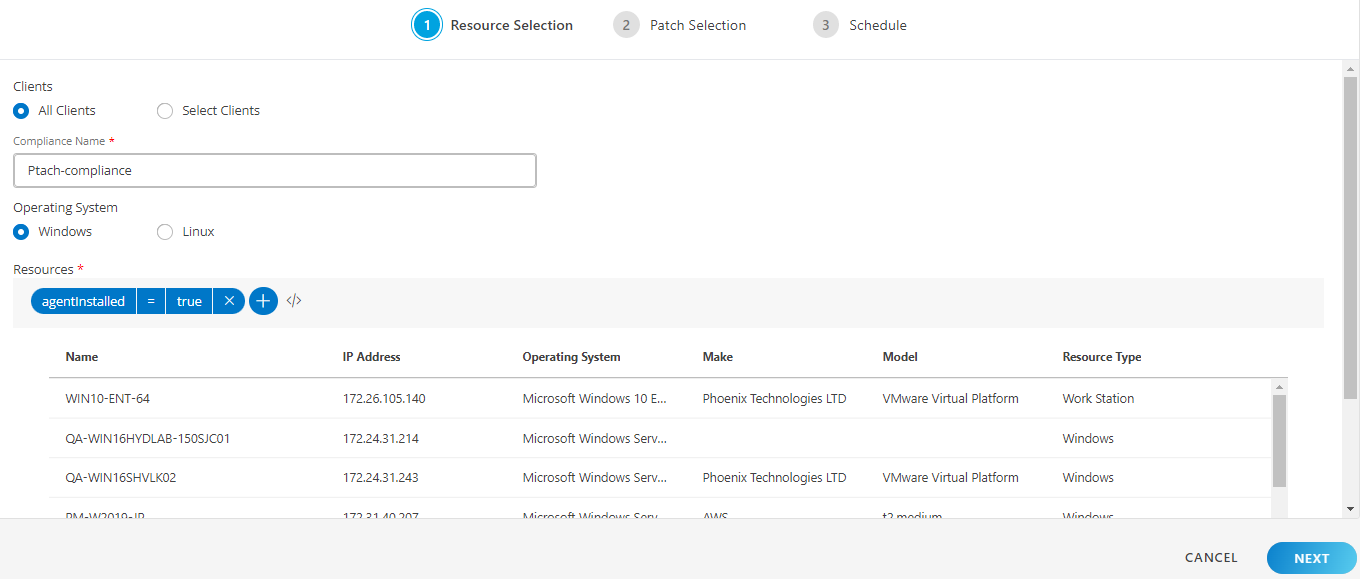
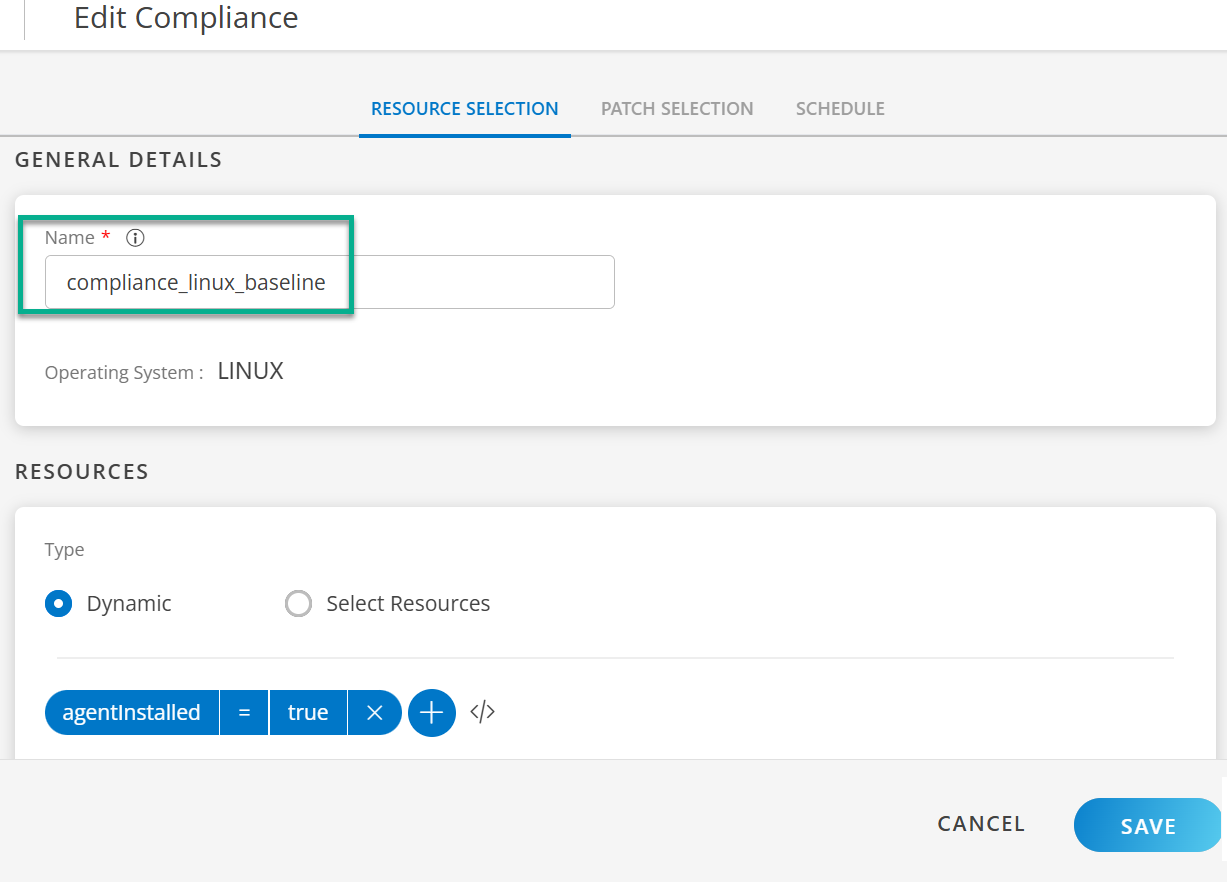
Resource Selection
On this page, we will choose resources based on the requirements.
- In the Compliance Name field, give a name to the patch compliance.
- Select the Resource group from the drop-down list.
- Select the Operating system: Windows/Linux
- Choose resources from the list. There are two options for doing so.
- Dynamic: Choose resources by adding an OpsQL query; if any resources match the query, they will be included in the Compliance configurations automatically. This will automate the process and reduce the need for user intervention whenever there are new devices onboarded and required to add new devices to the existing Compliance configurations.
- Select Resources: This is a manual process for searching and selecting resources by defining Resource attributes in a simple search query. The selected resources list would not be updated with newly onboarded devices if the Compliance configuration is saved with this option. Users must manually update the list for any onboarding or decommission of the devices on the platform.
Note
If you select multiple devices from the option Select Resources, in this case you cannot select more than 100 records at once; if you do, it show an error message “Resource Ids should not be greater than 100”.
- To proceed to the patch selection page, click Next.

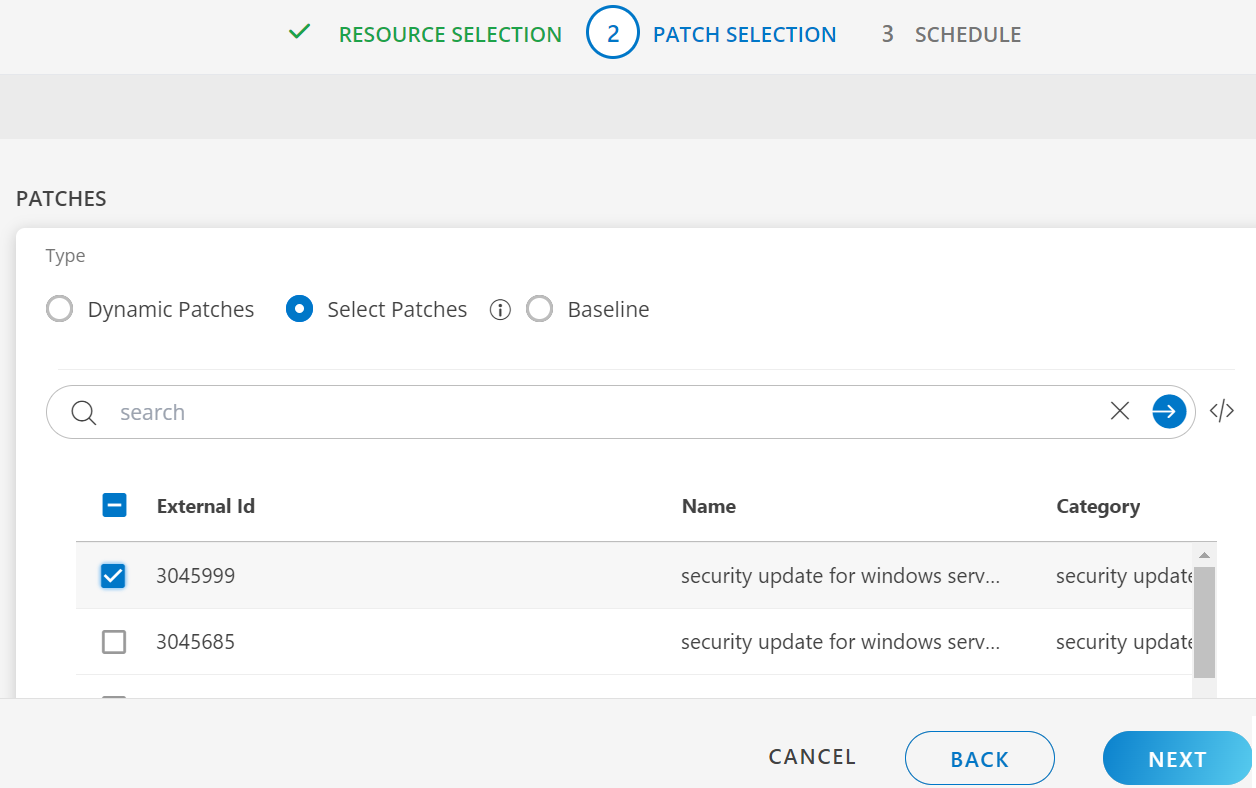
Patch Selection
In the Patch Selection page, select the patches to be configured by using any of the options.
- Dynamic Patches: You can have the Patches selected for the installation Dynamically using the filter criteria. With the next Missing Patch Scan job execution, if there are new patches found as per the filter criteria, those patches would be automatically included for installation under the respective configuration.
- Select Patches: You can select the patches manually from the list or using the Filter criteria and then click Apply.
Note: The advanced query filter option is only available for Select Patches. - Baseline: Select the patches created under baseline.
Once the patch selection process is completed, click Next to proceed to the schedule page.
Note
If you select multiple patches from the option Select Patches, in this case you cannot select more than 100 records at once; if you do, it shows an error message “Selection should not exceed more than 100 patches”.Schedule
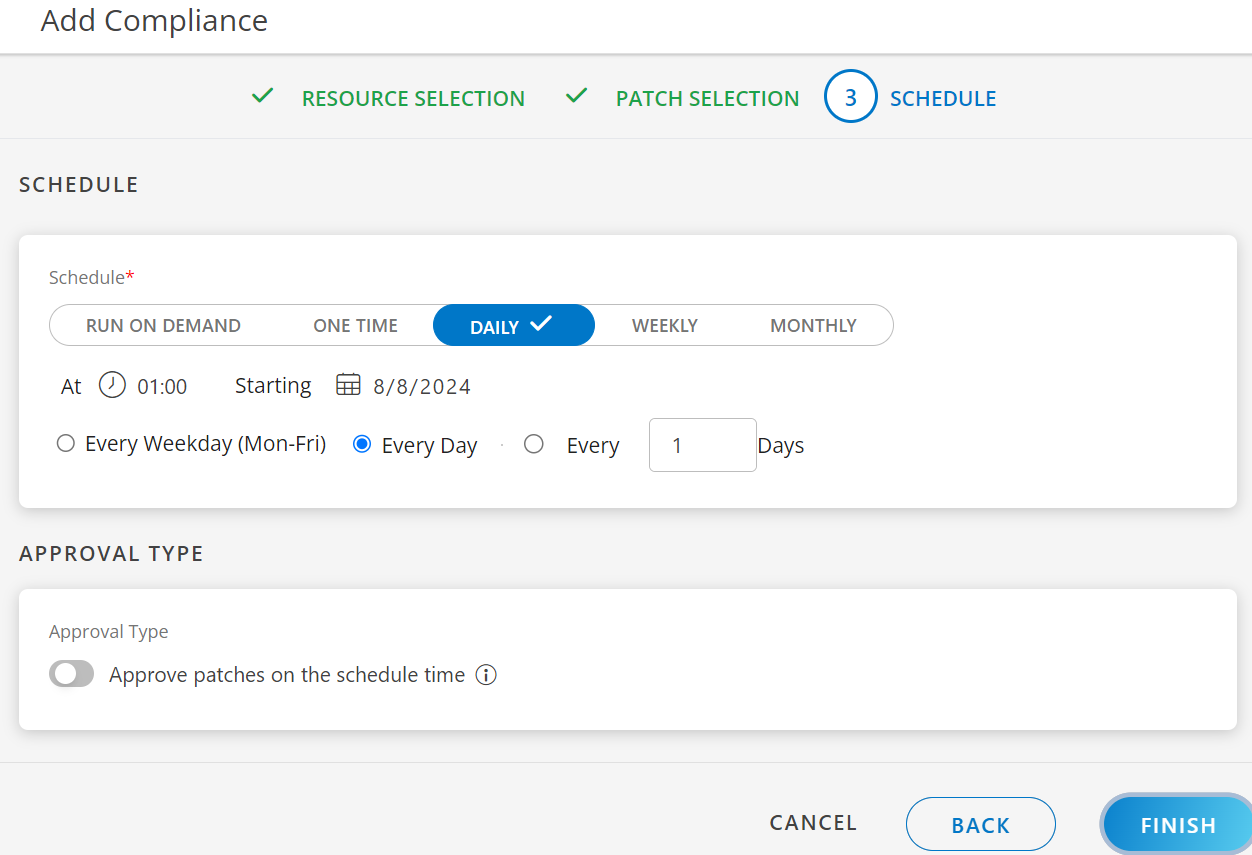
After selecting the resource and patches, you must now define a schedule to run the compliance at the desired time.
On the Schedule section, you could specify when this patch activity should be performed:
- Run On Demand: Select this option, if you want to apply the patch updates right away.
- One Time: Select this option, if you want to apply the patch updates once a time.
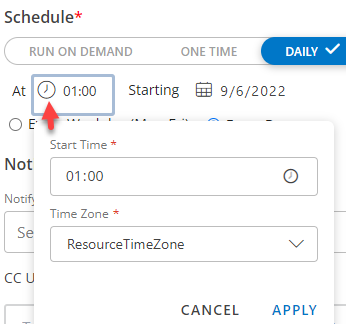
- Daily: Select this option, if you want to apply the patch updates on daily. You can configure this option by choosing: Every Weekday (Mon-Friday) or Everydays.
- Weekly: Select this option, if you want to apply the patch updates on weekly wise. Configure weekly schedule by selecting: Time preference, Starting date, and Days.
- Monthly: Select this option if you only want to apply patch updates on a monthly basis. Configure this by selecting: Time preference, Starting date, and number of days in a month.
Resource Time Zone: You can select a specific time zone to patch all the resources in the patch compliance. When you select a time zone, it ignores the different local time zones of resources and instead uses the time zone specified in the patch compliance.
- Approval Type: If you want automatic approval, enable the Approval Type option. If it is not enabled, it means you have chosen the manual type approval.
- Click Finish after you configured the scheduled page.
Create New Patch Compliance at Partner Level
OpsRamp categorizes any device as Compliant, if there are zero missing patches to be installed for a given Compliance configuration. If the missing patches in the Compliance criteria is greater than zero, the Device would be displayed as Non-Compliant.
To create new patch compliance at partner level, follow the below steps:
- Login to OpsRamp Portal.
- Select All Clients.
- Go to Configuration Management > Patch Management.
- On the left side of this page, click the Menu bar icon and then Compliance.
- Click + ADD to create a new patch configuration.
Let’s get started on creating a new patch compliance. You must fill out the necessary information on the following three pages:
- Resource Selection
- Patch Selection
- Schedule
Resource Selection
On this page, we will choose resources based on the requirements.
- To select a client, choose from All Clients or Select Clients.
- In the Compliance Name field, give a name to the patch compliance.
- Select the Operating system: Windows/Linux
- Find the resources from the list using the + QUERY button.
Choose resources by adding an OpsQL query; if any resources match the query, they will be included in the configurations automatically. This will automate the process and reduce the need for user intervention whenever there are new devices onboarded and required to add new devices to the existing installation configurations. - To proceed to the patch selection page, click Next.
Note
The next two steps for Patch Compliance at the Partner level (Patch Selection and Scheduling) are the same as the described above for Patch Compliance at the Client level. Follow the same steps to complete the configuration at Partner level.The following table summarizes the difference between Client Level and Partner Level functionality.
| Functionality | Client Level | Partner Level | |
|---|---|---|---|
| Resource Selection | |||
| Client Selection | ✗ | ✓ | |
| Windows OS Selection | ✓ | ✓ | |
| Linux OS Selection | ✓ | ✓ | |
| Dynamic Resources | ✓ | ✓ | |
| Static Resources | ✓ | ✗ | |
| Patch Selection | |||
| Manual Approval Type | ✓ | ✓ | |
| Automatic Approval Type | ✓ | ✓ | |
| Dynamic Patches | ✓ | ✓ | |
| Select Patches | ✓ | ✓ | |
| Schedule | |||
| Schedule Type | ✓ | ✓ | |
| Approval Type | ✓ | ✓ |
View List of Patch Compliance
View the list of configured patch compliance under Patch Management > Compliance. You can choose one or more patches and take action against them.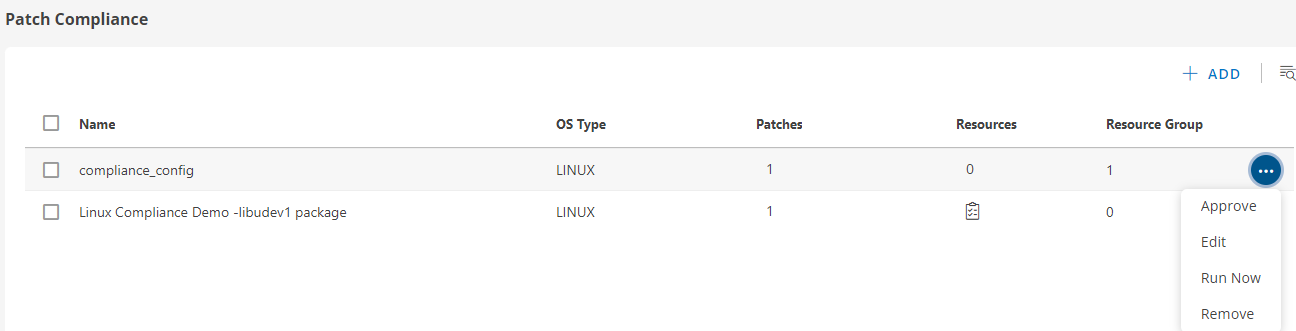
Modify the Compliance Name
To modify the name of the created Patch Compliance:
- Click on the compliance name.
- Edit the name as needed.
- Save the changes.
The following table describes the various attributes and actions displayed on the Compliance page:
| Attributes | Description |
|---|---|
| Name | The name of the patch compliance. |
| OS Type | Type operating system selected during the configuration; Windows/Linux. |
| Resources | The number of resources chosen when scheduling a compliance job. |
| Patches | Number patches selected for the particular compliance. |
| Resource Group | Selected resource group for the specific patch compliance. |
| Search button | Use the search field to find jobs. |
| Approve | Use this option to approve the patches. |
| Edit | Use the edit option to change the current job setup. |
| Run Now | Run the patch job on selected devices and resource groups. |
| Remove | Use this option to remove tasks from the list if they are not relevant. |
To see the configuration of the created compliance such as: Properties, Resources, Patches, and logs, click on the compliance jobs listed here.
For each baseline, there are complaint, non-complaint, and non-applicable counts.