Important Note
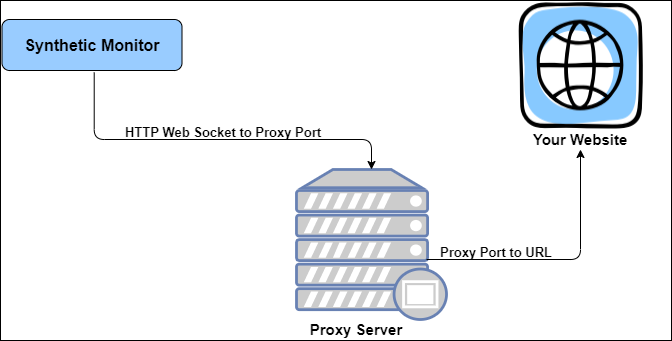
The old UI and its associated documentation are valid until the 2024.08.U1 release. The new UI and its related documentation will apply starting from the 2024.09.U1 release, see (New UI Document).Monitoring is an integral part of protecting websites from spyware or any suspicious activity. Using HTTP Proxy, start monitoring your websites (internal or external) that are accessible using proxy servers using one of the following:
- Gateway synthetic proxy. To configure a proxy, contact Support.
- Custom proxy
- No Proxy
Prerequisite: Gateway version 9.0.0
Supported synthetic monitors
Implement synthetic monitoring using proxy servers for the following synthetic monitors:
- HTTP/HTTPS
- SMTP
- IMAP
- POP3
- FTP
- RTT
- SSL
- SCRIPT – HTTP Synthetic Transaction
Synthetic monitoring using a proxy server workflow
Step 1: Create synthetic monitors
Creating monitors with adapter type Synthetics enables evaluating the resource performance according to your requirements. For more information, see Creating Monitors.
Select the following configuration parameters while creating a monitor from Setup > Monitors > CREATE A MONITOR > Configuration Parameters:
Timeout: The connection timeout value.
SyntheticProxyServerAuthType: The authentication type to restrict access to the websites using HTTP Proxy. Select one of the following options:
- None
- BASIC (Requires username and password)
SyntheticProxyServerConfigType: The method to start monitoring using proxy. Select one of the following options:
- None
- System (Applicable only for private locations)
- Custom
It is important that, if you select System config type, you provide a proxy IP address of the gateway configured in the webprobe configuration file.
SyntheticProxyServerUrl: The proxy server used to monitor the website. For example,
http://hostname:portorhttps://hostname:port.
Step 2: Create a synthetic template
A monitoring template defines all parameters used to monitor your target resource. For more information, see Creating Templates.
From Templates > MONITOR TEMPLATE, select the following while creating templates:
- Collector Type: Synthetics
- Applicable for: Synthetics
- Type: Select the synthetic monitor type.
Step 3: Create credentials
Using credentials, create a username/password to access the website using the HTTP Proxy server.
Go to Infrastructure > Resources > Synthetics.
Click the monitor.
Click Credentials > + Add.
From the Create New Credential screen, enter the details for the following parameters:
- Name: Name of the credential set.
- Description: Purpose of creating the credential set.
- Type: Collector type. Select HTTP Proxy from the drop-down list.
- Authentication Type: Validate the websites. Select Basic.
- Username: Username of the credential set.
- Password: Password that you set for the credential set.
- Confirm Password: Same password that you provide in the Password field.
The Credentials tab displays the created credential set. The credentials sets get assigned automatically when a credential set is created from the Credentials tab. If credentials already exists on the Credentials tab, use Assign to allocate to the resource.
Click Save.
Step 4: Assign credentials
Use Assign to add credentials from the existing list of credential sets.
- From the Credentials section, click + Assign.
- From the Assign Credentials screen, select the credential set and click + Assign. The credentials screen displays the list of assigned credentials.
Using Unassign, you can remove an assigned credential.
Step 5: Assign a synthetic template
After creating a template, assign the template to the resource. For more information, see Assign Templates.
While applying a template to the synthetic resource, provide values for the configuration parameters.