An alert correlation policy is a mechanism for grouping similar alerts as an inference to reduce the load of processing multiple alerts.
Alert correlation is site-specific. Alerts from different sites need to be managed separately and so, are not correlated.
OpsQ View and OpsQ Manage permissions are required to access alert correlation policies.
Partner Administrator or Client Administrator roles are required to create an alert correlation policy.
The time gap between each adjacent alert is five minutes. Only those alerts taking place in a 5-minute interval are correlated.
If alerts are continuously generated every five minutes, the overall time of a correlation can be much longer than five minutes. Take these example alert correlations:
A1: 10:00
A2: 10:04
A3: 10:07
A4: 10:14
A1, A2, and A3 are correlated, as the gap between adjacent alerts is less than five minutes. A4 is excluded because the gap between A4 and A3 is more than five minutes. In this example, the overall correlation time is 7 minutes.
Note
All alerts generated within the configured window duration are appended to the mapped incident, regardless of the inference state or action, unless the incident has already been resolved or closed.
Create an alert correlation policy
Go to Setup > Alerts > Alert Correlation.
If this is a partner-level policy, do not select a client.
If this is a client-level policy, select a client in the Select Client list.
Click Create New or + Add, depending on whether you have any existing policies.
On the Alert Correlation Policy page, enter a policy Name.
Ensure you have the correct Policy Scope selected.
Ensure you have the correct Client selected for a client-level policy or select Include All Clients or Include Clients for a partner-level policy.
If you selected Include Clients, click Add Clients to add clients to the partner-level policy.
In the Mode list, select a policy mode.
Policy Mode
Description
ON
The policy drives automated actions on alerts.
OFF
The policy is inactive and does not affect alerts. You can use this mode to review a newly defined policy before choosing one of the other modes.
Recommend
The policy creates a recommendation for actions that you should take on the alert. Recommendations are based on learned patterns in historical alerts. The recommendation includes a link to take the action.
Observed
This mode permits you to simulate a policy without affecting alerts. The policy creates an observed alert, which simulates the original alert. The observed alert shows the actions that would be taken on the original alert if the policy were in On mode. The observed alert includes a link to the original alert.
Note: When you select Observed mode, the Review for last 7 days results checkbox is displayed. Select this checkbox to enable the option to review the alert correlation policy for the last 7 days of alerts.
Recommend and Observed modes apply to incident actions.
In the Filter Criteria, toggle the Apply Filter Criteria button to ON.
Choose ANY or ALL to specify rule-matching constraints.
Select the attribute type to narrow the attribute list to one of the following types:
Native Attributes: Select from the list of native attributes.
Resource Custom Attributes: Select from the list of custom, user-defined attributes.
Alert Custom Attributes: Select from the list of alert custom user-defined attributes.
Note:
The Alert Custom Attributes are shown if they are available to the selected client.
As of now, this feature is enabled for client-scope policies only. This means the Alert Custom Attributes option is not displayed for the policy assigned to All-Clients.
Select the rule conditions you want from the list, and enter the required values.
Not Contains: Filters only the alerts that do not contain the input string provided in the field.
Not Equals: Filters only the alerts that are not equal to the input provided in the field.
Not Contains/Not Equals: If the selected property is not there in the alert, it is considered as matched.
Example: Property value is “ABC”.
Resource “A” belongs to two resource groups - ABCDEF AND XYZ. In this case, there is No Match. Resource “B” belongs to the resource group - PQRS. There is a Match. Resource “C” belongs to no resource group. There is a Match.
Click the + symbol to add more rules.
In the Policy Definition section, enter the Inference subject. You can use alerts and resource tokens to configure the inference subject. If a subject is not entered, the subject of the first alert is considered as the inference subject.
Toggle the Update Inference Criteria button to ON.This option enables the system to modify the existing inference based on the specified criteria. For instance, when the first correlated alert is triggered, it’s automatically designated as the inference alert.Subsequently, if any correlated alert meets the specified filter criteria, the inference alert will be updated with the properties of the matched alert. Once the inference is updated, it’s again considered for first response and escalation.
Choose ANY or ALL to specify rule-matching constraints.
Select the attribute type to narrow the attribute list to one of the following types:
Native Attributes: Select from the list of native attributes.
Resource Custom Attributes: Select from the list of custom, user-defined attributes.
Alert Custom Attributes: Select from the list of alert custom user-defined attributes.
Note:
The Alert Custom Attributes are shown if they are available to the selected client.
As of now, this feature is enabled for client-scope policies only. This means the Alert Custom Attributes option is not displayed for the policy assigned to All-Clients.
Select the rule conditions you want from the list, and enter the required values.
Click the + symbol to add more rules.
Select the Alert sequence recommended by the machine learning model to upload a .CSV file to configure topology.
Select the Within time window to select the time from the list.
When you select Within time window, an Alert trigger when it matched with below conditions within duration checkbox is displayed.
You can now select Resource Name, specify Resource value, and Alert Metric under the checkbox. This triggers an alert and correlates all the alerts that meet the criteria within the selected timeframe.
To create an inference from correlated alerts only when a match is detected for an attribute value for Resource Name, Resource Type, Resource Group, Host Name, or any alert metric within a specified duration, users can select the Alert trigger when it matched with below conditions within duration option.
You can now select one of Resource Name, Resource Type, Resource Group, Host Name attributes with its corresponding value OR Alert Metric under the checkbox. This triggers an alert and correlates all the alerts that meet the criteria within the selected timeframe.The alerts will not be correlated unless there is a match, or the waiting period specified in the condition has elapsed.
Example:
When multiple agents are connected to a gateway, a network outage results in gateway tunnel status alert along with multiple agent status alerts. To effectively correlate these alerts, consider the following configuration:
Assumptions
Correlation Time Window: 30 minutes
Trigger Duration Window: 5 minutes
Configuration Guidelines
Matching Condition:
Configure a condition to match the Tunnel Status Alert.
For this scenario, set the metric name as “Tunnel Status.”
Trigger Duration Window:
Ensure the trigger duration window is set to a maximum of 5 minutes.
Correlation Behavior
Once the Tunnel Status Alert is generated, the following alerts will be correlated:
All Agent Status Alerts generated in the last 5 minutes prior to the tunnel status alert.
Any new Agent Status Alerts triggered after the tunnel status alert.
Result:An inference will be created using the Tunnel Status Alert details, consolidating all associated agent status alerts for efficient analysis and troubleshooting.
Click + Add Similarity Rule and select the attribute and specify the matching condition from the list.Note: The + Add Similarity Rule is optional when you select the Alert sequence recommended by the machine learning model. However, it is mandatory when a user selects the Within time window option.
Edit an alert correlation policy
Your ability to edit a correlation policy depends on the client you have selected.
If you do not have a client selected, you can edit partner-level policies.
If you have a client selected, you can edit client-level policies for the selected client.
Go to Setup > Alerts > Alert Correlation.
For client-level policies, select a client in the Select Client list.
On the Alert Correlation Policy page, select the policy you want to edit.
Click Edit and change the policy details.
Click Save.
Change an alert correlation policy mode
You can change the mode of the correlation policy on the Alert Correlation Policy page.
Go to Setup > Alerts > Alert Correlation.
The Alert Correlation Policy page is context-sensitive to the client or partner selected.
On the Alert Correlation Policy page, select the mode in the Mode list.
The selected mode is displayed in the Mode column.
Delete an alert correlation policy
Your ability to delete a correlation policy depends on the client you have selected.
If you do not have a client selected, you can delete partner-level policies.
If you have a client selected, you can delete client-level policies for the selected client.
When you delete an alert correlation policy, the correlation of alerts getting newly ingested to the system and matching the deleted alert correlation policy does not happen.
Alert correlation policies are deleted in the following situations:
The device/resource generating the alerts is unavailable.
You do not want to correlate the alerts.
To delete the alert correlation policy:
Go to Setup > Alerts > Alert Correlation.
For client-level policies, select a client in the Select Client list.
On the Alert Correlation Policy page, select the checkbox next to one or more of the policies and click Remove.
On the confirmation dialog, click Yes to delete.
The selected alert correlation policy gets deleted.
Define correlation precedence
Precedence determines the order of execution for an alert correlation policy. For example, if VMware is part of an agent status alert correlation policy and a network outage alert correlation policy, you can determine which alert correlation policy should execute first to correlate VMware alerts.
Go to Setup > Alerts > Alert Correlation.
Select a client in the Select Client list.
Drag and place the inference in the appropriate row to adjust the order. The number in the alert correlation policy Precedence column changes accordingly.
Note
Regardless of precedence order, the ON state policy is picked first based. After that, Observed state policies will be followed in precedence order.
View alert sequences
Alert Sequence Clusters help you to visualize the detected alert sequences in your environment.
You can view the alert sequences detected from the existing alert data and sequences related to an inference.
These sequences are unmodified alert sequences fetched from the existing alert data.
Similar alert sequences are grouped and enter a count for each sequence to help visualize the alert sequences and the number of times alerts are triggered in a sequence.
The alert sequence clusters window serves as a verification of ML correlation.
For example, if ML correlates alerts _cpu.utilization_ and _system.ping_, you can use the Alert Sequence Clusters window to find the sequences that have both _cpu.utilization_ and _system.ping_.
View alert sequences detected from existing alert data
Go to Setup > Alerts > Alert Correlation.
Select a client in the Select Client list.
If there are one or more correlation policies enabled for the ML correlation, a new Detected Alert Sequence Patterns option is provided on the Alert Correlation Policies page.
From the drop-down list, select the patterns you want to download.
Click Export.The alert sequence patterns are downloaded.
View alert sequences related to inferences
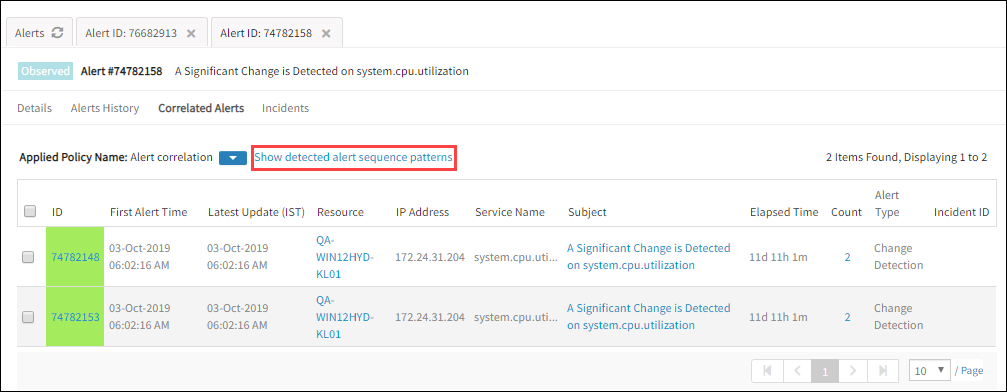
Go to Command Center > Alerts and click the inference alert ID.
Click the Correlated Alerts tab.
In the list of correlated alerts, click Show detected alert sequence patterns.
Alert Sequence Clusters window is displayed.
View Reviewed Inferences and its Correlated Alerts
Users have an option to test/review the alert correlation policy for the last 7 days of alerts. This means, when you select the Review option under the Observed Mode, the correlation policy will run on the alerts for the last 7 days and shows the results to the user. This will help a user to decide whether to proceed with the policy or modify the policy accordingly.
To view the reviewed Inferences and its Correlated Alerts:
Go to Setup > Alerts > Alert Correlation.
From the ALERT CORRELATION POLICIES page, select the policy for which the Mode is Observed and Review Status is displayed as Completed.
In the VIEW ALERT CORRELATION POLICY page, under REVIEW DETAILS section, click View Alerts.
The Alerts page displays the reviewed Inferences and its Correlated Alerts for the last 7 days.
Once you delete a policy from the ALERT CORRELATION POLICIES page for which you enabled the Review for last 7 days results option, the created reviewed observed inferences will also get deleted.