This section provides step-by-step instructions to deploy the OpsRamp Gateway VM using a Gateway image on supported public cloud environments. The following public cloud environments are supported:
- AWS
- Azure
- GCP
Prerequisites
Before deploying the Gateway VM, ensure the following prerequisites are met:
- Valid license and credentials to register the Gateway.
- Access to the public cloud environments.
- VM network connectivity to the OpsRamp Cloud endpoints.
- Refer to the minimum server requirements before creating a VM.
Installation Steps
Step 1: Request Access to the AWS Gateway Image (AMI)
To deploy the Classic Gateway on AWS, you must request access to the OpsRamp-provided Amazon Machine Image (AMI).
Follow the steps below to request access to the AWS AMI through the OpsRamp portal.
Requirements:
- OpsRamp Portal access.
- AWS Account ID.
- Permissions in OpsRamp to manage Collector Profiles.
Procedure:
- Log in to the OpsRamp Portal.
- Navigate to All Clients and select the client where you want to deploy the Gateway.
- Go to Setup > Account > Collector Profiles.
- Click the + ADD button to create a new Collector profile.

Enter the Collector Profile Details:
- Profile Name: Enter a name for your profile (e.g., AWS-Gateway-Deployment).
- Profile Type: Leave this as Standard (default).
- Description: (Optional) Add a short description for reference.
In the Gateway Collector (Classic) section, select the Amazon Machine Image (AMI) tile.
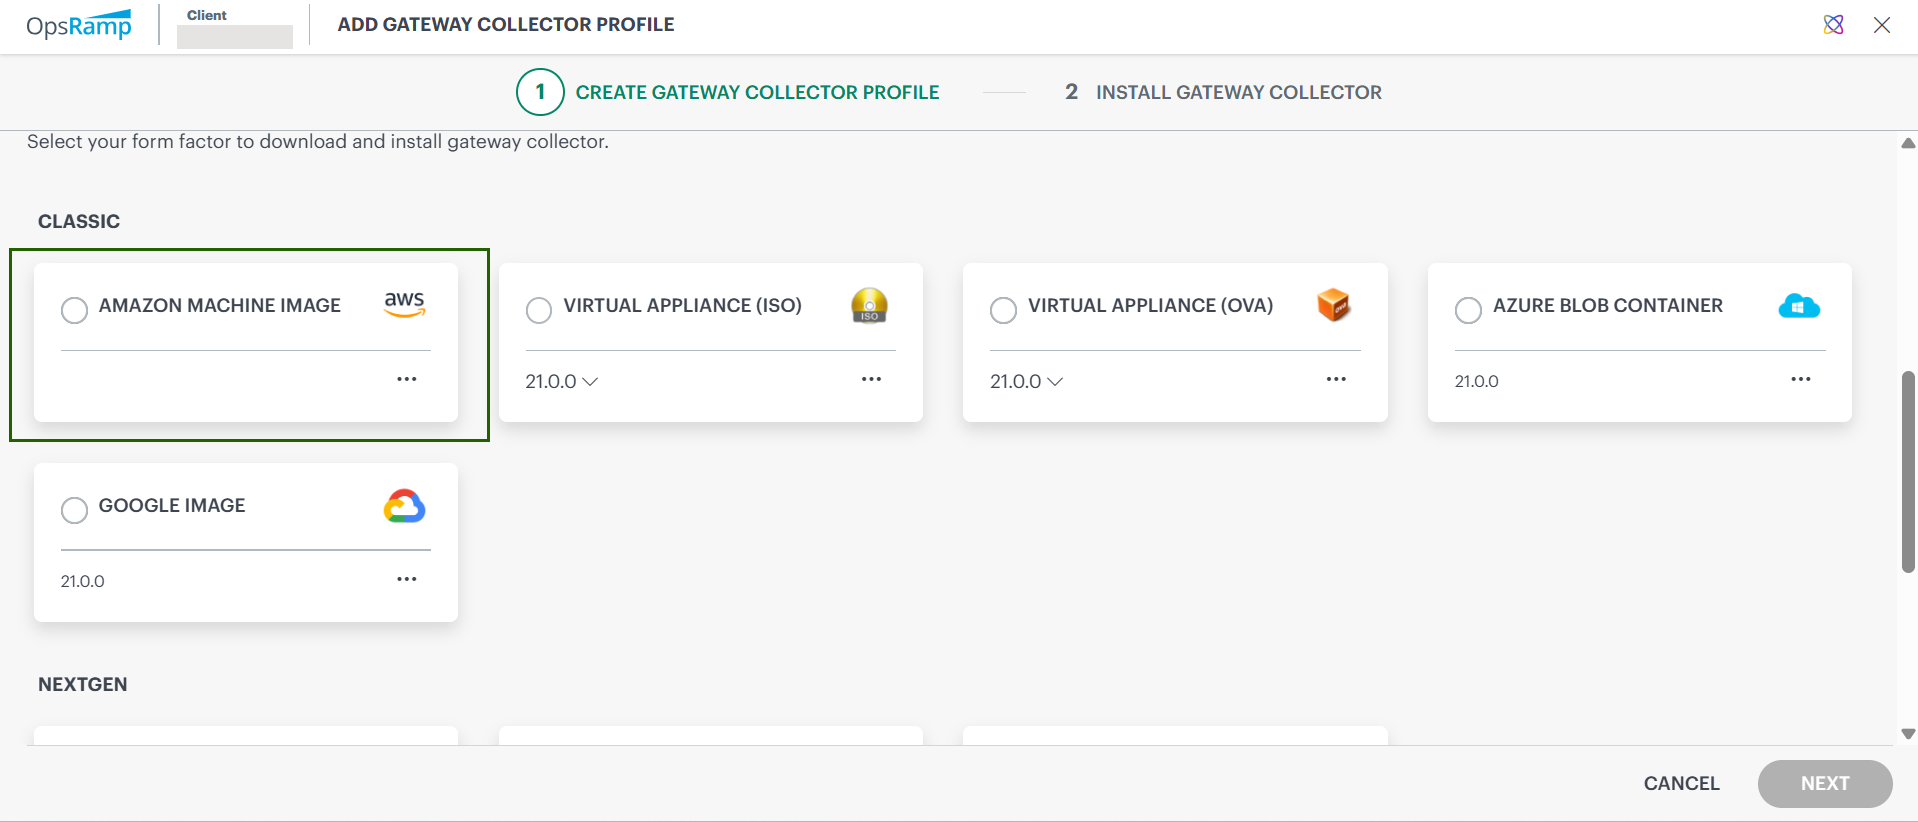
Enter your AWS Account ID and select the AWS region (e.g., us-east-1, us-west-2, etc.) where you want to deploy the AMI.
Click Request Access to request AMI access. This sends an automated request to the OpsRamp platform support team.
You will receive a confirmation email once access to the AMI is granted.Click Finish to complete the profile configuration.
Next Steps:
- The OpsRamp support team will share the AMI with your specified AWS account.
- You’ll receive a confirmation once the AMI is available for use.
- After that, you can launch the EC2 instance using the shared AMI to deploy your Gateway.
Step 2: Launch and Configure the Classic Gateway EC2 Instance on AWS
After AMI access is granted, launch the EC2 instance using the shared image. Follow the steps below to set up your instance correctly.
Requirements:
- AWS Console access with EC2 permissions.
- OpsRamp Gateway AMI access must be granted to your AWS account (see Step 1).
- Target AWS region for deployment is identified.
Procedure:
Log in to the AWS Management Console.
Go to Services > EC2. The EC2 Dashboard is displayed.
In the left navigation pane, select Images > AMIs.
Select Owned by me and then choose Private images from the filter options.
You’ll see a list of private AMIs shared with your account.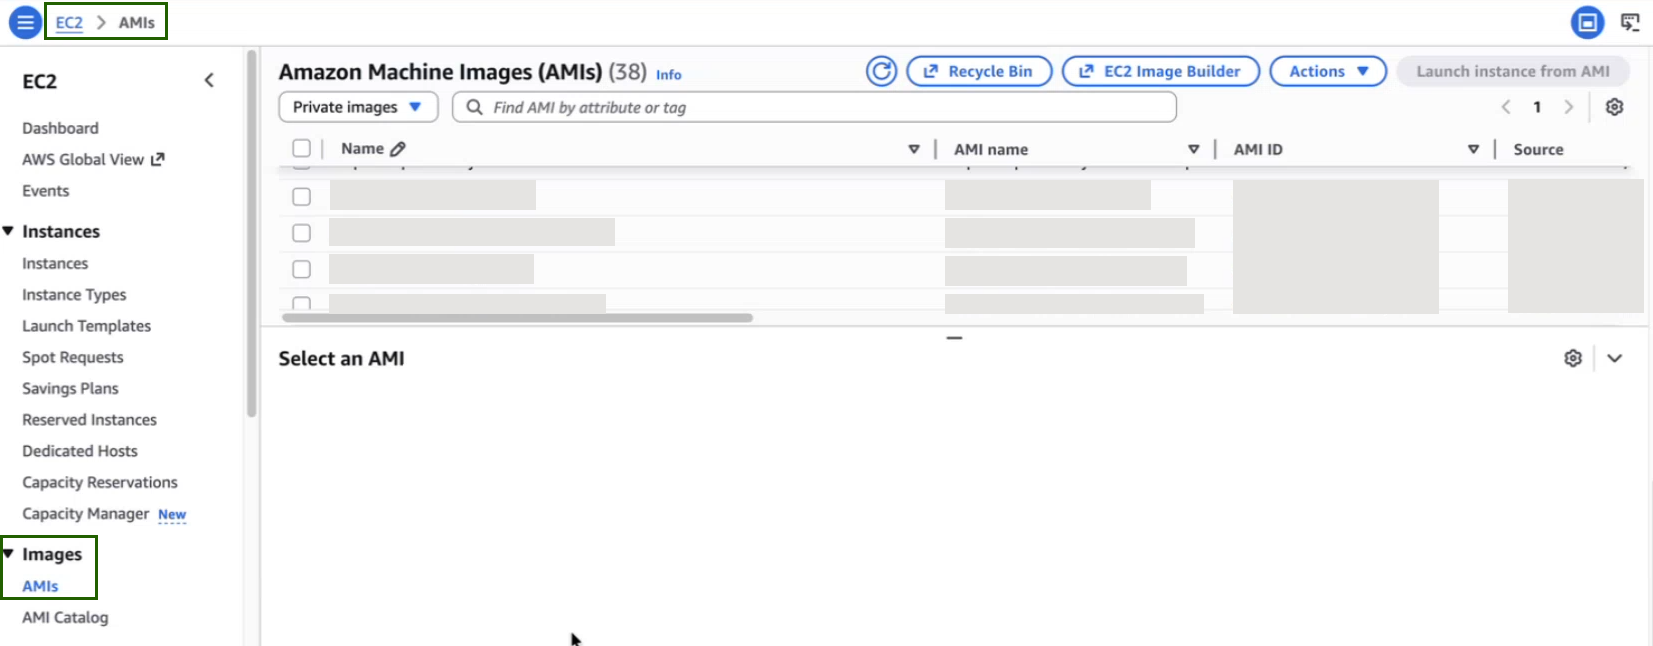
Select the correct OpsRamp Gateway AMI (for example, OpsRampGateway-20.0.0, shown in image below) from the list and then click Launch instance from AMI to begin the EC2 instance configuration.

On the Launch an instance page, select an instance type that meets the minimum server requirements.
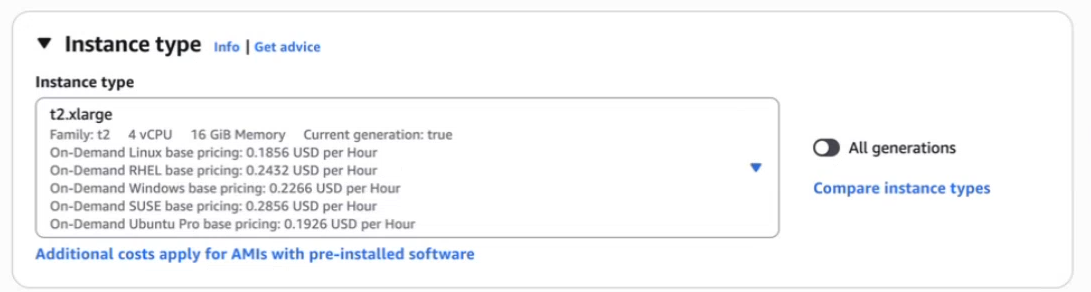
In the Key pair (login) section, select a key-pair name.
Configure Network Settings:
- Set the number of instances you want to deploy (one per Gateway).
- (Optional) Make sure Auto-assign Public IP is enabled, unless you plan to use a private IP.
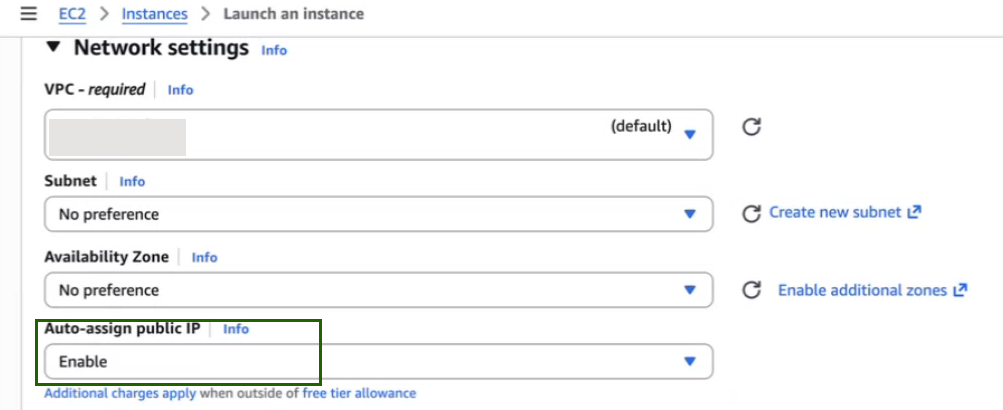
- Leave other default settings unless your architecture requires custom networking.
Add Storage:
- The root volume is added automatically.
- Ensure the disk size meets the minimum server requirements.
- You can increase this size if needed based on data retention or expected workload.
Add Tags (Optional):
- Tags help you identify and organize AWS resources.
- For example, you can add a tag like: Key: Name | Value: OpsRamp-Classic-Gateway
Configure Security Group (Firewall Rules):
- You can select an existing security group or create a new one.
- Ensure the following inbound ports are allowed:
- Refer to minimum system requirements.
- Click Launch instance. Once the launch is completed successfully, a confirmation message is displayed with the instance number.
After launching:
- Navigate to EC2 > Instances.
- Click the instance that you just created. The Instance Summary page displays the details of the instance.
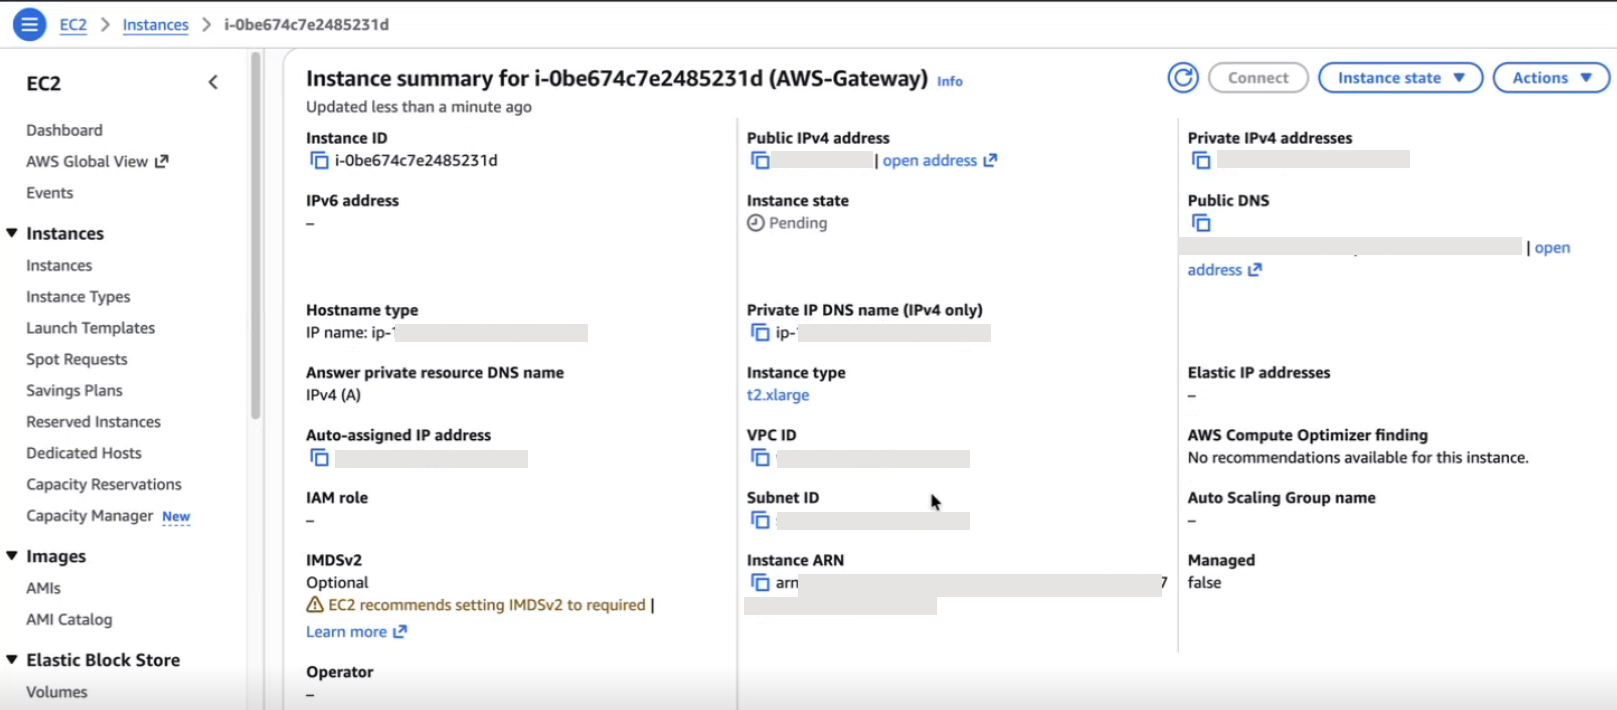
Once the instance is ready, you can access the Gateway Admin UI at: https://<Public/Private Gateway IP>:5480
For the next steps, refer Install Gateway on AWS, Azure, and GCP
Step 1: Create a Resource Group and Required Resources
Requirements:
- You have access to your Azure account.
- You have selected the deployment region.
Procedure:
Create a Resource Group
- Log in to your Azure account.
- On the Azure portal, select Resource Groups.
- Click + Create.
- Enter the resource group name and select the location.
- Click Create.
Create a Storage Account
- Go to Storage Accounts.
- Click + Create.
- Create a storage account in the same resource group.
Create a Blob Container
- Open the storage account.
- Select Blob Service > Containers.
- Click + Container.
- Enter a container name.
- Select Private (no anonymous access).
- Click Create.
Note
You upload the Gateway Virtual Hard Disk (VHD) file to this container.Create a Virtual Network
- Go to Virtual networks.
- Click + Create.
Step 2: Create the Template JSON to Launch the Gateway
To create the deployment template, follow these steps:
Log in to Azure.
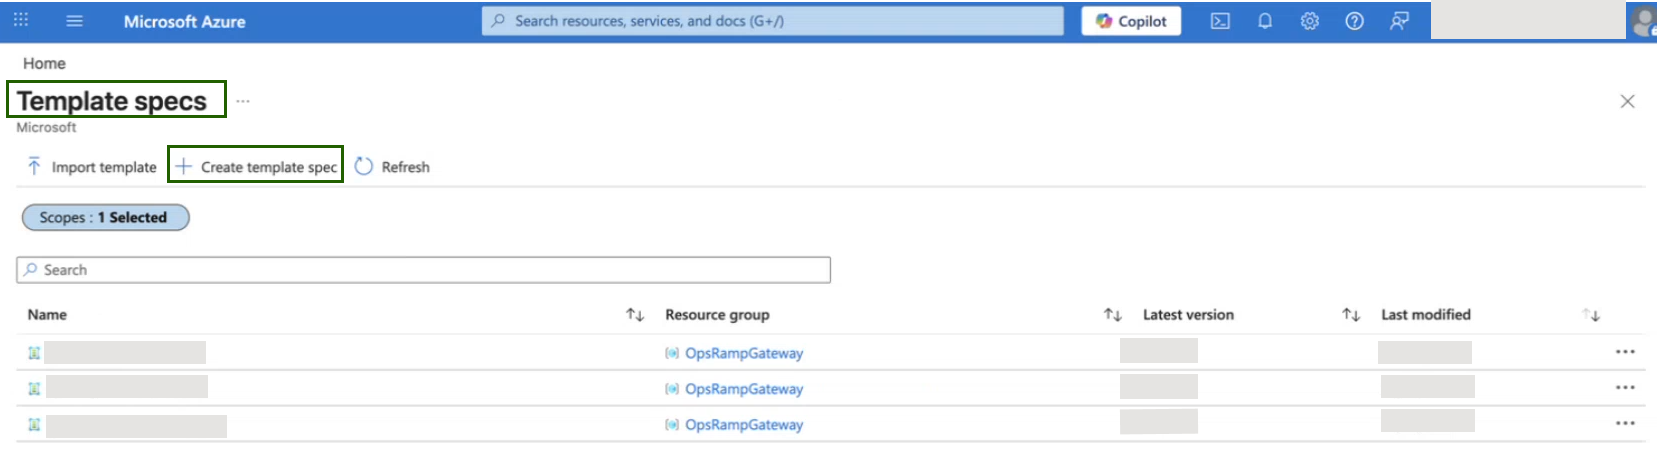
Search for Template Spec.
Click + Create Template Spec.
Enter the template name, resource group, description, and version.
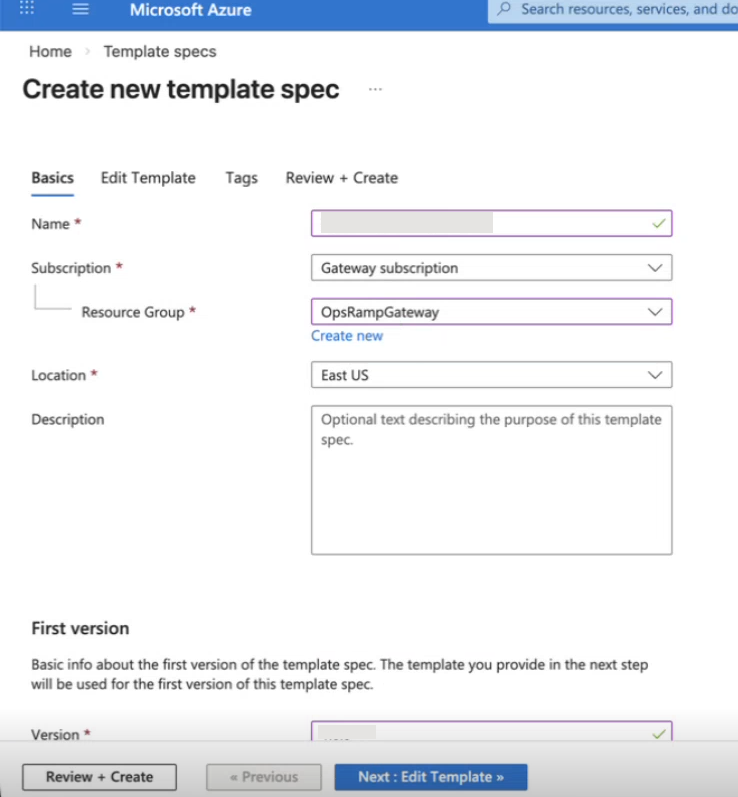
Select Edit Template.
Paste the provided JSON template.
{
"$schema": "https://schema.management.azure.com/schemas/2019-04-01/deploymentTemplate.json#",
"contentVersion": "1.0.0.0",
"metadata": {
"description": "Deploys an OpsRamp Classic Gateway VM on Azure from a VHD image, with NSG, NIC, and optional Public IP.",
"author": "HPE OpsRamp",
"version": "2.0.0",
"lastUpdated": "2026-04-13"
},
"parameters": {
"vmName": {
"type": "string",
"minLength": 1,
"maxLength": 64,
"metadata": {
"description": "The name of the virtual machine to be created. This name should be unique within the resource group."
}
},
"virtualMachineSize": {
"type": "string",
"defaultValue": "Standard_F4s_v2",
"metadata": {
"description": "The size of the virtual machine. Standard_B2s (2CPU/4GB) supports up to 25 resources, Standard_F4s_v2 (4CPU/8GB) up to 100, Standard_F8s_v2 (8CPU/16GB) up to 500."
}
},
"hyperVGeneration": {
"type": "string",
"defaultValue": "V2",
"allowedValues": [
"V1",
"V2"
],
"metadata": {
"description": "The Hyper-V generation of the virtual machine (e.g., V1 or V2).",
"uiHint": "dropdown"
}
},
"enablePublicIP": {
"type": "bool",
"defaultValue": true,
"metadata": {
"description": "Specifies whether a public IP address should be assigned to the VM."
}
},
"virtualNetworkName": {
"type": "string",
"metadata": {
"description": "The name of the existing virtual network to which the VM will be connected."
}
},
"subnetName": {
"type": "string",
"metadata": {
"description": "The name of the subnet in the virtual network to be used for the VM."
}
},
"sshSourceAddressPrefix": {
"type": "string",
"defaultValue": "*",
"metadata": {
"description": "Source IP CIDR range allowed to SSH into the VM. Restrict to your corporate IP range (e.g., 203.0.113.0/24) for security."
}
},
"managementSourceAddressPrefix": {
"type": "string",
"defaultValue": "*",
"metadata": {
"description": "Source IP CIDR range allowed to access management and monitoring ports (443, 5480, 162, 514). Restrict to your internal network CIDR for production use."
}
},
"nicDeleteOption": {
"type": "string",
"defaultValue": "Detach",
"allowedValues": [
"Detach",
"Delete"
],
"metadata": {
"description": "Specifies the delete behavior for the network interface when the virtual machine is deleted. Detach retains the NIC, while Delete removes it permanently."
}
},
"diskSizeGb": {
"type": "int",
"defaultValue": 60,
"minValue": 60,
"maxValue": 1024,
"metadata": {
"description": "The size of the OS disk in GB. Minimum 60 GB to accommodate OS, logs, and monitoring data growth."
}
},
"diskSku": {
"type": "string",
"defaultValue": "StandardSSD_LRS",
"allowedValues": [
"Standard_LRS",
"StandardSSD_LRS",
"Premium_LRS"
],
"metadata": {
"description": "The storage type for the OS disk. Standard_LRS (HDD) for dev/test, StandardSSD_LRS (SSD) for production, Premium_LRS for high-performance production."
}
},
"osDiskDeleteOption": {
"type": "string",
"defaultValue": "Delete",
"allowedValues": [
"Detach",
"Delete"
],
"metadata": {
"description": "Specifies the delete behavior for the OS disk when the virtual machine is deleted. Detach retains the disk, while Delete removes it permanently."
}
},
"storageAccountName": {
"type": "string",
"metadata": {
"description": "The name of the storage account where the VHD is stored."
}
},
"sourceUri": {
"type": "string",
"metadata": {
"description": "The URI of the source VHD to be used for the virtual machine."
}
},
"tags": {
"type": "object",
"defaultValue": {
"Application": "HPE OpsRamp Gateway"
},
"metadata": {
"description": "Tags to apply to all resources. The HPEOpsRampGateway tag is automatically added using the VM name. Add Owner, CostCenter, Environment, and other tags as required by the tagging policy of your organization."
}
}
},
"variables": {
"location": "[resourceGroup().location]",
"vnetID": "[resourceId('Microsoft.Network/virtualNetworks', parameters('virtualNetworkName'))]",
"subnetRef": "[concat(variables('vnetID'), '/subnets/', parameters('subnetName'))]",
"privateIPAllocationMethod": "Dynamic",
"publicIPAllocationMethod": "Static",
"nicName": "[concat(parameters('vmName'), '-nic1')]",
"publicIPAddressName": "[concat(parameters('vmName'), '-pip')]",
"diskName": "[concat(parameters('vmName'), '-disk')]",
"osDiskDeleteOption": "[parameters('osDiskDeleteOption')]",
"nicDeleteOption": "[parameters('nicDeleteOption')]",
"nsgName": "[concat('OpsRampGateway-', parameters('vmName'), '-nsg')]",
"resourceTags": "[union(parameters('tags'), createObject('HPEOpsRampGateway', parameters('vmName')))]",
"ipConfigWithPublicIP": {
"privateIPAllocationMethod": "[variables('privateIPAllocationMethod')]",
"publicIPAddress": {
"id": "[resourceId('Microsoft.Network/publicIPAddresses', variables('publicIPAddressName'))]"
},
"subnet": {
"id": "[variables('subnetRef')]"
}
},
"ipConfigWithoutPublicIP": {
"privateIPAllocationMethod": "[variables('privateIPAllocationMethod')]",
"subnet": {
"id": "[variables('subnetRef')]"
}
}
},
"resources": [
{
"apiVersion": "2022-03-02",
"type": "Microsoft.Compute/disks",
"name": "[variables('diskName')]",
"location": "[variables('location')]",
"tags": "[variables('resourceTags')]",
"properties": {
"osType": "Linux",
"supportedCapabilities": {
"architecture": "x64"
},
"creationData": {
"createOption": "import",
"sourceUri": "[parameters('sourceUri')]",
"storageAccountId": "[resourceId('Microsoft.Storage/storageAccounts', parameters('storageAccountName'))]"
},
"diskSizeGB": "[parameters('diskSizeGb')]",
"hyperVGeneration": "[parameters('hyperVGeneration')]",
"encryption": {
"type": "EncryptionAtRestWithPlatformKey"
},
"dataAccessAuthMode": "None",
"networkAccessPolicy": "DenyAll",
"publicNetworkAccess": "Disabled"
},
"sku": {
"name": "[parameters('diskSku')]"
}
},
{
"apiVersion": "2023-05-01",
"type": "Microsoft.Network/networkSecurityGroups",
"name": "[variables('nsgName')]",
"location": "[variables('location')]",
"tags": "[variables('resourceTags')]",
"properties": {
"securityRules": [
{
"name": "SSH",
"properties": {
"description": "Allow SSH Inbound",
"protocol": "Tcp",
"sourcePortRange": "*",
"destinationPortRange": "22",
"sourceAddressPrefix": "[parameters('sshSourceAddressPrefix')]",
"destinationAddressPrefix": "*",
"access": "Allow",
"priority": 100,
"direction": "Inbound"
}
},
{
"name": "HTTPS_Inbound",
"properties": {
"description": "Allow HTTPS Inbound",
"protocol": "Tcp",
"sourcePortRange": "*",
"destinationPortRange": "443",
"sourceAddressPrefix": "[parameters('managementSourceAddressPrefix')]",
"destinationAddressPrefix": "*",
"access": "Allow",
"priority": 101,
"direction": "Inbound"
}
},
{
"name": "GatewayAdminUI",
"properties": {
"description": "Allow OpsRamp Gateway Admin UI",
"protocol": "Tcp",
"sourcePortRange": "*",
"destinationPortRange": "5480",
"sourceAddressPrefix": "[parameters('managementSourceAddressPrefix')]",
"destinationAddressPrefix": "*",
"access": "Allow",
"priority": 102,
"direction": "Inbound"
}
},
{
"name": "SNMP_Traps",
"properties": {
"description": "Allow SNMP Trap Inbound",
"protocol": "Udp",
"sourcePortRange": "*",
"destinationPortRange": "162",
"sourceAddressPrefix": "[parameters('managementSourceAddressPrefix')]",
"destinationAddressPrefix": "*",
"access": "Allow",
"priority": 103,
"direction": "Inbound"
}
},
{
"name": "Syslog",
"properties": {
"description": "Allow Syslog Inbound (TCP/UDP)",
"protocol": "*",
"sourcePortRange": "*",
"destinationPortRange": "514",
"sourceAddressPrefix": "[parameters('managementSourceAddressPrefix')]",
"destinationAddressPrefix": "*",
"access": "Allow",
"priority": 104,
"direction": "Inbound"
}
},
{
"name": "NTP_Outbound",
"properties": {
"description": "Allow NTP Outbound for time sync",
"protocol": "Udp",
"sourcePortRange": "*",
"destinationPortRange": "123",
"sourceAddressPrefix": "*",
"destinationAddressPrefix": "*",
"access": "Allow",
"priority": 100,
"direction": "Outbound"
}
}
]
}
},
{
"condition": "[parameters('enablePublicIP')]",
"apiVersion": "2023-05-01",
"type": "Microsoft.Network/publicIPAddresses",
"name": "[variables('publicIPAddressName')]",
"location": "[variables('location')]",
"tags": "[variables('resourceTags')]",
"properties": {
"publicIPAllocationMethod": "[variables('publicIPAllocationMethod')]"
},
"sku": {
"name": "Standard"
}
},
{
"apiVersion": "2023-05-01",
"type": "Microsoft.Network/networkInterfaces",
"name": "[variables('nicName')]",
"location": "[variables('location')]",
"dependsOn": [
"[resourceId('Microsoft.Network/networkSecurityGroups', variables('nsgName'))]",
"[if(parameters('enablePublicIP'), resourceId('Microsoft.Network/publicIPAddresses', variables('publicIPAddressName')), resourceId('Microsoft.Network/networkSecurityGroups', variables('nsgName')))]"
],
"tags": "[variables('resourceTags')]",
"properties": {
"ipConfigurations": [
{
"name": "ipconfig1",
"properties": "[if(parameters('enablePublicIP'), variables('ipConfigWithPublicIP'), variables('ipConfigWithoutPublicIP'))]"
}
],
"networkSecurityGroup": {
"id": "[resourceId('Microsoft.Network/networkSecurityGroups', variables('nsgName'))]"
}
}
},
{
"name": "[parameters('vmName')]",
"type": "Microsoft.Compute/virtualMachines",
"apiVersion": "2024-03-01",
"location": "[variables('location')]",
"tags": "[variables('resourceTags')]",
"dependsOn": [
"[resourceId('Microsoft.Network/networkInterfaces', variables('nicName'))]",
"[resourceId('Microsoft.Compute/disks', variables('diskName'))]"
],
"properties": {
"hardwareProfile": {
"vmSize": "[parameters('virtualMachineSize')]"
},
"storageProfile": {
"osDisk": {
"createOption": "attach",
"osType": "Linux",
"managedDisk": {
"id": "[resourceId('Microsoft.Compute/disks', variables('diskName'))]"
},
"deleteOption": "[variables('osDiskDeleteOption')]"
}
},
"networkProfile": {
"networkInterfaces": [
{
"id": "[resourceId('Microsoft.Network/networkInterfaces', variables('nicName'))]",
"properties": {
"deleteOption": "[variables('nicDeleteOption')]"
}
}
]
},
"additionalCapabilities": {
"hibernationEnabled": false
},
"diagnosticsProfile": {
"bootDiagnostics": {
"enabled": true
}
}
}
}
],
"outputs": {
"vmName": {
"type": "string",
"value": "[parameters('vmName')]"
},
"publicIPAddress": {
"condition": "[parameters('enablePublicIP')]",
"type": "string",
"value": "[reference(resourceId('Microsoft.Network/publicIPAddresses', variables('publicIPAddressName'))).ipAddress]"
},
"privateIPAddress": {
"type": "string",
"value": "[reference(resourceId('Microsoft.Network/networkInterfaces', variables('nicName'))).ipConfigurations[0].properties.privateIPAddress]"
},
"nsgName": {
"type": "string",
"value": "[variables('nsgName')]"
},
"nicName": {
"type": "string",
"value": "[variables('nicName')]"
},
"diskName": {
"type": "string",
"value": "[variables('diskName')]"
},
"gatewayAdminUrl": {
"condition": "[parameters('enablePublicIP')]",
"type": "string",
"value": "[concat('https://', reference(resourceId('Microsoft.Network/publicIPAddresses', variables('publicIPAddressName'))).ipAddress, ':5480')]"
}
}
}Step 3: Download the Azure Blob Container
To download the Azure Blob Container from OpsRamp portal, follow the steps below:
- From All Clients, select a client.
- Go to Setup > Account > Collector Profile.
- Click + ADD on the Collector Profiles page.
- Enter the following details on the configuration page:
- Profile Name: Provide a name for the profile you are creating.
- Profile Type: By default, the Standard profile type is selected.
- Description: (Optional) Add a short description for the profile.
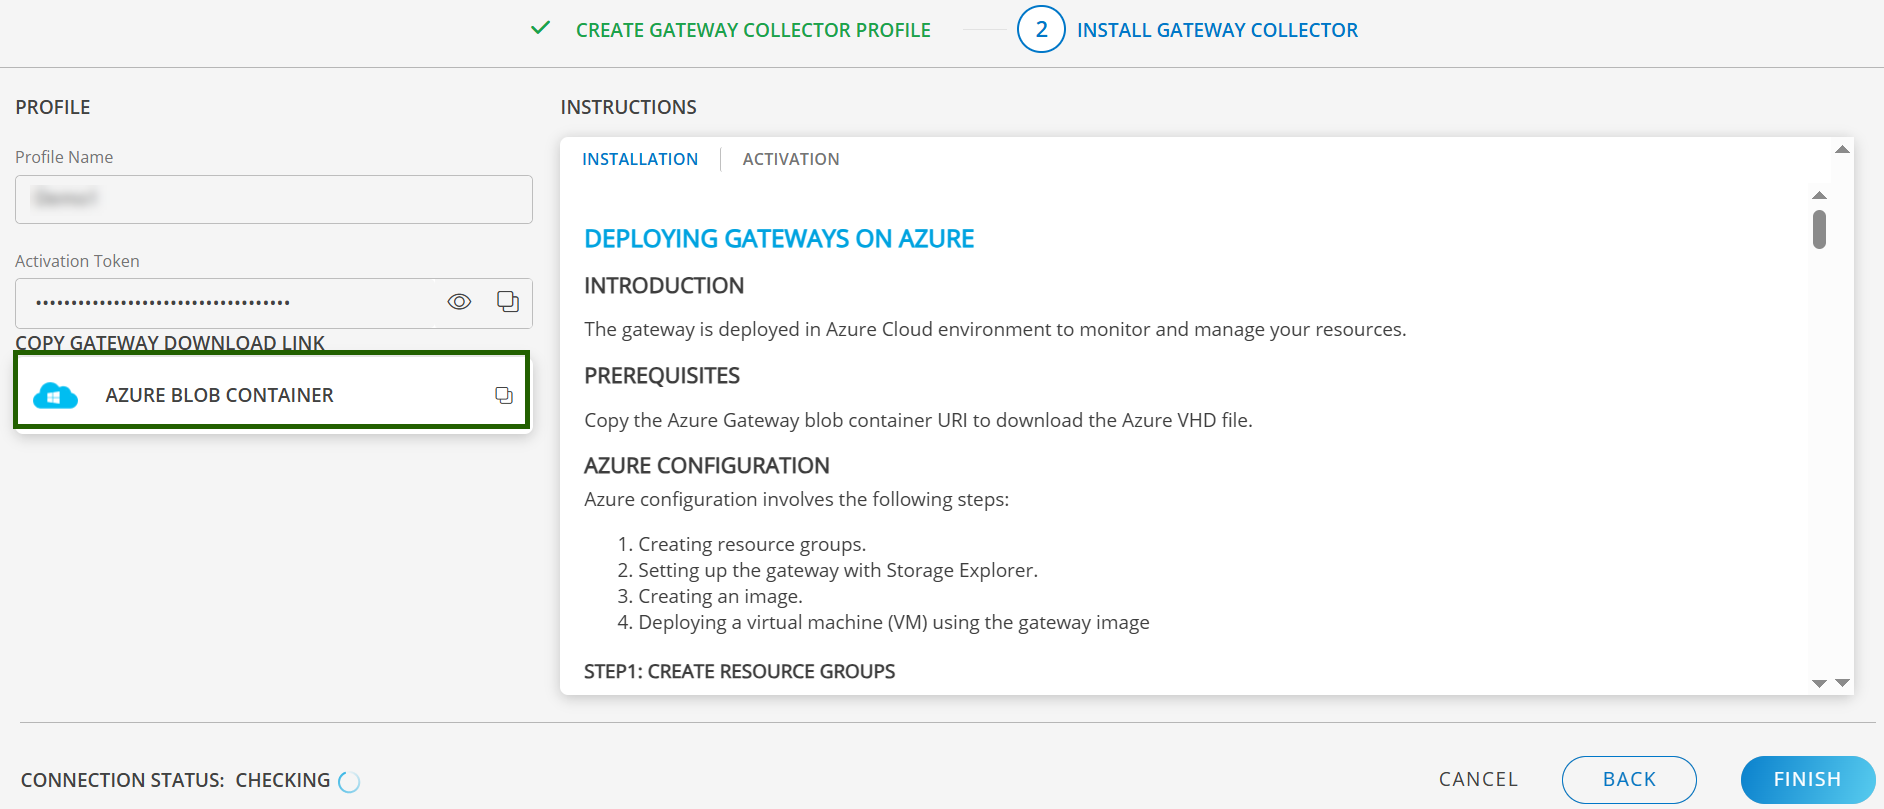
- Gateway Collector (Classic): Select the Azure Blob Container tile.
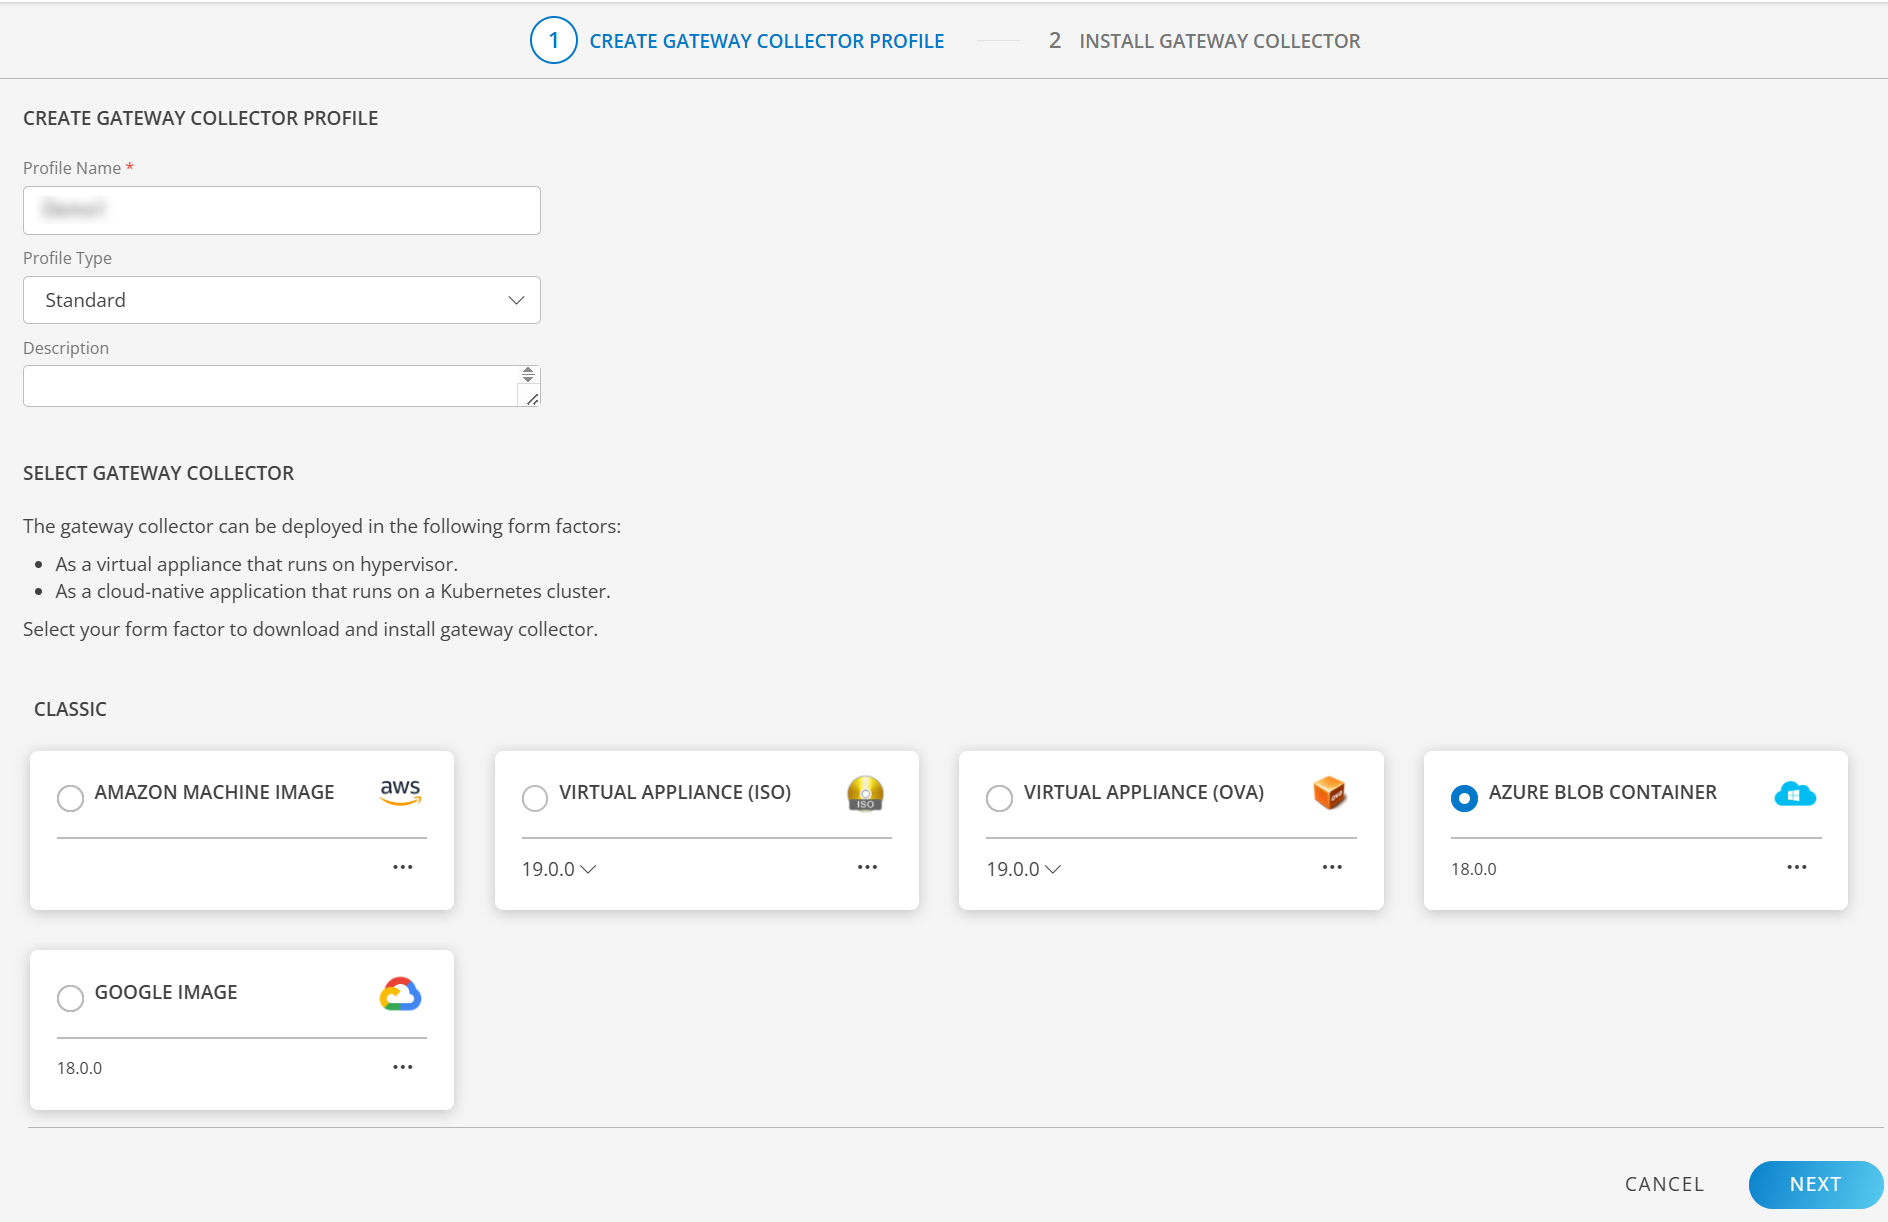
- Click NEXT to proceed.
- On the Azure widget, click Copy Link icon to copy the Azure blob container link.
- Use this link to download the Azure Gateway VHD file using Microsoft Azure Storage Explorer. You can download and install Microsoft Azure Storage Explorer on your machine if needed.
8. Click Finish.
Step 4: Set Up Gateway Using Azure Storage Explorer
To upload the Gateway VHD file using Azure Storage Explorer, follow these steps:
- Install Microsoft Azure Storage Explorer.
- Open Azure Storage Explorer.
- Add your Azure account.
Connect to Azure Storage
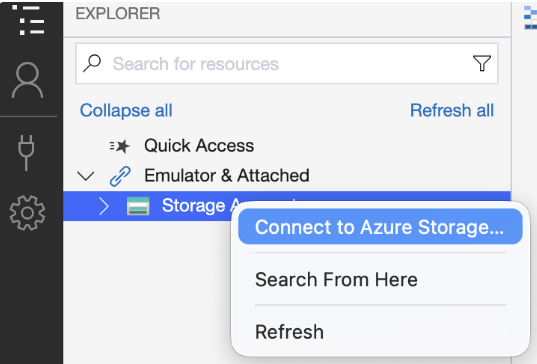
Go to Storage Accounts and select your storage account.
Click the Connection icon to launch the Connect to Azure Storage screen.
In the connection window, select Blob container or directory.
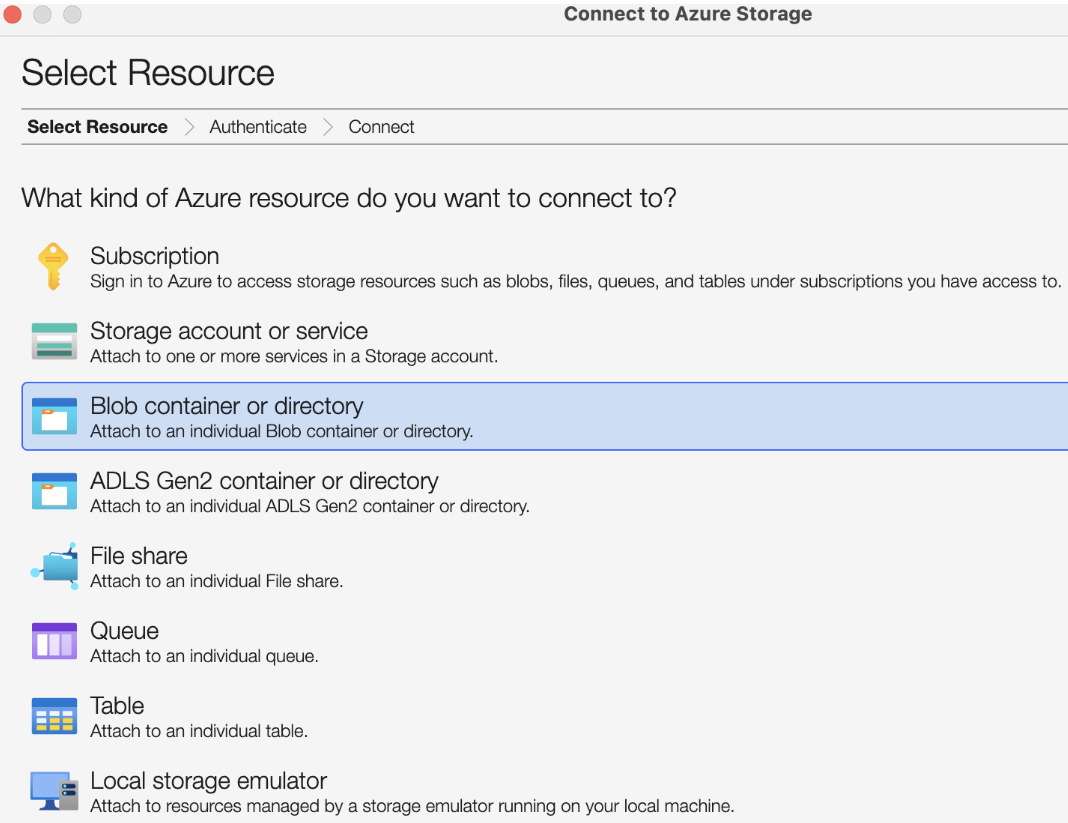
Click Next.
In the Select Connection Method window, select the Shared access signature URL (SAS) radio button.
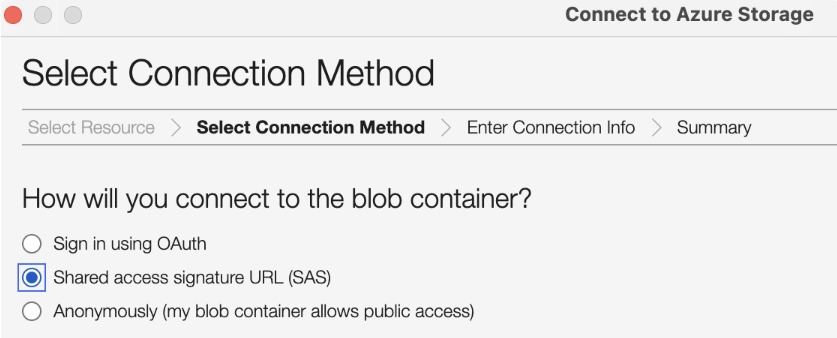
Paste the link that you copied from the OpsRamp Gateway download page and click Next.
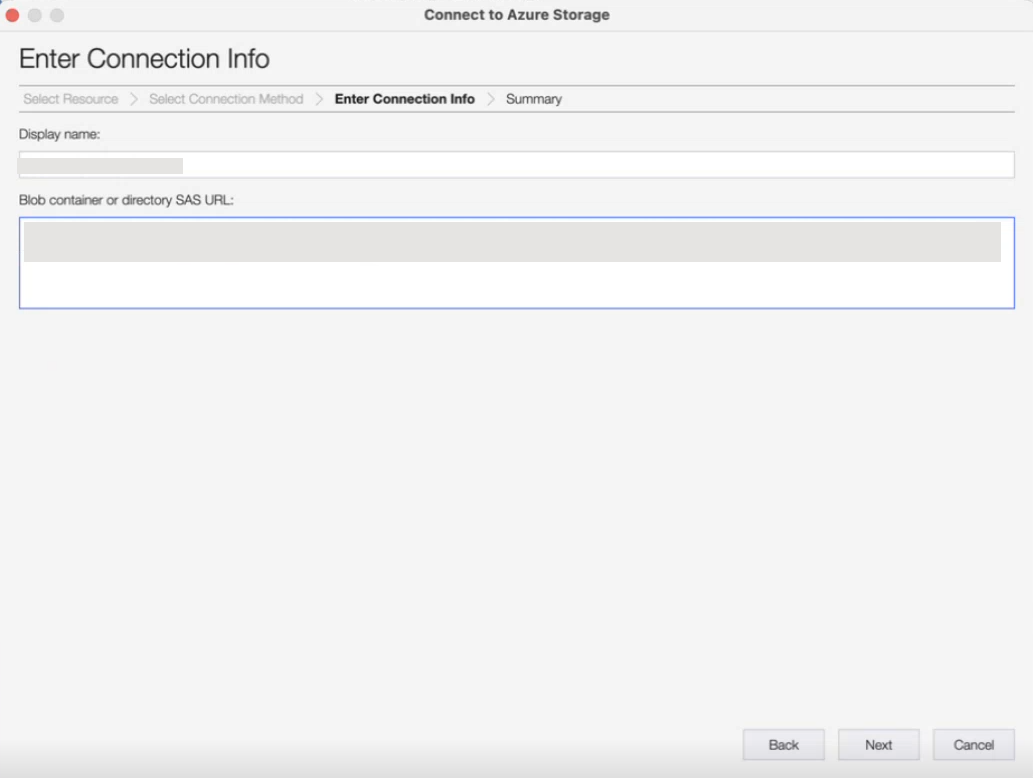
- Click Connect. The Gateway VHD file is downloaded.
- Locate the Gateway VHD file.
- Copy the VHD file.
- Paste the VHD file into your Azure storage container. Wait until the file upload completes before you continue.
Step 5: Deploy a Gateway using the Template JSON
- In the browser, log in to your Azure account and navigate to the templates page.
- Click your previously created template.
- Click Deploy and enter the following required information in the gateway deployment form:
| Property | Description |
|---|---|
| Resource Group | Select the resource group you created for gateway deployment. |
| Region | The Azure region where the gateway VM and dependent resources will be created. |
| VM Name | Enter a user-defined gateway VM name. |
| Virtual Machine Size | The size of the VM. For example, Standard_B2s supports up to 25 resources, Standard_F4s_v2 up to 100, and Standard_F8s_v2 up to 500. |
| Hyper V Generation | The Hyper-V generation of the VM, either V1 or V2. |
| Enable Public IP | Specifies whether a public IP address should be assigned to the VM. |
| Virtual Network Name | The name of the existing virtual network to which the VM will be connected. |
| Subnet Name |
|
| Nic Delete Option | Specifies the delete behavior for the NIC when the VM is deleted. Detach keeps the NIC, while Delete removes it permanently. |
| Disk Size Gb | The size of the OS disk in GB. Minimum is 60 GB to accommodate OS, logs, and monitoring data growth. |
| Os Disk Delete Option | Specifies the delete behavior for the OS disk when the VM is deleted. Detach retains the disk, while Delete removes it permanently. |
| Storage Account Name |
|
| Source Uri | The URI of the source VHD to be used for the virtual machine. |
- Accept the terms and conditions and click the Purchase button to deploy the gateway. Deployment takes a couple of minutes. You can check the progress on the Notification page.
- After deployment, go to Virtual Machines and select the gateway.
- In the left-hand side menu, choose the Networking option.
- Select Add inbound port rule and allow ports 22 and 5480 according to your requirement to access the gateway using SSH or WebUI.
- You can access the gateway by using the public IP address assigned to it.
Once the instance is ready, you can access the Gateway Admin UI at: https://<Public/Private Gateway IP>:5480
For the next steps, refer Install Gateway on AWS, Azure, and GCP
Step 1: Download the Google Image
To download the Google Image from OpsRamp Portal, follow the steps below:
From All Clients, select a client.
Go to Setup > Account > Collector Profile.
Click + ADD on the Collector Profiles page.
Enter the following details on the configuration page:
- Profile Name: Provide a name for the profile you are creating.
- Profile Type: By default, the Standard profile type is selected.
- Description: (Optional) Add a short description for the profile.
- Gateway Collector (Classic): Select the Google Image tile.
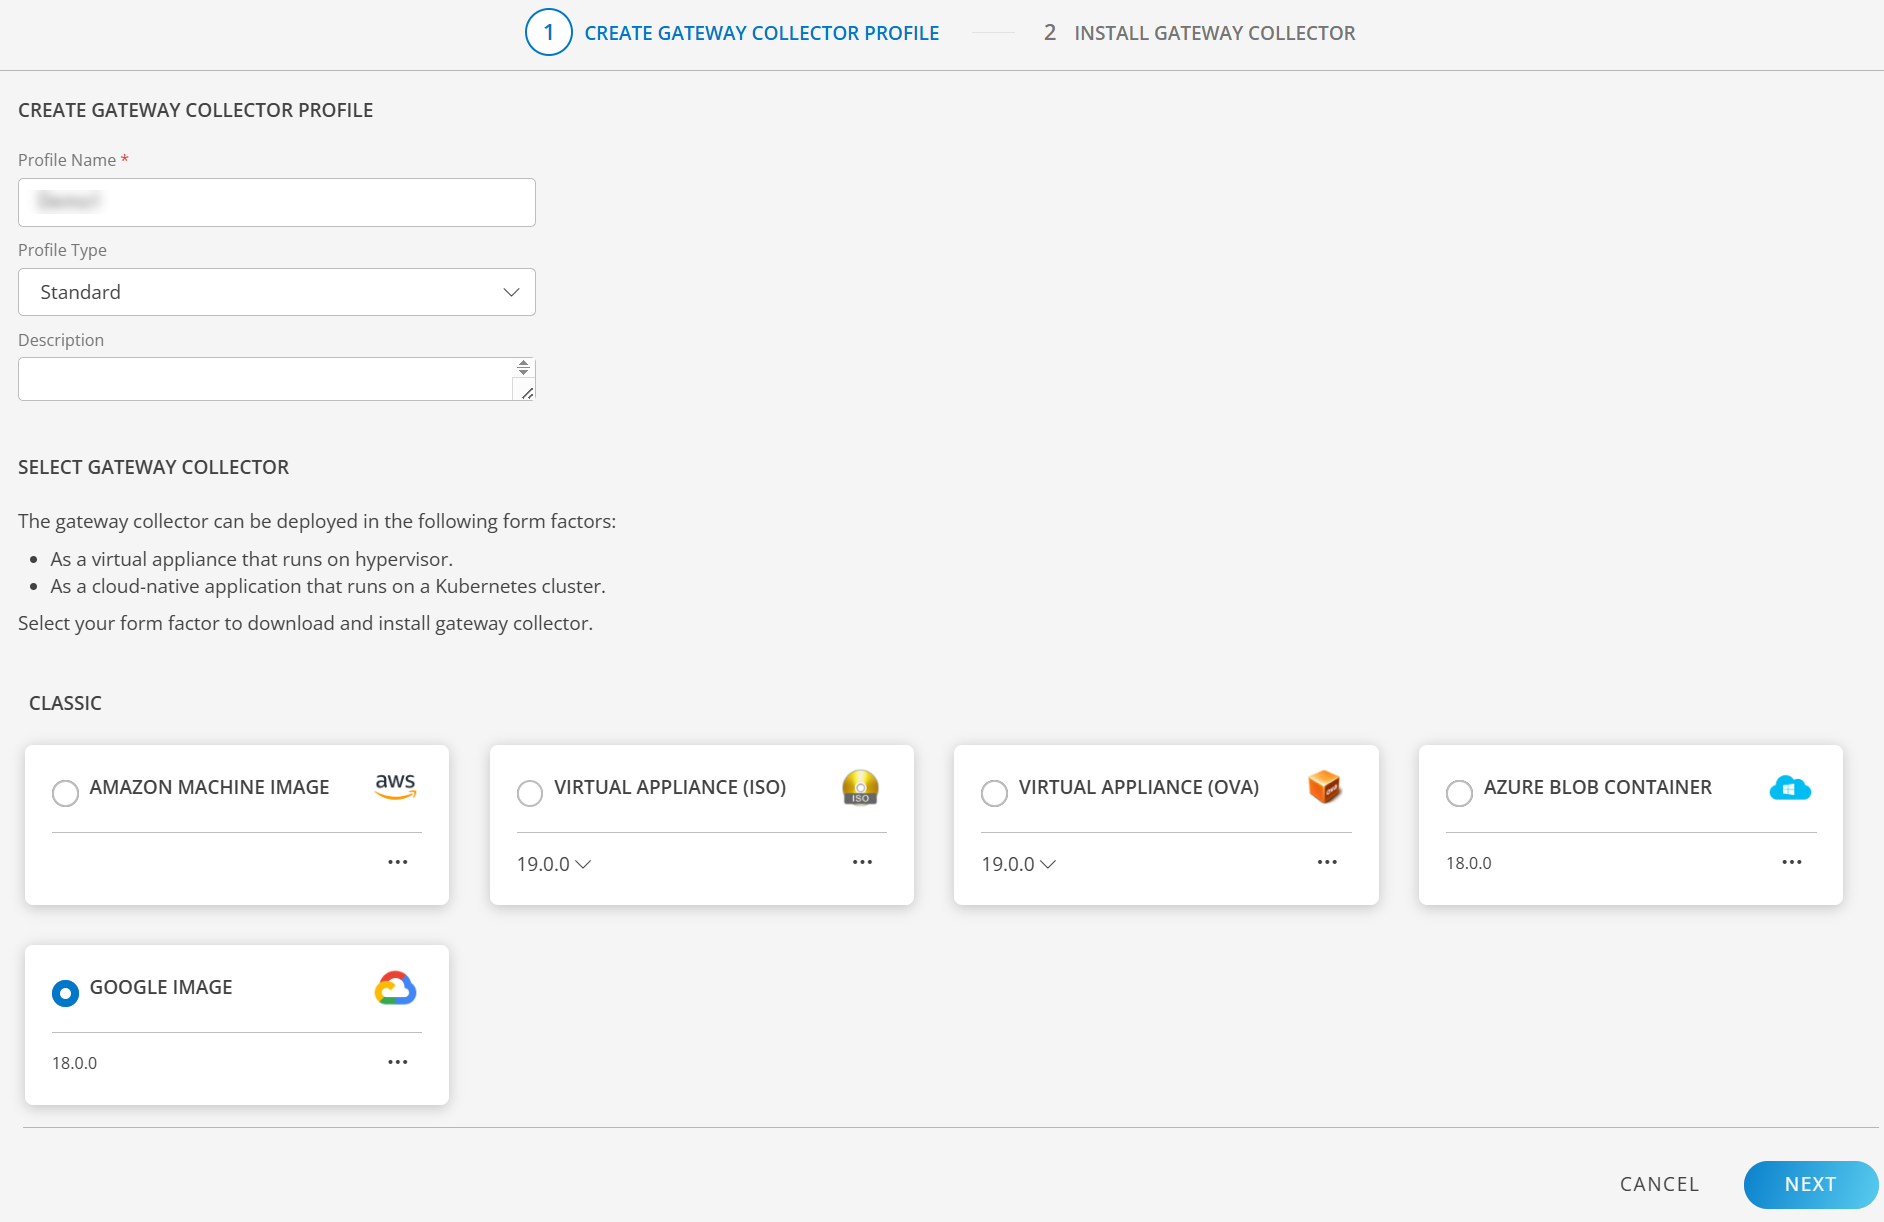
- Click NEXT to proceed.
- Click the download button in the Google Cloud Image widget to download the file.
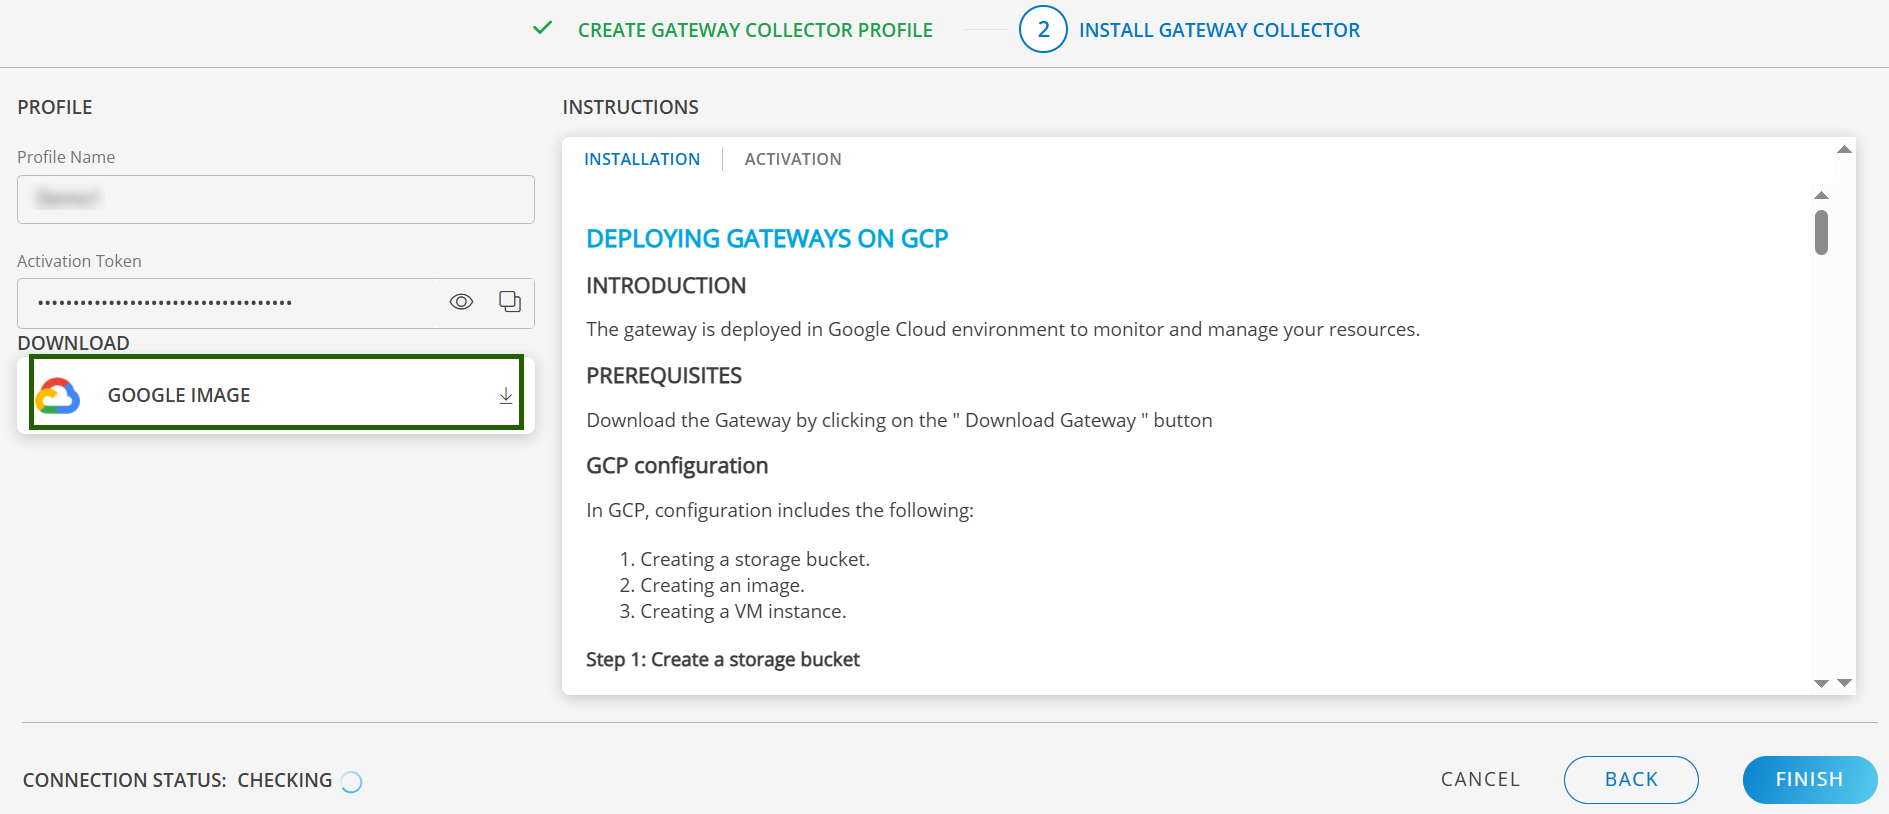
- Finally, Click to Finish to complete the configuration.
Step 2: Create a Storage Bucket
Buckets are the basic containers that hold your data. Everything stored in cloud storage must be contained in a bucket.
- Log into GCP with your credentials.
- From the Projects list, select the project to deploy the gateway.
- On the left pane, from Storage menu, click Storage and click Create Bucket.
- From Create a bucket, enter a bucket name (Example: opsramp-gateway) and click Continue.
- From the available default storage class options, select Multi-Regional and click Continue.
- (Optional) Configure Control access to objects and Advanced settings.
- Click Create. The bucket you created is in the Buckets list.
- Click the name of the bucket in the Buckets list.
- From the Objects tab, click Upload Files and select the gateway image file. The gateway image file is uploaded to the bucket.
Step 3: Create an Image
A virtual machine image is a single file that has a virtual disk with a bootable operating system. Google permits you to define virtual machine images or use pre-defined images that are used to create one or more virtual machine instances that look alike.
- On the left pane, from the Compute Engine menu, click Images. Images list is displayed.
- Click Create Image.
- Enter the following details:
- Name: Enter a unique name for the gateway image.
- Source: Select Cloud Storage file from the drop-down options.
- Cloud Storage file: Select the gateway image file that is attached to the storage bucket.
- Encryption: Google-managed key is selected by default.
- Click Create. The new image displays in the images list.
Step 4: Create a VM Instance
An instance is a virtual machine hosted on the Google infrastructure. A virtual machine instance is created for the gateway using the gateway image.
- On the left pane, from Compute Engine menu, click VM Instances.
- Click Create Instance.
- Enter the following information:
| Field | Description |
|---|---|
| Name | Unique gateway instance name |
| Region | Select US-central1 |
| Machine Type | Minimum requirement is two vCPU, 4GB |
| Access scopes | Default: Allow default access |
| Firewall | Ensure port 22 and port 5480 are permitted on the gateway to access web and serial user interfaces |
- Click Create.
- Verify if the gateway is installed in Google Cloud Platform (GCP).
Once the instance is ready, you can access the Gateway Admin UI at: https://<Public/Private Gateway IP>:5480
For the next steps, refer Install Gateway on AWS, Azure, and GCP