If you are already using a classic gateway, this article will guide you how to migrate the existing classic gateway to nextgen gateway.
Prerequisites
- Assign the old ip to the newly built gateway after the old gateway shut down.
- 8 GB Memory, and 50 GB Disk, and 4 Core CPU (Recommended)
Limitations
- The nextgen gateway does not support SIP synthetic monitoring.
- Any Critical/Warning alerts generated by the classic gateway will not be resolved by the nextgen gateway if the resource returns to normal.
- The time it takes to detach and reconnect the gateway is the down time and it may lose 5 to 10 minutes of data in addition to the down time.
Classic Gateway to NextGen Gateway Migration
To migrate an existing classic gateway to a nextgen gateway, follow the steps below:
- Step 1: Get the classic gateway configuration data
- Step 2: Download the gateway ISO/OVA
- Step 3: Configure and install the nextgen gateway Virtual Machine
- Step 4: Proxy configuration (Optional)
- Step 5: Detach the existing classic gateway
- Step 6: Attach the nextgen gateway
Step 1: Get the classic gateway configuration data
- In a web browser, enter the gateway URL. For example:
https://<Gateway IP address>:5480. - Log in using your username and password. Contact Support for default login credentials.
- In the Administration Menu, note the following configuration setup data, which you need to configure the new gateway:
- IP Address
- Network Configuration
- Date & Time
- Registration details
- Log out from the classic gateway.
Step 2: Download the gateway ISO/OVA
Download the gateway ISO or OVA based on the requirements. This will install the gateway on your computer.
Refer the below documents to download the ISO/OVA:
Once you have downloaded the gateway, proceed to step 3 to configure and install the gateway.
Step 3: Configure and install the nextgen gateway Virtual Machine
- Connect to the ESXi server.
- Select Create New Virtual Machine.
- Enter the following information for the virtual machine:
- Configuration: Select Typical.
- Name and Location: Enter a unique name for your virtual machine.
- Guest OS family: Select Linux.
- Guest OS version: Select Ubuntu Linux (64-bit).
- Storage: Select a destination storage section to store the virtual machine files.
- Network: Select the number of NICs to connect to the network and select Connect at Power ON.
- Create a Disk:
- Enter the disk size and units. The recommended size is 50 GB.
- Select the datastore type from the list.
- Ready to Complete: View and verify the configuration summary of the new virtual machine.
- Select Edit the virtual machine settings before completion and click Continue.
- In the New Virtual Machine Properties window, click the Hardware tab and enter:
- In the Memory Configuration section, enter the memory size and the corresponding unit. The recommended size is 8 GB.
- CPUs: Enter the number of CPUs. The recommended core is 4 vCPUs.
- New CD/DVD: Select Data Store ISO and browse to the location where you downloaded the gateway ISO file.
- Verify the remaining hardware details.
- Click Finish.
The ESXi server displays the new virtual machine - To power on the machine, right-click the Machine > Power > Power On.
Step 4: Proxy configuration (Optional)
Follow the below steps to setup the Node Level Proxy in nextgen gateway:
- Log in to the gateway device through SSH.
- Use the following command to edit the environment file.
vi /etc/environment - Add the following lines to the environment file.
HTTPS_PROXY=http://<proxy-ip>:<>proxy-port> NO_PROXY=localhost,127.0.0.1,10.43.0.1,<gateway-ip> HTTP_PROXY=http://<proxy-ip>:<>proxy-port> - Save the environment file after adding the above lines. (To save enter the li and use the command:
wq!). - Now, log out and log in to the gateway to reflect the changes in environment variables.
Step 5: Detach the existing classic gateway
Before you detach the gateway, make sure Web Service Agent are not disabled in your management profile.
To detach the existing gateway, follow the below steps:
- Select Setup > Resources > Management Profiles.
- Select the gateway profile you want to detach. Remember this profile for step 5.
- Click Detach Gateway.
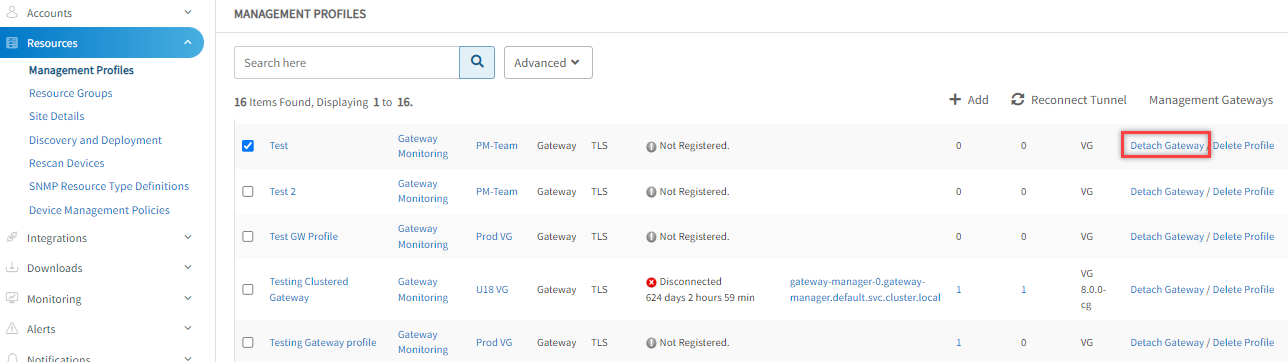
- On the Infrastructure page, make sure no other available device has the same gateway IP address. If a device with the same IP address exists, delete the device.
- Shut down the gateway.
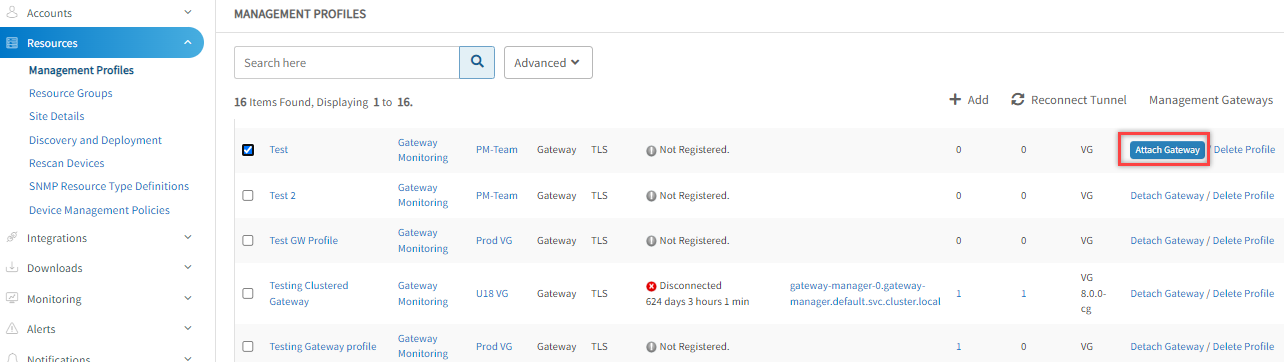
Step 6: Attach the nextgen gateway
To attach the nextgen gateway, follow the below steps:
- Select Setup > Resources > Management Profiles.
- Click Attach Gateway for the management profile from which the gateway was detached in step 3.
- Click Copy. The activation code is copied to the clipboard to be used in next step (Activation of gateway).
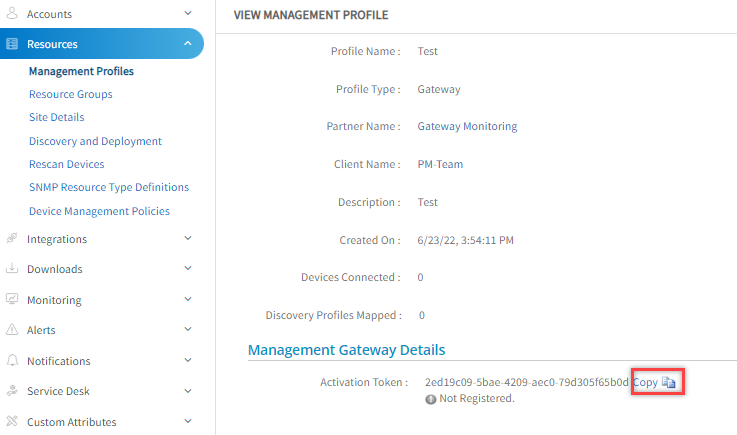
- To activate the nextgen gateway, click here for detailed procedure.
You have now successfully migrated to the nextgen gateway. To verify it, proceed to the section below.
Post Migration Checks
To ensure that the migration is complete, follow the steps below:
- The gateway is connected and has a status of UP in the Management Profile Status column.
- In Management Profile, click Management gateways and verify the following columns for the respective management profile:
- Model; verify that the model ID starts with OG, such as ONGVMAU20.
- Firmware Version
- Wait 10 minutes and verify recent graphs on a gateway or gateway-managed devices.
- If a gateway is used as a Proxy server for Agents, verify that the Agents are in the Active state and verify recent graphs.
- If a gateway is used for monitoring Web Services, verify recent graphs for all the installed apps