Task is a one-time, non-recurring work assigned to a user and executed on selected resource/s for a certain stipulated time.
Planning, managing and execution of tasks are required as part of an IT service. Task scheduling is carried out by IT operations management. Task execution is automated in Service Desk that runs online tasks on specific date and time.
Configure tasks
- From All Clients, select the client.
- Go to Setup > Service Desk > Configuration section > Settings.
- Click the Tasks tab, configure the required properties in the TASKS SETTINGS page.
- Click Update.
The following applies to whether or not a client is selected:
- Select Client to apply the settings to all users in the client.
- When NO client is selected, the chosen settings apply to all clients in the partner.
Create a task
Select the Service Desk menu.
Click Add in the top right and click Task.
From New Task, enter the the following information:
Field name Description Partner Select the Partner. Client Select the Client. Project Select the Project. Subject Title or short summary of Task. Description Information required to describe Task. This can include details of the task and steps to execute the task Attach file Artifacts required to support Task. Supported file types: `.txt`, `.jpg`, `.zip`, `.docx`, `.odt`, `.odg` and `.xlsx`. File size limit: 32 MB
Requested By User who requests Task. Assignee Group User group that can act on Task. Assign to User responsible for working on Task. Resources Resources for which Task is created. Priority Measure of how soon Task needs to be executed. Estimated Hours Estimated time duration in minutes for completion of Task. Articles KB articles that refer to similar Tasks in the past. Click Create.
Edit a tasks
- Select the Service Desk menu.
- Click a task.
- Click Edit and edit the required fields.
Edit multiple tasks
- Select the Service Desk menu.
- Click Bulk Update button and select the number of entities to be edited.
- Select Apply Actions option.
- Update Actions, select the required changes and click Update.
Add auto-close policy to close a task
Configure Auto-Close Policies to close tasks that are resolved and that are in an inactive state since a certain elapsed time.
Note
- If the customer selects a 6-month duration, incidents will be evaluated for two time ranges:
- From today up to the past 180 days
- From 180 days prior to today up to 360 days priorExample:If today is 09/07/2024:
- End Date (180 days prior): Thu Jan 11 00:00:00 IST 2024
- Start Date (360 days prior): Sat Jul 15 00:00:00 IST 2023
- After an incident is resolved, no further activity should occur on that incident.
- The policy must be configured at the organization level.
Go to Setup.
On the Service Desk page, click Auto Close Policies.
In the AUTO CLOSE POLICIES section, select the client and click Auto Close Tasks.
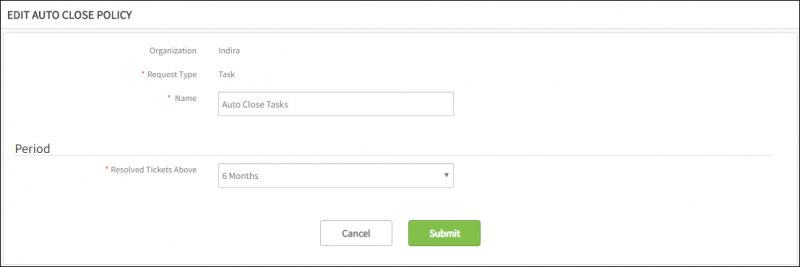
In the EDIT AUTO CLOSE POLICY section, enter:
- Name: Name of the Auto-Close policy
- Resolved Tickets Above: The inactive period of a resolved Task beyond which the entity needs to be closed
Click Submit to add the Auto-Close Policy.
Task details view
| Tabs | Description |
|---|---|
| Conversations | Comments added by assignee or creator which can be viewed by all users in assignee group. |
| Activity Log | User activities on Task. |
| Resources | Resources for which Task is created. |
| Notes | Useful information or hint for Task execution. Viewed by all users of assignee group. |
| To Do | Information recorded by a user for self-reference. Viewed by a single user. |
| Properties |
 |
| Status Flow | The workflow representation that shows the status changes of Task. |
| Articles | KB articles that refer to similar Tasks in the past. |
| Integration Log | Details of inbound and outbound third-party communication. |
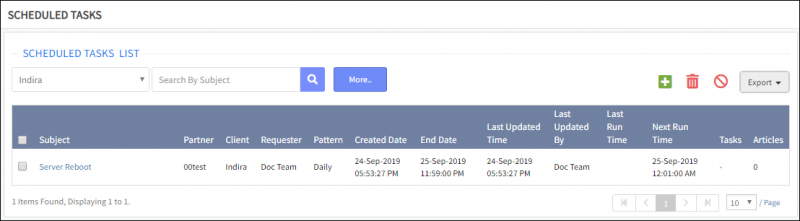
Configure scheduled tasks
The Scheduled Task entity provides the ability to schedule and run recurring tasks for a predefined duration and at a specified time period. Each instance of a scheduled task is recorded and grouped as Tasks in the Scheduled Task listing.
Example:
Reboot selected servers every Saturday for one month.
Start Date: April 1, 2019
End Date: April 30, 2019
Recurrence Pattern:
Weekly Day of the week: Saturday
Configure a scheduled task
- Go to Setup > Service Desk > Automation > Scheduled Tasks.
- Click + to create a new scheduled task.
- ADD SCHEDULED TASK, enter the required information and click Next.
- Enter the schedule details of the task and click Preview.
- Click Submit after previewing the scheduled task details.
View scheduled tasks
You can be view and manage Scheduled Tasks. Every instance of a Scheduled Task run is listed under Tasks. The Deactivate options temporarily deactivates Scheduled Tasks.