A problem is a condition from numerous incidents that are related or have common issues. Problem management is the process responsible for managing the lifecycle of all problems that happen or could happen.
The primary objectives of problem management are:
- To prevent problems and resulting incidents from happening
- To eliminate recurring incidents
- To minimize the impact of incidents that cannot be prevented
It may take several incidents to occur before Problem Management has enough data to understand the root cause. After Problem Management identifies the factor and develops a workaround, the problem becomes a “known error.”
Problem management processes activities in the following way:
- Problem diagnosis and resolution - Achieved by categorization, prioritization and root cause identification. This may include a change request to resolve the Problem.
- Determination of workaround - Workarounds are provided to reduce service interruptions until Problem is resolved.
- Documentation of known errors - Known errors are added to Knowledge Base including related incidents and relevant workarounds.
ITIL defines a problem as an underlying cause of one or more incidents.
Example: An incident of a server hang is reported. The server becomes functional after a reboot. Later on, the incident repeats and the root cause of failure is analyzed and found as a faulty motherboard. The root cause is reported as Problem.
Configure problem entity settings
Customize Problem details by creating custom fields in addition to the predefined fields.
If you select Client, the settings are applied to all users in the client. If you do not select a client, the chosen settings apply to all clients in the partner.
- From All Clients, select the client.
- Go to Setup > Service Desk > Configuration > Settings.
- Click the Problem tab.
- From PROBLEM SETTINGS, configure the Property settings.
- Click Update.
Create a problem entity
Problem entities are created on the Service Desk.
- Select Service Desk from the drop-down menu.
- Click + and select Problem.
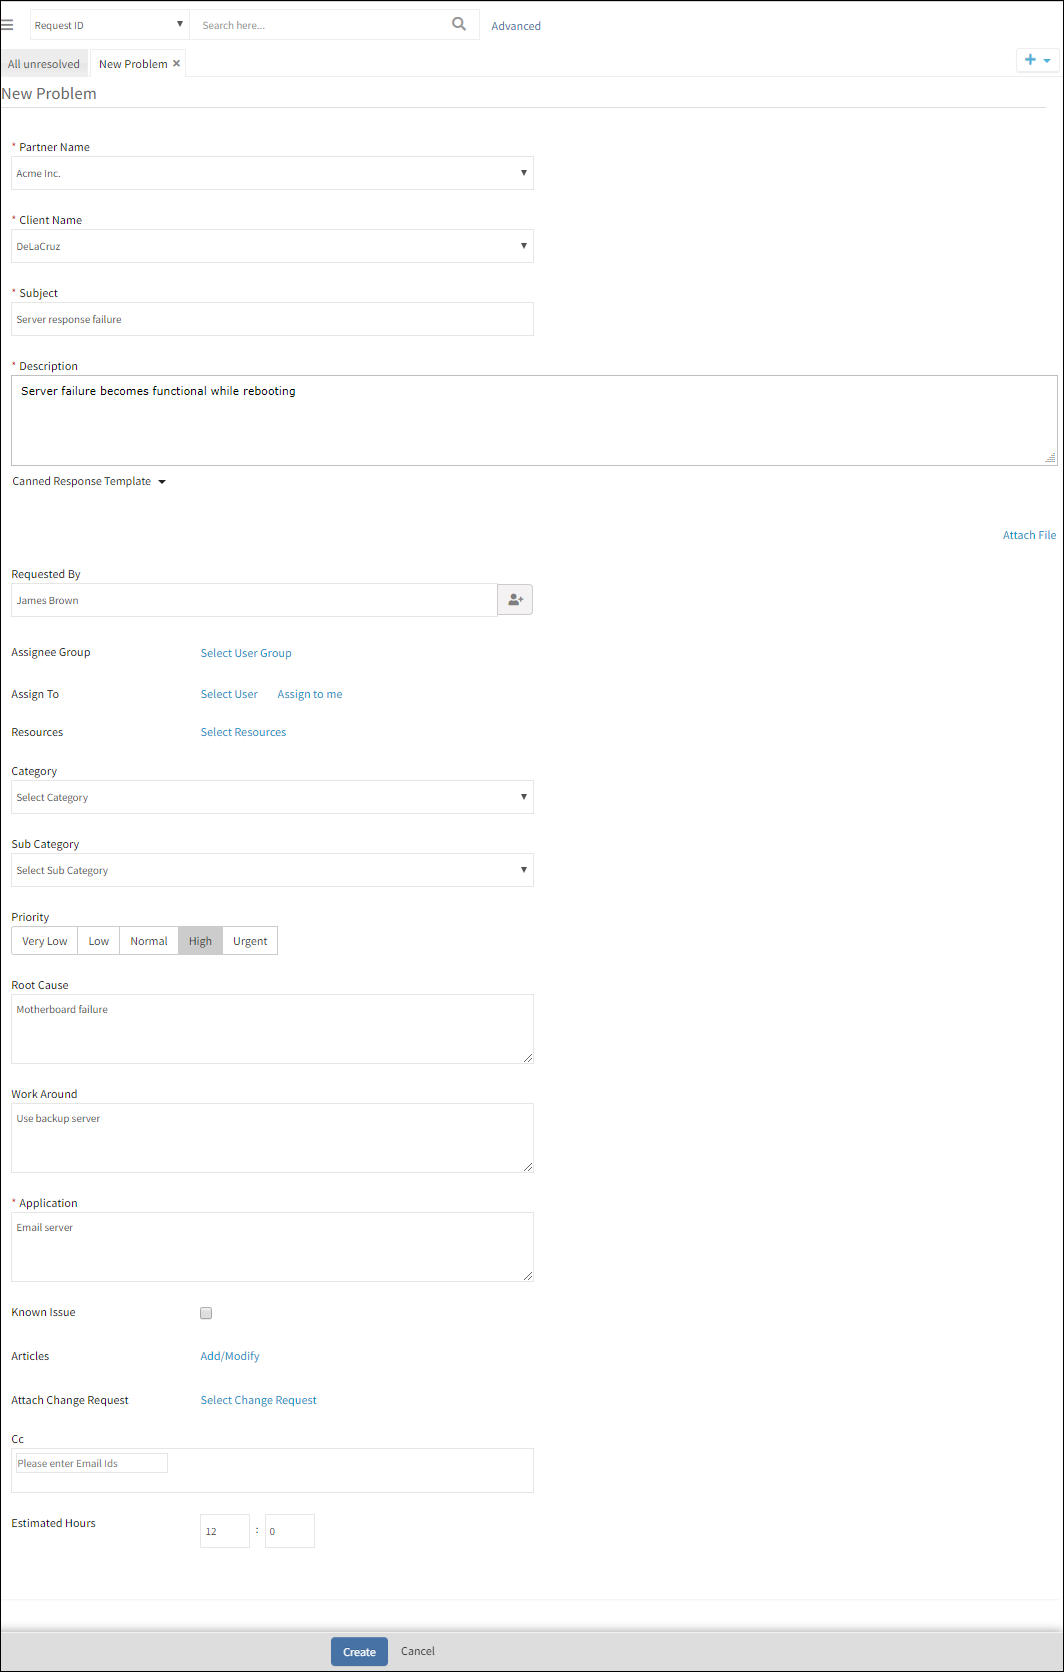
- In the New Problem page, enter the required details.
- Click Create.
Supported fields
| Field name | Description |
|---|---|
| Partner | Select the partner. |
| Client | Select the client. |
| Subject | Title or short summary of Problem |
| Description< | The information required to describe Problem scenario. This can include the actual behavior, expected behavior, and steps to reproduce the issue. |
| Attach file | The artifacts required to support Problem. Example: error messages, screenshots, excerpt from log files. Supported file types: `.txt`, `.jpg`, `.zip`, `.docx`, `.odt`, `.odg` and `.xlsx`. File size limit: 32 MB |
| Requested By | User who requests Problem |
| Assignee Group | User group that manages Problem |
| Assign to | User who acts on Problem |
| Resources | Devices on which Problem is identified |
| Category | Category to which Problem is mapped |
| Sub Category | Subcategory under the category to which Problem is mapped |
| Priority | Measure of how soon Problem needs to be fixed |
| Root Cause | Factors On resolution of which the causal incidents can be prevented or healed |
| Work Around | Temporary method for achieving the given task when the planned method is not working due to Problem. The workaround is abandoned when the Problem is fixed. |
| Application | Applications on which the Problem is detected |
| Known Issue | Whether the Problem has occurred in the past |
| Articles | KB articles that refer to similar Problems in the past |
| Attach Change Request | Change request required to fix the Problem |
| Estimated Hours | Planned time duration for Problem resolution |
View problems
Problem details page provides the following attributes.
| Tabs | Description |
| Conversations | Comments added by assignee or creator which can be viewed by all users in assignee group |
| Activity Log | User activities on Problem |
| Resources | Resources on which Problem is identified |
| Notes | Useful information or hints for Problem resolution. Viewed by all users of the assignee group. |
| To Do | Information recorded by a user for self-reference. Viewed by a single user. |
| Properties |
 |
| Status Flow | The workflow representation that shows the status changes of Problem |
| Articles | KB articles attached if the Problem is a known error |
| Attached Requests | Change Requests attached as part of Problem resolution |
| Integration Log | The inbound and outbound third-party communication details. |
Edit a problem
- On the drop-down menu, click Service Desk.
- Click a problem.
- Click the Edit button and edit the required fields.
Edit multiple problem entities
- On the drop-down menu, click Service Desk.
- Filter the tickets (from the left pane or by searching) and select the entities to be edited,
- Click Bulk Update,
- From Update Actions, select the required changes.
- Click Update.
Add an auto-close policy to close a problem
Configure auto-close policies to close problems that are resolved and that are in an inactive state since a certain elapsed time.
Note
- If the customer selects a 6-month duration, incidents will be evaluated for two time ranges:
- From today up to the past 180 days
- From 180 days prior to today up to 360 days priorExample:If today is 09/07/2024:
- End Date (180 days prior): Thu Jan 11 00:00:00 IST 2024
- Start Date (360 days prior): Sat Jul 15 00:00:00 IST 2023
- After an incident is resolved, no further activity should occur on that incident.
- The policy must be configured at the organization level.
- Go to Setup > Service Desk > Auto Close Policies.
- Select the client and click Auto Close Problems.
- From EDIT AUTO CLOSE POLICY, enter:
- Name: Name of the Auto-Close policy
- Resolved Tickets Above: The inactive period of a resolved Problem beyond which the entity needs to be closed
- Click Submit.