Incident management is a process to restore a normal service operation as quickly as possible to minimize the business impact. The process is responsible for managing the lifecycle of all incidents. Incident management ensures that service quality is maintained as defined in the Service Level Agreement (SLA).
Incidents are events reported by monitoring applications or user queries that need clarification. An incident is created when an intervention is required to restore agreed service to the business. The failure of a component of a service that has not yet impacted service is also an incident. For example:
- High CPU utilization in a server.
- Failure of a server or disk.
Configure incident settings
Customize incident details by creating custom fields in addition to the predefined fields.
- From All Clients, select the client.
- Go to Setup > Service Desk > Configuration > Settings.
- Click Incident.
- From INCIDENT SETTINGS, configure the property settings.
- Click Update.
Create an incident with Service Desk
- From All Clients, select a client.
- Go to Command Center > Service Desk.
- Click the + button and select Incident. A New Incident page is displayed as shown below:
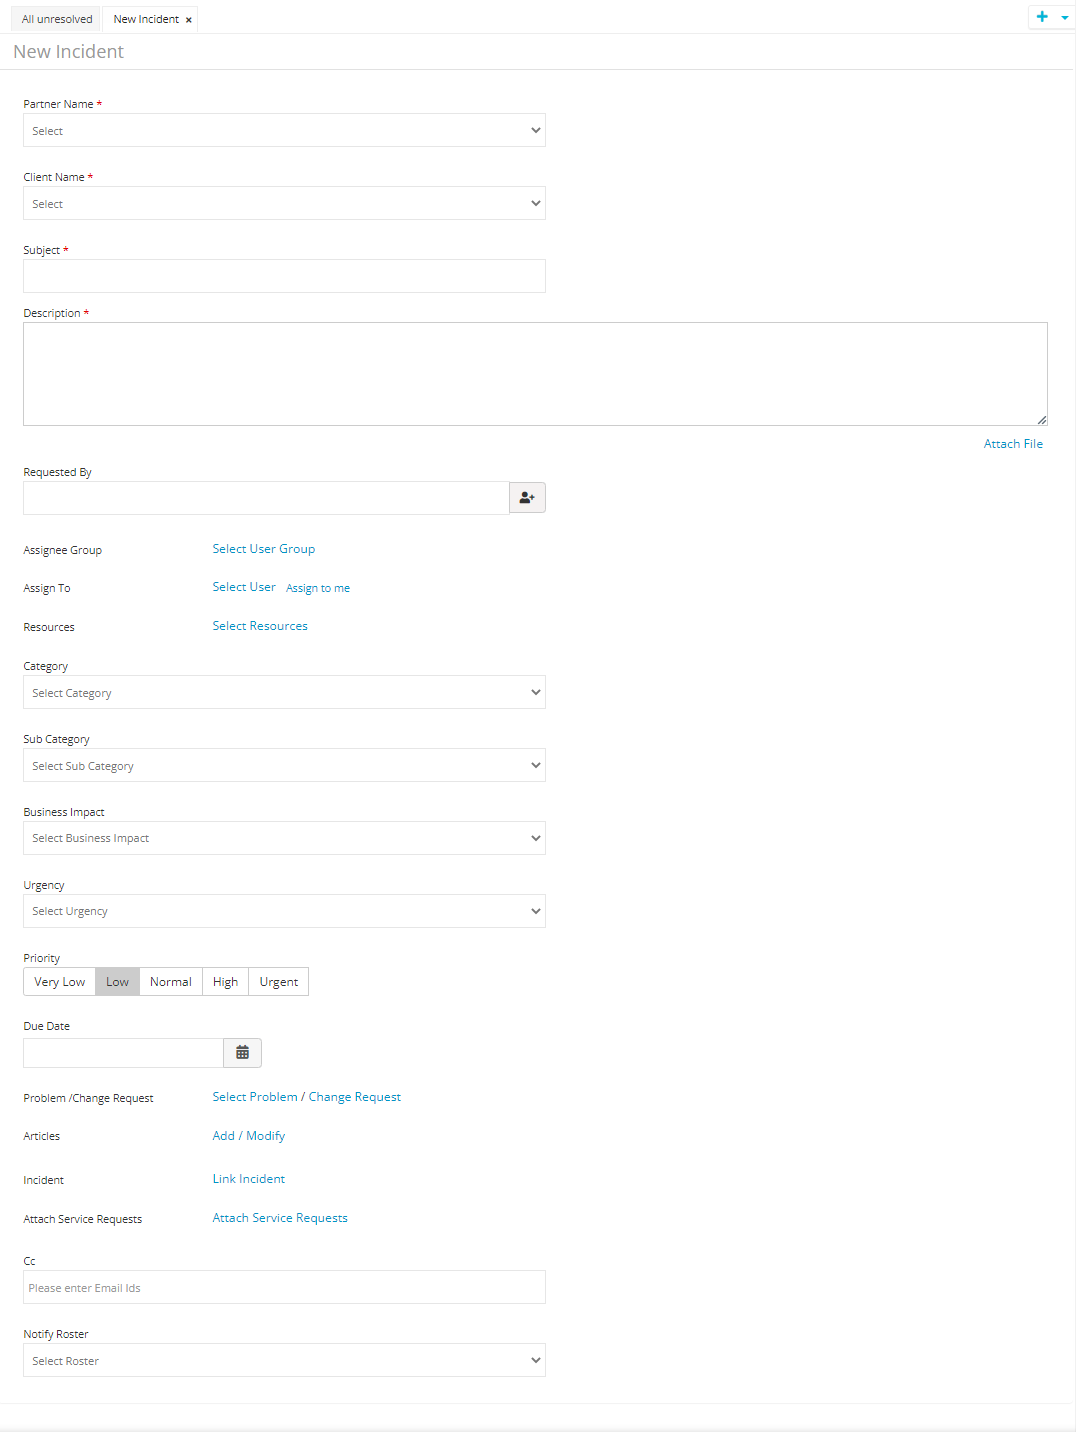
- On the New Incident page, enter below information.
| Field name | Description |
|---|---|
| Partner Name | Select the partner. |
| Client Name | Select the Client. |
| Subject | Title or short summary of the Incident |
| Description | The information required to describe the Incident scenario. This can include the actual behavior, expected behavior, steps to reproduce the issue etc. |
| Attach file | The artifacts required to the support Incident. For example, Error messages, screenshots, excerpts from log files. Supported file types: `.txt`, `.jpg`, `.zip`, `.docx`, `.odt`, `.odg` and `.xlsx`. File size limit: 32 MB |
| Requested By | User who requests Incident |
| Assignee Group | User group that manages Incident |
| Assign to | User who acts on Incident |
| Resources | Devices on which the Incident is identified |
| Category | Category to which the Incident is mapped |
| Sub Category | Sub category under the category to which the Incident is mapped |
| Business Impact | Severity of the Incident on the business |
| Priority | Measure of how soon the Incident needs to be resolved |
| Due date | Expected date to resolve the Incident |
| Attach Problem/Change Request | Attach an existing Problem or Change Request that corresponds to the Incident |
| To | Email addresses of the users who need to act on the Incident |
| Cc | Email addresses of the users who need to be copied in the email notification |
| Notify Roster | Select a Roster to send the notification to a group of users who are working in the selected shift. |
- Click Create.
The Incident is created.
Create an incident with email
Go to Setup > Integrations > Integrations.
In Available Integrations, click Email Requests.
In Install Email Requests Integrations, enter the name of the integration.
Specify an
IncidentRequest Type.Upload an image file if required.
Click Install.
Click the copy icon in Incoming Email Address.
When composing the incident email, enter:
Field Description To Incoming email address Subject Incident subject Email Body Incident description 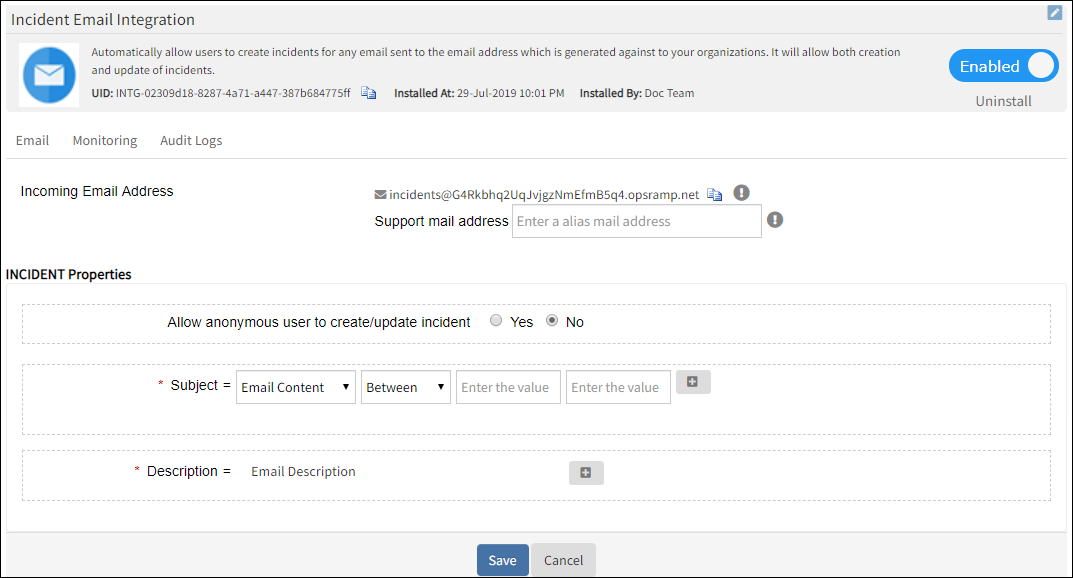
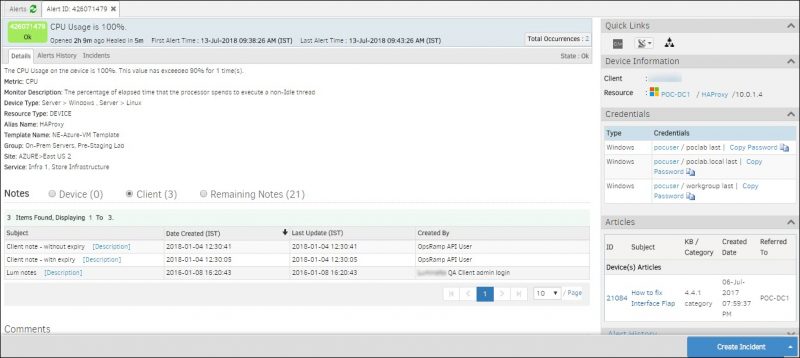
Create an incident from an alert
- Go to Alerts, click alert subject.
- In the Alert Details page, click Create Incident. The Create Incident window is displayed.
- In the Create Incident window, enter the incident details.
- Click Save.
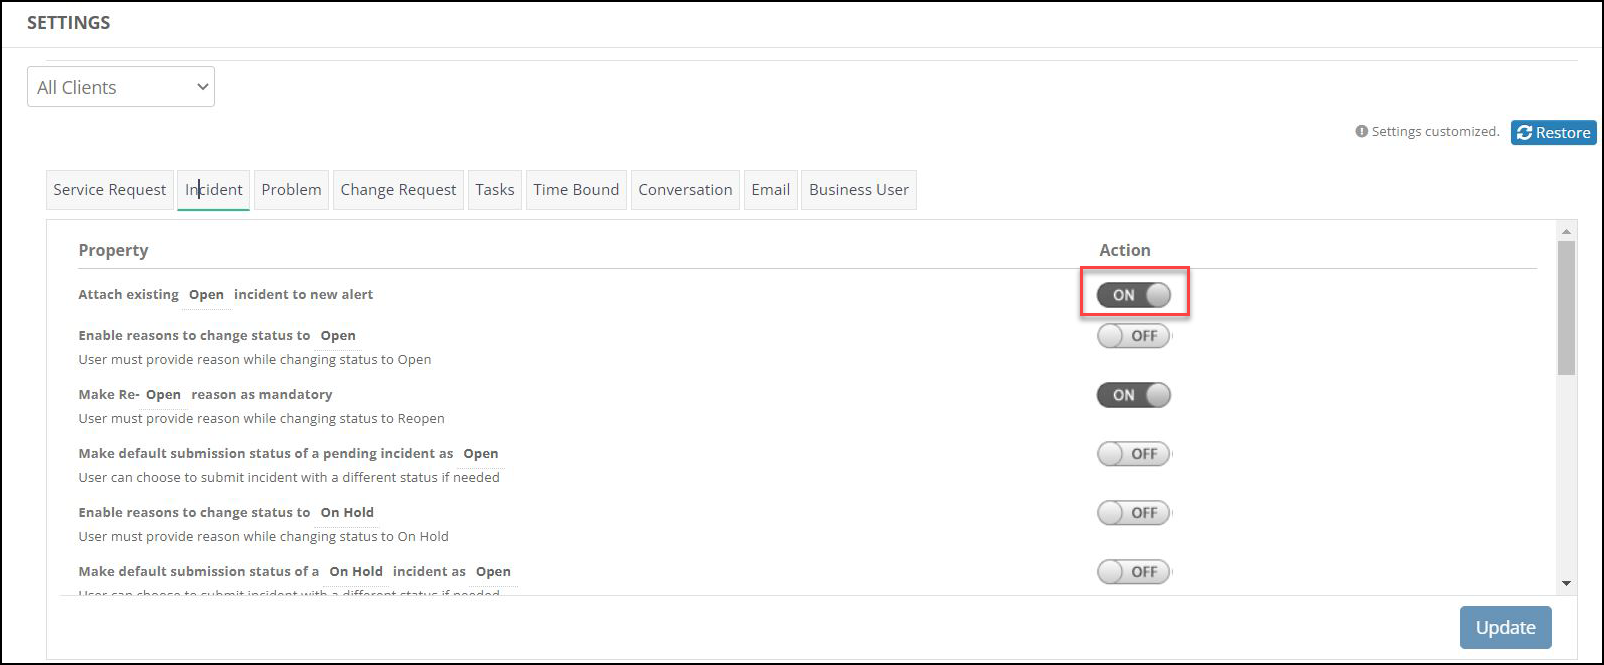
Make existing open incidents to new alert
If the previous alert has an incident created and that incident is in an Open state, enabling this option will append that incident to the new alert instead of creating a new incident.
To activate this feature, navigate to Setup > Service Desk > Settings > Incident and enable the option “Attach existing open incident to new alert”.
Note: The Attach existing Open incident to new alert does not apply to the incident created by an inference alert.
Prerequisite:
Users should have ALERTS_MANAGE, INCIDENT_MANAGE, SERVICEDESK_MANAGE, and OPSQL_MANAGE permission.
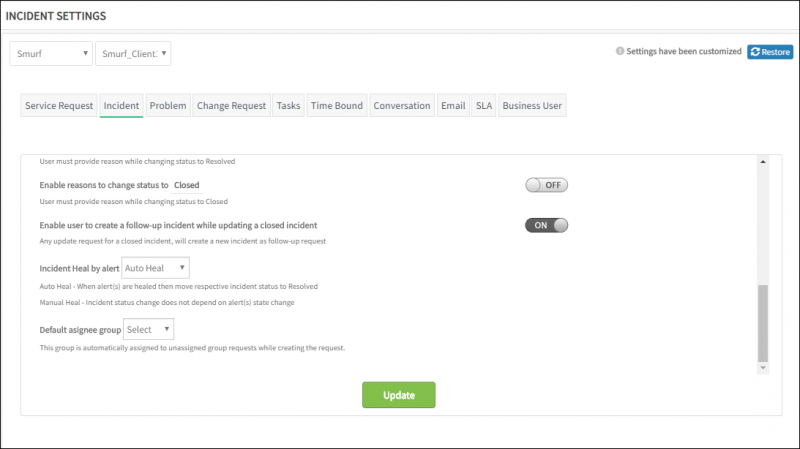
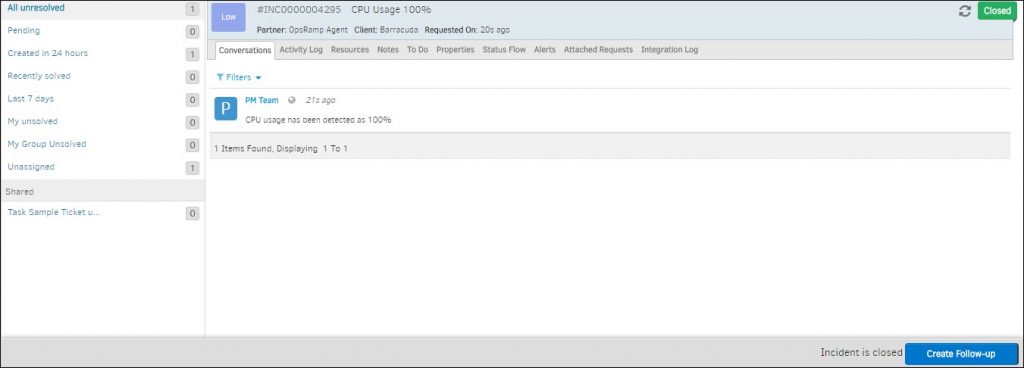
Create an incident from a closed incident
If a closed incident needs to be reviewed or a similar issue needs to be reported, create a new incident and attach the closed incident to the same.
Prerequisite:
You need to activate Enable to create a follow-up Incident setting in the Incident Settings page to be able to view the Create Follow-up option.
- Go to the Service Desk, select a closed incident.
- Click Create Follow-Up.
- From the New Incident page, provide incident details.
- Click Create.
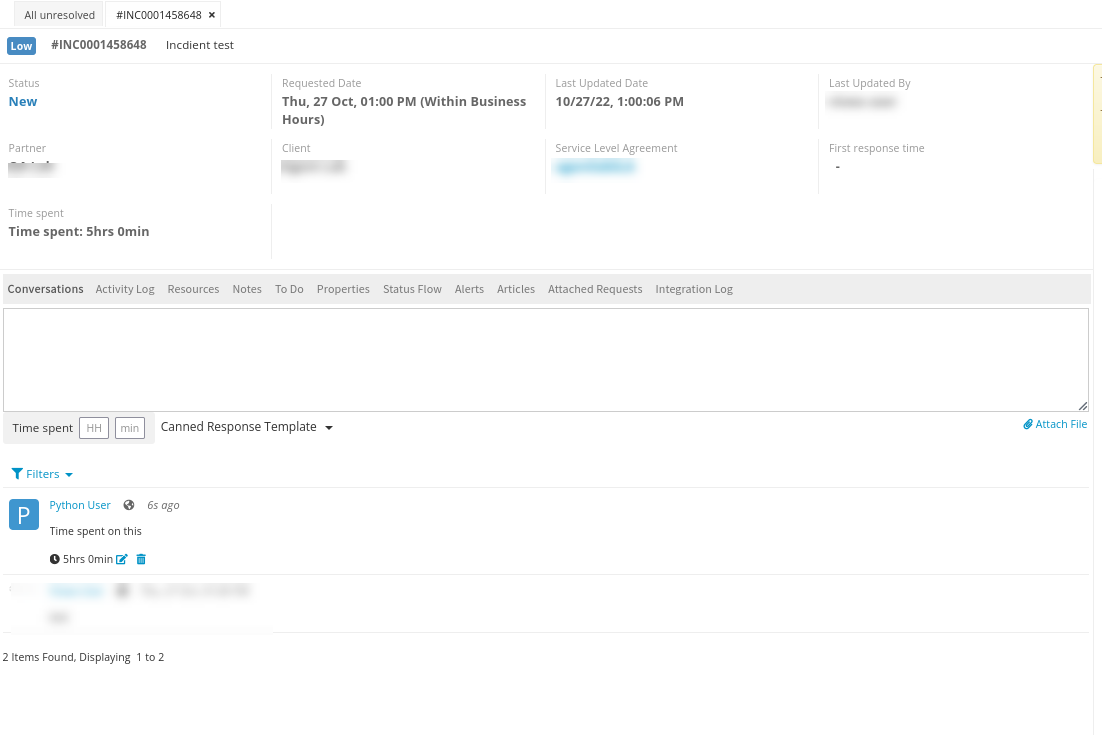
Viewing incidents
The incident details page displays the following attributes:
| Attributes | Description |
|---|---|
| Status | Status of the Incident. |
| Requested Date | It is the date on which the Incident request was made. |
| Last Updated Date | Date when the policy was last updated. |
| Last Updated By | Name of the user who last modified the Incident. |
| Partner | Partner name to whom the Incident belongs to. |
| Client | Client name to whom the Incident belongs to. |
| Service Legal Agreement | Used to configure response and resolution time for the tickets based on their priorities. |
| First response time | It is the time when you first responded to the Incident. |
| Time spent | Total amount of time spent on the Incident. |
The incident details page displays the following tabs:
| Tabs | Description |
|---|---|
| Conversations | Comments added by assignee or creator which can be viewed by all users in the assignee group. |
| Activity Log | User activities on Incident. |
| Resources | The resources on which the Incident is identified. |
| Notes | Useful information or hint for Incident Resolution. Viewed by all users of the assignee group. |
| To Do | Information recorded by a user for self-reference. Viewed by a single user. |
| Properties |
 |
| Status Flow | The flowchart representation showing Incident status change. |
| Alerts | Alerts details corresponding to Incident. |
| Articles | Knowledge Base articles that refer to the resolution of similar incidents in the past. |
| Attached Requests |
|
| Integration Log | The inbound and outbound third-party communication details. |
Edit an incident
- Click Service Desk
- Click Incident.
- Click the Edit button and edit the required fields.
Edit multiple incidents
- Click Service Desk.
- Click the bulk update button and select the number of incidents to be edited.
- Select Apply Actions option. Update Actions window is displayed.
- Select the required changes and click Update.
Associate an incident with other entities
Link incident to problem or change request
Link an incident to a problem, change request or another incident while creating or editing the Incident.
To link an incident:
Click Service Desk.
Click Incident ID.
In the right side pane of the Incident Details page, click Problem / Change Request or Link Incident:
- Click Problem / Change Request to open the Service Change Request window.
- Click Link Incident to open the Select Incident window.
Select the required Request Id. The entity is attached to Incident.
Link new incident to service request
Link single or multiple service requests to an incident if there is an existing service request that has already been created and is relevant to your context. As service requests are resolved and closed, the incident gets automatically closed.
- From the options in the drop-down menu, click Service Desk.
- Click New and click Incident.
- In the New Incident page, click Attach Service Requests.
- Select the required service request then click Create.
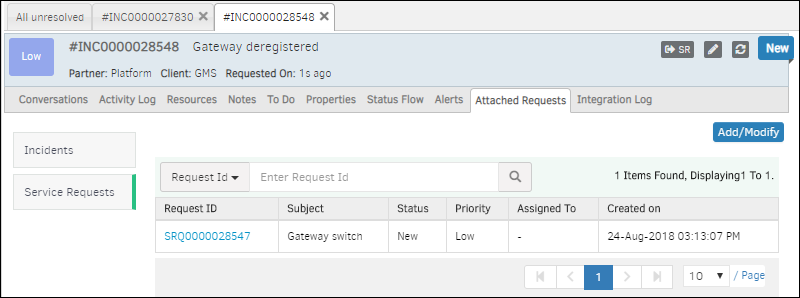
Link existing incident to service request
- Click Incident.
- Click Attached Requests, click Add/Modify.
- Select the required service request and click Update.
Convert incident to service request
You can convert an incident to a service request if the entity conforms to the service request criteria.
- Click Incident.
- Click SR and confirm.
- The Incident is converted to service request and the parent Incident number is shown.
Close incident
Configure Auto-Close Policies to close Incidents that are resolved and that are in inactive state since a certain elapsed time.
Note
- If the customer selects a 6-month duration, incidents will be evaluated for two time ranges:
- From today up to the past 180 days
- From 180 days prior to today up to 360 days priorExample:If today is 09/07/2024:
- End Date (180 days prior): Thu Jan 11 00:00:00 IST 2024
- Start Date (360 days prior): Sat Jul 15 00:00:00 IST 2023
- After an incident is resolved, no further activity should occur on that incident.
- The policy must be configured at the organization level.
Go to Setup > Service Desk > Auto Close Policies.
From AUTO CLOSE POLICIES, select the client and click Auto Close Incidents.
From EDIT AUTO CLOSE POLICY, enter:
Field Description Name Auto-close policy name Resolved Tickets Above Inactive interval of a resolved incident beyond which the incident needs to be closed Click Submit.
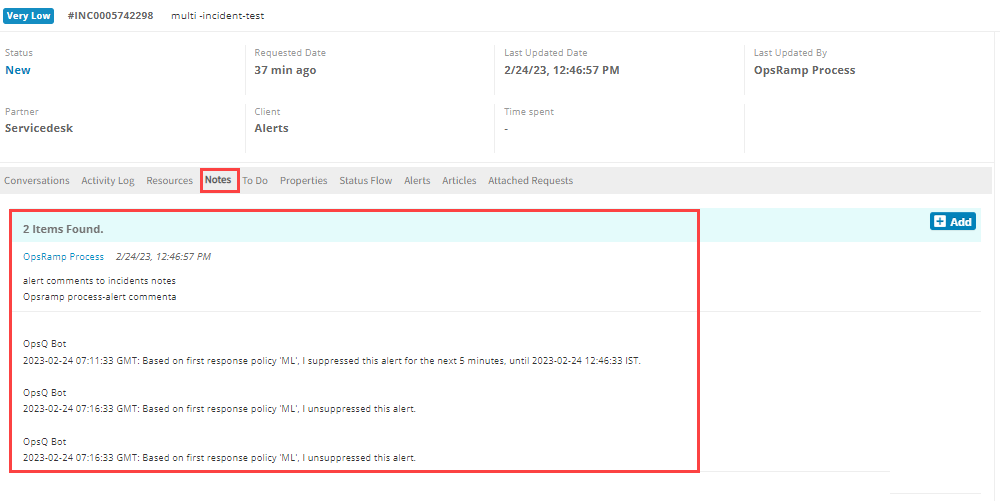
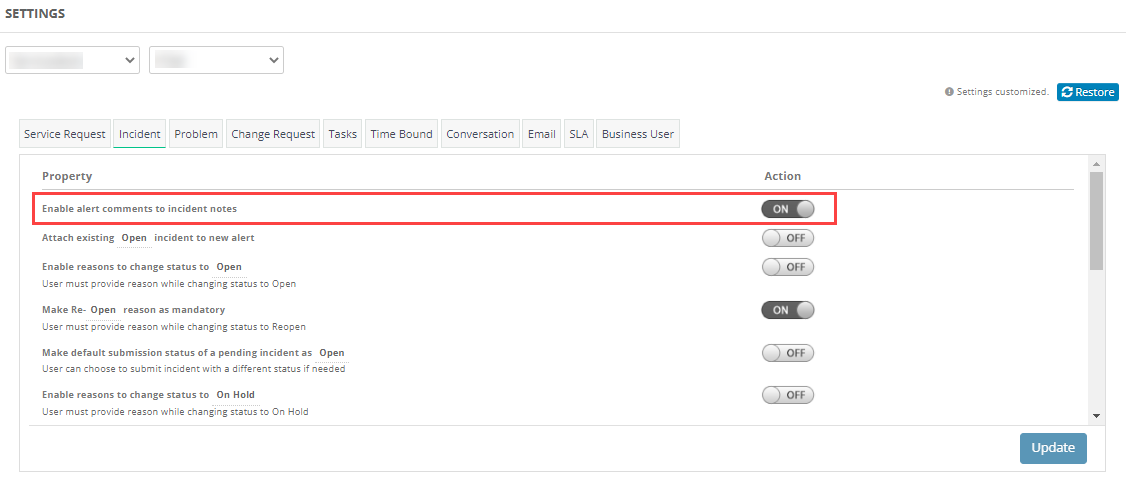
View OpsRamp Process and OpsQ Bot comments under Notes
Users can view the OpsRamp Process and OpsQ Bot comments under the Incident Notes section.
Prerequisite:
You need to enable the Enable alert comments to incident notes property under Service Desk settings to be able to view the comments under notes.
You need to search for the incident for which the alert comments to incident notes option is enabled. You can find the notes as shown below: