Change management process
Change management helps to deploy new changes without any disruption or downtime. ITIL Change management follows a standard operating procedure to eliminate any unintended interruptions and capture details about a change before it is implemented such as reason for the change, planning, and approval.
Change management works closely with Incident management, problem management, configuration management to manage infrastructure and Configuration Items(CIs) that are affected or going through the change.
Change requests typically originate from one of the following sources:
- Problem reports that identify bugs to be fixed
- System enhancement requests from end users
- Changes in underlying structure and or standards
Change assessment
Change assessment and planning includes activities such as:
- Prioritization: After analyzing the reasons and RFC, prioritize change request and determine change type depending on the risk/impact.
- Scheduling: Depending on priority, scheduling specifies the planned start date and end date and ensures there is no conflich with other scheduled activities.
- Roll out planning: Providing details about implementation steps and approaches.
- Stakeholder identification: Identifies the project members responsible for carrying out the implementation and approval authorities.
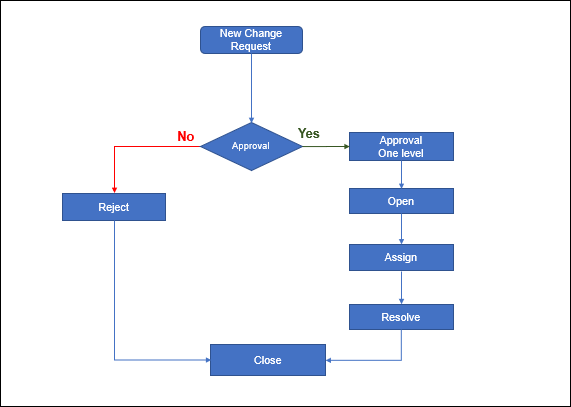
Change approval
Approval process flow is decided depending on the type of change. For example, major change requires approval from Change Approval Group and management whereas standard change does not require any Change Approval Group approval as they are pre-approved. Change request is approved only if all the Change Approval Group users approve it. On rejection, reassessment review is done and submitted again for approval.
Change implementation
Change Implementation includes activities such as:
- Change Plan: After the change is approved, it is implemented with the help of the release management team.
- Test Plan: The release team follows established planning and testing processes.
- Rollback Planning: If the change fails, a plan is provided to restore services to the previous version.
Configure change request settings
Customize change details by creating custom fields in addition to the predefined fields.
To configure change request settings:
- Go to Setup > Service Desk > Settings.
- Select the Change Request tab and configure the settings.
- Click Update.
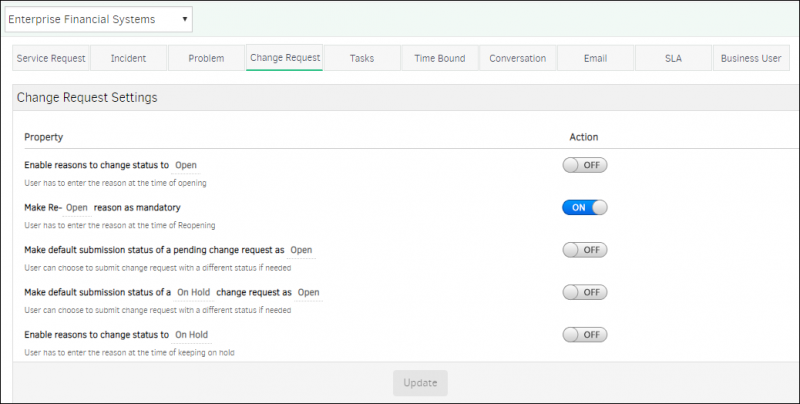
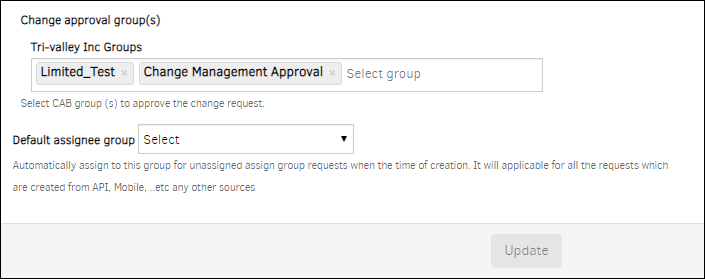
To make the settings apply to all users in the client, select Client. When NO client is selected, the chosen settings apply to all clients in the partner. Configure the Change Approval Group from User groups created for the organization.
Create a change request
Change requests can be created using:
- Service Desk
Create a change request with Service Desk
- Select Service Desk from the drop-down menu.
- Click + and click Change.
- On the New Change Request page, enter the required information.
- Click Create.
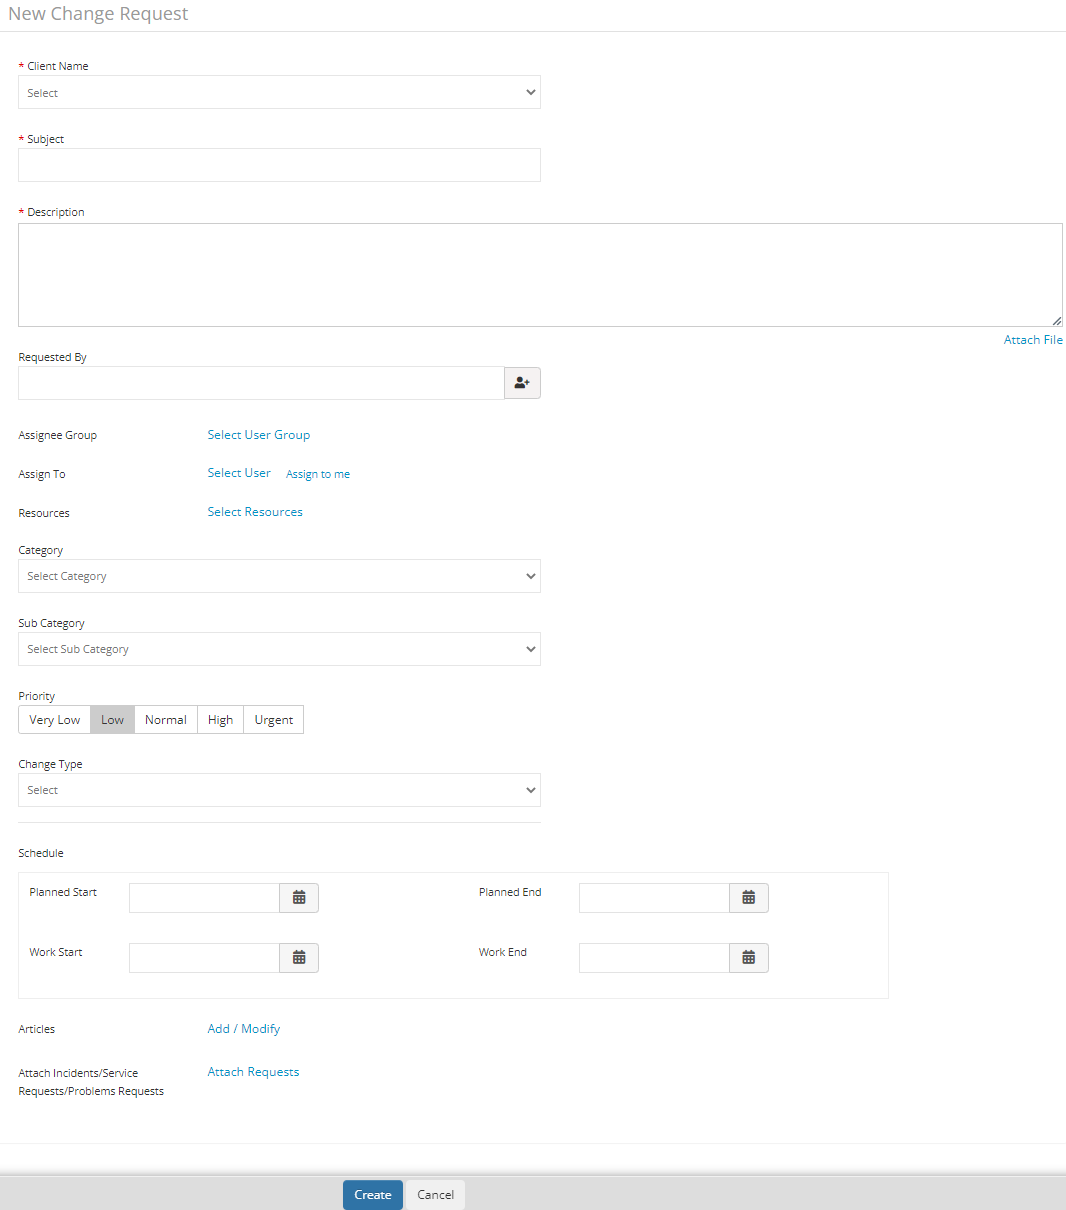
| Field name | Description |
|---|---|
| Subject | Title or short summary of Change Request |
| Description | The information required to describe Change Request scenario. This can include the actual behavior, expected behavior, and steps to reproduce the issue. |
| Attach file | The artifacts required to support Change Request. Example: error messages, screenshots, excerpt from log files. Supported file types: `.txt`, `.jpg`, `.zip`, `.docx`, `.odt`, .`odg` and `.xlsx`. File size limit: 32 MB |
| Requested By | User who requests Change |
| Assignee Group | User group that manages Change Request |
| Assign to | User who acts on Change Request |
| Resources | Devices on which the Change Request is identified |
| Category | Category to which the Change Request is mapped |
| Sub Category | Subcategory under the category to which the Change Request is mapped |
| Priority | Measure of how soon the Change Request needs to be fulfilled |
| Change Type | Normal/Emergency depending on Change Priority |
| Change Plan | Plan to execute change implementation |
| Rollback Plan | Plan to restore services to the previous version if change implementation fails |
| Test Plan | Plan to test the implemented change to ensure adherence to quality |
| Cc | Email addresses of the users who need to be copied in the email notification |
| Schedule | Planned and actual time duration of change implementation |
| Attach Requests | Attach any Incident, Service Request, or Problem Request to the change requestNote: You cannot attach the same type of Incident, Service Request, or Problem Request to multiple change requests. |
Create a change request with email
- Go to Setup > Integrations > Integrations.
- On the Available Integrations, click Email Requests.
- On Install Email Requests Integrations window, provide a name of the Integration, select the Request Type as Change, upload an Image file if required and click Install. The new email integration is displayed on the Email Requests Integration page.
- Click the copy icon in Incoming Email Address.
- While composing Change Request email, enter the following in the email fields:
| Field | Description |
|---|---|
| *To* | Incoming email address |
| *Subject* | Change request subject |
| *Email Body* | Change request description |
User can define rules to configure email attributes such as subject, description, priority, external ticket ID, and email addresses.
View change requests
| Tabs | Description |
|---|---|
| Conversations | Comments added by assignee or creator which can be viewed by all users in assignee group. |
| Activity Log | User activities on Change Request. |
| Resources | Resources on which the Change Request is identified. |
| Notes | Useful information or hint for Change Request resolution. Viewed by all users of assignee group. |
| To Do | Information recorded by a user for self-reference. Viewed by a single user. |
| Properties |
 |
| Status Flow | The flowchart representation that shows Change Request status change. |
| Integration Log | The inbound and outbound third-party communication details. |
Edit a change request
- Click Service Desk
- Click a Change Request.
- Click the Edit button and edit the required fields.
Edit multiple change requests
- Click Service Desk.
- Click the bulk update button and select the number of change requests to be edited.
- Select Apply Actions option. Update Actions window is displayed.
- Select the required changes and click Update.
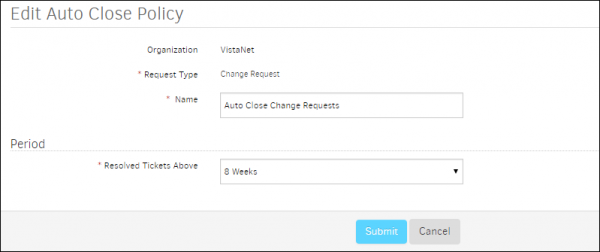
Close a change requests
Configure auto-close policies to close change requests that are resolved and that are in inactive state since a certain elapsed time.
Note
- If the customer selects a 6-month duration, incidents will be evaluated for two time ranges:
- From today up to the past 180 days
- From 180 days prior to today up to 360 days priorExample:If today is 09/07/2024:
- End Date (180 days prior): Thu Jan 11 00:00:00 IST 2024
- Start Date (360 days prior): Sat Jul 15 00:00:00 IST 2023
- After an incident is resolved, no further activity should occur on that incident.
- The policy must be configured at the organization level.
Go to Setup > Service Desk > Automation section > Auto Close Policies.
Select a client and click Auto Close Change Requests.
Enter:
Field Description Name Auto-lose policy name Resolved Tickets Aboveff Inactive period of a resolved Change Request beyond which the change request needs to be closed Click Submit.