When creating a Service Map, you define its structure using service nodes and resource nodes. These nodes represent services or resources and their relationships within your IT environment.
Add Your First Service Node
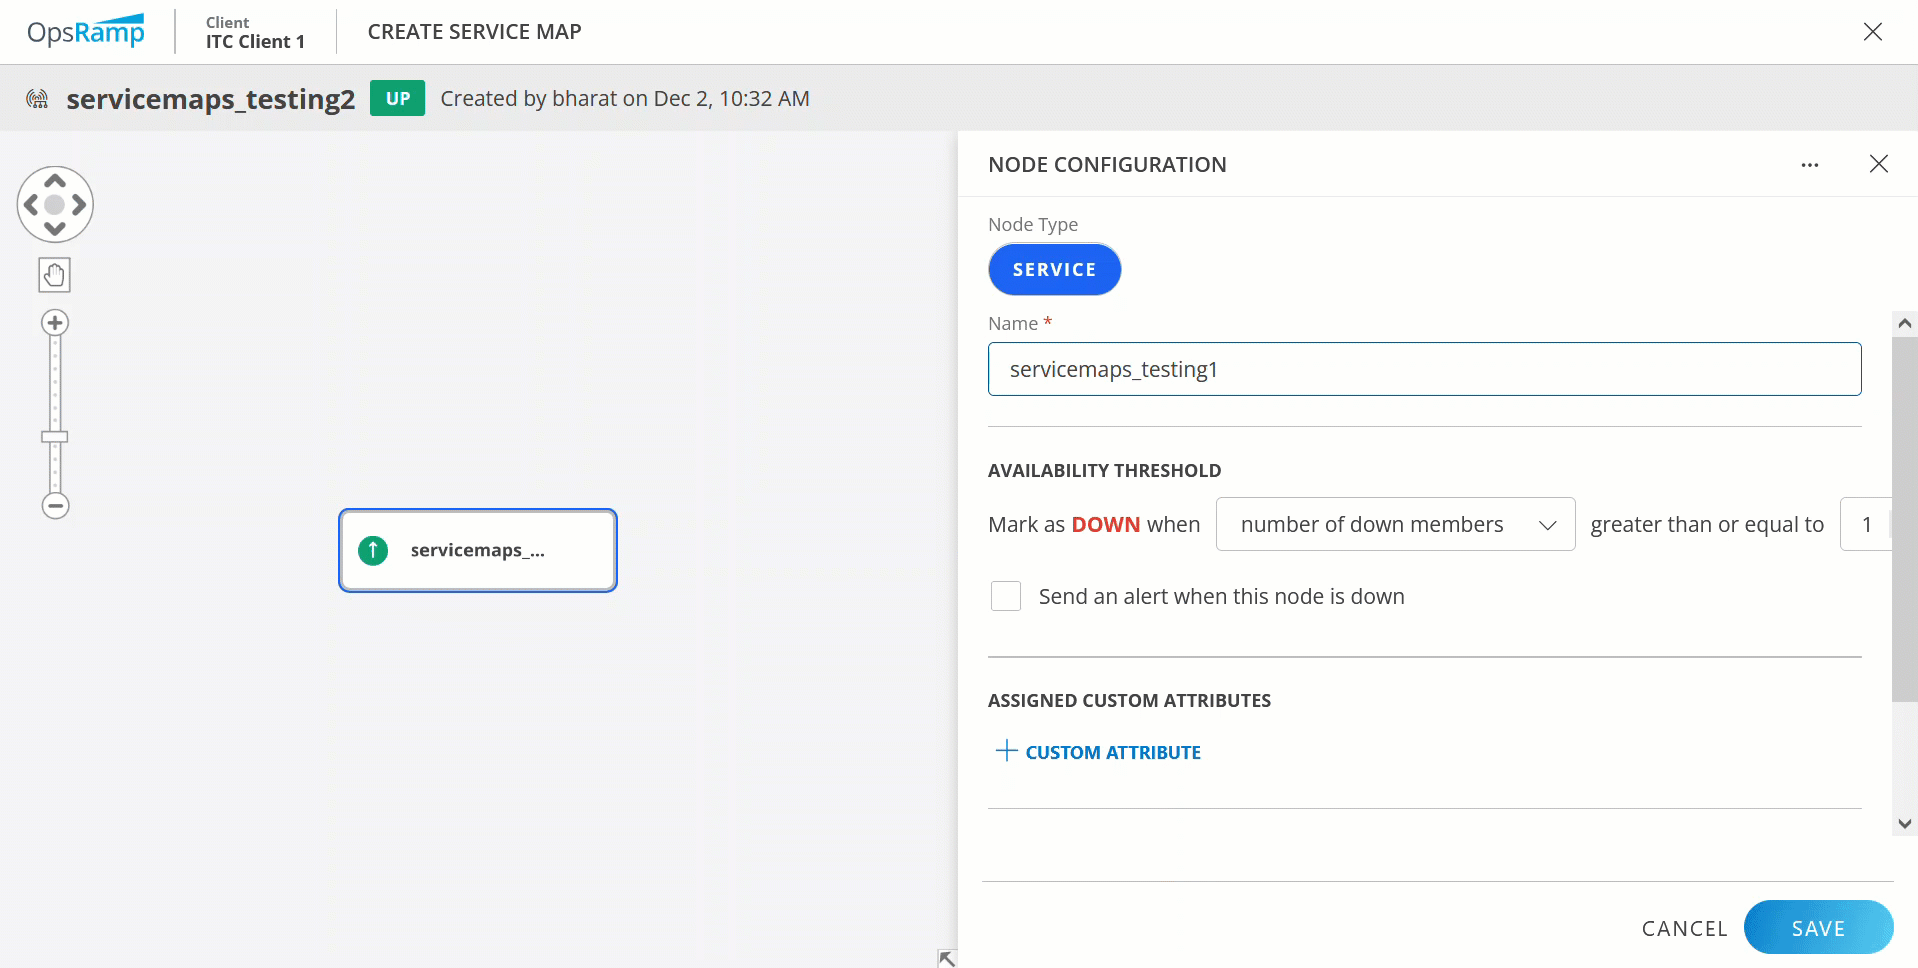
The first service node serves as the top-level entity in a Service Map. It is also called the root node. It represents a main business service.
To create a new Service Map, follow these steps:
- Click +ADD to create a new Service Map.
- Enter the Name for the Service Map, which acts as the name of the service node (root node).
- Configure the service node on the NODE CONFIGURATION page as follows:
| Field | Field Type | Description |
|---|---|---|
| Node Type | String | Defines the type of node being created. For a service node, this is set to Service by default, which represents a business service in the Service Map. You cannot change it to a resource node. |
| Availability Threshold | Integer | Specifies the criteria for marking a node as DOWN. Select the available options from the dropdown. You can define thresholds based on:
|
| Send an alert when this node is down | Checkbox | Enables or disables alerts for this node. When selected, the platform sends an alert notification if the node's status changes to DOWN. This allows you to proactively address issues with critical services and ensures a timely response to disruptions. |
| Assigned Custom Attributes | String | Click +CUSTOM ATTRIBUTE. Select the Name of the custom attribute and enter the Value. You can add as many custom attributes as required. |
| Assigned Articles | Dropdown | Select the articles from the dropdown. Assigned articles provide quick access to helpful resources, improving incident response and operational efficiency. |
Add Subsequent Nodes to Your Service Node
You can add additional nodes directly under the first service node as required.
To add nodes, follow these steps:
- Hover over your node and click the + icon on the first service node.
- Choose from the following four options:
- Add as Service
- Add as Resource
- Import an existing Service Map
- Link a node from another Service Map
Add as Service
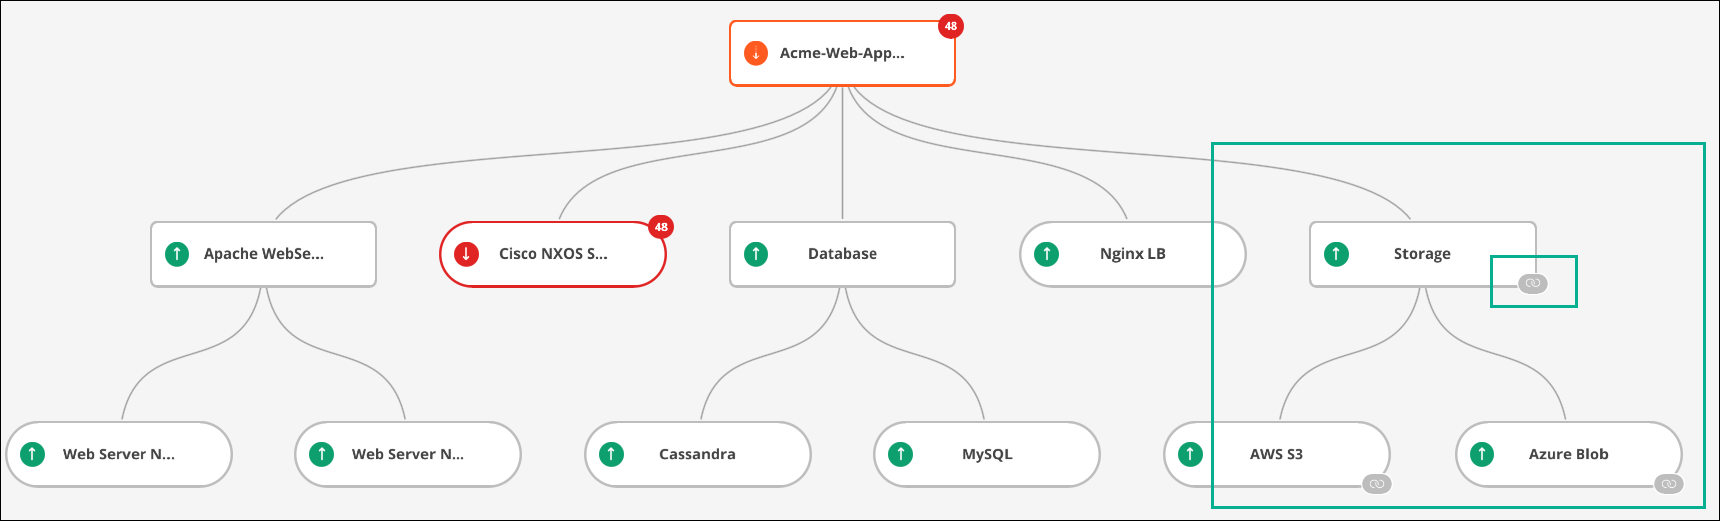
A service node, represented by a rectangular shape, signifies a logical or functional entity within your IT environment, such as an application, business service, or IT service. You can add more service nodes to your root node, which is also rectangular, and continue to add additional nodes to any service node as needed.
Add as Resource
A resource node, represented by an oval shape, signifies an individual IT asset contributing to the service’s operation. These can include physical or virtual IT resources, such as servers, databases, storage, networks, or cloud-native resources.
Resource nodes are essential for a Service Map to function effectively. Without resources in resource nodes, Service Maps do not provide actionable insights. The Service Map automatically tracks service impacts based on the health state of metrics collected from the resources in these nodes, ensuring visibility into your IT environment’s performance.
| Field | Field Type | Description |
|---|---|---|
| Node Type | String | The node type is set to Resource. |
| Filter Criteria | Filter | Click Select Filter Criteria to enter the filter criteria. On the RESOURCE FILTER page, add filter criteria by clicking +QUERY and selecting:
|
| Manually Assigned Resources | Dropdown | Select the assigned resources from the dropdown. |
| Service Availability Monitor | Radio button | Defines the criteria for determining the status of a resource node in the Service Map. It evaluates and reports the node's availability based on specific monitoring conditions. The available options are:
|
| Availability Threshold | Integer | Specifies the criteria for marking a node as DOWN. Select the available options from the dropdown. You can define thresholds based on:
|
| Send an alert when this node is down | Checkbox | Enables or disables alerts for this node. When selected, the platform sends an alert notification if the node's status changes to DOWN. |
| Assigned Custom Attributes | String | Click +CUSTOM ATTRIBUTE. Select the Name of the custom attribute and enter the Value. You can add as many custom attributes as required. |
| Assigned Articles | Dropdown | Select the articles from the dropdown. Assigned articles provide quick access to helpful resources, improving incident response and operational efficiency. |
Link Service Map
A linked map connects another Service Map within the client to the current Service Map. Changes in the original map are dynamically reflected in the current map. The linked map is represented by a link icon on the node.
To link a Service Map, follow these steps:
- Click the + icon on the parent node.
- Select an existing Service Map from the Service Maps dropdown.
- Click Save.
Note
Linked nodes in a Service Map cannot be edited directly. To make changes to a linked node, open the original Service Map from the listing page and edit it there. Any changes you make will automatically update across all the Service Maps where the node is linked.Import Service Map
An imported map pulls the structure and components of another Service Map into the current map as a static copy. Changes made to the original map are not reflected in the imported map. Use an existing Service Map as a resource node to avoid recreating dependencies.
To import a Service Map, follow these steps:
- Click the + icon on the parent node.
- Select an existing Service Map from the Service Maps dropdown.
- Select the Node dropdown.
- Click Save.
Note
You cannot import a Service Map if the selected client does not have the required custom metrics. Ensure you collect and enable the necessary metrics before importing. If the import fails due to missing metrics, check the client’s monitoring configuration and ensure the required custom metrics are being collected.Edit Your Service Map
To modify threshold levels, add resources, or update details of an existing Service Map, follow these steps:
- Open your Service Map from the listing page.
- On the Service Map page, click EDIT in the top-right corner.
The node configuration details panel appears.
- Select the node you want to edit and modify the details. You can add more nodes to an existing node in edit mode.
- Click Save and Close.
The status of the Service Map changes based on the rules you modify. For example, if the Service Map status shows as DOWN, changing the Availability Threshold rule can update the status to DEGRADED.
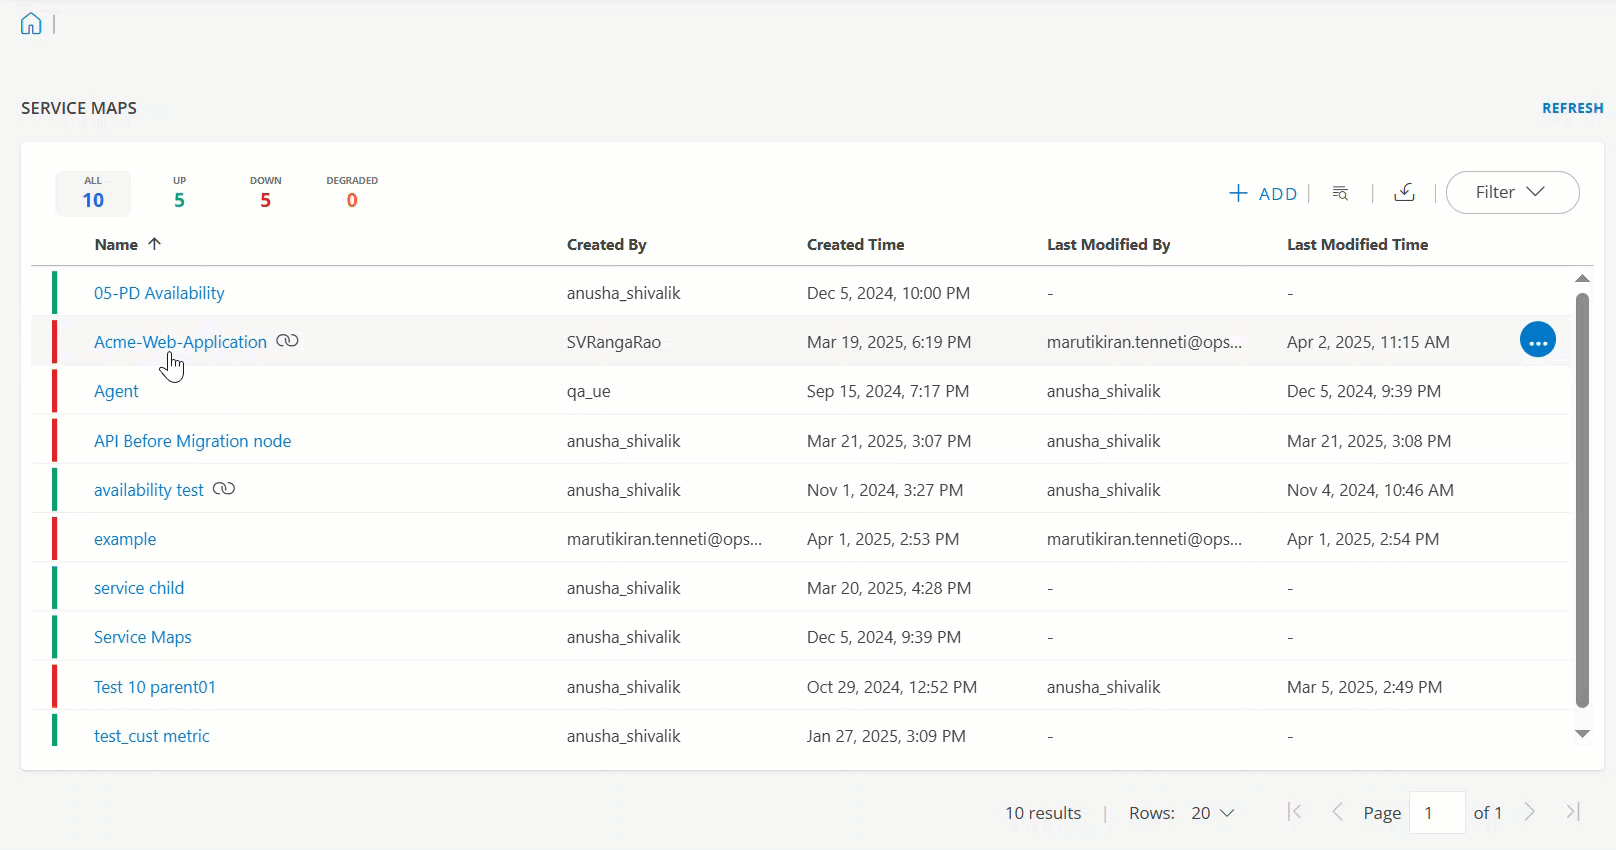
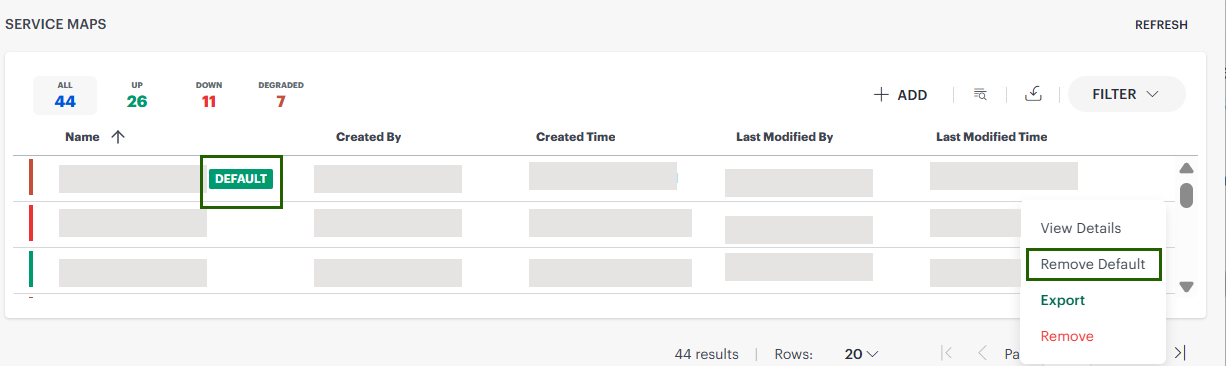
Set a Service Map as Your Default View
You can set a Service Map as your default so that it opens automatically when you access the Service Maps page.
To set a Service Map as your default view, follow these steps:
- Go to Infrastructure > Service Maps.
- On the Service Maps listing page, hover over the required Service Map.
- Click the Actions icon (⋯).
- Click Set as Default.
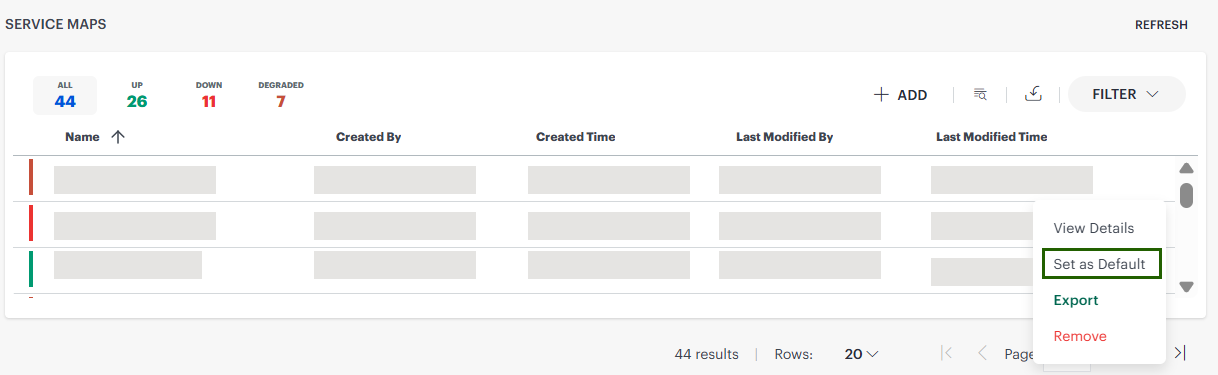 The selected Service Map is now marked as your default.
- You can set only one Service Map as default at a time.
- You can remove the default setting from the same menu if needed.
Configure a Service Map as Your Login Landing Page
You can configure the platform to open a specific Service Map immediately after login.
To configure a Service Map as your login landing page, follow these steps:
- Set a Service Map as default (see Set a Service Map as Your Default View).
- Go to My Profile.
- Under Options > Homepage dropdown, select Service Map as your homepage.
- Save your changes.
- Log out and log in again to verify.
After login, you are redirected directly to the selected Service Map.