Introduction
Time Bound entity facilitates access to a remote resource or a group of resources.
The following functions are available only using role-based access control:
- Configuring users to access selected resources.
- Providing required permissions.
The time-bound tickets feature no longer provides time-bound access to the resources.
Remote console access is the key functionality that helps user to access the affected resource from anywhere and resolve the issue in real-time. The user actions on the remote resource are recorded for auditing and learning. You can do remote console access for managed resources by creating Time Bound entity.
Configure time bound settings
Navigate to Setup > Service Desk > Configuration section > Settings.
Select the Time Bound tab.

From TIME BOUND SETTINGS, configure the Property settings and click Update.
You can customize Time Bound details by creating custom forms in service desk.
Create time bound entities
Navigate to Command Center > Tickets.The Tickets page is displayed.
Click ADD + and select Time Bound Request. The Add Time Bound Request page is displayed.

Enter the following information:
| Field name | Description |
|---|---|
| Client | The resources of the selected client are accessed for Time Bound activity |
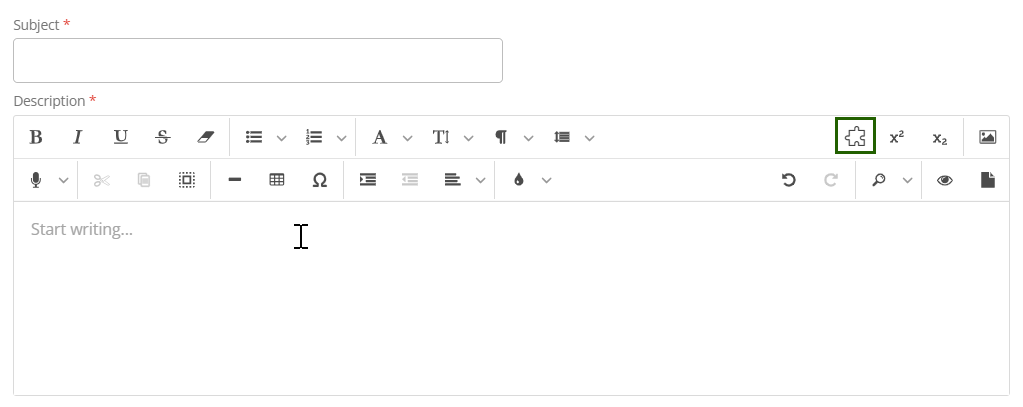
| Subject | Title or short summary of Time Bound |
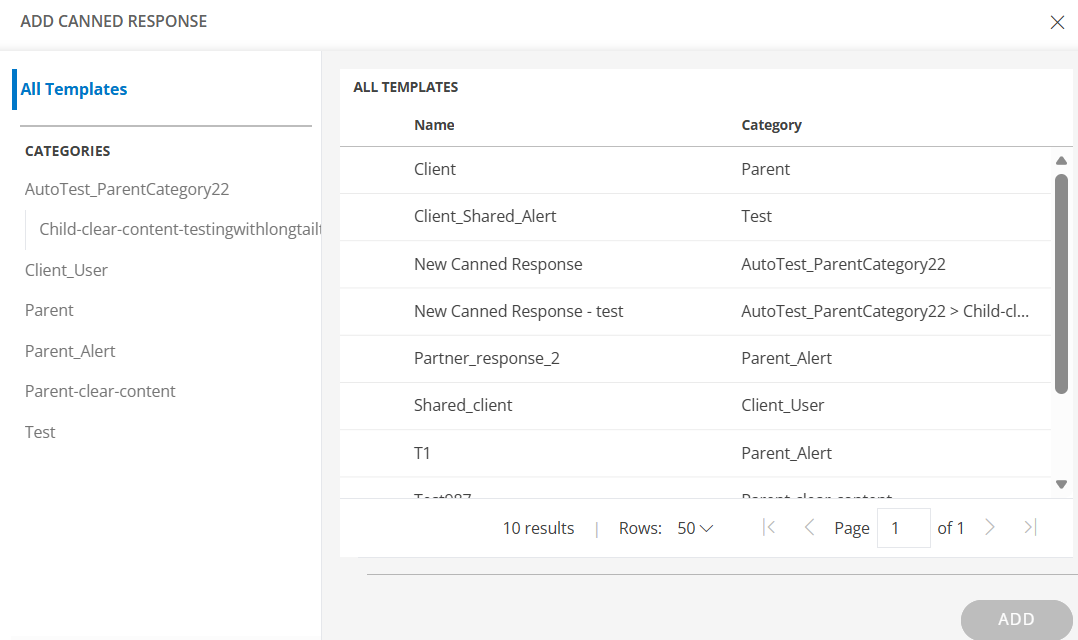
| Description | The information required to describe Time Bound scenario.You can also use the Canned Response option to quickly insert predefined, categorized response templates. Click the Canned Response icon to view the available categories, select a template, and the content will be automatically added to the Description field.
  |
| Requested By | User who requests Time Bound activity |
| Assignee Group | User group that manages Time Bound |
| Assign to | User who can access remote resources. |
| Resources | Devices to be accessed remotely |
| Participants | Users who can work on the remote resource apart from the assignee group |
| Priority | The measure of how soon the assignee needs to act on Time Bound |
| Cc | Users to be notified about the Time Bound activity |
| Articles | KB articles that refer to similar Time Bound activity in the past or that are related to the activity |
| Schedule | Time duration for which the resources need to be accessed remotely |
| Permissions | Access permission for the selected resources
Example:
|
Manage time-bound entities
You can view, edit and close the time-bound request that you have created in Service Desk.
- You can create a time-bound request that has the same configurations as an existing request by using Save As option. The new time-bound request is created with a unique Request ID.
- The timer displays the remaining time duration to access the resource.
Edit time bound request
Edit a single time bound request
- Navigate to Command Center > Tickets and select a time bound request that you want to modify.
- You can either click on the time bound request ID to modify the details and save them or select Edit from the Actions dropdown menu to make changes to the details.
Edit multiple tasks
- On the Tickets page, select the multiple time bound requests for which you want to perform a bulk update.
- Click BULK UPDATE.The Update Actions page is displayed.
- Make the necessary changes and click SAVE.
Close time-bound entities
You can close time-bound entities manually or by configuring Auto-Close policy.
- Click a time-bound request you have created.
- On the Time Bound details page, select the option Closed from the Save as drop-down options.The request is saved as a closed request.
Auto-close time-bound entities
Configure auto-close policies to close the resolved time-bound requests that are in an inactive state for a certain elapsed time.
- Navigate to Setup > Account > Service Desk.
- In the left navigation pane, navigate to the Automation section and select Auto Close Time Bound Requests.The Auto Close Policies page is displayed.
- From Auto Close Policies, select Auto Close Time Bound Requests.The POLICY - AUTO CLOSE Time Bound Requests screen is displayed.
- Enter the following information:
| Field | Description |
|---|---|
| Request Type | Type of the request. |
| Name | Auto-close policy name. |
| Reason | Reason for auto-close. |
| Tickets Resolved Exceeding | Inactive interval of a resolved service request beyond which the task needs to be closed. |
- Click SAVE to activate auto close.
Approval Restart Rules for Rejected TBRs
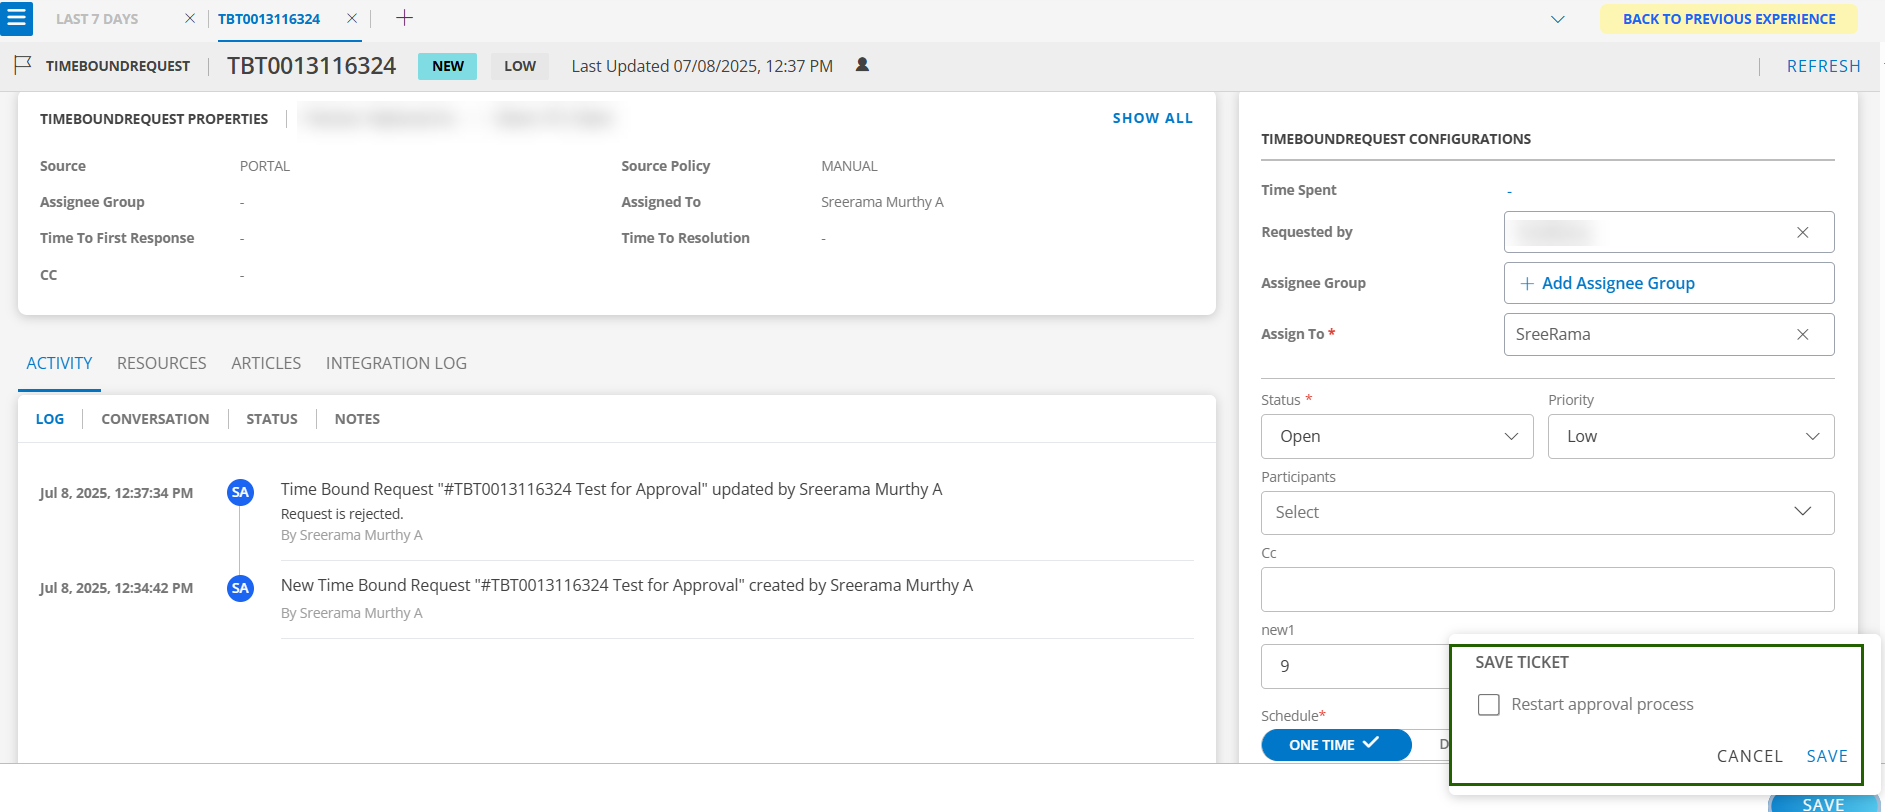
The Approval Restart Window is a popup that appears when a user takes action on a time bound request that was previously rejected. This ensures that appropriate approval workflows are reinitiated based on the request’s status and rejection reason.
Rejection with Need more info:
- If the approver selects Need more info and rejects the request:
- The user can update the required details in the TBR.
- Upon submission, the Approval Restart Window popup will be displayed to reinitiate approval.
- If the approver selects Need more info and rejects the request:
Rejection with Not Required:
- If the approver selects “Not Required” and rejects the request:
- The TBR moves to the Resolved state.
- If the user later reopens the TBR, the Approval Restart Window popup will be displayed.
- If the approver selects “Not Required” and rejects the request:
General Rejection Rule:
- If a TBR has been rejected, the Approval Restart Window popup will be shown when the user acts on it in either the New or Open (Reopened) states.
- If the user transitions the TBR to any state other than New or Open, the popup will not be displayed.
Time Bound Request Approval Process
The Time Bound workflow includes an approval mechanism that ensures only authorized users can approve or reject time bound requests. Access to approval actions is based on user group membership defined in the Approval Groups configuration.
When a user who belongs to the configured approval groups logs in and opens the ticket, the Approve and Reject options are displayed. The user can take appropriate action to approve or reject the time bound requests directly from the ticket view.
Configuration Steps
Navigate to Setup > Account > Service Desk > Settings.
Click TIME BOUND tab.
Under the settings section, add one or more user groups as approval groups under TimeBound approval group(s).Only users within these groups will have permission to approve or reject time bound requests.
