Note
The Custom Attributes feature is being migrated toSetup > Account > Custom Attributes. This page will be removed soon.For information on Custom Attributes see Custom Attributes in Account Details .
Introduction
Custom attributes provide the ability to create attributes for resources separate from the attributes.
Also, custom attributes can be used to organize and categorize the resources assigned.
Prerequisite
You must have one of the following permissions to access the Custom Attribute section:
- Custom Attributes View: To view the custom attribute type and values.
- Custom Attributes Create: To create and edit the custom attribute type and values.
- Custom Attributes Manage: To create, edit and delete the custom attribute type and values.
Create custom attributes
Custom attributes can be created for a partner or a client.
The custom attributes types are case-sensitive. For example, you can create two different custom attribute types - APPLICATIONID and applicationid.
To create a custom attributes type:
Go to Setup > Custom Attributes > Custom Attributes.
From the Custom Attributes section, click + icon, and enter:
- Scope - Select the type of user:
- Service Provider
- Partner
- Client
- Custom Attribute Type - Enter the name for the custom attribute type.
Note: The following regular expressions are supported for the custom attribute name (or tag name):[a-zA-Z_:][a-zA-Z0-9_:]* - Description - Enter the details of the custom attribute type.
- Scope - Select the type of user:
Click Submit.
The Custom Attributes section displays the new custom attribute and the custom attribute count associated with the partner or client tags.
Note: You can add a website URL (prefixed with ‘http’ or ‘https’) as a custom attribute. The website URL, when clicked, will redirect to the specific website in a new tab.
Create custom attribute values
After selecting the custom attributes type, you can create custom attribute values and later assign the same to Resources, Service Groups, Partners and Clients. You can create more than one custom attribute value for a single custom attribute.
You must select a custom attribute type for a selected partner or client user.
To create a custom attribute value:
Go to Setup > Custom Attributes.
Search for the custom attribute, from the search box, for which you want to create a custom attribute value.
Click the +Add icon. The Create Custom Attribute Value window is displayed.
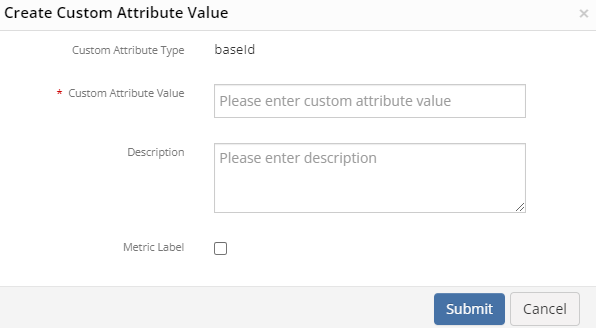
Enter the information in the following fields:
- Custom Attribute Value - Enter the value.
- Description - Enter the details of the Custom Attribute value.
- Metric Label - Select the Metric Label checkbox to add this custom attribute as a label to your resource metrics, that can be queried in dashboards and other product areas.
- Metric label enabled custom attributes have limits. A maximum of 5 metric labels can be enabled per device.
- While editing the custom attribute value, if the custom attribute value assigned to resources having metric label enabled exceeds the limit of 5 metric labels, then the metric label option will not be available on the Edit Custom Attribute Value popup window.
Note: If a resource already has 5 metric labels enabled for the custom attributes, and if you want to enable another metric label for another custom attribute, then you need to unassign a custom attribute from the resource which has a metric label. - The metric label enabled custom attributes are displayed in the Attributes section of the resource details page. This will allow you to decide which of the custom attributes you can consider as a label for the metrics.
Note: It takes 24 hours for the custom attribute labels to be displayed on the metric series.
Click Submit.
Note: You can create one or more custom attribute values for a selected custom attribute type.
Assign entity objects
Entity objects like resources and services can be assigned for a selected custom attribute value.
- Entities cannot be assigned to more than one custom attribute value.
- Custom attribute values can be modified for an assigned entity.
To assign entity objects:
- Select the custom attribute value.
- Click the tick-mark icon to assign entity objects to a custom attribute value.
- From Assign Entity Objects to Custom Attributes, enter:
- Assign On - Select one of the following options:
- Clients
- Resources and Services
- Client - Select the client user.
- Entity Type - Select one of the following options:
- Resources
- Services
- All Resources and Clients - Select the number of Resources or services.
The options displayed in this section depend on the option selected in the
Entity Typeparameter.
- Assign On - Select one of the following options:
- Click Submit. The number of entities assigned to the custom attribute value are displayed beside the attribute type.
Assign custom attributes at resource level
To assign custom attributes at resource level:
Go to Infrastructure > Resources, select any resource type.
Click the Name or IP Address of the resource in the Infrastructure listing page.
Go to Attributes > Custom Attributes, and click Assign.
From Assign Custom Attribute, enter:
- Scope - Select one of the following options:
- All: Specifies both the partner and client.
- Partner: Specifies the partner.
- Client: Specifies the client.
- Name - Select the name of the custom attribute from the drop-down list.
- Value - Select the value of the custom attribute from the drop-down list.
- Scope - Select one of the following options:
Click Save. The custom attribute is assigned to the resource.
The Scope field indicates whether the entity is assigned at the partner level or the client level.
View custom attributes
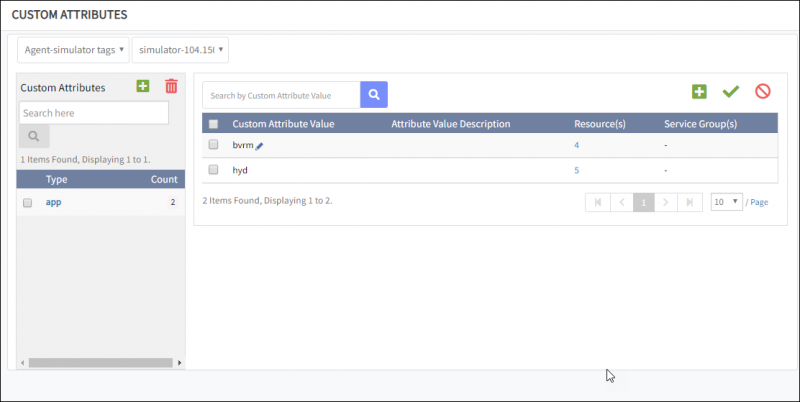
You can view the created attributes and corresponding values from Custom Attributes Management > Custom Attributes. The Custom Attributes page displays the type, count, custom attribute value, attribute value description, resources, service groups, clients, and partners.
The Entity Object fields displayed for custom attributes vary with the selection of service provider, partner, and client tags. View the custom attributes in the Filter Criteria section for the following features:
- Infrastructure > Groups
- Infrastructure > Sites
- Infrastructure > Services
- Setup > Resource Management > Device Management Policy
Edit custom attributes
You can change the description of a custom attribute, but cannot change the Scope and Type.
To change the custom attribute:
- Go to Setup > Custom Attributes.
- From the CUSTOM ATTRIBUTES page, go to the Custom Attributes section.
- Click the Edit icon for any custom attribute type.
- From the Edit Custom Attribute screen.
- Make your changes in the description parameter.
- Click Submit.
Edit custom attribute values
You can edit the existing description for a custom attribute value type.
To edit the custom attribute values
- Go to Setup > Custom Attributes.
- From the CUSTOM ATTRIBUTES page, go to the Custom Attributes section.
- Click the Edit icon for any custom attribute type.
- From the Edit Custom Attribute screen.
- Page displays Authz Tag, Metric value, Log value, and Description.
- Make the changes and click Submit.

Note
When you select an AuthZ Tag, the system automatically enables the remaining valuesChange custom attribute values for assigned entity objects
You can change the custom attribute value for any assigned entity objects using the Edit icon in the respective Resources and Services and Clients page.
To change the custom attribute value:
- From the CUSTOM ATTRIBUTES page, click the number displayed for any entity object.
For example, if you want to change the custom attribute value for the set of resources assigned,
click the number of resources assigned to the selected custom attribute value.
- Click the count for Service Group(s) to display the Custom Attribute Value screen.
- Click the count for client(s) to display the Custom Attribute Value screen.
- Select any resource, service, or client name.
- Click the Edit icon for the custom attribute value.
- Enter the new custom attribute value.
- Click the tick-mark icon to update the new custom attribute value.
You can remove a custom attribute value from any selected entities using the Unassign functionality.
Export entity object details
The export functionality in the respective Resources and Services and Clients page allows you to export the entity object details assigned to any custom attribute value in CSV or PDF format.
Delete custom attributes
You can delete the custom attributes and the corresponding custom attribute values and entity objects.
To delete the custom attribute:
- Go to Setup > Custom Attributes > Custom Attributes.
- From the CUSTOM ATTRIBUTES page, go to Custom Attributes and select the types.
- Click the Delete icon and click Yes to continue.
Delete custom attribute values
You can permanently remove any resources and services and clients associated with a custom attribute.
To delete the custom attribute value:
- Go to Setup > Custom Attributes.
- From CUSTOM ATTRIBUTES, select the custom attribute values.
- Click the Delete icon and click Yes to continue. The Custom Attributes are deleted.
Custom attributes in Dashboards
The custom attributes can be used for querying in the dashboard tiles - Metric, Alert, and Resource.
Metric tile:
To use a custom attribute for querying in a metric tile:
From the Add Metric Tile window:
- Add a custom attribute as a label to the resource metrics.
See Create custom attribute values for more information. - Select the metric and filter like any predefined attribute.
Example:
- Metric is
acs_rds_MySQL_ActiveSessions - Custom attribute is
db_instance_class - Attribute value is
mysql.n1.micro.1
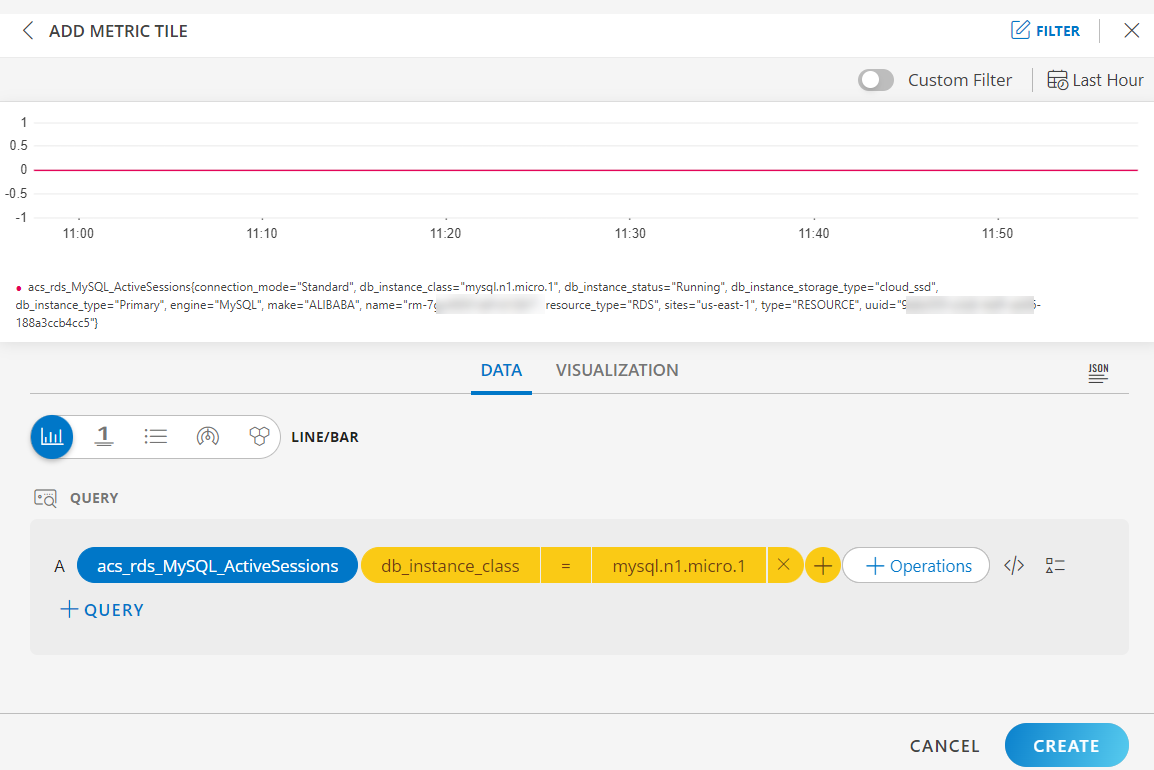
The above screen shows the metric series for all the resources that are filtered using the custom attribute.
Resource tile:
Use the custom attributes for querying, in the resource tile.
From the Add Resource Tile window:
- Select the attribute, operator and the value.
- Select a filter from the Group By option.
Example: Resources are filtered using the custom attribute. The Group By attribute groups the resources based on the Group By filter selected.
- Attribute is
tags.name - Operator is
= - Attribute value is
Root Resource IPAddress(the custom attribute you created from the Custom attributes page: Setup > Custom Attributes > Custom Attributes).
See Create custom attributes for more information on how to create a custom attribute. - Group By filter is
availabilityState.
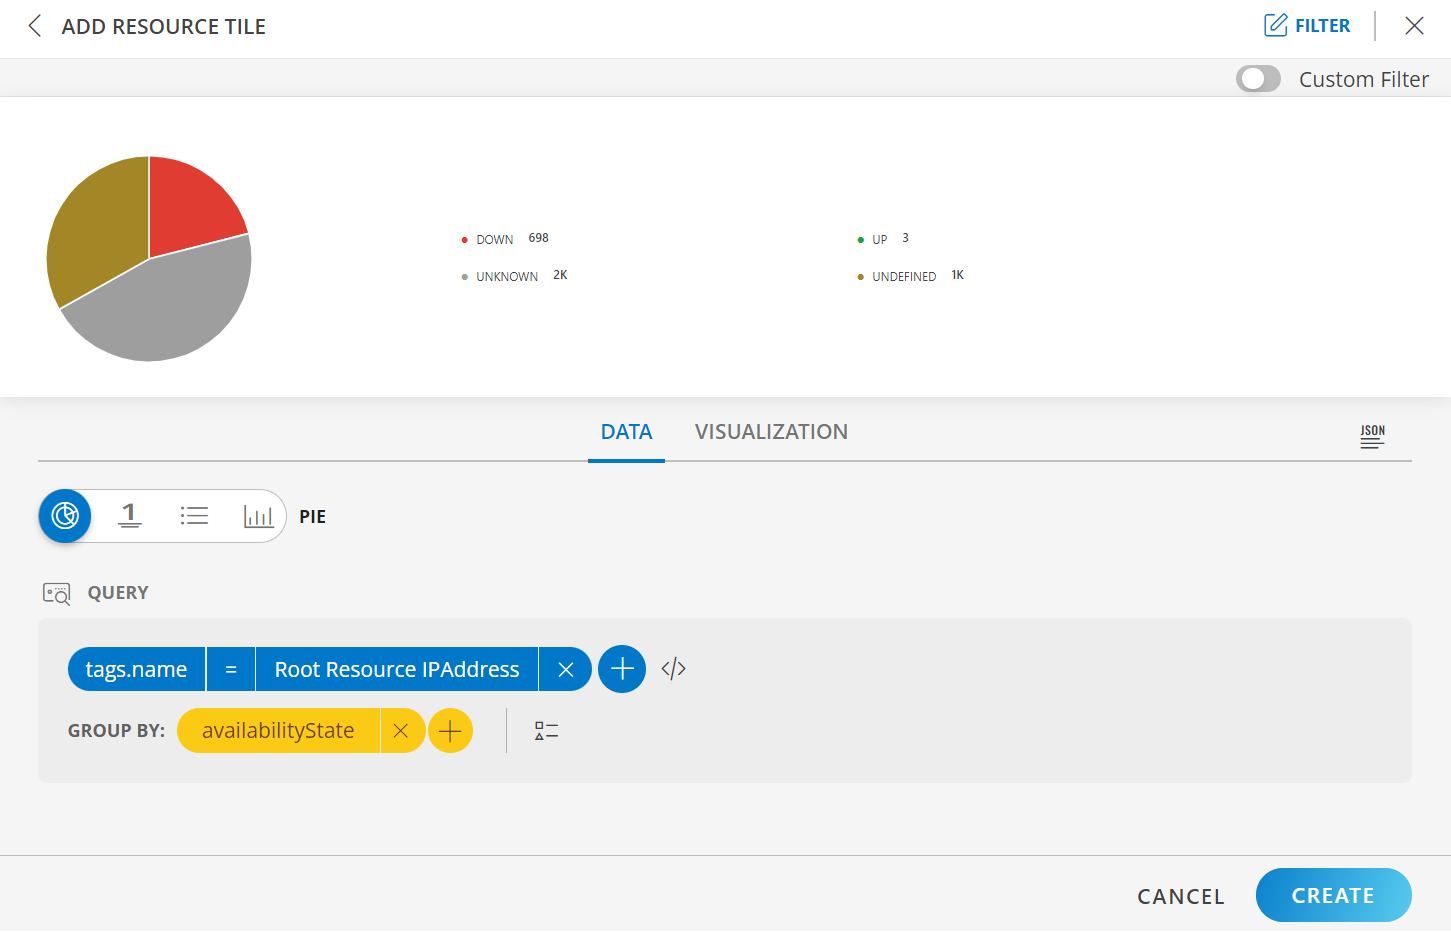
The above screen shows the resources filtered using the custom attribute and grouped according to the availability state.
- Click the links on the tile to navigate to the Infrastructure search page, which shows all the information related to the resources.
Example: If you click DOWN, it will navigate to the infrastructure search page, which shows all the resources that are in the DOWN availability state.
Alert tile:
Use the custom attributes for querying, in the alert tile.
From the Add Alert Tile window:
- Select the attribute, operator and the value.
- Select a filter from the Group By option, and select All Alerts (you can select other options like Alert created time and Alert updated time based on your requirement).
Example: Alerts are filtered using the custom attribute. The Group By attribute groups the alerts based on the Group By filter selected.
- Attribute is
resource.tags.name - Operator is
= - Attribute value is
vmware_tag(the custom attribute you created from the Custom attributes page: Setup > Custom Attributes > Custom Attributes).
See Create custom attributes for more information on how to create a custom attribute. - Group By filter is
alertTypeandmetric.
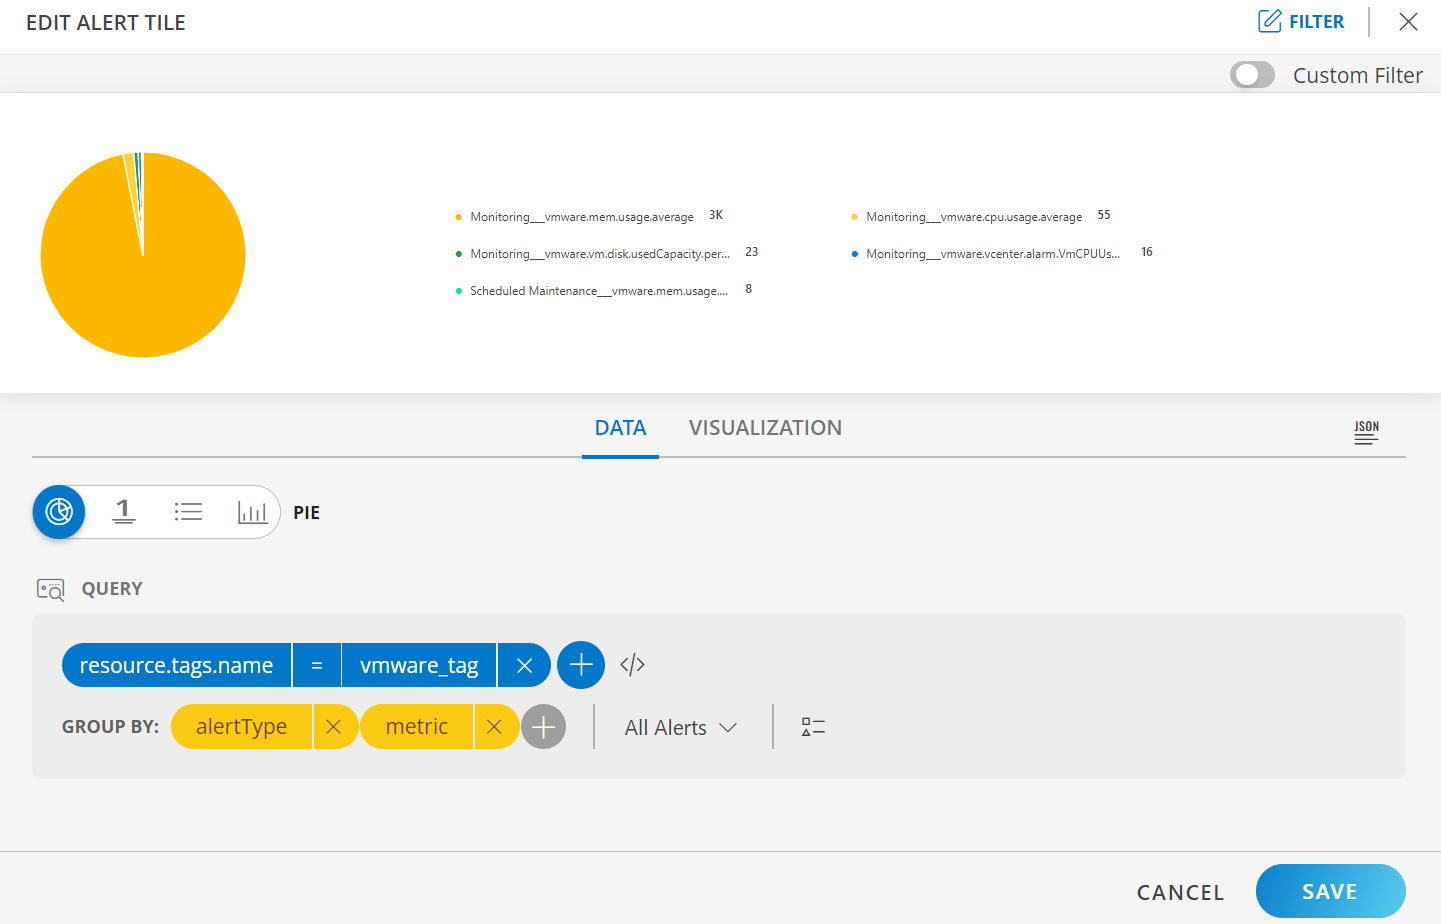
The above screen shows the alerts that are filtered using the custom attribute and grouped according to the alert type and metric.
- Click the links on the tile to navigate to the Alerts page, which shows all the information related to the alerts.
Example: Clicking on Monitoring will navigate to the Alerts listing page with all the information about the alerts.