Introduction
Notifications are alert messages that inform users about an event’s status. They can be sent via email, SMS, or voice and allow users to acknowledge the event directly from these channels. Notification templates can be created for Process Definitions and escalated based on predefined rules. When these rules are met, notifications are sent to users, groups, or rosters.
Notification preferences, priority, and templates are fully customizable. You can configure the content of each template type (email, SMS, voice) and include custom tokens to personalize notifications.
You can create the following types of notification templates:
- Email: Specify the content to be sent via email notifications.
- SMS: Define the message for text notifications.
- Voice: Create a template for automated voice message notifications.
Important Note about Toggle Functionality
Case 1: If the global toggle (event-specific toggle) on the landing page is disabled, even if the SMS/Voice configuration toggle is enabled, users will not receive any SMS/Voice notifications. The notification template functionality will be completely halted.
Case 2: If the global toggle (event-specific toggle) on the landing page is enabled, but the SMS/Voice configuration toggle is disabled, users will not receive SMS/Voice notifications. The notification template functionality will be completely halted.
You can use these created notification templates in Process Definition, as Send Task. See Process Definition document for more details.
Create Email Notification Template
To create an Email notification template, follow the below steps:
- To select your client, navigate to All Clients, and click the Client/Partner dropdown menu.
Note: You may either type your client’s name in the search bar or select your client from the list. - Navigate to Setup → Account → Notification Templates.
- Click the Process Definition tile. The process definition listing screen is displayed.
- Click + ADD to create a new Templates.

- The ADD NOTIFICATION TEMPLATE page is displayed.
- In GENERAL DETAILS section, enter the following:
- Name: Enter the name for the configuration.
- Input Type: Select type of inputs from: Alert, Incident, Resource, Task, and Json Object.
- In the CONTENT section, select the Email tile.
- Enter the following details:
- Subject: Enter the Subject for the email notification.
- Content: Use the
$symbol to insert tokens for template notifications. Add multiple tokens, separated by commas. - Customize the email content using the options in the toolbar.

- Click SAVE. The Email notification is now created and available on the listing page.
Create SMS Notification Template
To create an SMS notification template, follow the below steps:
- To select your client, navigate to All Clients, and click the Client/Partner dropdown menu.
Note: You may either type your client’s name in the search bar or select your client from the list. - Navigate to Setup → Account → Notification Templates.
- Click the Process Definition tile. The process definition listing screen is displayed.
- Click + ADD to create a new Templates.
- The ADD NOTIFICATION TEMPLATE page is displayed.
- In GENERAL DETAILS section, enter the following:
- Name: Enter the name for the configuration.
- Input Type: Select type of inputs from: Alert, Incident, Resource, Task, and Json Object.
- In the CONTENT section, select the SMS tile.
- Use the
$symbol to insert tokens for template notifications and customize the SMS text message as per your requirements. Note: The message body can be up to 1600 characters. Messages longer than 160 characters will be split into segments of 160 characters each and sent as multiple messages. - To enable SMS notifications, switch the toggle to
ONposition.
- Click SAVE. The SMS notification is now created and available on the listing page.
Create Voice Notification Template
To create a Voice notification template, follow the below steps:
- To select your client, navigate to All Clients, and click the Client/Partner dropdown menu.
Note: You may either type your client’s name in the search bar or select your client from the list. - Navigate to Setup → Account → Notification Templates.
- Click the Process Definition tile. The process definition listing screen is displayed.
- Click + ADD to create a new Templates.
- The ADD NOTIFICATION TEMPLATE page is displayed.
- In GENERAL DETAILS section, enter the following:
- Name: Enter the name for the configuration.
- Input Type: Select type of inputs from: Alert, Incident, Resource, Task, and Json Object.
- Use the
$symbol to insert tokens for template notifications and customize the voice message body as per your requirements. - To enable Voice notifications, switch the toggle to
ONposition.
- Click SAVE. The Voice notification is now created and available on the listing page.
Notification Template Listing page
- To select your client, navigate to All Clients, and click the Client/Partner dropdown menu.
Note: You may either type your client’s name in the search bar or select your client from the list. - Navigate to Setup → Account → Notification Templates.
- Click the Process Definition tile.
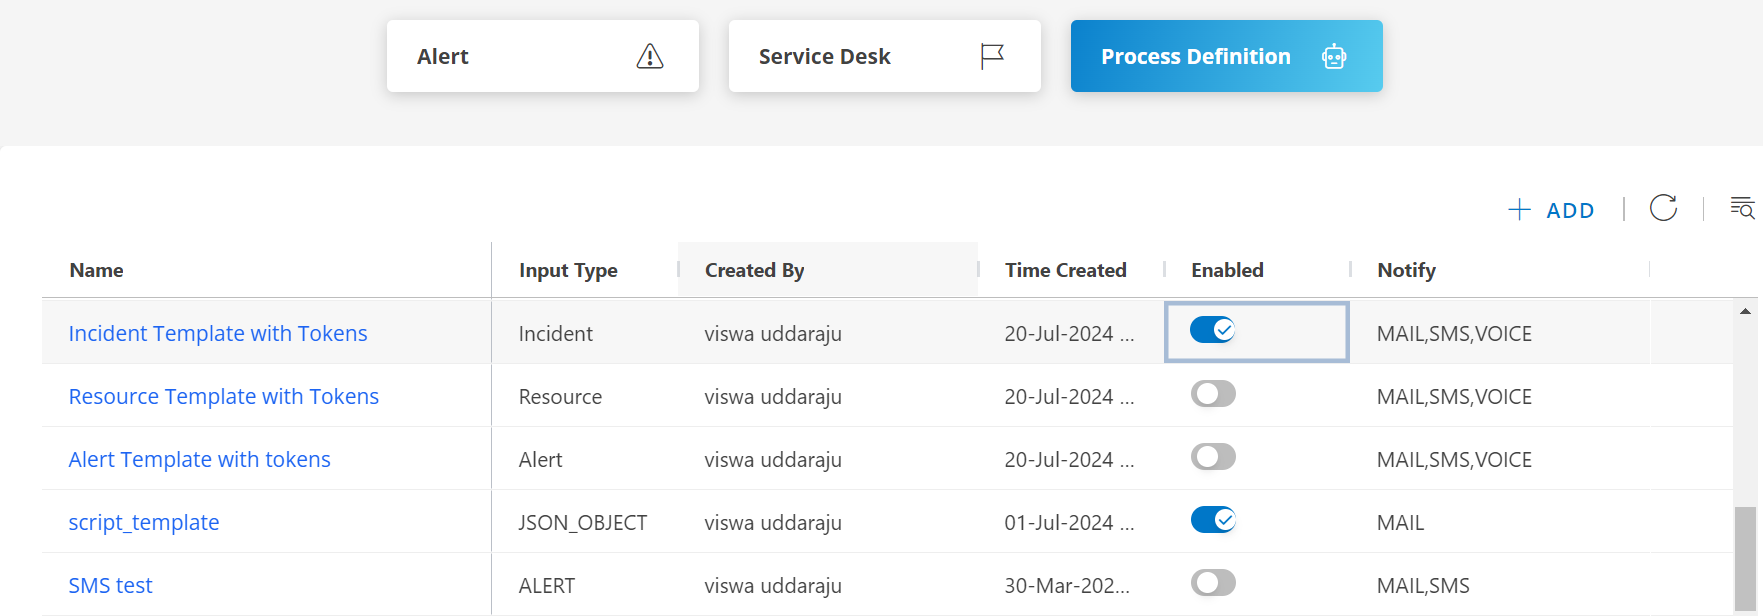
- The process definition listing screen is displayed with the following information:
| Field Name | Description |
|---|---|
| Name | Displays the name of the notification template. Clicking the name will open the template for editing or review. |
| Input Type | Specifies the type of input that the template is based on, such as Incident, Resource, Alert, or JSON Object. |
| Created By | Shows the user who created the template. |
| Time Created | Displays the date and time when the template was created. |
| Enabled | This toggle switch allows the user to enable or disable the notification template. When switched on, the template will actively send notifications based on the specified configurations. |
| Notify | Specifies the modes of notification available for the template. The options include MAIL, SMS, and VOICE. | Add Button (+ADD) | This button allows the user to add new templates or records to the list of existing templates. | Refresh | This icon is used to refresh the list to see any new changes or updates. | Search | This feature helps users to search for a specific templates based on keywords. |
Set Notification Preferences
The SMS and Voice notification feature is available as an add-on for partners and clients with Event and Incident Management packages. If a partner subscribes to this add-on, it applies to all their clients. Users can set their notification preferences (SMS, Email, Voice) based on priority under their profile settings.
For example, if an administrator configures escalation notifications, users can choose to receive alerts on different channels depending on the notification’s priority.
To set up your notification preferences, follow these steps:
- Hover over your profile in the upper-right corner and then click My Profile.

- The My Profile screen appears.
- Click the Profile Details tab and check if your mobile number is verified. If not, follow the below steps:
- Enter your mobile number in the Mobile field where notifications should be sent.
- Click Save, then the Verify option will appear.
- Click Verify and enter the code sent to your mobile.
- Click Verify again.
- Your mobile number is now verified.

- Click the Notification tab and do the following:
- Adjust the default notification preferences as needed in Generic Notification section.
- Select Primary Email to send notifications to your primary email.
- Click Save to apply changes.

Supported countries for SMS notifications
Following is the list of supported countries for SMS notifications:
| Region | Country name | Country code |
|---|---|---|
| North America | Canada | +1 |
| United States | +1 | |
| Mexico | +52 | |
| Puerto Rico | +1787 | |
| Asia | India | +91 |
| Israel | +972 | |
| Japan | +81 | |
| Philippines | +63 | |
| Singapore | +65 | |
| Europe | Austria | +43 |
| Belgium | +32 | |
| Czech Republic | +420 | |
| Finland / Aland Islands | +358 | |
| Germany | +49 | |
| Italy | +39 | |
| Netherlands | +31 | |
| Poland | +48 | |
| Spain | +34 | |
| Sweden | +46 | |
| United Kingdom | +44 | |
| Hungary | +36 | |
| South America | Argentina | +54 |
| Brazil | +55 | |
| Uruguay | +598 | |
| Africa | South Africa | +27 |
| Oceania | New Zealand | +64 |
| Australia / Cocos / Christmas Island | +61 | |
| Guam | +1671 |