Resources Home Tab
An IT infrastructure encompasses a wide range of resources like servers, network devices, applications, storage solutions, virtualization, web services, public cloud, containers, etc.
The Resources Home Tab shows a summary of all the resources in your IT environment, allowing you to manage the performance of your infrastructure and take necessary steps to minimize downtime and service degradation for users.
Prerequisite: User should have Integration View and Device View permission to access the Resources Home Tab.
Users can:
- Customize column settings and apply additional filters.
- Save their settings as a View.
- Export a search response.
- Take action on the search result.
Availability State colors
The resource availability states are indicated with colors:
| Availability State | Color |
|---|---|
| Down | Red |
| Up | Green |
| Unknown | Grey |
| Undefined | Brown |
| Unmonitored | Light teal |
Perspective
The Resources Home Tab allows you to group resources in the following ways:
- By Categories. Resources are discovered through integrations. Each integration has a resource category. Each category has one or more integrations. Click on the integration to view the resources that are discovered through that integration.
By default, the resources are grouped by Native Type.
Note: If native type is not available for the resource, the resource is listed as NULL native type. - By Resource Groups. Shows the list of resource groups. Click on a group to view the resources in that group. You can edit or remove a resource group. By default, the resources are grouped by Availability State.
- By Resource Sites. Shows the list of sites. Click on a site to view the resources in that site. You can add, edit, or remove a site. By default, the resources are grouped by the Installed App Name.
Group resources by Metric: The top 50 and bottom 50 resources are shown for metrics (CPU, Disk, Memory) within a group or site.
See here for more information on managing resource groups and sites.
Integrations Hierarchy
In the Infrastructure > Search page, the integrations are presented in a hierarchical tree structure with two levels:
- Sub-category
- Application
View tree structure
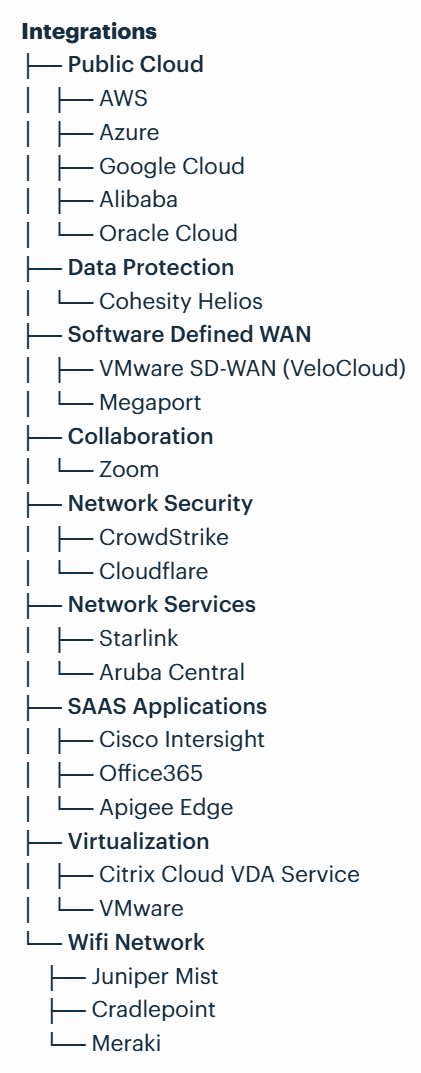
The above tree structure shows a two-level hierarchy of integrations: sub-category and application. Each sub-category contains its associated applications.
Example: The Public Cloud sub-category has AWS, Azure, Google Cloud, and Alibaba as applications.
- Click any app to view the associated resources.
View SDK resources in Hierarchical Tree Structure
Click to expand
You can view SDK resources in a hierarchical tree structure, organized logically by their native types (by default).
The hierarchy represents how different components of an application are organized and related.
- It defines dependencies (Example: a Virtual Machine cannot exist without a Host Node, or a Cluster Shared Volume cannot exist without a Storage Pool).
- It reflects physical and logical architecture of the system.
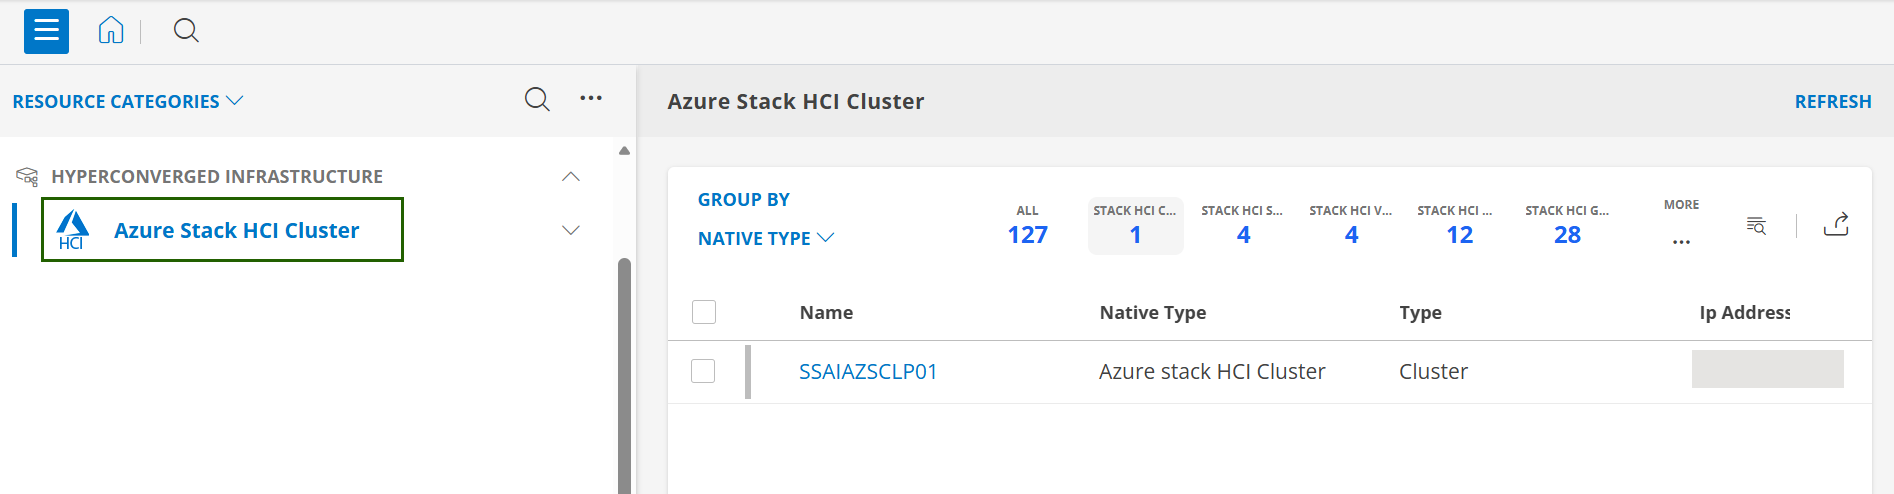
Following is an example of an SDK app – Azure Stack HCI Cluster with detailed information in a hierarchical tree representation.
To view the tree structure:
Click the down arrow next to Azure Stack HCI Cluster app. It will expand the hierarchical tree.
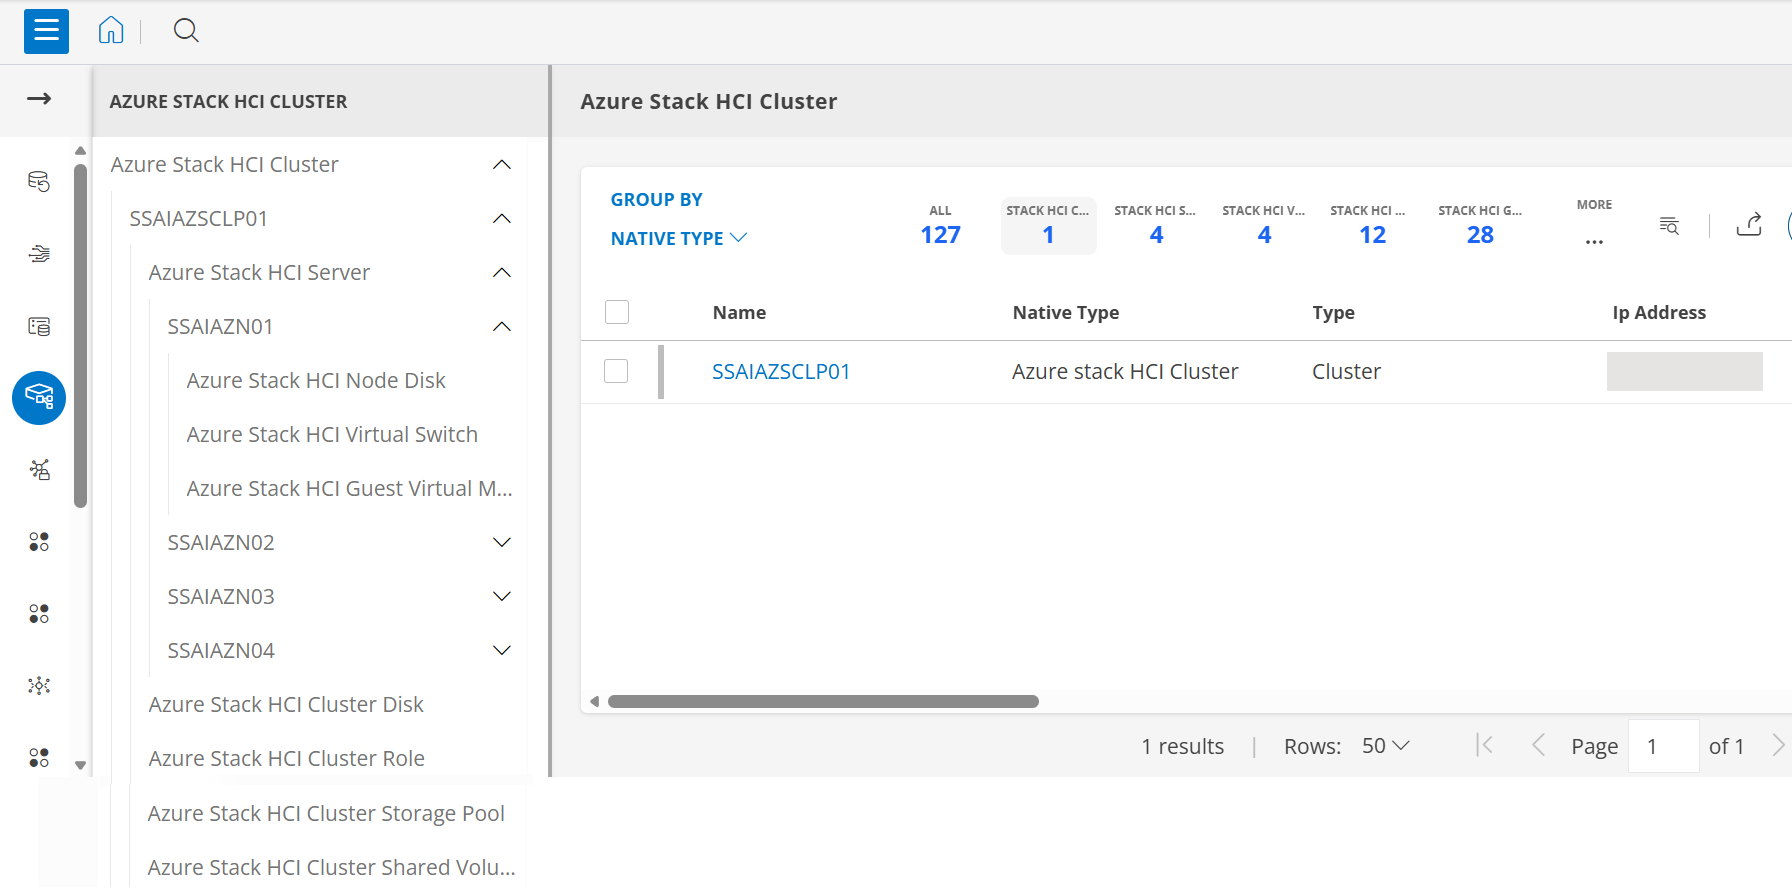
Below are the components:
- Azure Stack HCI Cluster – App name
- Azure Stack HCI Cluster – Root native type
- SSAIAZSCLP01 – Root resource name
- Azure Stack HCI Server – Native type
- SSAIAZN01 – Resources of the native type (can be one or more, like in the above screenshot: SSAIAZN02, SSAIAZN03, SSAIAZN04)
- Azure Stack HCI Node Disk – Child native type of Azure Stack HCI server
- Azure Stack HCI Virtual Switch – Child native type of Azure Stack HCI server
- Azure Stack HCI Guest Virtual Machine – Child native type of Azure Stack HCI server
- SSAIAZN01 – Resources of the native type (can be one or more, like in the above screenshot: SSAIAZN02, SSAIAZN03, SSAIAZN04)
- Azure Stack HCI Server – Native type
- Azure Stack HCI Cluster Disk – Child native type of Azure Stack HCI cluster
- Azure Stack HCI Cluster Role – Child native type of Azure Stack HCI cluster
- Azure Stack HCI Cluster Storage Pool – Child native type of Azure Stack HCI cluster
- Azure Stack HCI Cluster Shared Volume – Child native type of Azure Stack HCI cluster
- SSAIAZSCLP01 – Root resource name
Following are the components with their descriptions:
App Name Description Azure Stack HCI Cluster Represents the application or resource category in the portal. It is the top-level grouping for all resources related to Azure Stack HCI. Root Native Type Description Azure Stack HCI Cluster Indicates the type of the top-level resource. In this case, the cluster itself is the root resource type. Root Resource Name Description SSAIAZSCLP01 This is the specific instance name of the cluster. It uniquely identifies the cluster in your environment. Child Native Type Description Azure Stack HCI Server Represents the type of resources inside the cluster - in this case, the servers (nodes) that make up the cluster. Resources of the Native Type Description SSAIAZN01, SSAIAZN02, SSAIAZN03, SSAIAZN04 These are individual server nodes within the cluster. Each node is an instance of the Azure Stack HCI Server native type. Child Native Types of Azure Stack HCI Server Description Azure Stack HCI Node Disk Represents disks attached to a node for local storage. Azure Stack HCI Virtual Switch Represents virtual network switches configured on the node. Azure Stack HCI Guest Virtual Machine Represents virtual machines running on the node. Child Native Types of Azure Stack HCI Cluster Description Azure Stack HCI Cluster Disk Represents shared disks at the cluster level. Azure Stack HCI Cluster Role Represents roles or services running on the cluster. Azure Stack HCI Cluster Storage Pool Represents storage pools that aggregate disks across nodes. Azure Stack HCI Cluster Shared Volume Represents volumes shared across the cluster.
Parent-Child resource visibility
Click to expand
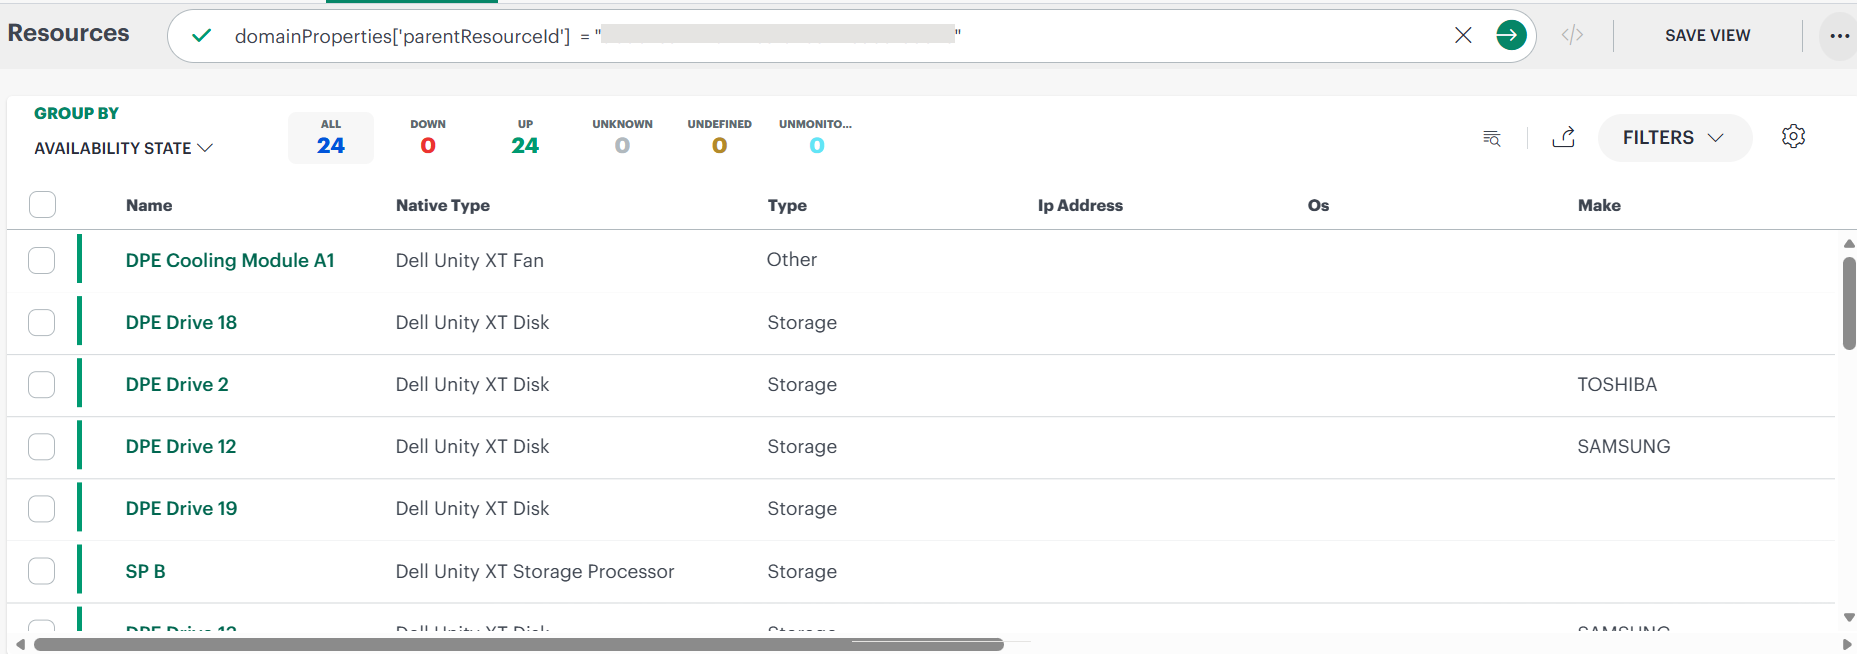
Search by parent properties in Infrastructure Search to return all related child resources.
Below is an example of Dell Unity XT Resource parent-child relationship.

Portal View
The same parent-child relationship (as highlighted in the above screenshot) is displayed in the portal, where:
Dell Unity XT DPE (Disk Processor Enclosure) is the parent container for:
- Dell Unity XT Disk - Storage devices
- Dell Unity XT Fan - Cooling components
- Dell Unity XT PowerSupply - Power distribution units
- Dell Unity XT Storage Processor - Processing units
Search
Use the search (magnifying glass) icon to search for resources at the partner or the client level.
Follow these steps to search:
Navigate to Infrastructure > Search and from the Infrastructure Search page click the search (magnifying glass) icon next to the Home tab. The New View tab is displayed.
The advanced search box is displayed that allows for keyword search, by default.
To switch to basic search, click </>.
See Advanced Search for more information.
Resource Summary Slide-out
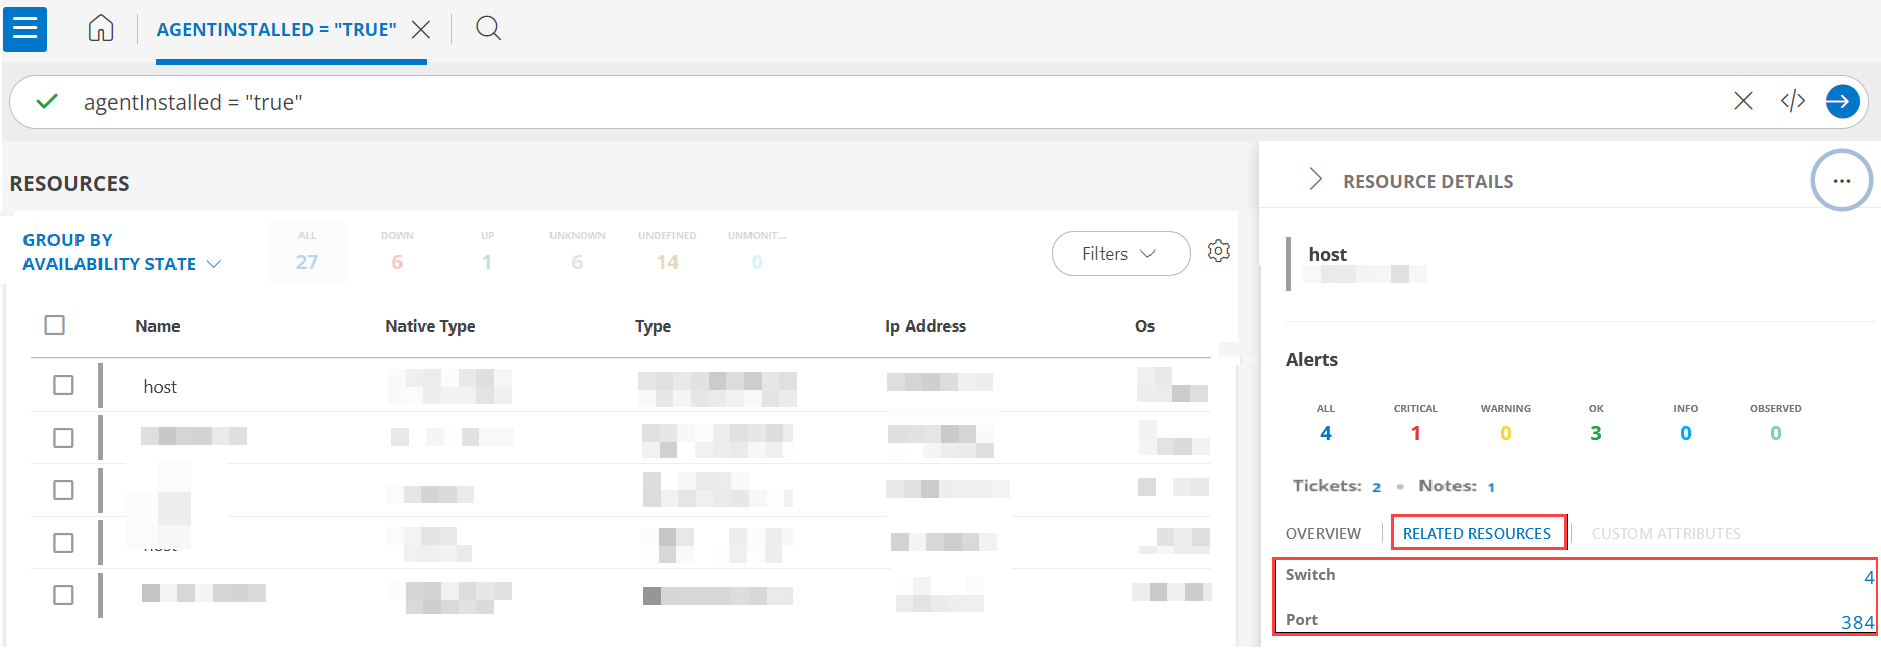
The resource summary slide-out provides a quick overview of key details, including the number of alerts, tickets, notes, maintenance window information, quick resource overview, related resources, custom attributes, and the actions you can take right from the slide-out.
Follow these steps to view the resource summary slide-out:
- From the search results, click on the resource name. The resource summary slide-out is displayed.
Note: The fields displayed in the slide-out vary based on the resource type.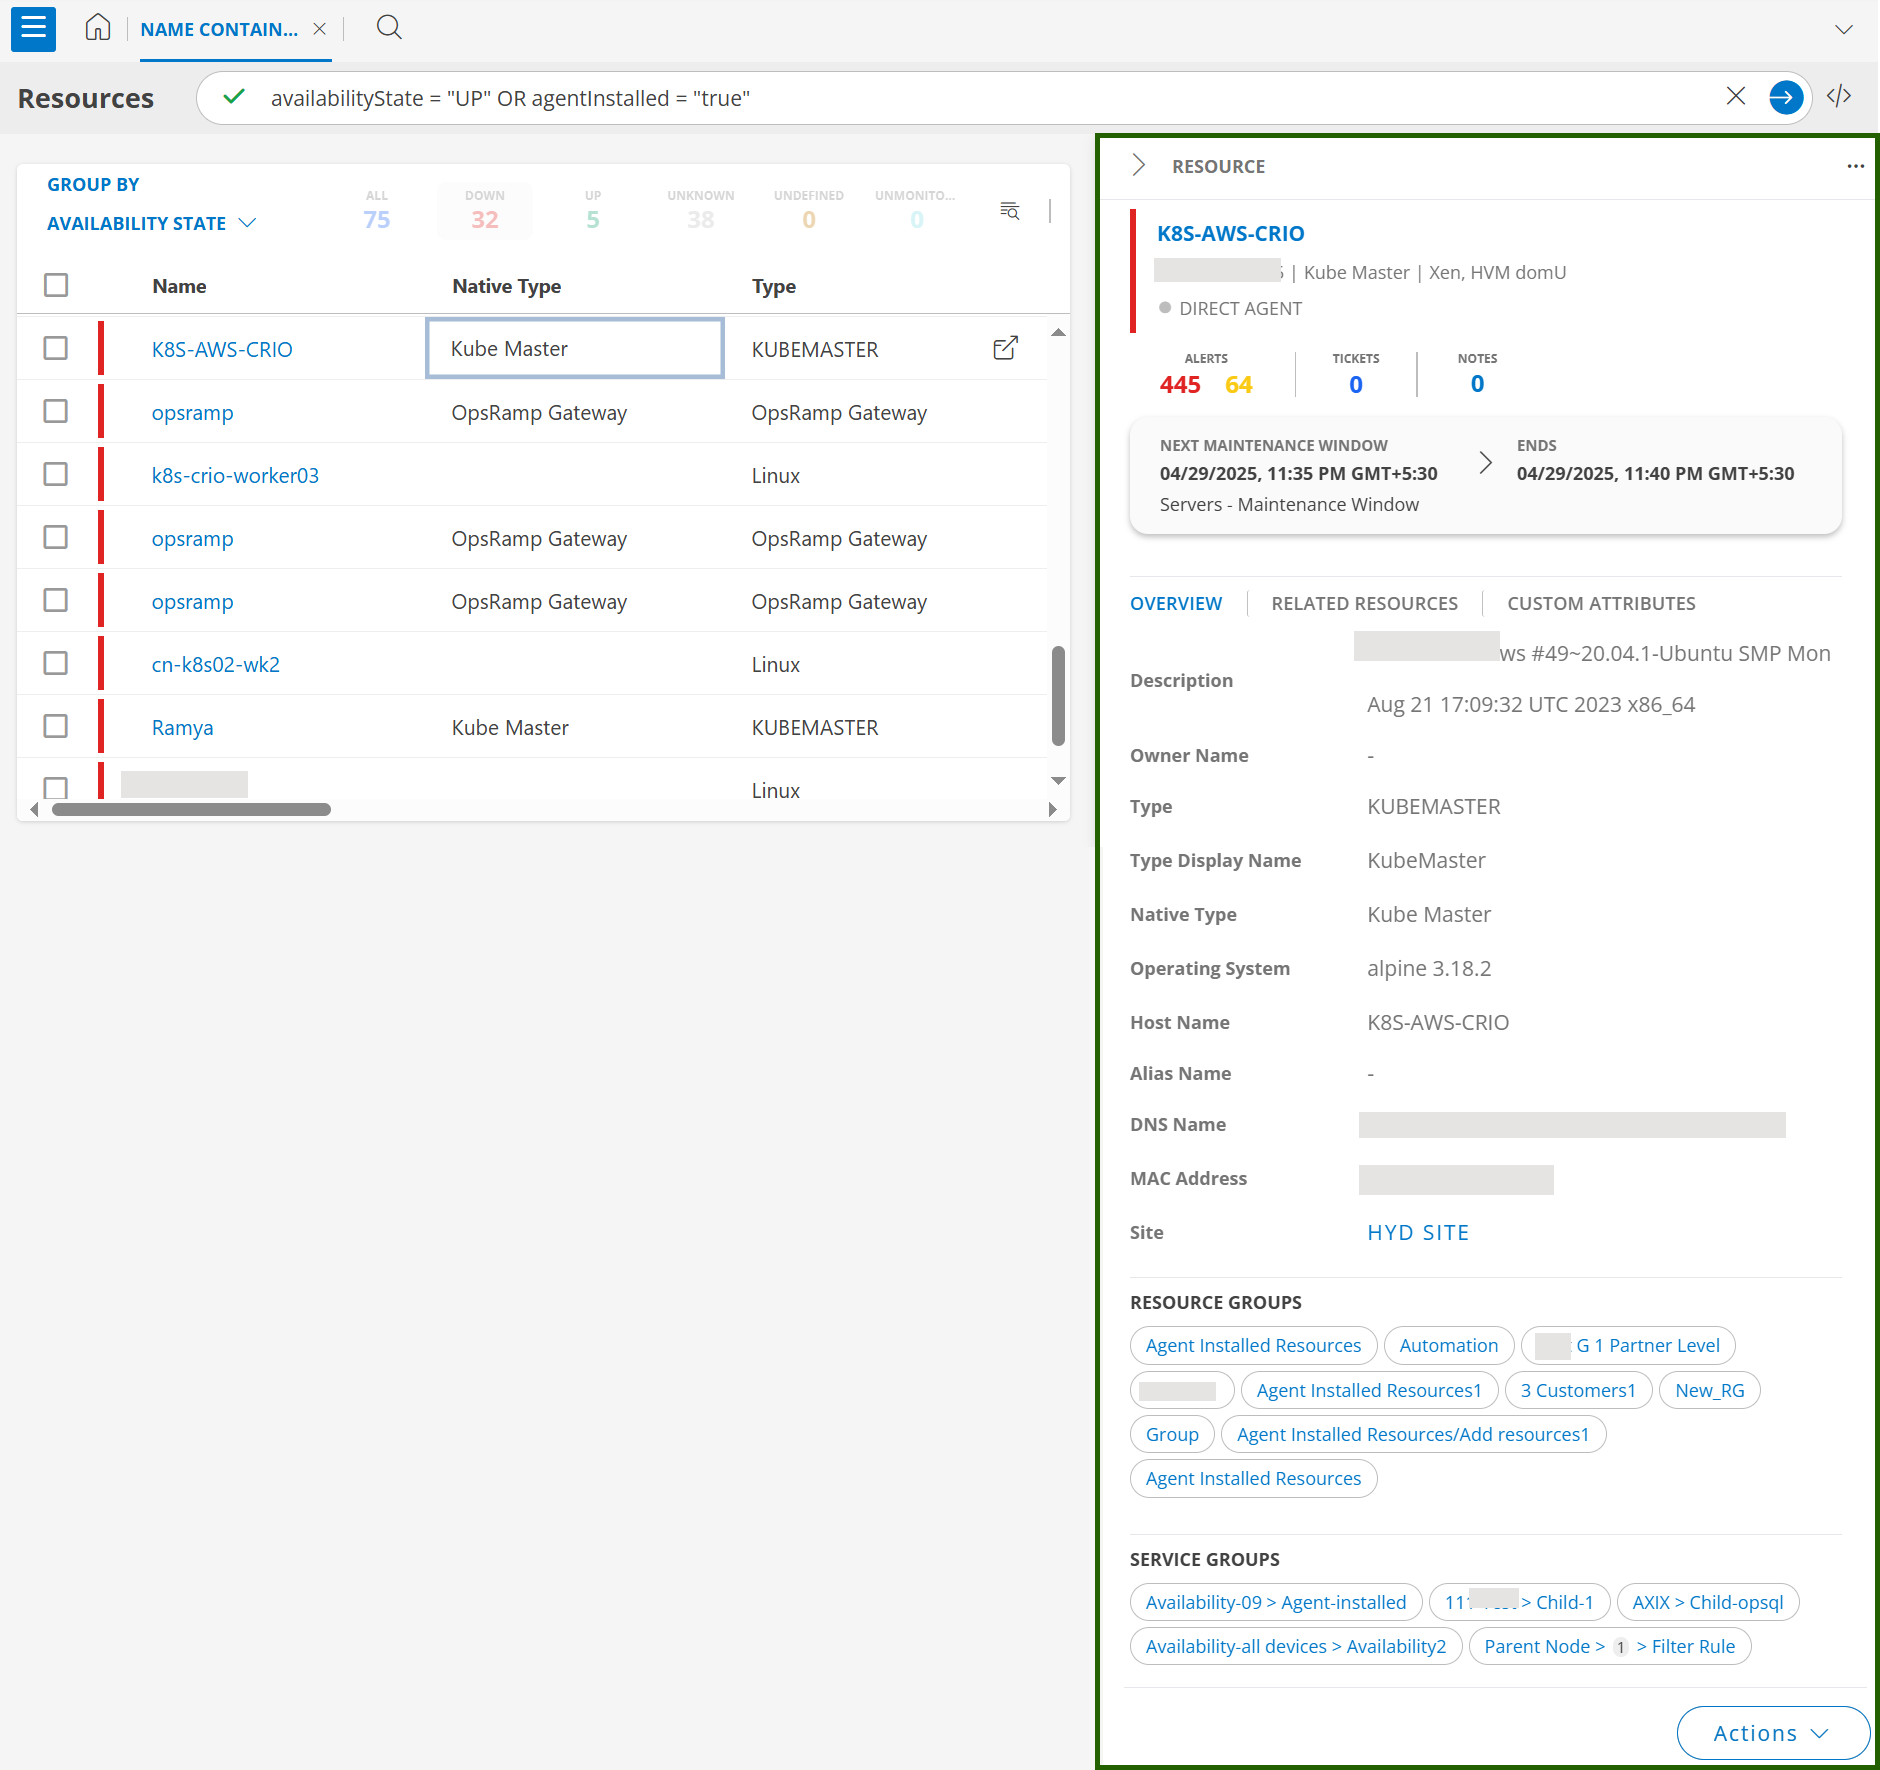
The slide-out has the following details:
Alerts Statistics: The number of alerts on the resource based on their current state: Critical, Warning, OK, Info, Observed, AND All (total number of alerts).
- Click the number against the alert state. The alerts listing page is displayed with the alert details.
Note: The alert listing page is feature-flag based. Contact OpsRamp support to enable the feature.
- Click the number against the alert state. The alerts listing page is displayed with the alert details.
Tickets and Notes: The number of tickets and notes associated with the resource.
Maintenance window information: Provides maintenance window details including maintenance window name, scheduled start and end date and time, timezone.
- For an ongoing maintenance, the status UNDER MAINTENANCE is displayed in red to clearly indicate that the resource is currently under a scheduled maintenance window.
- For an upcoming maintenance, the status NEXT MAINTENANCE WINDOW is displayed to indicate a scheduled maintenance period that has not yet started. It includes the planned start and end times along with relevant maintenance details.
Following are the permissions required to view Scheduled Maintenance information:
Category Permission Type Permission Value Account Administration Scheduled Maintenance View Overview: The Overview tab has information like OS, IP Address, Make, Model, Serial Number.
Resource Groups: Shows the resource groups that the resource belongs to.
Following are the permissions related to access Resource Groups information:
Category Permission Type Permission Value Account Administration Devices View
and
Access to all resources.Note: The above is applicable to both Partner and Client users.
Service Groups: Shows the service groups that the resource belongs to. Clicking a service group navigates to the service maps page.
Traits: Information related to the resource properties like agent/gateway connectivity information, resource type.
You can view the Integration/App that discovered the resource in the resource slide-out.
To view the Integration/App:- Click the resource. The resource slide-out appears. The Integration/App is displayed under Overview > Apps.
- Click on the App/Integration to view the Installed Integrations page with the details.
- Click the resource. The resource slide-out appears. The Integration/App is displayed under Overview > Apps.
Related Resources: If the resource has a relationship with other resources, then the count of those resources, along with their native types, is displayed in the Related Resources tab. Click the count to get the list of resources that are related to the resource. The tab is grayed out if there are no related resources.
Custom Attributes: The custom attributes tab displays the attribute name, value and the Source.
Actions: Use the Actions button to:
- Assign credential
- Assign custom attribute
- Schedule maintenance period on a resource.
- Edit attributes
- Launch Remote Session
- Execute Command
- Manage and unmanage a resource.
- Add a note.
- Delete a resource.
Click on the host name to view the resource details.
Execute Commands (this option appears only if Agent is installed on the resource.)
Launch Remote Session (this option appears only if Agent/Gateway is installed on the resources. It is applicable for Classic Gateway, Windows and Linux devices.)
Click the horizontal (three dots) menu to view the topology details.
Add, Delete, Manage and Unmanage resources
Monitorable resources that have only agent installed and gateway discovered devices can be managed, deleted, or unmanaged. Remaining resources can only be deleted.
Note: A maximum of 40 resources/devices can be selected to perform the above actions.
Delete resource
Follow these steps to delete a resource:
- From All Clients, select a client.
- Navigate to Infrastructure > Search.
- Select the resource(s) you want to delete. The number of selected resources is shown.
Note: The maximum number of resources you can select to delete is 20. - From the Actions dropdown click Delete.
- The Delete Resources dialog box shows the resource(s) that are selected for deletion. A confirmation message and a Note are displayed.
- Click DELETE to delete the resource(s). The resource(s) are deleted and a confirmation message appears.
Note:- The Delete option is not available if you select only Cloud Provider type resource(s).
- If multiple resources are selected and one or more are of the Cloud Provider resource type, only the non–Cloud Provider resources are deleted.
Manage resource
You can manage a resource that is in an inactive or unmanaged state.
Follow these steps to manage a resource:
- From All Clients, select a client.
- Navigate to Infrastructure > Search.
- Search and select the resource(s) that are in the inactive state. The State column in the table shows the inactive resources.
- From the Actions dropdown click Manage.
- The Manage Resources dialog box shows the resources that are applicable for managing. It also shows the resources that are not applicable for managing. For example, if you select an active resource, it will be shown under the Non-Applicable section.
- Click Manage to manage the resource(s). The resource(s) are managed and a confirmation message appears.
The state of the resource(s) changes to Active.
Note:- You can select a maximum of 50 resources at a time.
A message appears if the number of resources that are selected increases the limit.
You can deselect the resources from the list box. - A maximum of 20 resources can be managed at a time.
- You can select a maximum of 50 resources at a time.
Unmanage resource
You can unmanage a resource that is in an active or managed state.
Follow these steps to unmanage a resource:
- From All Clients, select a client.
- Navigate to Infrastructure > Search.
- Select the resource(s) that are in the active state. The State column in the table shows the active resources.
- From the Actions dropdown click Unmanage.
- The Unmanage Resources dialog box shows the resources that are applicable for unmanaging. It also shows the resources that are not applicable for unmanaging. For example, if you select an inactive resource, it will be shown under the Non-Applicable section.
- Click Unmanage to unmanage the resource(s). The resource(s) are unmanaged and a confirmation message appears. The state of the resource(s) changes to Inactive.
Note:- You can select a maximum of 50 resources at a time.
A message appears if the number of resources that are selected increases the limit.
You can deselect the resources from the list box. - A maximum of 20 resources can be unmanaged at a time.
- You can select a maximum of 50 resources at a time.
Add resource
Follow these steps to manually add resource:
- Navigate to Infrastructure > Search.
- Click on the hamburger icon on the left side of the page. The My Resource Views Slide-out appears.
- Click on Add resource under Quick Actions.
- Enter the details in the Add Resource window.
- Click Add Resource.
Manage Resource Groups and Sites
The following table shows how to manage the resource groups and sites from the Resource Categories dropdown that is available on the left side of the page:
Note: You can perform these actions based on the permissions available to you.
| Action | Steps/Description |
|---|---|
| View resource groups | To view a resource group: For Partner users:
| Search resource groups | To search a resource group:
| Add resource groups | To add a resource group:
| Add resource subgroups | To add a resource subgroup:
| Edit resource groups | To edit a resource group or a subgroup:
| Remove resource groups | To remove a resource group or a subgroup:
|
| Create schedule maintenance on a resource group | To create a schedule maintenance on a resource group or a subgroup:
The Specific Resources option is selected by default. Select the All Resources option, if you want to create a scheduled maintenance for all the resources in the client. | View Logs | To view logs:
| View sites | To view a site:
| Search sites | To search a site:
| Add sites | To add a site:
| Add Subsites | To add a subsite:
| Edit sites | To edit a site or a subsite:
| Remove sites | To remove a site or a subsite:
|
Export
The Export functionality lets you export the search response as a report.
Prerequisite: User should have Manage Report and View Integrations permissions to export.
To export a search response:
From All Clients, select a client.
Navigate to the Infrastructure > Search page.
Use the search option to search for resources using a query. The Search results are displayed.
Click the Export icon available next to the Filters option.
Note: A message appears asking the user to install the app, if it is not already installed. Click Install App. The Reporting Apps Overview page is displayed to install the app.

If the app is already installed, the page is redirected to the Asset Inventory app screen.
The configuration properties in the Asset Inventory app are auto-filled with the filter criteria that was provided for the global search.
The report generation process is initiated. The progress depends on the data and the configuration parameters.
Similarly, you can export search response from the Resources Home Tab.
See Asset Inventory for more information.
Actions on search result
You can select one or more resources in the client and perform the following actions:
- Assign a credential
- Assign custom attribute
- Schedule a maintenance period
- Add a note
- Assign Templates
- Execute command
- Delete resource(s)
- Manage resource(s)
- Unmanage resource(s)
Note: Multi-select operations are not supported in the Partner scope. This is because a credential defined within a client’s scope may not be available or valid in another, preventing bulk actions. As a result, it is not possible to assign a single credential to resources across multiple clients.
Assign a credential
You can assign multiple credentials to one or multiple resources.
Prerequisite: User should have Manage_Device and Credentials_Manage permissions to perform this action.
Follow these steps to add credential(s):
- Click Infrastructure > Search.
- From the Infrastructure search page, search for the resource(s) (from resource categories, resource groups, sites, or query) and use the checkboxes to select the resource(s).
- From the Actions menu, select Assign Credential.
- From the Assign Credential popup that shows the selected resources, select the credential(s) from the list of credentials that are available under the client.
Note: You can select up to five credentials at a time.
You can also click the Manage Credentials link to add a credential. - Click the Assign Credential button to assign the credential(s) to the resource(s).
Note: The maximum resources that you can select is 50 at a time.
A message appears if the number of selected resources exceeds the limit. You can deselect the resources from the list box.
- You can also use the resource slide-out to assign credentials to a resource:
- Once you have searched for resources using step#2 above, you can use the filter criteria or the search box to search for the specific resource.
- Click anywhere on the search result.
- From the resource slide-out, click Actions > Assign Credential.
- Follow steps 4 to 5 above. The credential(s) are assigned to the resource, and a success message appears.
Assign custom attribute
You can assign custom attribute to one or multiple resources.
Prerequisite: You should have Edit_Devices and Custom_Attributes_View permissions to perform this action.
Follow these steps to assign custom attribute to multiple resources:
Click Infrastructure > Search.
From the Infrastructure search page, search for the resource(s) (from resource categories, resource groups, sites, or query) and use the checkboxes to select the resource(s).
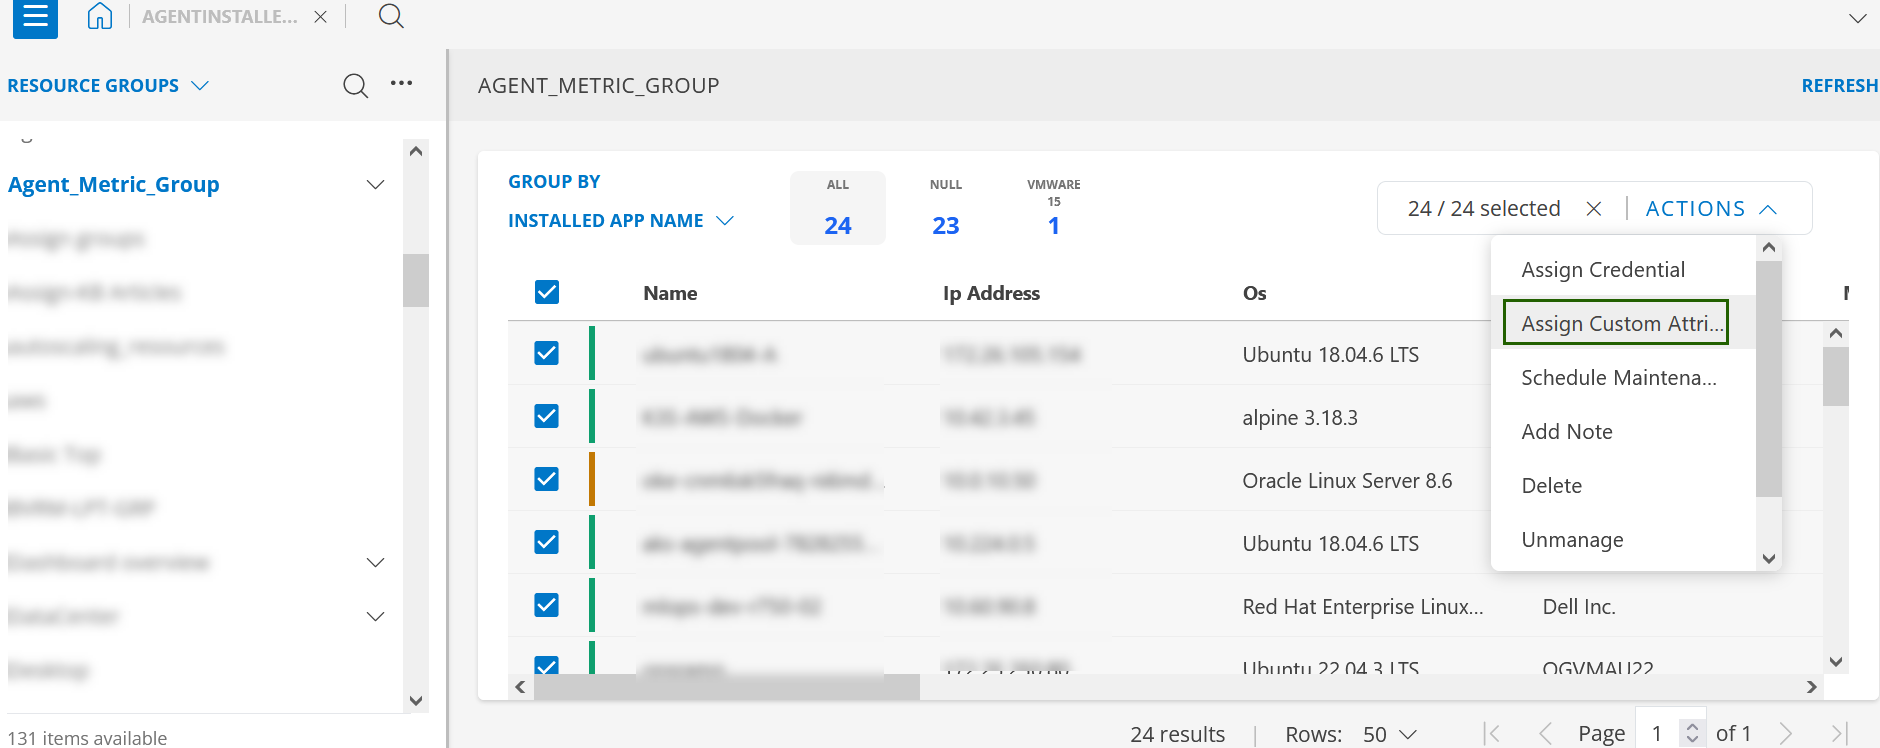
From the Actions menu, select Assign Custom Attribute.
From the Assign Custom Attribute popup that shows the selected resources, select the custom attribute name and the value from the Name and Value drop-down lists respectively.
Click the ASSIGN CUSTOM ATTRIBUTE button to assign the custom attribute to the resource(s). A success message appears.
Note: The maximum number of resources you can select at a time is 20.
A message appears if the number of selected resources exceeds the limit. You can deselect the resources from the list box.
- You can also use the resource slide-out to assign custom attribute to a resource:
- Once you have searched for resources using step#2 above, you can use the filter criteria or the search box to search for the specific resource.
- Click anywhere on the search result.
- From the resource slide-out, click Actions > Assign Custom Attribute.
- Follow steps 4 to 5 above. The custom attribute is assigned to the resource, and a success message appears.
Schedule a maintenance period
You can schedule a maintenance period on one or multiple resources.
Follow these steps to schedule a maintenance period:
- Click Infrastructure > Search.
- From the Infrastructure search page, search for the resource(s) (from resource categories, resource groups, sites, or query) and use the checkboxes to select the resource(s).
- From the Actions menu, select Schedule Maintenance.
- From the Schedule Maintenance popup, enter the required information and click Schedule.
Note: The maximum resources that you can select is 20 at a time.
A message appears if the number of resources that are selected increases the limit.
You can deselect the resources from the list box.
Add a note
You can add a note to one or multiple resources.
Follow these steps to add a note:
- Click Infrastructure > Search.
- From the Infrastructure search page, search for the resource(s) (from resource categories, resource groups, sites, or query) and use the checkboxes to select the resource(s).
- From the Actions menu, select Add Note.
- From the Add Note popup that shows the selected resources, enter the subject for the note and the description.
- Set the validity for the note from the calendar.
- Click the Add Note button to add the note.
Note: The maximum resources that you can select is 50 at a time.
A message appears if the number of resources that are selected increases the limit.
You can deselect the resources from the list box.
Assign Templates
Use this option, if you have to assign templates to multiple resources.
Follow these steps to assign templates:
- Click Infrastructure > Search.
- From the Infrastructure search page, search for the resource(s) (from resource categories, resource groups, sites, or query) and use the checkboxes to select the resource(s).
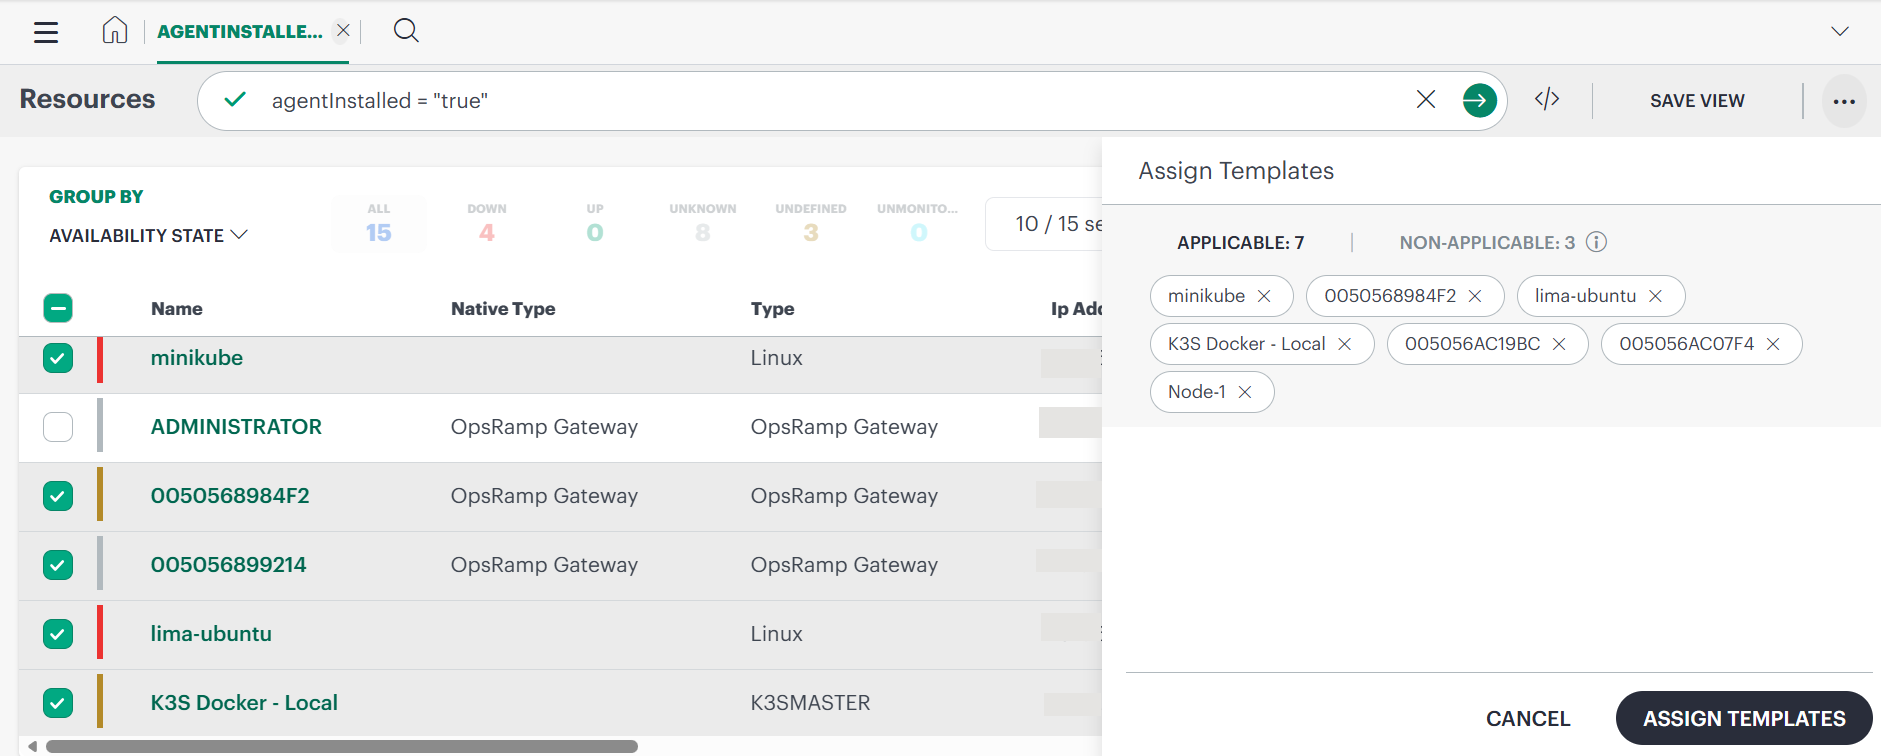
- From the Actions menu, select Assign Templates.
- The Assign Templates popup shows the count of applicable and non-applicable resources.
The non-applicable resources are unmanaged, so templates cannot be assigned to them. - Click Assign Templates. The Assign Templates page shows the selected resources and the list of templates.
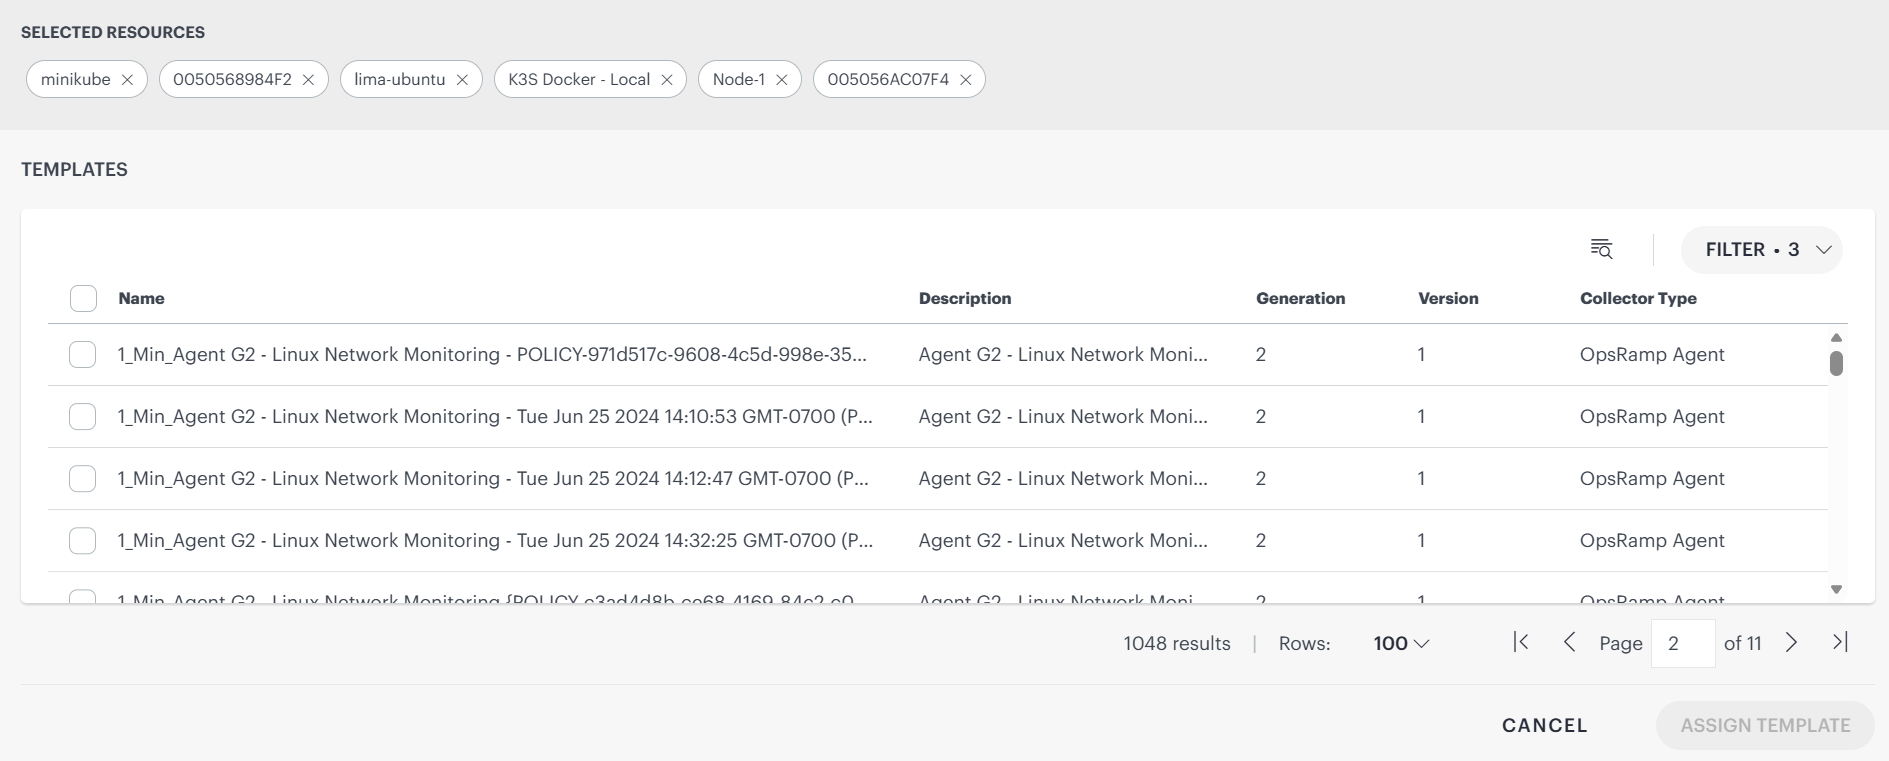
- Use the filter and search options to search for the templates.
- Select the templates.
Note: Templates compatible with the resource type should be selected. - Click Assign Template. The template(s) are assigned and a confirmation message appears.
The resource listing page is displayed.
To verify that the template(s) have been assigned:
- Click the resource name to open the resource details page.
- Click the action (three dots) menu and select View Templates. The Metric Configuration page is displayed with the list of assigned templates.
Launch Remote Session
You can launch a remote session on only one resource at a time.
Note:
- This option appears only if Agent/Gateway is installed on the resource. It is applicable for Classic Gateway, Windows and Linux devices.
Follow these steps to launch a remote session:
- Click Infrastructure > Search.
- From the Infrastructure search page, search for the resource (from resource categories, resource groups, sites, or query) and use the checkboxes to select the resource.
- Click anywhere on the search result.
- From the resource slide-out, click Actions > Launch Remote Session.
- Enter all the mandatory information in the Launch Remote Session popup window:
- Select a console from the existing list.
(or)
Add a new console. - Enter the Ticket Id/Alert ID.
- Activity Log Notes: Enter the activity log notes information. This is a mandatory field.
- Enable upload or download: Select to upload or download a file to the console.
- Protocol Security: Select the protocol security: NLA or TLS.
- Select an existing credential or enter the credentials.
- Select a console from the existing list.
- Click Launch and execute the file that is downloaded on your local computer.
Execute command
You can execute a command on one or multiple resources.
Follow these steps to execute a command:
- Click Infrastructure > Search.
- From the Infrastructure search page, search for the resource(s) (from resource categories, resource groups, sites, or query) and use the checkboxes to select the resource(s).
- From the Actions menu, select Execute Command.
- From the Execute Command popup, select a command from the Command Name dropdown and provide the required information in the fields (based on the command name selected the fields that populate differ) and click Execute Command.
Note:
- The maximum resources that you can select is 20 at a time.
A message appears if the number of resources that are selected increases the limit.
You can deselect the resources from the list box.
See Agent Remote Commands for the list of commands and their description.
OpsRamp Gateway supports the same commands that the OpsRamp Agent does.
You can run all the above commands at both the partner and client levels.
Delete Resources
Follow these steps to delete resource(s):
- Click Infrastructure > Search.
- From the Infrastructure search screen, search for the resource(s) (from resource categories, resource groups, sites, or query) and use the checkboxes to select the resource(s).
Note: The maximum number of resources you can select to delete is 20. - From the Actions dropdown, select Delete.
- The Delete Resources dialog box shows the resource(s) that are selected for deletion. A confirmation message and a Note are displayed.
Note: The maximum resources that you can select is 40 at a time.
A message appears if the number of resources that are selected increases the limit.
You can deselect the resources from the list box. - Click DELETE to delete the resource(s). The resource(s) are deleted and a confirmation message appears.
Note:- The Delete option is not available if you select only Cloud Provider type resource(s).
- If multiple resources are selected and one or more are of the Cloud Provider resource type, only the non–Cloud Provider resources are deleted.
Manage Resources
You can manage resource(s) that are in an inactive or unmanaged state.
Follow these steps to manage a resource:
- Click Infrastructure > Search.
- Search and select the resource(s) that are in the inactive state. The State column in the table shows the inactive resources.
- From the Actions dropdown click Manage.
- The Manage Resources dialog box shows the resources that are applicable for managing. It also shows the resources that are not applicable for managing. For example, if you select an active resource, it will be shown under the Non-Applicable section.
- Click Manage to manage the resource(s). The resource(s) are managed and a confirmation message appears.
Note:- You can select a maximum of 50 resources at a time.
A message appears if the number of resources that are selected increases the limit.
You can deselect the resources from the list box. - A maximum of 20 resources can be managed at a time.
- You can select a maximum of 50 resources at a time.
Unmanage Resources
You can unmanage resource(s) that are in an active or managed state.
Follow these steps to unmanage a resource:
- Click Infrastructure > Search.
- Select the resource(s) that are in the active state. The State column in the table shows the active resources.
- From the Actions dropdown click Unmanage.
- The Unmanage Resources dialog box shows the resources that are applicable for unmanaging. It also shows the resources that are not applicable for unmanaging. For example, if you select an inactive resource, it will be shown under the Non-Applicable section.
- Click Unmanage to unmanage the resource(s). The resource(s) are unmanaged and a confirmation message appears.
Note:- A maximum of 20 resources can be unmanaged at a time.
- You can select a maximum of 50 resources at a time.
A message appears if the number of resources that are selected increases the limit.
You can deselect the resources from the list box.
Related Resources
The related resources are a group of resources that are related to a particular resource. For the resources to be related to each other, they should meet one of the following conditions:
- runsOn: Indicates that a resource is running on another resource. For example, an application that is running on a server that is in the process of getting discovered.
- connectedTo: Indicates that a resource is connected to another resource. For example, a port that is connected to a switch.
- dependsOn: Indicates that one resource needs another resource to exist. For example, an ESXi host cannot exist without a vCenter.
- componentOf: Indicates that one resource is a component of a group of resources. For example, a number of VMs that belong to a cluster. Each VM is a component of the cluster.
Concept of relationship
The following example demonstrates the concept of relationship among the resources:
There are three resources, namely Resource 1, Resource 2, and Resource 3.
- If Resource 2 is connected (meets one of the four conditions of related resources) to Resource 1, it indicates that Resource 2 is related to Resource 1.
- If Resource 3 is connected (meets one of the four conditions of related resources) to Resource 1, it indicates that Resource 3 is related to Resource 1.
The above example can be summarized in the following way:
- Resource 2 and 3 are in a relationship with Resource 1.
- Resource 2 and 3 are the related resources of Resource 1.
Related Resources tab
The Related Resources tab displays the number of related resources for a selected resource. It also displays the native type of the resources connected to the main resource.
For example: Main = Resource 1, native type = host
Related resources = Resources 2 and 3, native type = vm
The main resource displays the native type as vm and the associated count as 2.
Prerequisites
The following conditions are a must for a resource to display the related resources count:
- The Native Type attribute for the resource (1, according to the example) that shows the count must be defined.
- One or more resources (2 and 3, according to the example) must be in a relationship with the resource (1).
Exceptions
The related resources will not be displayed under the following conditions:
| Native Type Attribute | Relationship | Result |
|---|---|---|
| Defined | Resources not related |
|
| Not defined | Related |
|
View Related Resources tab
To view the Related Resources tab, log in to OpsRamp.
From All Clients, select a client.
Navigate to Infrastructure > Search.
You can select a resource under a category/App and click.
Alternatively, click the search icon to look for a specific resource.
The NEW VIEW tab is displayed.Click +Query and search for the resource(s) using a query. From the list of resources displayed, click the target resource.
A slide-out screen that contains the RELATED RESOURCES tab and the following information is displayed:
- Native types (Switch and Port as seen in the illustration) of the resources that are related to the main resource.
- Associated count (4 switches and 384 ports as seen in the illustration) of native types.
Click the count of any category resources.
A new tab that contains a query with the native type of the resource and topology UUID is displayed. The list of resources of the selected category are also displayed.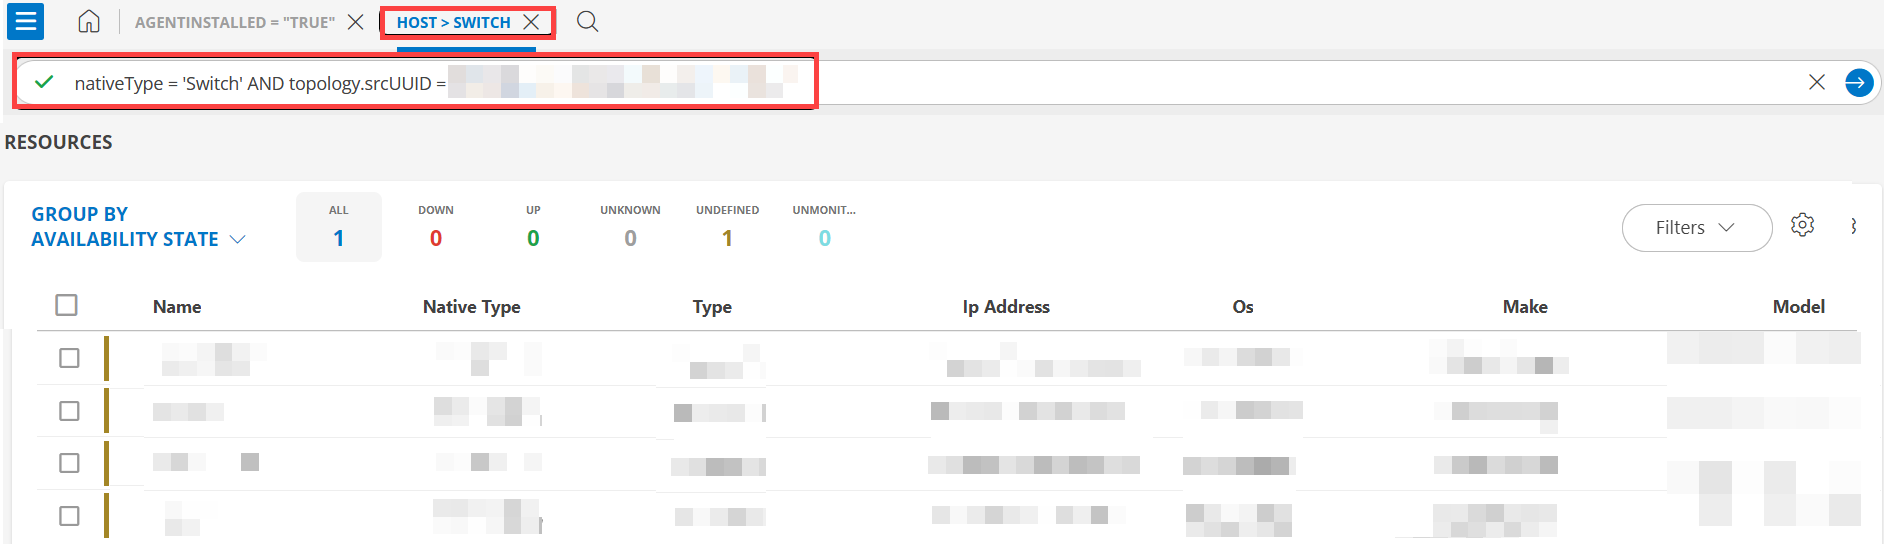
Alert Count on a Resource
The Resources page displays two different alert counts for each resource. These counts serve different purposes and are calculated using different criteria.
Active Alert Count (Top Section)
The alert count displayed at the top of a resource card or details page represents the current operational impact of the resource.
This count includes only alerts that meet all of the following conditions:
Severity: Critical or Warning
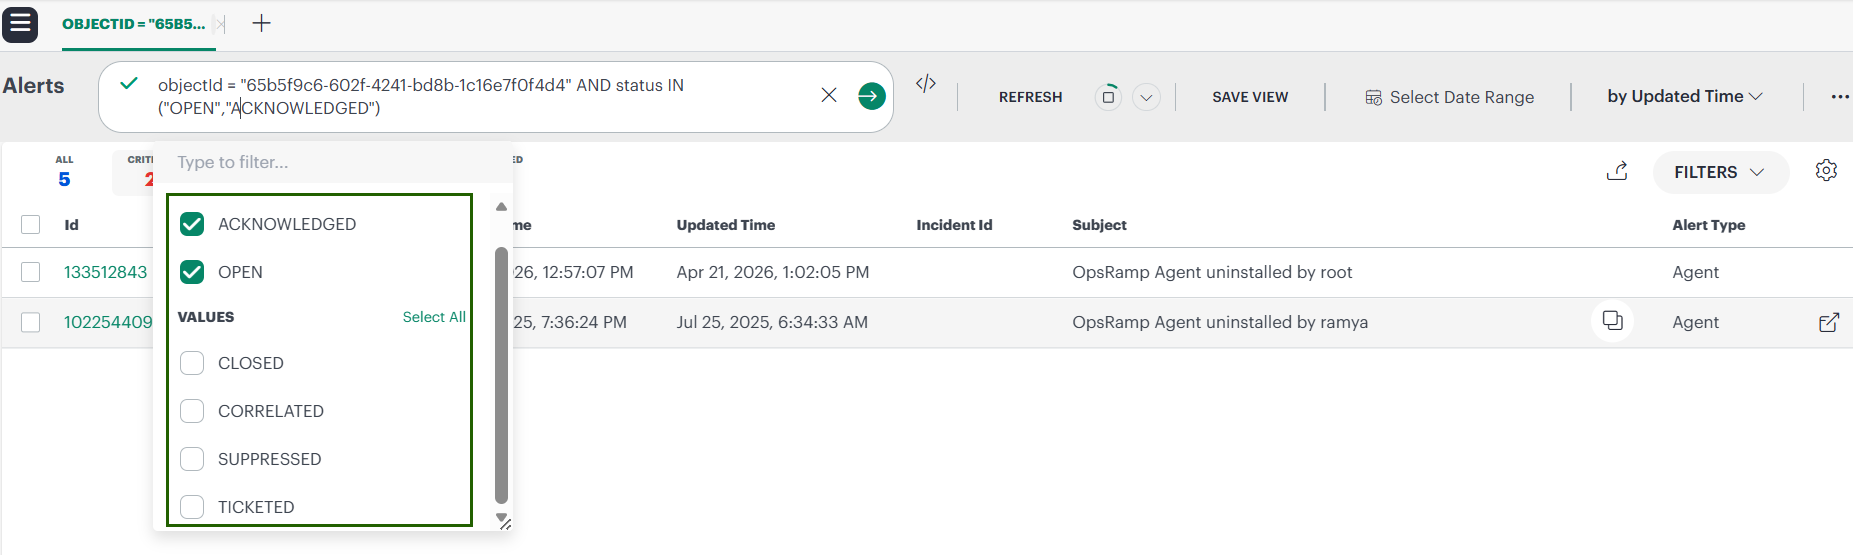
Status:
- Open
- Acknowledged
The following alert states are not included in this count:
- Suppressed
- Ticketed
- Correlated
- Closed
This count is intended to show alerts that currently require attention from operations teams.
Ticket Count
When an alert is converted into a ticket:
- The alert is removed from the active alert count.
- The Ticket count for the resource is incremented.
The ticket count includes tickets in the following states:
- New
- Open
Tickets in Resolved or Closed states are not included in the ticket count.
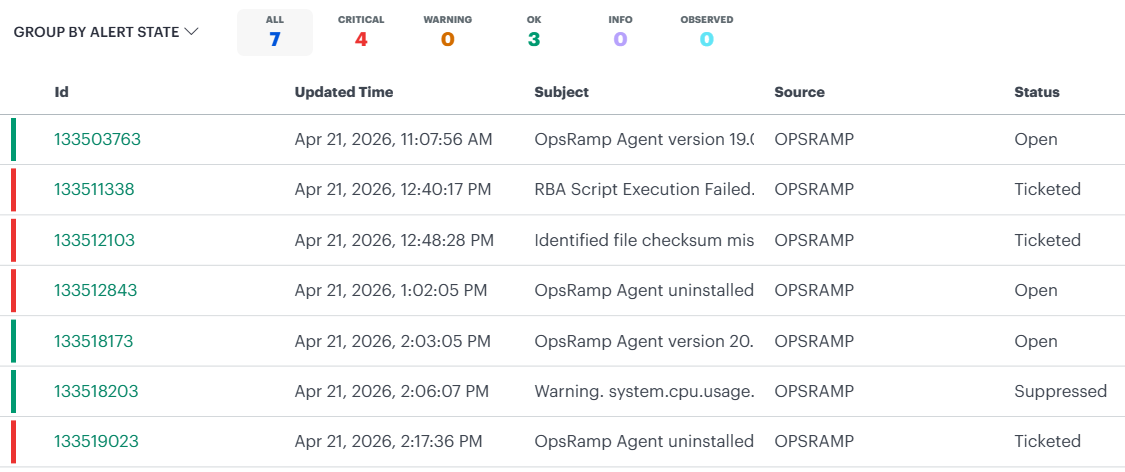
Historical Alert Count (Bottom Section)
The alert count shown at the bottom of a resource provides a historical availability perspective.
Key characteristics:
- Displays alerts from the last 30 days by default
- Includes alerts in all states, such as:
- Open
- Acknowledged
- Suppressed
- Ticketed
- Correlated
- Closed
- Alerts older than 30 days are not included
This view helps you understand the resource’s alert history and stability over time, rather than its current operational status.
Summary of Alert Counts
| Alert Count Type | Purpose | Included States |
|---|---|---|
| Active Alert Count | Current issues requiring attention | Open, Acknowledged |
| Ticket Count | Ongoing ticketed issues | New, Open |
| Historical Alert Count | Resource availability over time | All states (last 30 days) |