Introduction
This document explains the difference between the Basic and Advanced modes of querying.
Using OpsQL, you can perform advanced search operations to fetch the results. These results help you analyze and make better decisions.
The Advanced Search feature allows you to:
- Quickly and easily build queries.
- Search for resources at the partner or the client level.
Follow these steps to navigate to the Advanced Search query box and build queries:
Log in to OpsRamp.
Navigate to Infrastructure > Search.
From the Infrastructure Search screen, click the search (magnifying glass) icon next to the Home tab. The New View tab is displayed.
Click +Query. The Search box displays the list of resource attributes.
Build a query using the basic query mode.
Basic Query Mode
Select the attribute and the operator from the dynamically populated matching operator list.
Type in (or select) a value from the VALUES dropdown. The values are populated based on the selected attribute and operator.
The query result is displayed.
Click + to add another expression.
The AND logical operator is selected by default. Click and select the desired operator.
Follow the steps mentioned above to form another expression – attribute, operator and value. The query result is displayed.
For more examples, click here.
Advanced Query Mode
Alternatively, use the Advanced Query Mode to start building more complex queries with nested expressions.
Click </> to switch to the Advanced query mode.
As soon as you start typing in the Search box, the available attributes are displayed automatically.
You can search using a keyword / string and then click on search for " “. The keyword search will search for occurrence of that string across multiple fields. The result is displayed.
Example:
Enter a string, Linux and click on search for “Linux”. The search result is displayed. The string “Linux” may occur in one or more fields, like Name, description, OS.
Click here to view the list of attributes.Select the attribute and the operator from the dynamically populated matching operator list and then type in (or select) a value.
Select the logical operators,
ANDorORFollow the steps mentioned above – select the attribute, operator, and value, to add another expression. You can add as many valid expressions as possible.
Click the Search icon or press Enter. The query result is displayed.
Note:
- Your most recent query is added to the Recent Queries list, which shows the query string used for the search.
- To repeat a previous query, click the (magnifying glass) search icon to create a new tab, and then click the tile for that search string. The search results are displayed.
For more information on how to use OpsQL, click here
MY RESOURCES VIEWS
Save your query results as Views to easily preserve complex queries and their results, and update them whenever needed.
The MY RESOURCES VIEWS slide-out is a feature that provides quick and easy access to your saved query views. Instead of typing the same queries over and over, you can just open this slide-out and select a saved view to instantly run that query again. This allows you to save time by easily reusing your frequently accessed queries.
To access the MY RESOURCES VIEWS slide-out:
- Navigate to Infrastructure → Search. The Infrastructure search listing screen is displayed.

- Click on the hamburger icon on the upper-left corner of the screen.
The MY RESOURCES VIEWS slide-out is displayed.
Managing Views
Create and manage (Add, Copy, Set as default, etc.) views from the Infrastructure search screen.
You can do the following actions after performing a search operation:
| Action | Steps/Description | ||||||
|---|---|---|---|---|---|---|---|
| Save a View | After executing a query, you have an option to save the current view. To save the current view:
| ||||||
| Save New View | You can modify an existing query and save the filter criteria and its results as a new view. Follow these steps to do this:
| ||||||
| Update Saved View | You can modify an existing query and save the view. Follow these steps to do this:
| ||||||
| Restore Saved View | This option reverts to the previously saved view. Once you have made changes to a specific query, which is already saved as a view:
| ||||||
| Copy Link | After executing a query, you have an option to copy the Direct link (URL) to the view. To copy a Direct link (URL) to a view:
| ||||||
| Set Favorite | To mark a view as favorite:
| ||||||
| Rename | The Rename option allows you to rename the name of the view. To rename a view:
| ||||||
| Copy | The Copy option allows you to create a copy of a view. To create a copy of a view:
| ||||||
| Set Default View | The Set Default View option allows you to set a view as a default view for the current user. To set a view as a default:
The User default takes first precedence. In the absence of a User default, the Role default is displayed. If no Role default exists, the System default is displayed. | ||||||
| Share | The Share option allows you to share a view with users who are assigned the selected role. To share a view:
Based on the scope of the user, the options appear. For Partner scope:
Note: Only users with Resource View or Resource Manage permission have access to this link. | ||||||
| Remove | The Remove option allows you to remove a view. To remove a view:
| ||||||
| Add Resource | The Add Resource functionality lets you add a resource manually. To add a resource:
| ||||||
| Download resources | The Download Resources functionality lets you download the resources at the client level, in CSV format. To download resources:
|
Customize columns
You can select resource attributes and custom attributes for listing from the Column Settings popup window.
Navigate to Infrastructure → Search.
Click the Settings (gear) icon available on the upper-right corner of the resource listing screen to view a list of 100 resource attributes including custom attributes.
Note: A maximum of 100 custom attributes are displayed in the list. You can search for a custom attribute that is not listed but is available under the client.
Search for the resource attribute or custom attribute. The search result can have resource attribute or custom attribute or both.
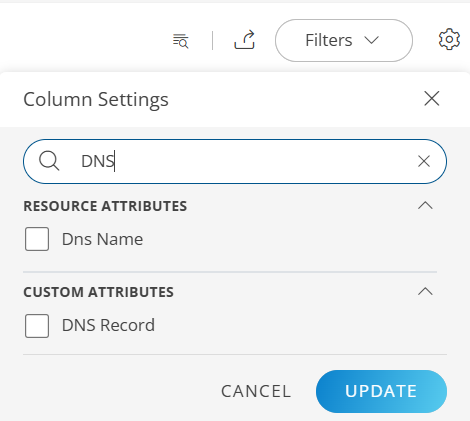
Select the resource attribute(s)/custom attribute(s) and click UPDATE.
The resource attribute is added as a column in the list.
Scroll to the right of the screen to view the column(s).- The custom attribute is listed as a column, with its value for the resource(s) it is assigned to.

Note:- In case a custom attribute is assigned to one or more resources, you will see the custom attribute value for all those resources.
- Custom attributes are case-sensitive. The custom attribute must be entered in the search field with the exact capitalization as it was originally defined.
- Refreshing the screen will clear all the selected columns. The default columns will be displayed. You can create Views to save the column listing. See Views for more information on saving a view.
- The custom attribute is listed as a column, with its value for the resource(s) it is assigned to.
Filters
Use the Filters option to filter and search.
To filter:
- Click Filters and then select the required attribute.
- Click Filter.
Multi-select capability
This feature is for screens that support multi-select.
You can select multiple items and perform actions.
Search for the items and select the checkbox next to the item.
Click the Actions menu and select the required option.
Note: Depending on the actions performed, there will be limitations. If there is a breach on the limit, then the UI will show you a message.
List of Attributes
Keyword search will search for occurrence of that string across the following fields:
| id | name | ipAddress | make | model | serialNumber |
| hostName | resourceName | dnsName | aliasName | os | description |
| softwareVersion | LocationName | CloudInstance Public Ip | CloudInstance instance Id (Management Object Id) | NetworkInterface Name | NetworkInterface Ip address |
| NetworkInterface Mac address | NetworkInterface description | NetworkInterface aliasIp | custom attribute name | custom attribute value |