A partner administrator with manage clients permission can create, activate, terminate clients. A Client scope access is restricted to a specific client. Partner permissions apply to all partner clients but the partner can restrict some client permissions.
Create a client
Follow the steps given below to create a client:
Navigate to Setup > Accounts > Clients.
Click +Add.
This takes you to the NEW CLIENT page and begins the create client workflow indicated by the tabs in the menu bar. At each step in the workflow, click Next to continue to the next step or click Back to return to the previous step. Click Skip to skip data entry on the current page or Finish to complete creating the client.
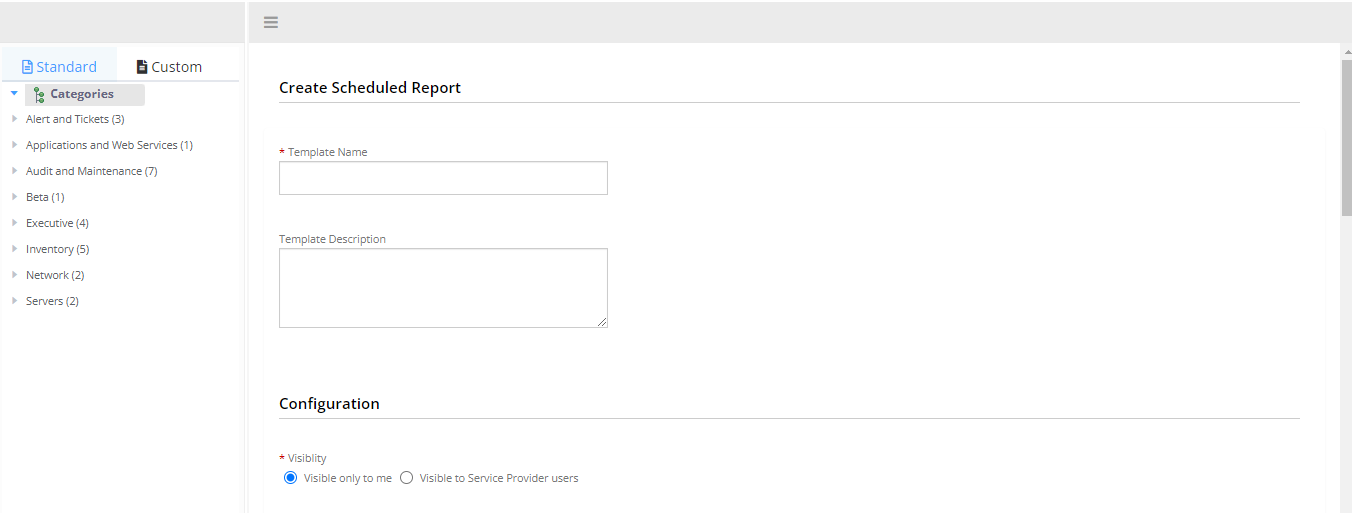
In the Client Details tab, enter the following client information and any optional information if you want:
Client Name
Address
Country
Time Zone
To restrict access to specific IP addresses, select the Restrict Access To Specific IP(s) checkbox. Restricting access to specific IP addresses from the console can improve system security. When a partner user tries to log in from a restricted IP address, the following error message is displayed:
Your organization policies restrict you from accessing
OpsRamp
from your current IP.
Select the Enable Global Policies checkbox to enable global policies for the client.
This flag is considered for non-SDK based resources.
For SDK based resources, regardless of whether this checkbox is enabled or disabled, the DMPs will be automatically applied.
In the Log Management section, select Yes or No to enable or disable log management.
In the Trace Management section, select Yes or No to enable or disable trace management.
In the Availability Settings section, select the option as required:
In the Integration Settings section, select one or more available custom integrations that a client can inherit from the partner’s configurations.
In the Application Discovery & Dependency Mapping section, select Yes to enable or No to disable the application discovery and dependency mapping.
In the Agent Monitoring Capabilities section, select Yes to enable agent self-monitoring and choose a time-frequency from the drop-down menu (supported time frequencies are 1, 2, 3, 6, and 12 hours), or select No to disable agent self-monitoring.
In the Admission control for agents in Public Cloud section, select Yes to enable or No to disable onboarding AWS, Azure, and Google Cloud Platform Resources, using agent without public cloud integration.
In the Patch Management section, select Yes to enable or No to disable auto patch scan.
In the Remote Access Management section, for each listed feature, select Yes to enable or No to disable remote commands on the client.
In the Agent Policies section, select the checkbox to apply the policy to the devices listed for your organization. Click the Add New button to define a new policy.
Click Next.
Package selection page
In the Product Package tab, select the packages you want and click Next to continue.
In the Add-Ons tab, select the checkbox for the add-ons you want to install and click Next to continue.
On the ADD SERVICES page, select the services and technology that corresponds to the selected services.
Click Next to define service details.
On the SERVICE page, click + to add Alternate Access Details and to add Internet Service Provider Details.
Click Skip or Next to go provide network architecture information.
Network architecture page
On the ADD NETWORK ARCHITECTURE page, upload an image of the client network architecture and enter a Title for the image. The network architecture visualization helps clients understand the root cause of alerts.
Click Finish to create the client and display the client configuration on the CLIENT DETAILS page.
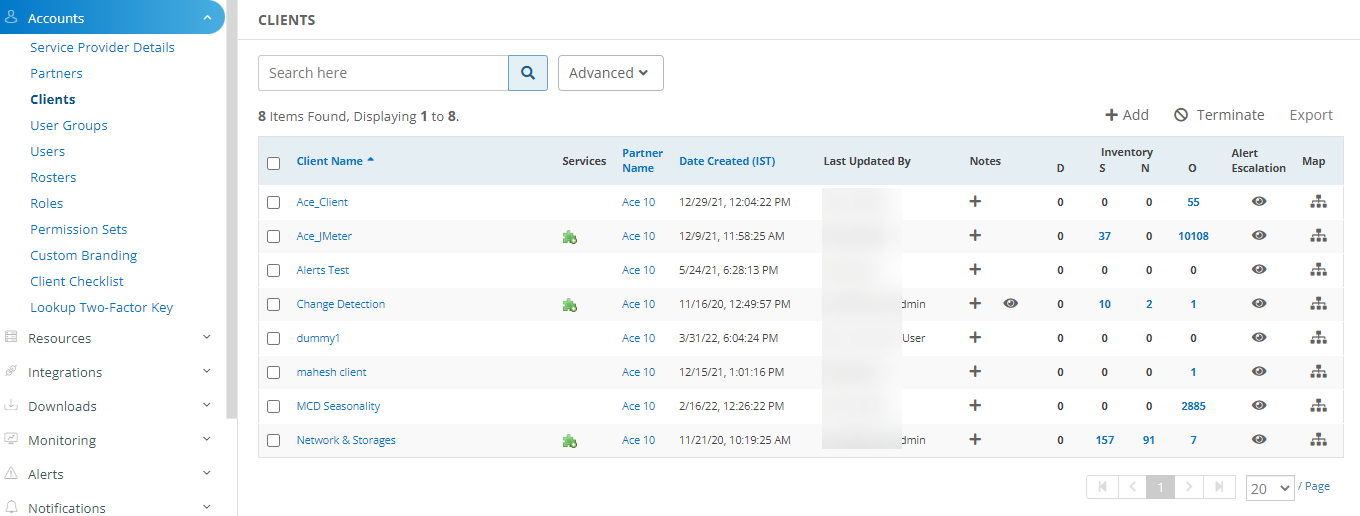
View a client configuration
You can view the list of clients added to the organization on the CLIENTS page.
Select a client to edit client settings.
If you are a partner administrator with two-factor authentication enabled and activated, your two-factor key is re-authenticated when you save the updates to CLIENT DETAILS. Three unsuccessful two-factor authentication attempts redirect you to the login page.
Export client details
Client information can be downloaded and saved in CSV file format on your local computer:
On the CLIENTS page, select Export. It will reroute to the Tenant Profiles report page.
Input data in the Tenant profiles report creation page. Select the attributes and the schedule as needed. Click Save to generate the report.
Click the Download CSV icon. The report is downloaded.
As Partner does not have device information, the generated report will have NA in the row (against the partner name) for Desktops, External ID, Network Devices, Servers and Other Devices.
The exported file includes the following information:
Attribute
Description
Tenant ID
Tenant ID
Partner Name
Name of the partner
Client Name
Name of the client
Unique ID
Partner Identifier to whom the client belongs
Email
Client email address
Address
Client address
City
Client city
State
Client state
Country
Client country
Zip
Client zip code
Phone Number
Client telephone number
Mobile Number
Client cellular number
Contact Person Name
Contact person name
Time Zone
Client time zone
External ID
External client identifier
Activated
Client activation state: Yes = activated, No = terminated
Date Created
Date and time when the client was created
Last Updated By
Name of the person who last updated the client details
Desktops
Number of desktops attached to the client
Servers
Number of servers attached to the client
Network Devices
Number of network devices attached to the client
Other Devices
Number of other types of devices attached to the client, such as storage devices
Search for a client
Use the Search box to search for a client, entering the client name.
Use the Advanced search option to filter the search results:
Click Advanced.
Choose the client Status type:
All - Displays active and terminated clients.
Active – Users actively using the platform.
Terminated – Terminated clients.
Enter a Client Name.
Use the Clear All option to clear the filters.
Activate a client
Once terminated, you cannot reactivate a client. Follow the process to onboard a client.
Terminate a client
Client termination is a process of moving the client to a terminated state and cleaning up all client data. The data will be deleted and can no longer be retrieved once terminated. A partner administrator with manage clients permission can terminate a client.
The following client data is deleted:
Resources & Synthetics along with asset data
Metrics
Alerts
Tickets
Users
Audit data
Configuration & Policies
Device management policies
Maintenance windows
Alert correlation policies
SNMP trap configuration
Client details
Management profiles
Integrations
SSO configurations
To terminate a client:
Navigate to Setup > Accounts > Clients. The CLIENTS page is displayed.
Search for the client you want to terminate using the search box.
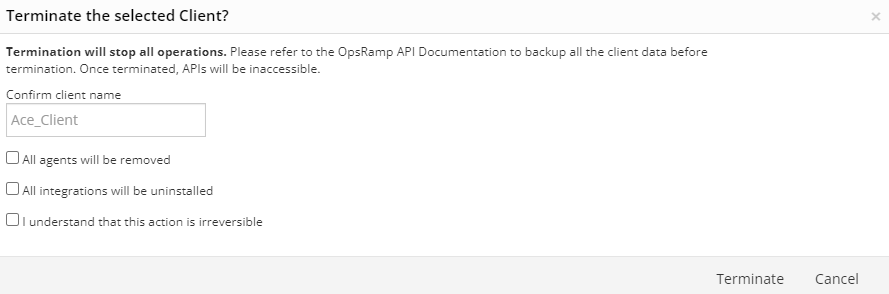
Select the checkbox for the client and click Terminate. The Terminate the selected Client? warning popup appears.Popup provides all information regarding backing up all client data because once terminated without backup, all data will be erased permanently. Note: You can terminate only one client at a time.
Provide the following information in the popup:
Enter the client name (as shown in the box) in the Confirm client name box.
Select the checkboxes against the information provided. Note: All fields are mandatory.
Click Terminate to confirm you want to terminate the client. The client is terminated and all data related to the client is erased. The client cannot be activated again. Also, all the users will go into Inactive state.
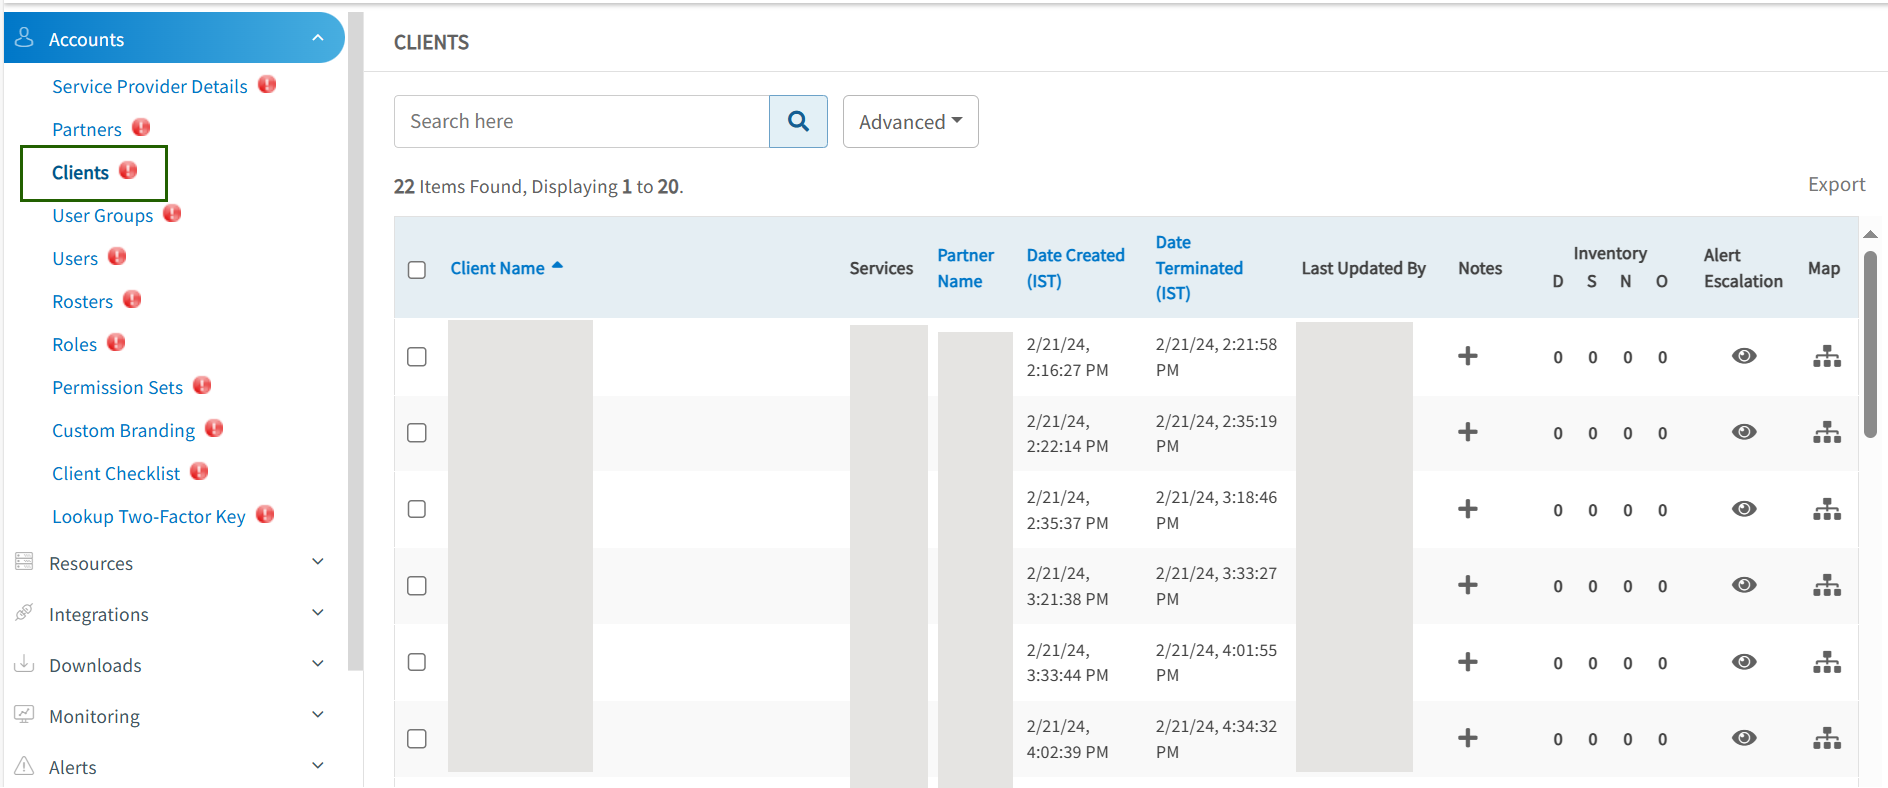
Use Advanced Search feature to view the terminated clients:
Click Advanced search. The Advanced Search popup appears.
Choose the Status drop-down menu option.
Select Terminated and click Search to display terminated clients.