Overview
OpsRamp now offers an enhanced agent upgrade experience for both Linux and Windows agents, with version selection, scheduled upgrades, pre-upgrade validation, and real-time progress tracking, all from a single UI.
Keeping your agents updated ensures you have the latest features, bug fixes, and performance improvements. We recommend keeping agents on the latest supported version.
Info
This upgrade experience is currently available as a Beta feature and must be enabled through a feature flag. Contact OpsRamp Support to enable it for your account.Prerequisites
- The agent must be online and communicating with the OpsRamp Platform.
- You must have management permissions on the target resource.
- Agent version 22.0.0 or later.
Note
This enhancement is introduced in Agent 22.0.0, which is treated as release N. Full support across the N, N-1, and N-2 release window starts after two subsequent agent release cycles. In other words, after two additional releases, 22.0.0 becomes N-2, with newer releases becoming N-1 and N. To update to N-1 or N-2, the current agent version must be 22.0.0 or later.Upgrade policy
Each agent can be assigned one of four upgrade policies:
| Upgrade Option | Description |
|---|---|
| Auto Upgrade | Automatically upgrades the agent to the latest available version as soon as it becomes available. |
| On-Demand Upgrade | Immediately upgrades the agent to a version that you select. |
| Scheduled Upgrade | Upgrades the agent to a selected version at the specified date and time, making it ideal for planned maintenance windows. |
| Do Not Upgrade | This is the default upgrade policy assigned when an agent is onboarded. It prevents the agent from being upgraded until the upgrade policy is changed. |
All four options run the same pre-upgrade checks automatically before proceeding, see Pre-Upgrade Checks below.
How to upgrade Agents
Step 1: Find your Agents
To find the agents that you want to upgrade, follow these steps:
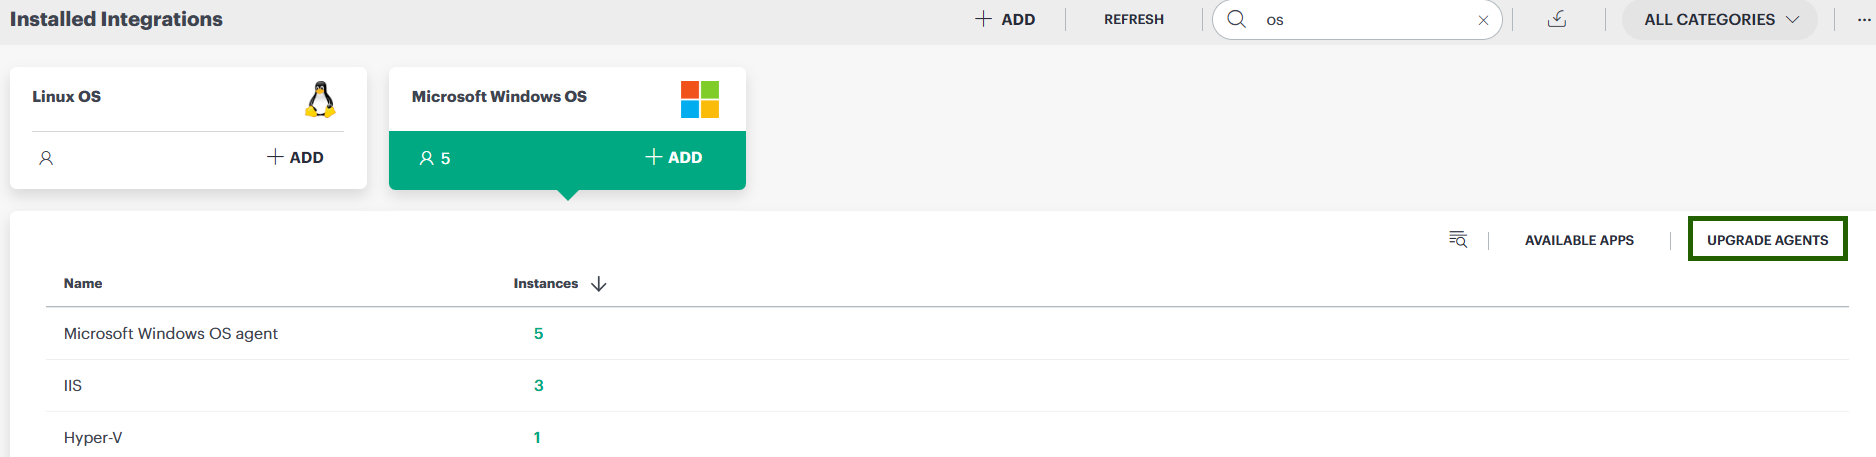
- Go to Setup > Accounts > Integrations.
- Search for Microsoft Windows OS or Linux OS in the Installed Integrations list.
- Click the integration tile (Windows-OS or Linux-OS) for the agents that you want to upgrade.
- Click Upgrade Agents to open the agent details page.
- Select one or more resources from the list. Use Search or Filter to narrow the list if needed.
- Click Actions menu (or the 3-dot menu), then choose the upgrade option you want (see details in step 2 below).
Step 2: Choose an upgrade option
Auto Upgrade
Sets the agent to always move to the latest version automatically, with no manual trigger needed for future upgrades.
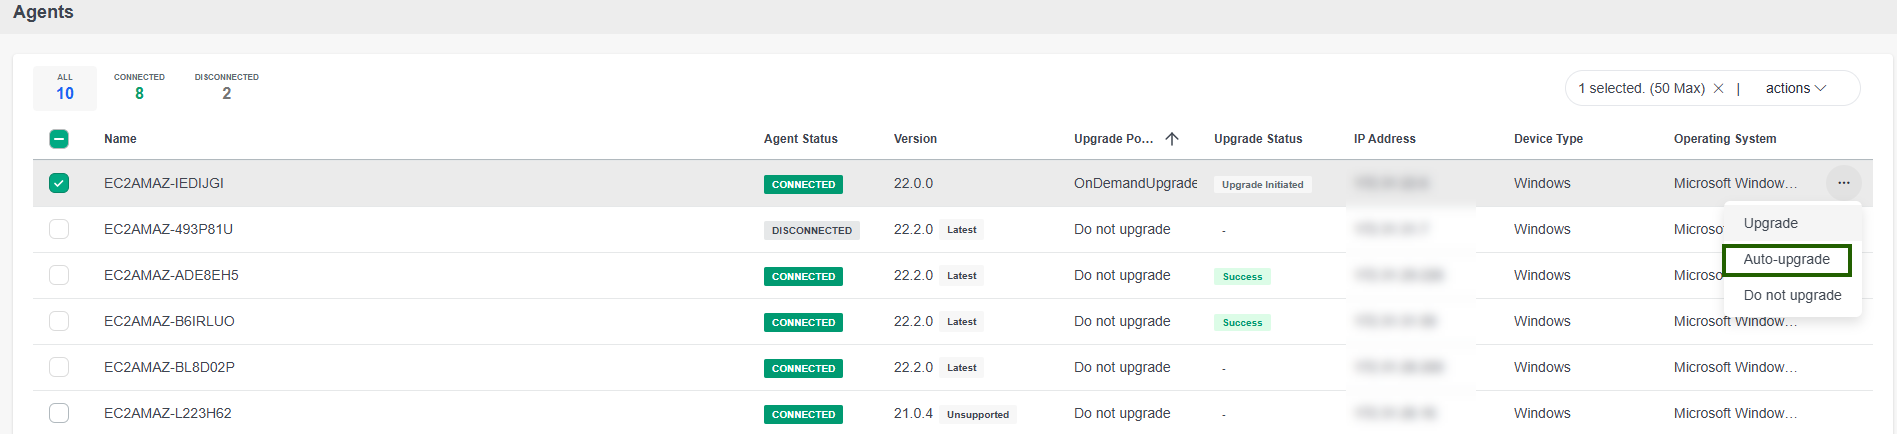
- Select one or more agents from the listing page.
- Click Auto-upgrade from the actions menu (or the 3-dot menu, for a single agent).
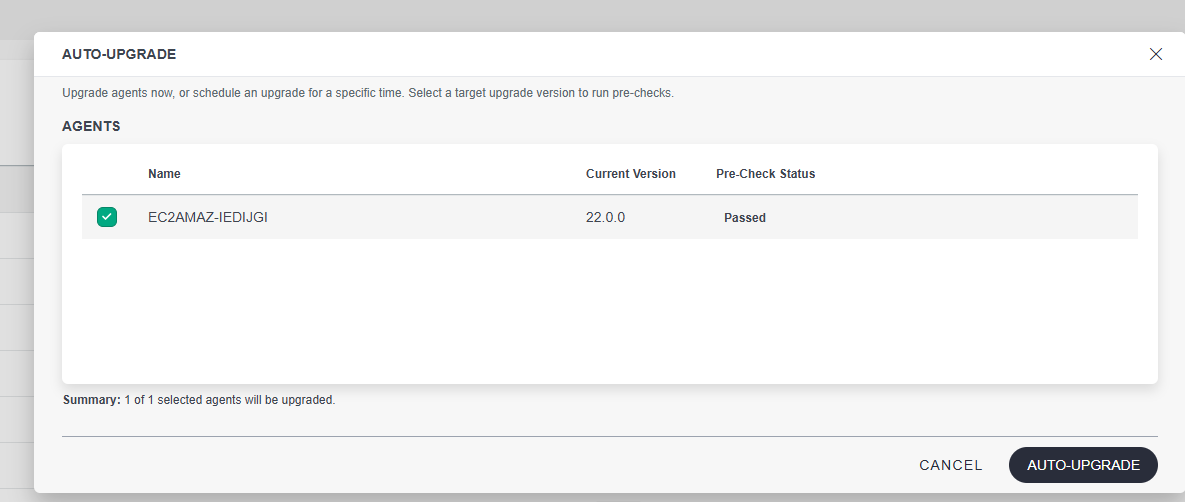
- On the Auto-Upgrade page, select the agents you want to automatically upgrade to the latest available version.
- The system automatically runs pre-upgrade checks. Review the results, only agents that pass can proceed.
- Click Auto-upgrade.
Once selected, the system checks for new versions and applies upgrades automatically every 6 hours.
On-Demand Upgrade
Triggers an immediate, one-time upgrade to a specific version.
- Select one or more agents from the listing page.
- Click Upgrade from the actions menu (or the 3-dot menu, for a single agent).
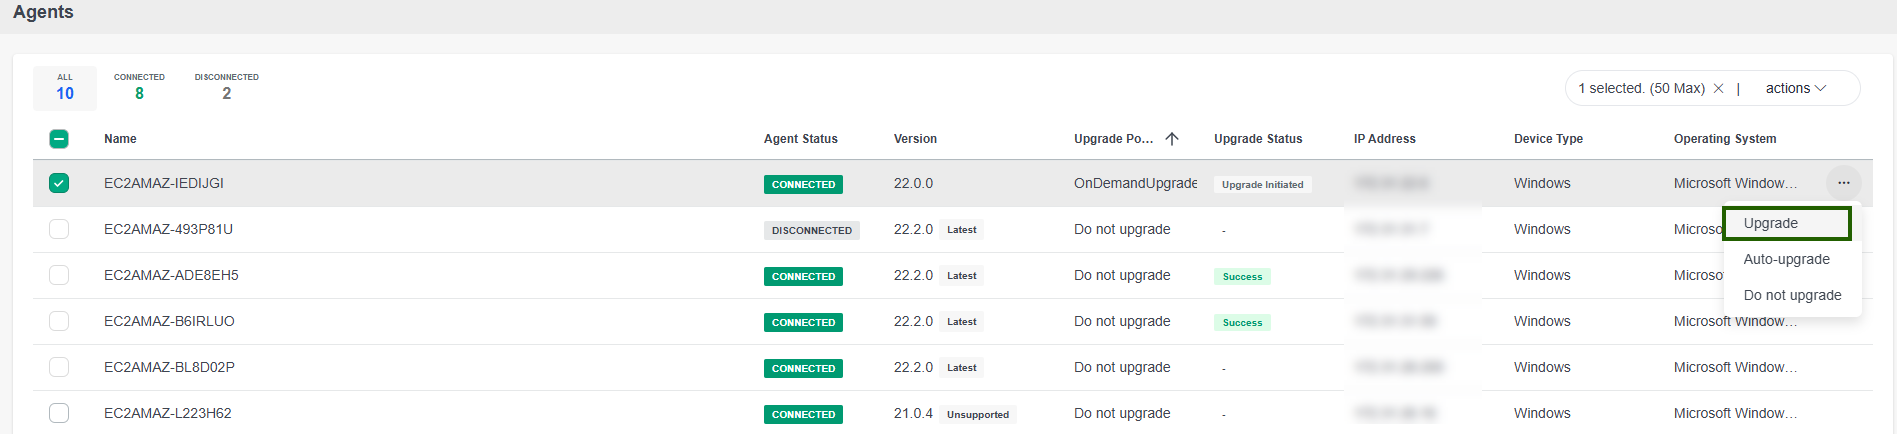
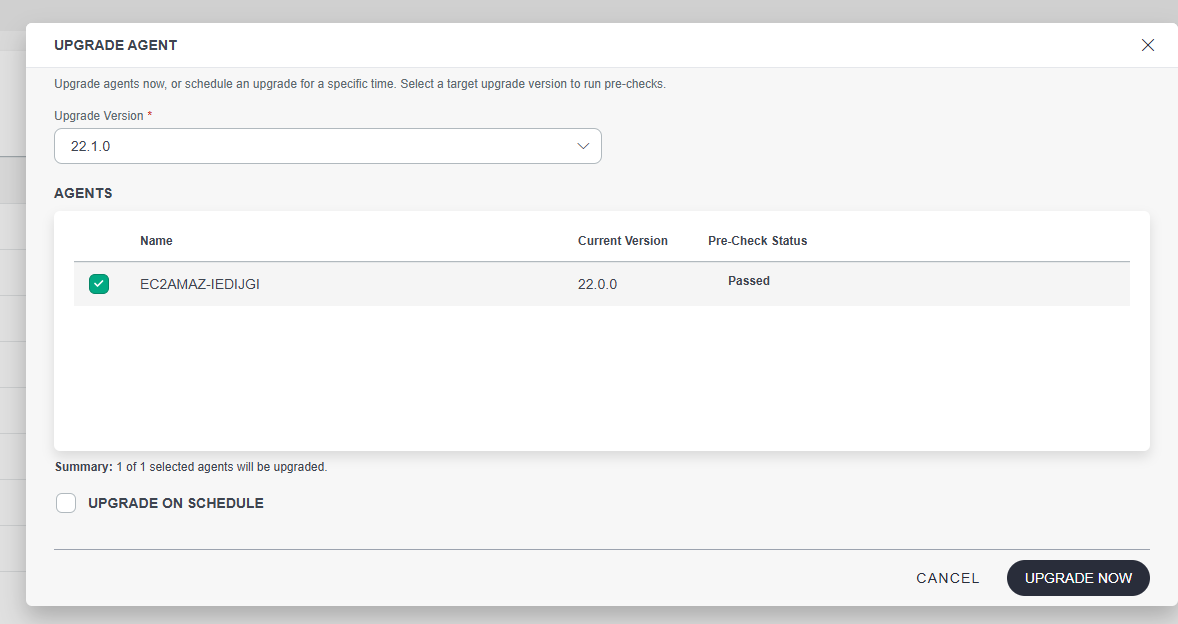
- On the Upgrade Agent page, select a target version (N, N-1, or N-2).
- Review the pre-upgrade check results.
- Click Upgrade Now to start the upgrade immediately.
Once the upgrade is initiated, the Upgrade Policy is automatically set to Do Not Upgrade.
Scheduled Upgrade
Plans an upgrade for a future date and time, ideal for coordinating with a maintenance window.
- Select one or more agents from the listing page.
- Click Upgrade from the actions menu (or the 3-dot menu, for a single agent).
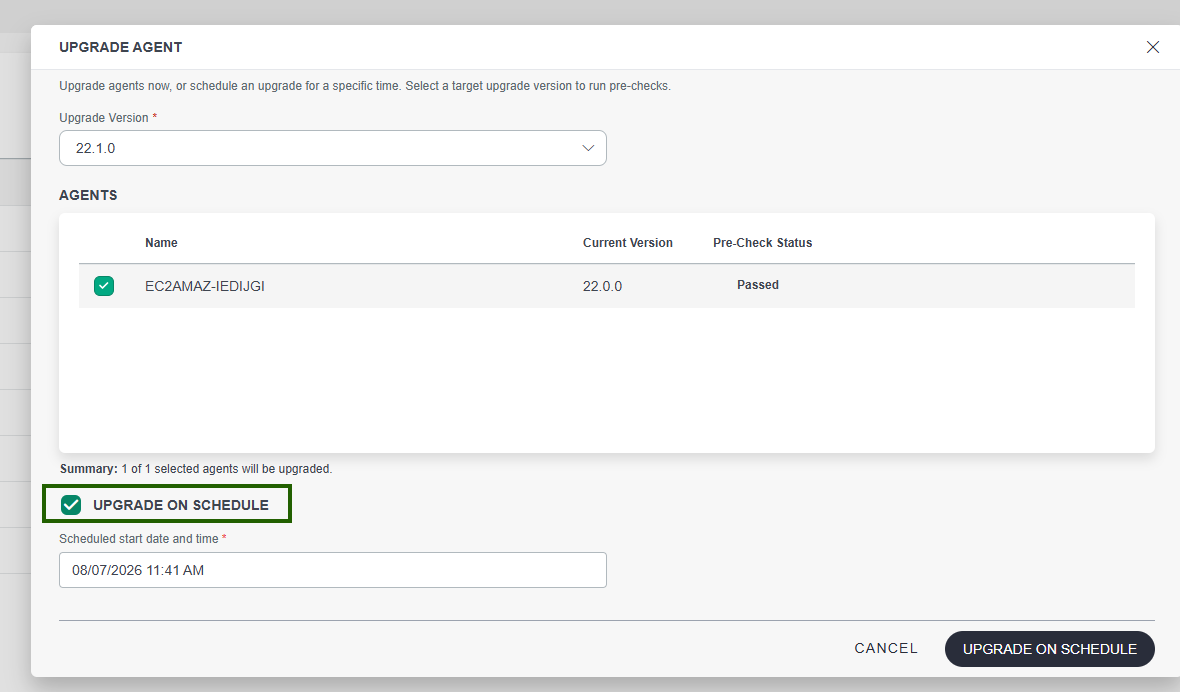
- On the Upgrade Agent page, select a target version (N, N-1, or N-2).
- Review the pre-upgrade check results.
- Select the Upgrade on Schedule checkbox.
- Choose a start date and time. The system uses the time zone set in user profile.
- Click Upgrade on Schedule to save it.
Once the upgrade is initiated, the Upgrade Policy is automatically set to Do Not Upgrade.
You can modify or cancel a pending schedule at any time before it runs.
Cancel a scheduled upgrade
To cancel a pending scheduled upgrade, follow these steps:
Note
Cancellation is only possible while the upgrade status is Pending. Once an upgrade moves to In Progress, it can no longer be canceled.- From the agent listing page, select the agent(s) whose scheduled upgrade you want to cancel.
- Click the 3-dot menu and select Do Not Upgrade.
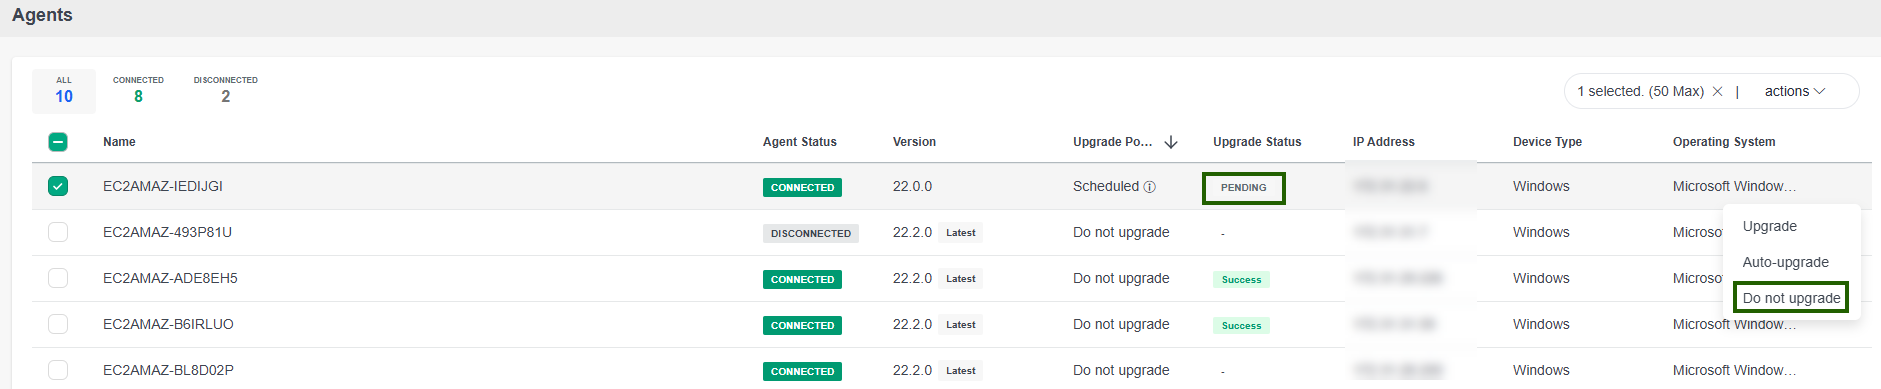
- Confirm the agent selection, then click Do Not Upgrade.
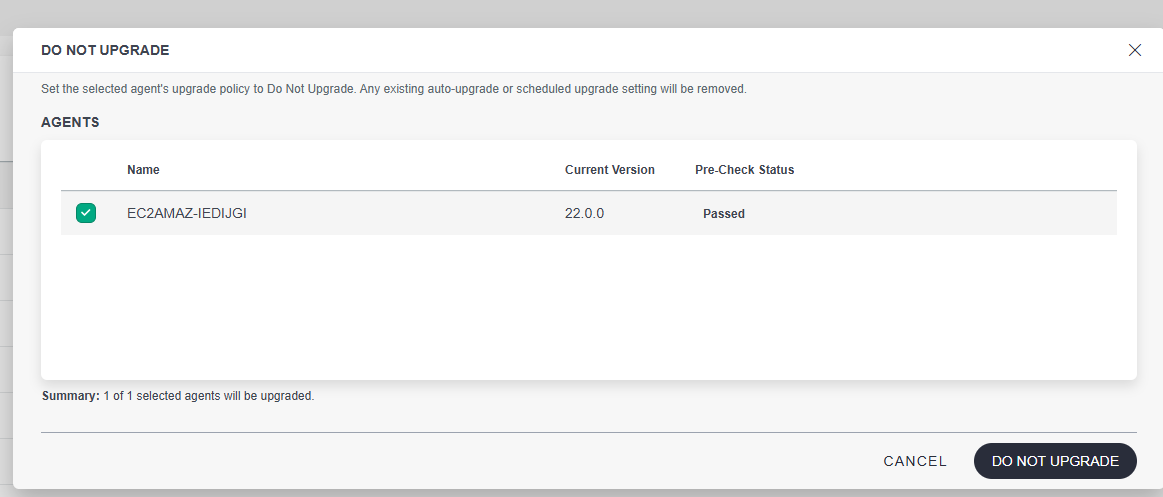
The scheduled upgrade for the selected agent(s) is canceled.
Do Not Upgrade
Keeps the agent at its current version and prevents all upgrade actions until the policy is changed.
- Select one or more agents from the listing page.
- Click Do Not Upgrade from the actions menu (or the 3-dot menu, for a single agent).
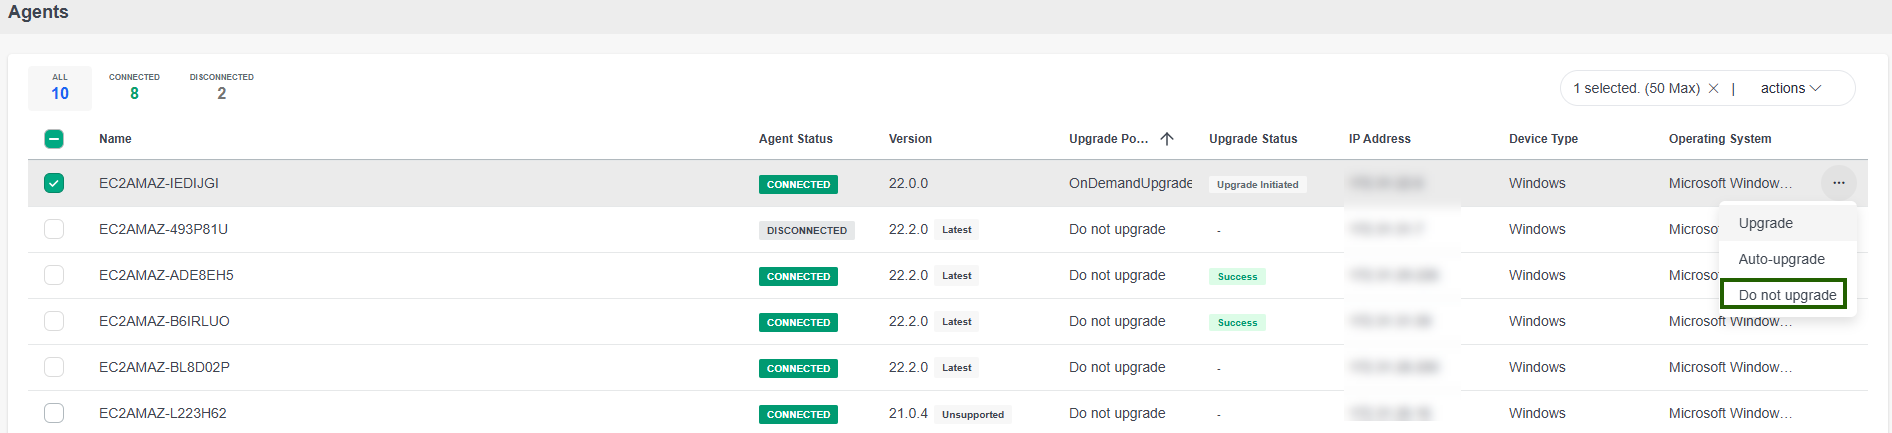
- Review the pre-upgrade check results.
- Select the agent(s) to lock.
- Click Do Not Upgrade to confirm.
Pre-upgrade checks
Before any upgrade runs, the system validates each selected agent against these checks:
| Prerequisite Check | Description |
|---|---|
| Agent Connectivity | Verifies that the agent is online and connected to the OpsRamp platform. |
| Version Compatibility | Verifies that the selected target version is newer than the currently installed agent version. |
| N-1/N-2 Upgrade Eligibility | Verifies that the installed agent version is 22.0.0 or later, which is required for upgrades to supported N-1 and N-2 releases. |
| Device Permissions | Verifies that you have the required permissions to manage and upgrade the selected resource. |
Each agent shows one of the following results:
- Passed - Eligible to proceed with the upgrade.
- Failed - Cannot be upgraded. A specific reason is shown.
Only agents that pass all checks proceed with the upgrade.
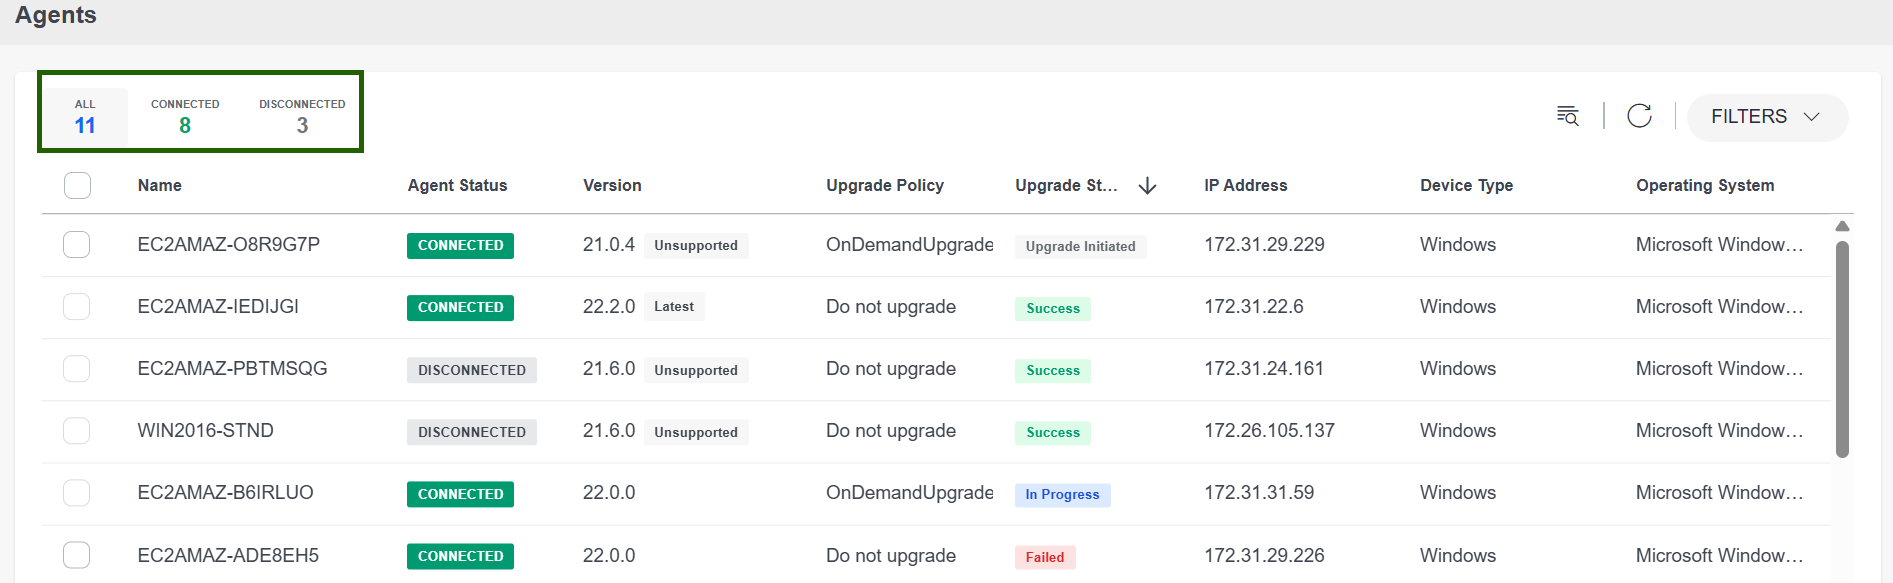
Agent listing page
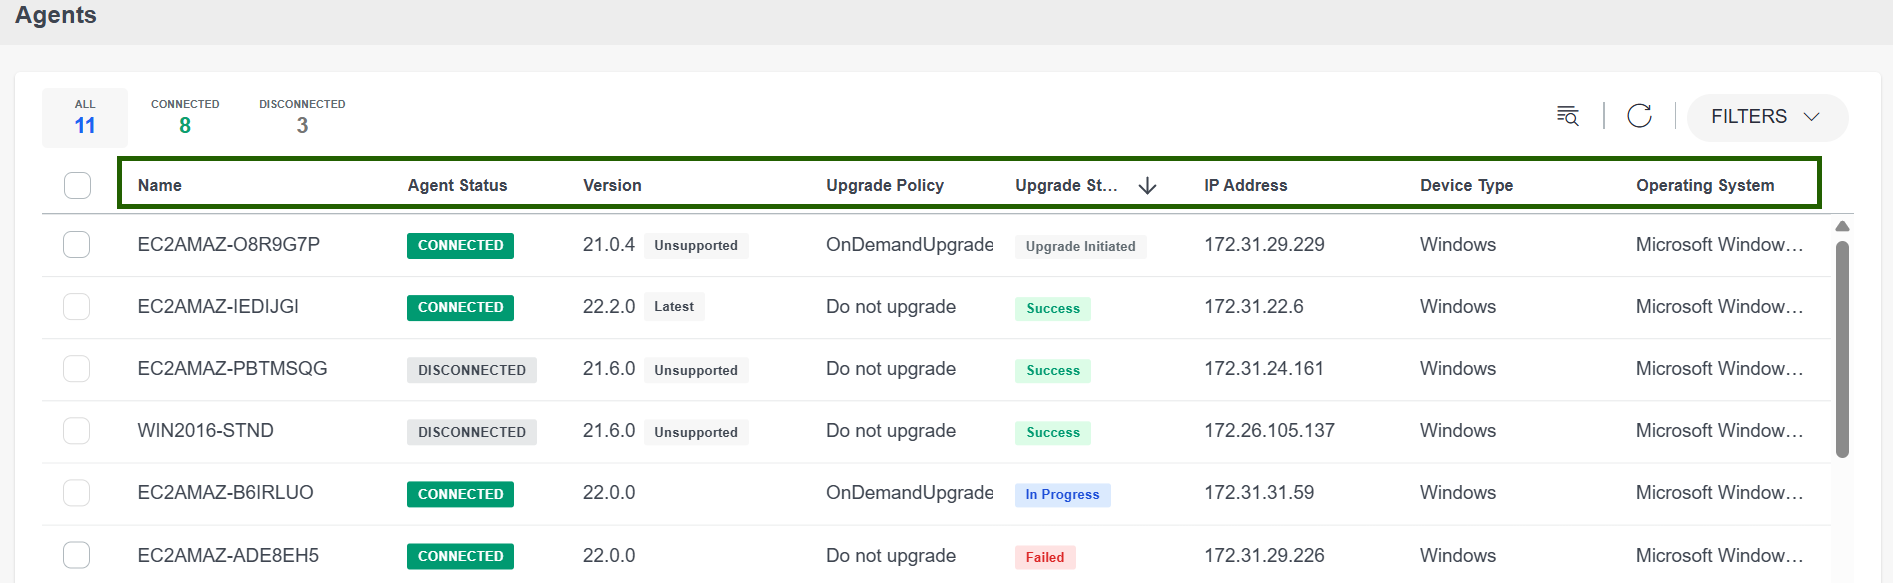
The Upgrade Agents page shows the following columns for each resource:
| Column | Description |
|---|---|
| Name | Displays the name of the device. |
| Agent Status | Displays the current connectivity and operational status of the agent. |
| Version | Displays the currently installed agent version. |
| Upgrade Policy | Displays the configured upgrade policy for the agent, such as Auto Upgrade, On-Demand Upgrade, Scheduled Upgrade, or Do Not Upgrade. |
| Upgrade Status | Displays the current or most recent agent upgrade status. |
| IP Address | Displays the IP address assigned to the device. |
| Device Type | Displays the device type, such as Linux or Windows. |
| Operating System | Displays the operating system and version running on the device. |
Tracking upgrade status
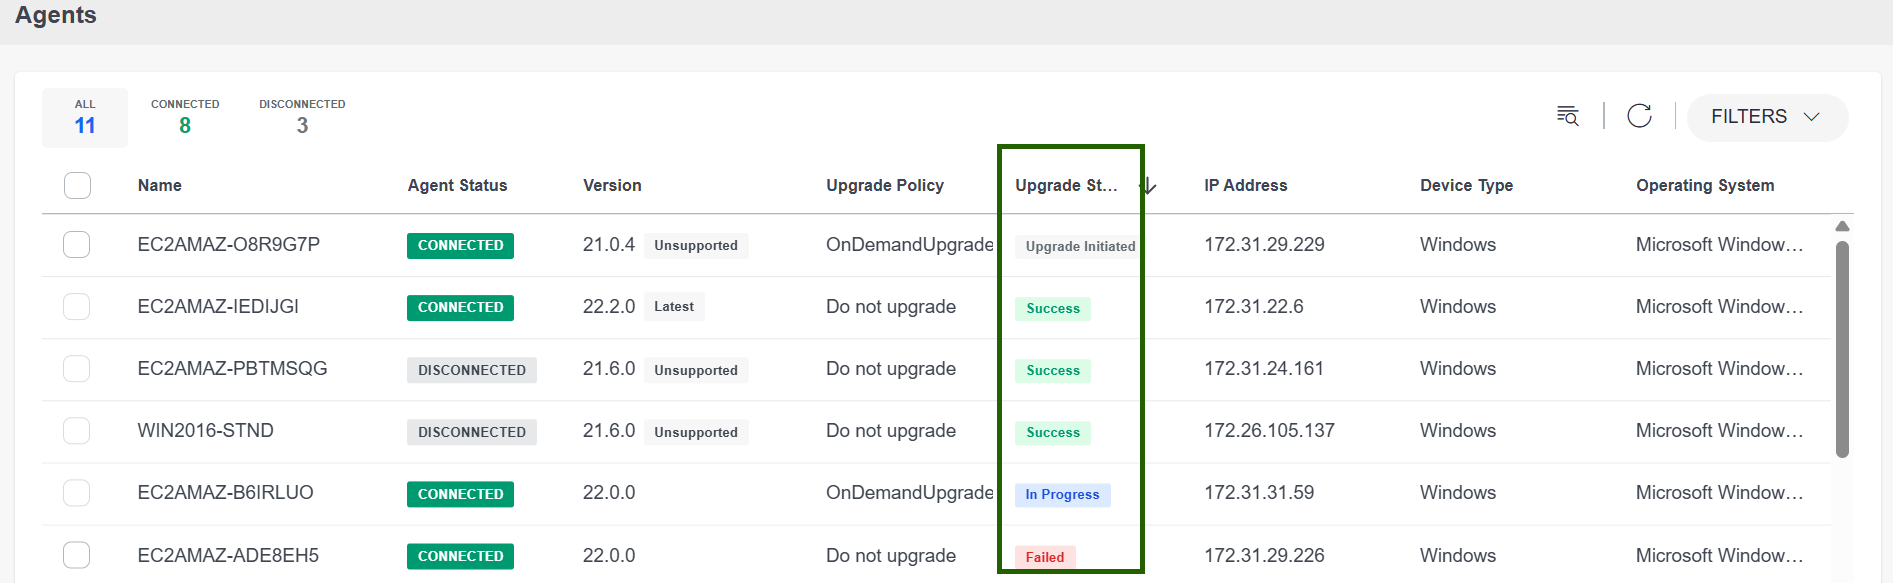
Upgrade progress
Once an upgrade starts, its progress moves through these stages:
| Status | Description |
|---|---|
| Pending | The upgrade request has been queued and is waiting to start. |
| In Progress | The agent upgrade is currently in progress. |
| Success | The agent upgrade completed successfully. |
| Failed | The agent upgrade failed. Review the displayed error message for details. |
The Upgrade Status column in the agent listing shows the current state, with a full timestamp on hover (for example, “2026-04-21 19:10:30 - Successfully upgraded to version 21.0.0-1”).
Version badges
The agent listing shows a badge next to the installed version to flag its status at a glance:
- Latest - The agent is running the most current version.
- Unsupported - The agent is below the minimum supported version. Hovering shows: “Support unavailable on versions below 19.0.0. Upgrade recommended."
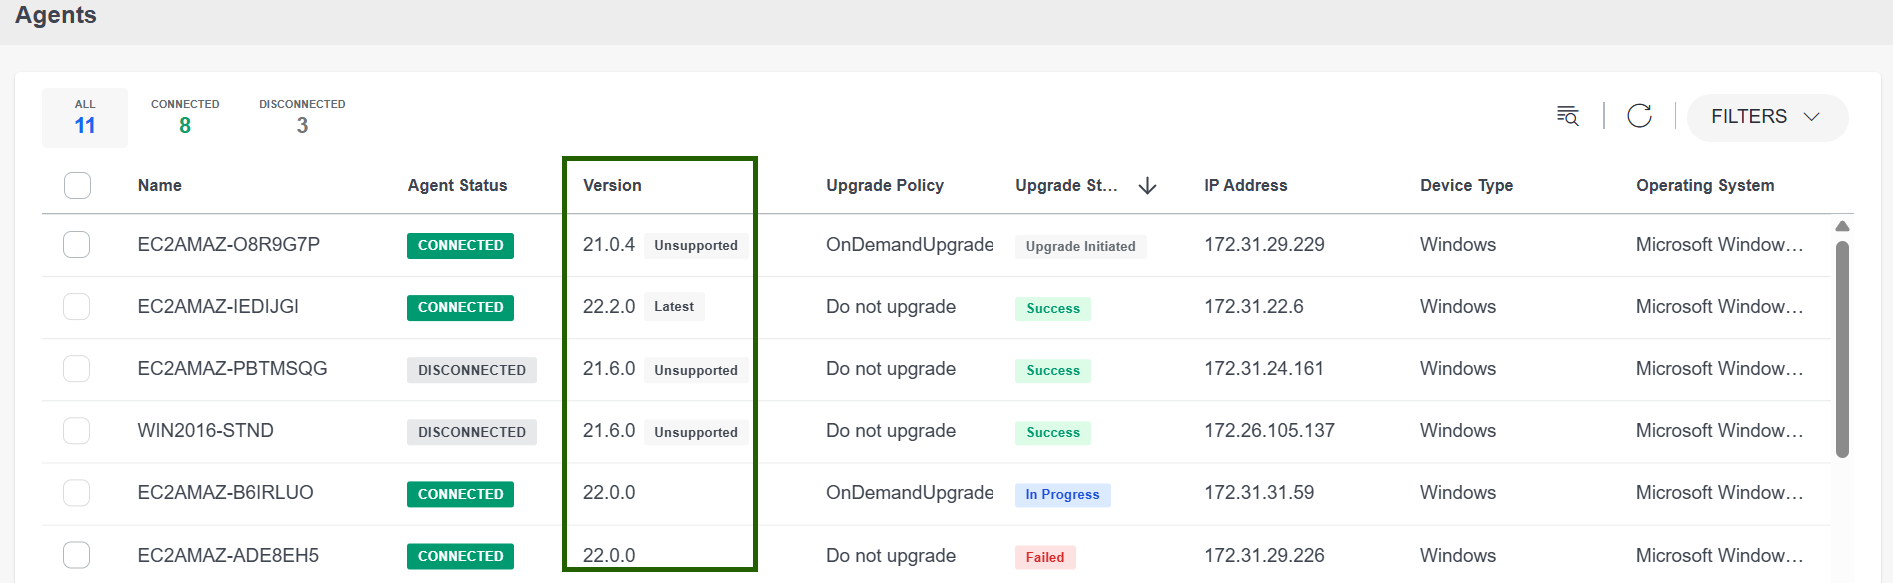
Connection status tabs
Filter the agent listing by connection state using the tabs at the top:
- ALL - Total number of agents.
- CONNECTED - Agents currently online.
- DISCONNECTED - Agents currently offline.