The ServiceNow Store integration allows bi-directional synchronization of incidents between OpsRamp and ServiceNow. You can:
- View an OpsRamp incident in ServiceNow.
- View a ServiceNow incident in OpsRamp.
Prerequisites
- Ensure that the Service Desk Priority Matrix is configured in your OpsRamp environment.
- Ensure that the OpsRamp Integration app is installed in ServiceNow. Refer to Download and Install from ServiceNow Store.
- Complete the OAuth2.0 authentication setup between OpsRamp and ServiceNow.
- Gather the following details from your OpsRamp instance:
- Tenant ID
- OAuth Key
- OAuth Secret
Configure Incident Integration in OpsRamp
Step 1: Navigate to the Integration Setup
- Go to All Clients and select your target client from the dropdown or search.
- Navigate to Setup > Account.
- Click Integrations.
If no integrations are installed, you’ll be redirected to the Available Integrations page.
Step 2: Add the ServiceNow Integration
- On the Installed Integrations page, click +ADD.
- Use the search bar or All Categories to locate ServiceNow.
- Click ADD.
Step 3: Configure INBOUND Tab (OAuth Authentication)
Fill in the following in the INBOUND tab:
- Under AUTHENTICATION:
- Select Authentication Type as OAuth2 from the dropdown.The GENERATE KEY appears.
- Click GENERATE KEY. Save the Tenant ID, Key, and Secret — these are required in ServiceNow’s OAuth setup.
- Under MAP ATTRIBUTES:
Click +ADD. The ADD MAP ATTRIBUTES window appears. The Map Attributes allow you to link ServiceNow properties to OpsRamp properties, enabling seamless data synchronization between the two platforms.
1. Fill in the following in ADD MAP ATTRIBUTES window:
- OpsRamp Entity : Select the OpsRamp entity associated with the integration from the dropdown.For example,
Incident- OpsRamp Property: Select the property related to the OpsRamp entity. This property in OpsRamp will hold the unique identifier for the incident. The list of options change based on your selection in the OpsRamp Entity. For example,incident_id- ServiceNow Entity: Enter the entity from ServiceNow that corresponds to the OpsRamp entity.For example,Incident- SERVICENOW Property: Define the ServiceNow property related to the entity. 2. Fill in the follwing under PROPERTY VALUES - SERVICENOW Property Value: Enter the value associated with a specific property in ServiceNow. It is used to map the value of a ServiceNow property to its corresponding field in OpsRamp. For example,incident_number- OpsRamp Property Value: Enter the property value related to the OpsRamp integration. For example,INC0012345
Note
The Property Value field set does not appear by default. It appears depending your selection in OpsRamp Entity and OpsRamp Property. 3. Under **PROPERTIES**, click **+PROPERTIES** to add a property and fill in the following. For example, `incident_number`
- **Properties**: Enter the property in the system that will be linked to its corresponding value. For example, `INC0012345`
- **Value**:
2. Click **Done**
Step 4: Configure OUTBOUND Tab
Fill in the following in the OUTBOUND tab:
- Under CONFIGURATION, Click add
- Fill in the following in ADD CONFIGURATION window
| Field Name | Field Types | Field Dependency | Description |
|---|---|---|---|
| BASE URI | String | None | Enter the Base URI for the external API or service that you are integrating with. This is the primary endpoint URL used for API communication. |
| Notification Type | Dropdown | None | Select the type of API used for notifications. The options available are: REST API and SOAP API. |
| Authentication type | Dropdown | None | Select the type of API used for notifications. The options available are: REST API and SOAP API. |
| Notification type | Dropdown | Authentication type | Select the type of API used for notifications. When you select REST API in the **Notification Type**, following options are available: - None: No authentication is required for the API connection. - Basic: Basic authentication is required, typically requiring a username and password. - OAuth2: OAuth2 is an authorization framework that allows third-party services to exchange a token for access to the API. The user grants permission via an OAuth2 consent screen, and the application receives an access token. - JWT: JWT is an authentication method where a token is used to authenticate API requests. The token is generated on successful login and is passed along with API requests to prove the user's identity. JWT is commonly used for stateless authentication in RESTful APIs. When you select SOAP API in the **Notification Type**, following options are available: - None: No authentication is required for the API connection. - Basic: Basic authentication is required, typically requiring a username and password. |
 - **Base URI**: Enter the Base URI for the external API or service that you are integrating with. This is the primary endpoint URL used for API communication. For example, ``https://{servicenow-subdomain}.com`
 - **Notification Type**: Select the type of API used for notifications from the dropdown. The options available are: REST API and SOAP API
 - **Authentication Type**:
 When you select REST API in the **Notification Type**, following options are available:
  - None
  - Basic
  - OAuth2
  - JWT
 When you select SOAP API in the **Notification Type**, following options are available:
  - None
  - Basic
 - **Grant Type**: `Password Credentials`
 - **Access Token URL**: `URL:https://{servicenow-subdomain}.com/oauth_token.do`
 <br> For example: `https://demo.servicenow.com/oauth_token.do`
 - **Key**, **Secret**, **Username**, **Password**, and **Scope**
- Click ADD CONFIGURATION.
Step 5: Add Event Configuration
- Under the EVENTS section, click +ADD.
- Fill in the following fields:
- Event Name
- Entity, Entity Type, and Entity Type Event
Advanced Settings (Optional) - Click the dropdown to choose ALL or ANY filters. - Click +ADD to set Property, Operator, and Value. - Click Save.
Actions
Select the Use parent configuration option to inherit parent configuration.
- Enter the End Point URL.
- Select the Notification Type. Available options are REST API and SOAP API.
- Select the Authentication Type. Based on the Notification Type selected, the Authentication Type differs. Available options are Basic, OAuth2, JWT, None.
- Select the Web Method.
Headers & Payload
- Enter attribute and value.
- Enter the payload.
Response Mapping
Configure response property extraction to identify ServiceNow incident ID. To parse the properties returned in response for the configured API payload, select the property from the dropdown and enter the value, and click SAVE.
Note
A custom attribute already configured as response for a given integration is not available when configuring another event. To use the custom attribute, remove the existing mapping from the integration to make the custom attribute available for mapping as response.Attachements (Optional)
Enter the following details:
- Select the Name and enter the Value and click SAVE.
- Enter the Attachment Payload in the field.
- Enter the Key and Value under Attachment Response.
- Click ADD EVENT.
You can perform actions on the created event. See Actions on an Event for more information.
FAILURES
Follow these steps to configure integration failure:
- Click Add in the FAILURES section and enter the following information:
- Select Notify type as Email.
- Enter the email addresses in To and CC fields, and click ADD FAILURE NOTIFICATIONS.
In case of an integration failure, an email is sent to the respective user.
- Click FINISH.
Actions on an Event
You can perform various actions on an event.
- Hover over the event and click the actions (three dots) icon.
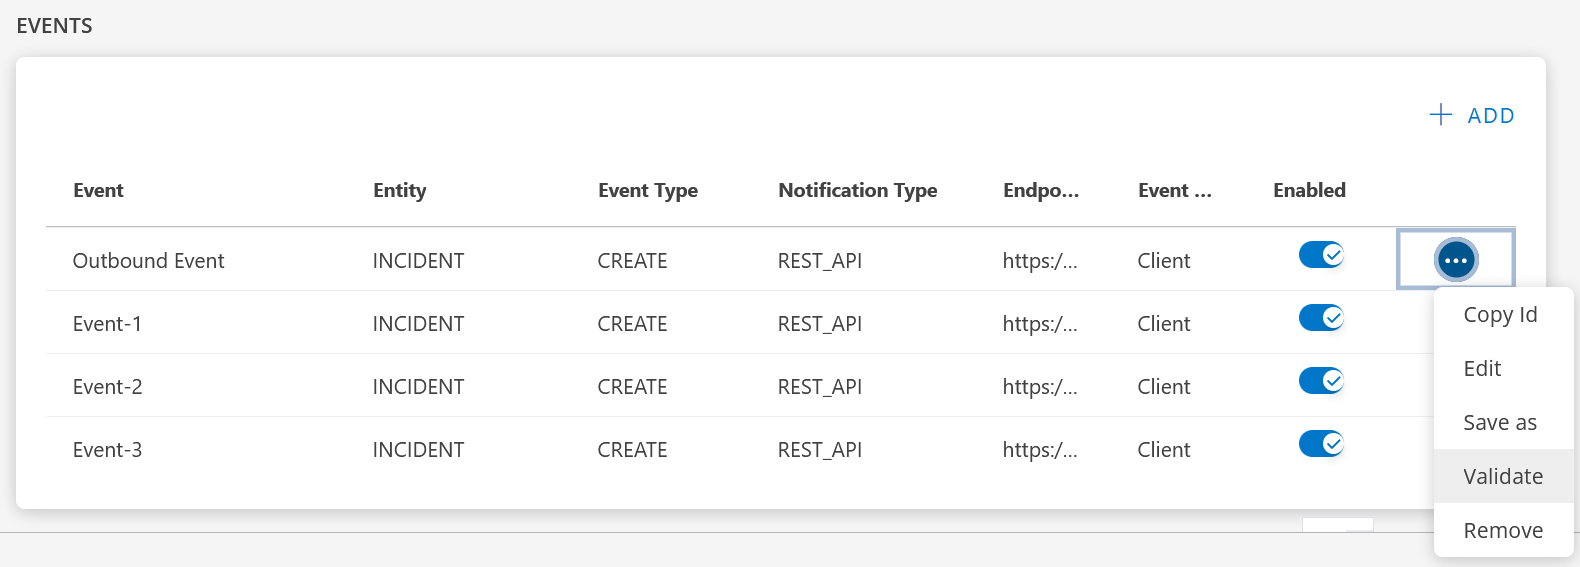
- Select the required action like Edit, Save as, Validate, Remove. * Copy Id: To copy the Event Id. * Edit: To update the event. * Save as: Copy of an event. Use this copy to create another event. * Validate: Validate if the event is successful. Enter the details: JSON or Form and click Validate. A success response is generated if the event is successful. * Remove: To remove the event.
Integration response mapping configuration:
Response mapping configuration is mainly based on the response payload that is received in third party payload; below are a few examples for response mapping configuration -
Integration event payloads
Refer to the integration event payload below to create an incident in ServiceNow.
Create incident in ServiceNow
| Fields | Values |
|---|---|
| Endpoint URL | https://{subdomain}.com/api/now/import/x_opra_opsramp_int_opsramp_incident |
| Headers |
|
| Method | POST |
Example request
{
 "caller_id": "6816f79cc0a8016401c5a33be04be441",
 "status": "$incident.status.name",
 "impact": "$incident.businessImpact.name",
 "urgency": "$incident.urgency.name",
 "subject": "$incident.subject",
 "description": "$incident.impact",
        "opsramp_incident_id": "$incident.uniqueId"
}
Example response
{
 "import_set": "ISET0013148",
 "staging_table": "x_opra_opsramp_int_opsramp_incident",
 "result": [{
  "transform_map": "OpsRamp Incident Trans Map",
  "table": "incident",
  "display_name": "number",
  "display_value": "INC0979030",
  "record_link": "https://{subdomain}.com/api/now/table/incident/c4372d5e0f971200500c00dce1050e56",
  "status": "inserted",
  "sys_id": "c4372d5e0f971200500c00dce1050e56"
 }]
}
Customize ServiceNow Configuration
To complete the incident integration, ServiceNow must be configured to send incident data to OpsRamp — enabling true bi-directional communication.
This section outlines the required steps:
- Enable secure API calls from ServiceNow to OpsRamp
- Ensure custom fields are visible and correctly mapped
- Trigger API calls using business rules on incident creation or updates
Prerequisites
If you’re integrating at the partner level, ensure a custom field named OpsRamp Client ID exists in the Company form.
- Navigate to System Definition > Tables, and locate the
Companytable. - Edit the Form Layout to display the
OpsRamp Client IDfield. - Update each company record with its matching OpsRamp client ID (e.g.,
client_1023).
If you’re integrating at the partner level, ensure a custom field named OpsRamp Client ID exists in the Company form.
- Go to System Definition > Tables, find the
Companytable, and check for this field. - Edit the Form Layout to make it visible.
- Update the field with the OpsRamp equivalent client ID (e.g.,
client_1023). - This ID is referenced in business rules to route incidents correctly.
For client-level integrations, this step is not required.
ServiceNow Kingston version supports OAuth2.0 authentication. To enable correct incident routing and field mapping, you must customize certain ServiceNow components. This information is used in the business rule script to route incidents to the OpsRamp client.
A custom field named OpsRamp Incident ID is preconfigured in the Incident form. To display this field, update the Form Layout in ServiceNow accordingly.
Note
By default, Business rules are made inactive to stop any unnecessary triggering of rules. You would need to enable them and add specific conditions to support it.Modify Custom Fields
Ensure the following custom fields are present and visible in the ServiceNow interface:
- OpsRamp Incident ID: Used to store the reference to the OpsRamp incident in the ServiceNow Incident table.
- Update the Form Layout of the Incident form to expose this field to users and scripts.
Business rules are disabled by default to avoid unnecessary triggers. You must enable them and define appropriate filter conditions.
Configure OpsRamp API Access in ServiceNow
To enable ServiceNow → OpsRamp incident flow, you must configure ServiceNow to call OpsRamp’s Incident API. This step is required to:
- Push newly created or updated incidents from ServiceNow into OpsRamp
- Complete bi-directional synchronization
You’ll need to:
- Create a dedicated ServiceNow user with appropriate permissions
- Configure OAuth2 credentials (from OpsRamp)
- Set up REST messages with the correct endpoint and authentication
- Create a business rule that triggers on incident creation or update
Step 1: Create a User Account in ServiceNow
- Navigate to Organization > Users.
- Click New to create a user.
- Assign the role
x_opra_opsramp_int.admin. - Save the user.
Step 2: Configure the OAuth Provider
- Go to System OAuth > Application Registry.
- Open the record for
OpsRamp OAuth Provider. - Enter the following values:
- Client ID: Use the Key generated from OpsRamp
- Client Secret: Use the Secret from OpsRamp
- Token URL:
https://api.opsramp.com/auth/oauth/token
- Click Update to save.
Step 3: Configure the REST Message
- Navigate to System Web Services > REST Message.
- Search for
OpsRamp Incident RESTand click to edit. - Update the Endpoint:
https://api.opsramp.com - Open the HTTP Methods tab.
- For both Create Incident and Update Incident, set the Endpoint to:
https://api.opsramp.com/api/v2/tenants/${tenantId}/incidents - Click Update.
Step 4: Modify the Business Rule Script
- Navigate to System Definition > Business Rule.
- Search for and open
OpsRamp Incident BR. - Set the Run Conditions:
- Ensure the rule triggers when created or updated
- Add filter:
Created by/Updated byis notsystem administrator
This avoids recursive API calls triggered by OpsRamp’s own updates.
In the script:
- For client-level, set:
var opsRampClientId = 'client_392'; - For partner-level, use:
var opsRampClientId = current.company.x_opra_opsramp_int_opsramp_client_id;(Uncomment this line and comment out the static one.)
- For client-level, set:
Click Update.
Step 5: (Optional) Add Custom Fields to Payload
To extend payload mapping:
Modify Import Sets
- Go to System Definition > Tables.
- Search for
x_opra_opsramp_int_opsramp_incident. - Click Columns > New to add new fields.
Modify Transform Map
- Navigate to System Import Sets > Transform Maps.
- Open
OpsRamp Incident Trans Map. - Click Field Maps > New.
- Enter:
- Map Source Table:
x_opra_opsramp_int_opsramp_incident - Target Table:
incident - Source Field: The newly created field
- Target Field: Desired ServiceNow field
- Coalesce: Inactive
- Use Source Script: Inactive
- Map Source Table:
Once these configurations are complete, ServiceNow will be able to send incident updates to OpsRamp automatically, ensuring full two-way synchronization.