After installing the OpsRamp Agent integration and downloading the Agent, you can view the following details on the integration home screen:

This section provides information on Agent resource details and instructions on how to manage them.
View Resource Details
- Navigate to Setup > Account > Integration.
- Use the search feature on the Installed Integrations page to find Linux OS or Microsoft Windows OS.
Click on the integration tile to view the resource details for the selected integration. - Click the Instances.
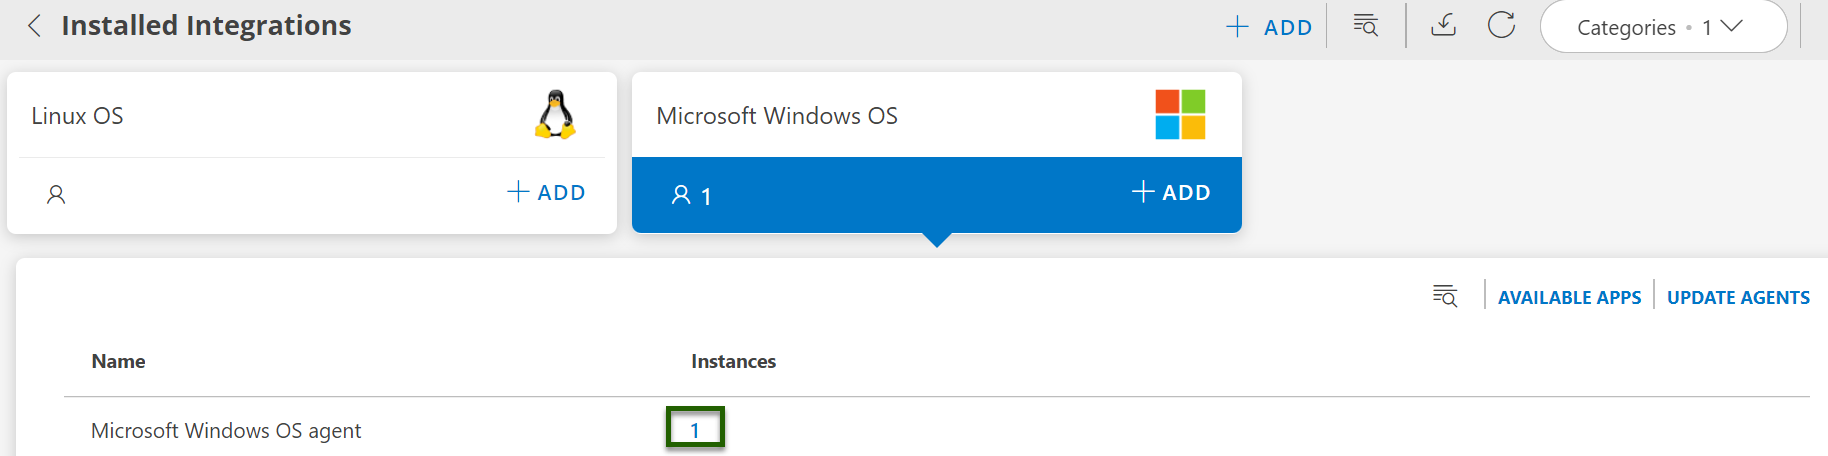
- It will redirect to the Resource Details page.
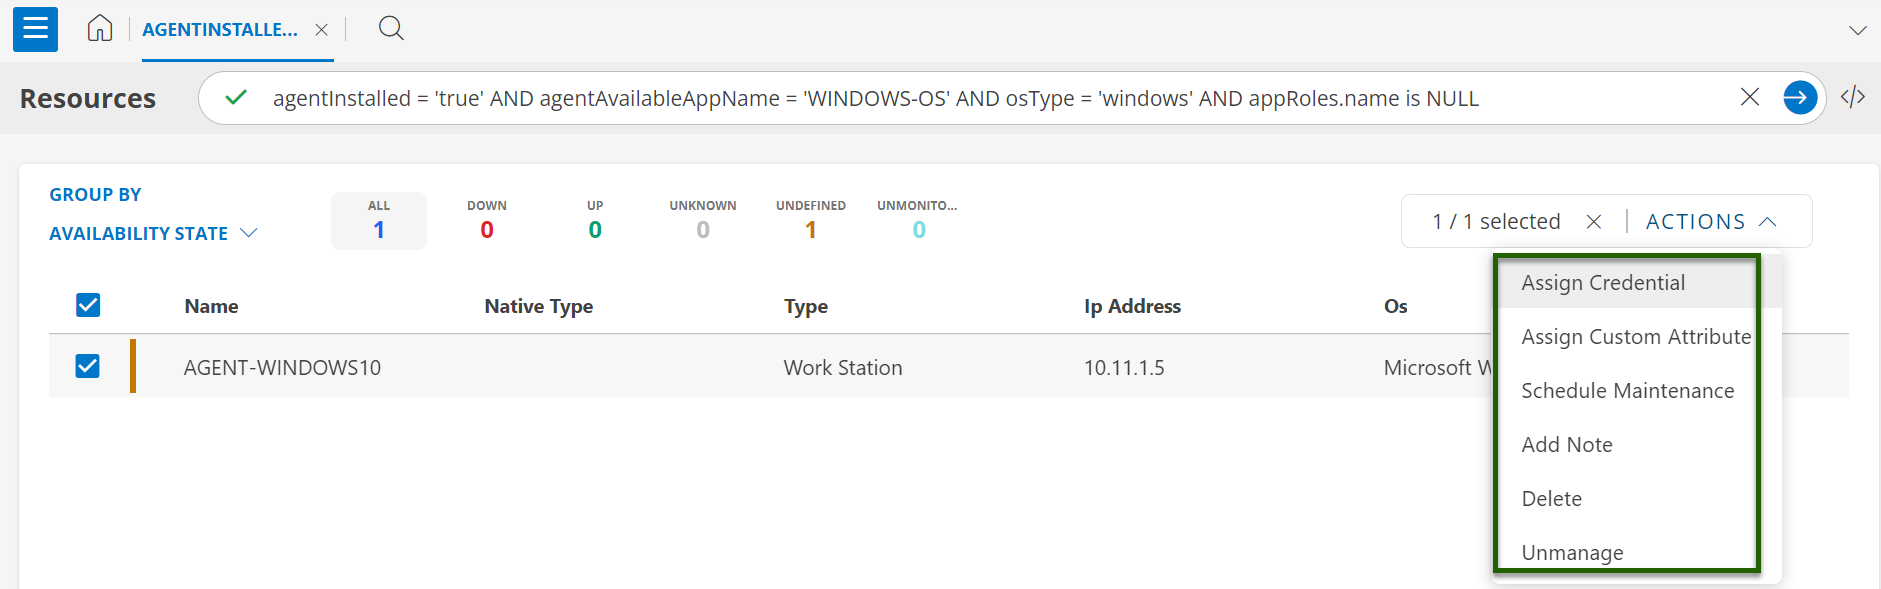
Manage the Resources
To manage a resource, click the ACTIONS button and do the following actions:
Assign Credentials
You can assign multiple credentials to one or multiple resources.
Prerequisite: User should have Manage_Device and Credentials_Manage permissions to perform this action.
Follow these steps to add credential(s):
- From the Actions menu, select Assign Credential.
- From the Assign Credential popup that shows the selected resources, select the credential(s) from the list of credentials that are available under the client.
Note: You can select up to five credentials at a time. - Click the Assign Credential button to assign the credential(s) to the resource(s).
Note: The maximum resources that you can select is 50 at a time.
A message appears if the number of resources that are selected increases the limit.
You can deselect the resources from the list box.
Assign Custom Attributes
You can assign custom attribute to one or multiple resources.
Follow these steps to assign custom attribute to multiple resources:
- From the Actions menu, select Assign Custom Attribute.
- From the Assign Custom Attribute popup that shows the selected resources.
- Select the custom attribute Name and the Value from dropdown lists.
- Click the ASSIGN CUSTOM ATTRIBUTE button to assign the custom attribute to the resource(s). A success message appears.
You can also use the resource slide-out to assign custom attribute to a resource:
- Once you have searched for resources using step#2 above, you can use the filter criteria or the search box to search for the specific resource.
- Click anywhere on the search result.
- From the resource slide-out, click Actions > Assign Custom Attribute.
- Follow steps 2 to 3 above. The custom attribute is assigned to the resource, and a success message appears.
Schedule maintenance period
You can schedule a maintenance period on one or multiple resources.
To schedule maintenance for a monitor, follow these steps:
- From the Actions menu, select Schedule Maintenance.
- From the Schedule Maintenance popup, enter the following details:
- Name: Enter a name.
- Description: Provide a description.
- Schedule: Select One Time, Daily, Weekly, or Monthly.
- Timing: Set start and end times.
- Select the settings:
| Setting | Description |
|---|---|
| Run RBA scripts during this window | Check to run RBA scripts during maintenance. |
| Install patches during this window | Check to install patches during maintenance. |
| Correlate all open alerts when window ends | Optionally check to correlate alerts after maintenance. |
| Escalate maintenance alerts when window ends | Optionally check to escalate alerts after maintenance. |
| Define alert criteria for maintenance alert | Optionally check and define criteria for maintenance alerts. |
- Click ADD MAINTENANCE WINDOW to save.
Add a Note
You can add a note to one or multiple resources.
Follow these steps to add a note:
- From the Actions menu, select Add Note.
- From the Add Note popup that shows the selected resources.
- Enter the Subject and Description.
- Set the validity for the note from the calendar.
- Click the Add Note button to add the note.
Note: The maximum resources that you can select is 50 at a time.
A message appears if the number of resources that are selected increases the limit.
You can deselect the resources from the list box.
Unmanage Resources
You can unmanage resource(s) that are in an active or managed state.
Follow these steps to unmanage a resource:
- From the Actions dropdown click Unmanage.
- The Unmanage Resources dialog box shows the resources that are applicable for unmanaging. It also shows the resources that are not applicable for unmanaging. For example, if you select an inactive resource, it will be shown under the Non-Applicable section.
- Click Unmanage to unmanage the resource(s). The resource(s) are unmanaged and a confirmation message appears.
Note: The maximum resources that you can select is 40 at a time.