Introduction
Simple Network Management Protocol (SNMP) is an application-layer protocol defined by the Internet Architecture Board (IAB) for exchanging management information between network devices. It is a part of the Transmission Control Protocol/Internet Protocol (TCP⁄IP) suite.
SNMP is one of the widely accepted protocols to manage and monitor network elements. Most of the professional-grade network elements come with bundled SNMP agent. These agents have to be enabled and configured to communicate with the network management system (NMS). The SNMP agent is a program that resides on your managed device, packaged within the network element. You have to enable it on your device. It collects the management information from the device locally and provides it to the SNMP manager. These agents could be standard, for example, Net-SNMP or specific to a vendor, such as HP Insight Agent.
SNMP Credentials
SNMP uses a password-like authorization known as a community string. When you provide an SNMP credential to a device, it checks to see if the community string matches the community string configured on the device. If the string matches, the device responds to the SNMP query.
SNMP Discovery Prerequisites
Classic Gateway
- Allow ICMP between end-device and OpsRamp Gateway.
- Allow UDP port
161/162bi-directional between end-device and OpsRamp Gateway. - Allow SNMP on the end-device.
- Create SNMP credentials and assign them to end-device for discovery.
NextGen Gateway
- Allow ICMP between end device and (nodes, load balancers).
- Allow UDP port
161/162bi-directional between end-device and (nodes, load balancers). - Allow SNMP between end device and (nodes, load balancers).
- Create SNMP credentials and assign them to end-device for discovery.
Discover the gateway using SNMP
To find the read-only gateway community string, one option is to:
- Log into the gateway WebUI.
- Click SNMP.
Or, you can get the read-only community string by logging into the gateway and reading the string in the /etc/snmp/snmpd.conf file.
You can change the community string to a name of your choice.
Multi-credential functionality
SNMP multi-credential functionality allows you to discover network resources using multiple credentials using a single discovery profile. You can create or use multiple credential sets if you are using a gateway to discover your resources.
For example, a printer uses SNMPv2c credential type and a Cisco router uses SNMPv3 credential type. In such a case, you need to create two discovery profiles. With SNMP multi-credential functionality, you can create one discovery profile and use both the credential sets.
The gateway discovers devices with the credentials, sequentially, as the credentials were entered when a Discovery Profile was created at the time of the first scan. After successful discovery, the gateway remembers resources and their credentials for subsequent discovery.
Multi-credentialed, SNMP-enabled devices have the following advantages:
- Reduces the effort of creating multiple discovery profiles.
- Reduces time for manually traversing through multiple discovery profiles to discover a network resource.
- Scans and discovers a subnet with multiple SNMP community strings.
- Discovers network resources working on different SNMP versions.
SNMP field values
The following provides information on configuring the SNMP fields for creating an SNMP credential set.
SNMPv1 and SNMPv2
| Field | Value | Description |
|---|---|---|
| Port | 161 | Agent receives requests on UDP port 161. |
| Community | N/A | Read-only community string. |
SNMPv3
SNMPv3 is a user-based security model. It provides secure access to the devices by combining authenticating and encrypting packets over the network. The security features provided in SNMPv3 are message integrity, authentication, and encryption.
| Field | Value | Description |
|---|---|---|
| Port | 161 | SNMP Agent port. The default port is 161. |
| Context | N/A | Specify context name (an octet string) that identifies the collection of management information accessible by an SNMP entity. |
| Security Name | N/A | Enter the name of the user (principal) on whose behalf the message is being exchanged. |
| Security Level |
|
|
| Authentication Protocol |
| Authentication in an SNMPv3 uses an encryption algorithm to determine if the data is from a valid source. The encryption algorithms for authentication:
|
| Authentication Password | N/A | Enter the Authentication password. |
| Confirm Password | N/A | Re-enter authentication password for validation. |
| Privacy Protocol |
| Privacy in SNMPv3 uses an encryption algorithm to encode the contents of an SNMPv3 packet. This encoding is used to verify that the content cannot be viewed by unauthorized entities when routed over the network.
|
| Privacy Password | N/A | Enter the privacy password. |
| Confirm Password | N/A | Re-enter authentication password for validation. |
| Connection time-out | N/A - Default value: 10,000 milliseconds | Provide a maximum time period for discovery. If the gateway does not get a response from the device after 10,000 milliseconds, it terminates the discovery. |
Note
Before starting the SNMP-based discovery, the gateway will check for the following ports: 22, 80, 135, 443, 3389, and 5900 on the remote resources to ensure that the resource is available for further discovery.Configure and Install the Integration
From All Clients, select a client.
Go to Setup > Account.
Select the Integrations tile from the Account Details page.
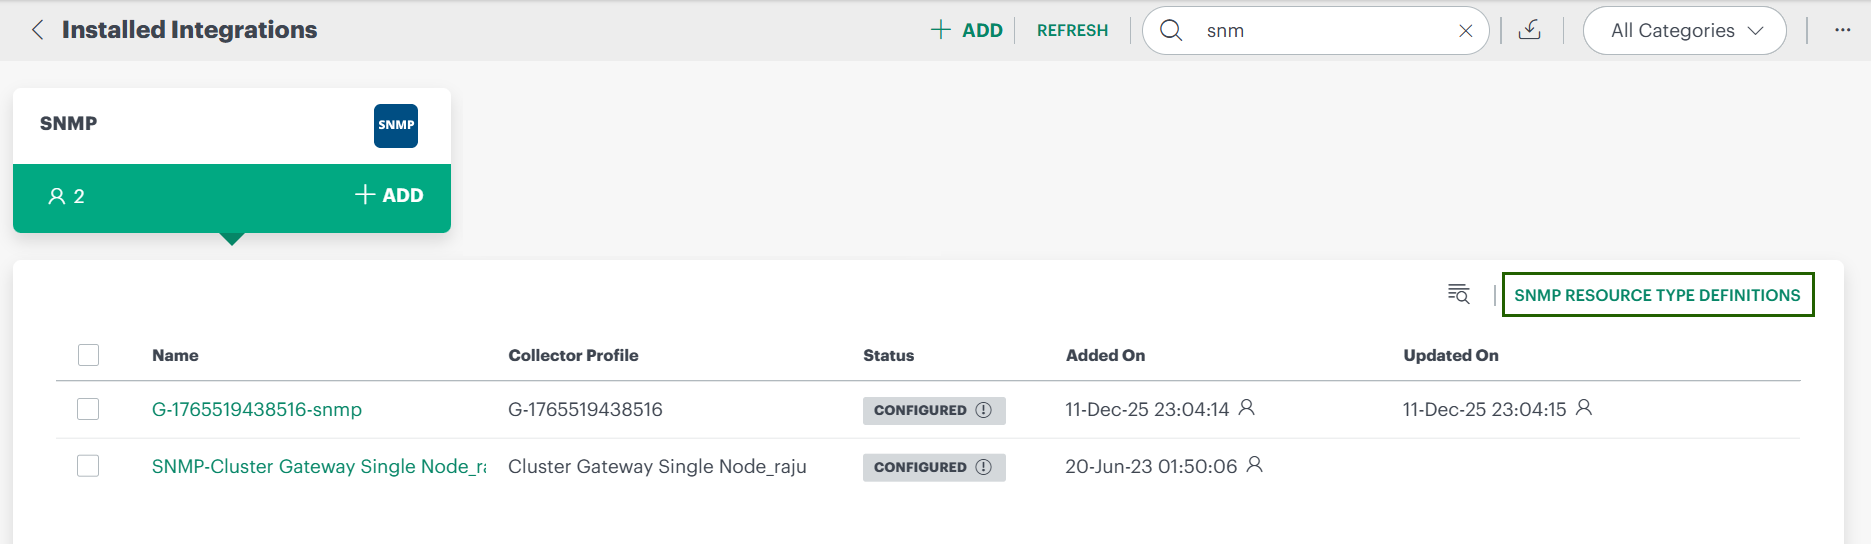
The Installed Integrations page, where all the installed applications are displayed.
Note: If there are no installed applications, it will navigate to the Available Integrations and Apps page.Click + ADD on the Installed Integrations page. The Available Integrations and Apps page displays all the available applications along with the newly created application with the version.
Note: You can even search for the application using the search option available. Also you can use the All Categories option to search.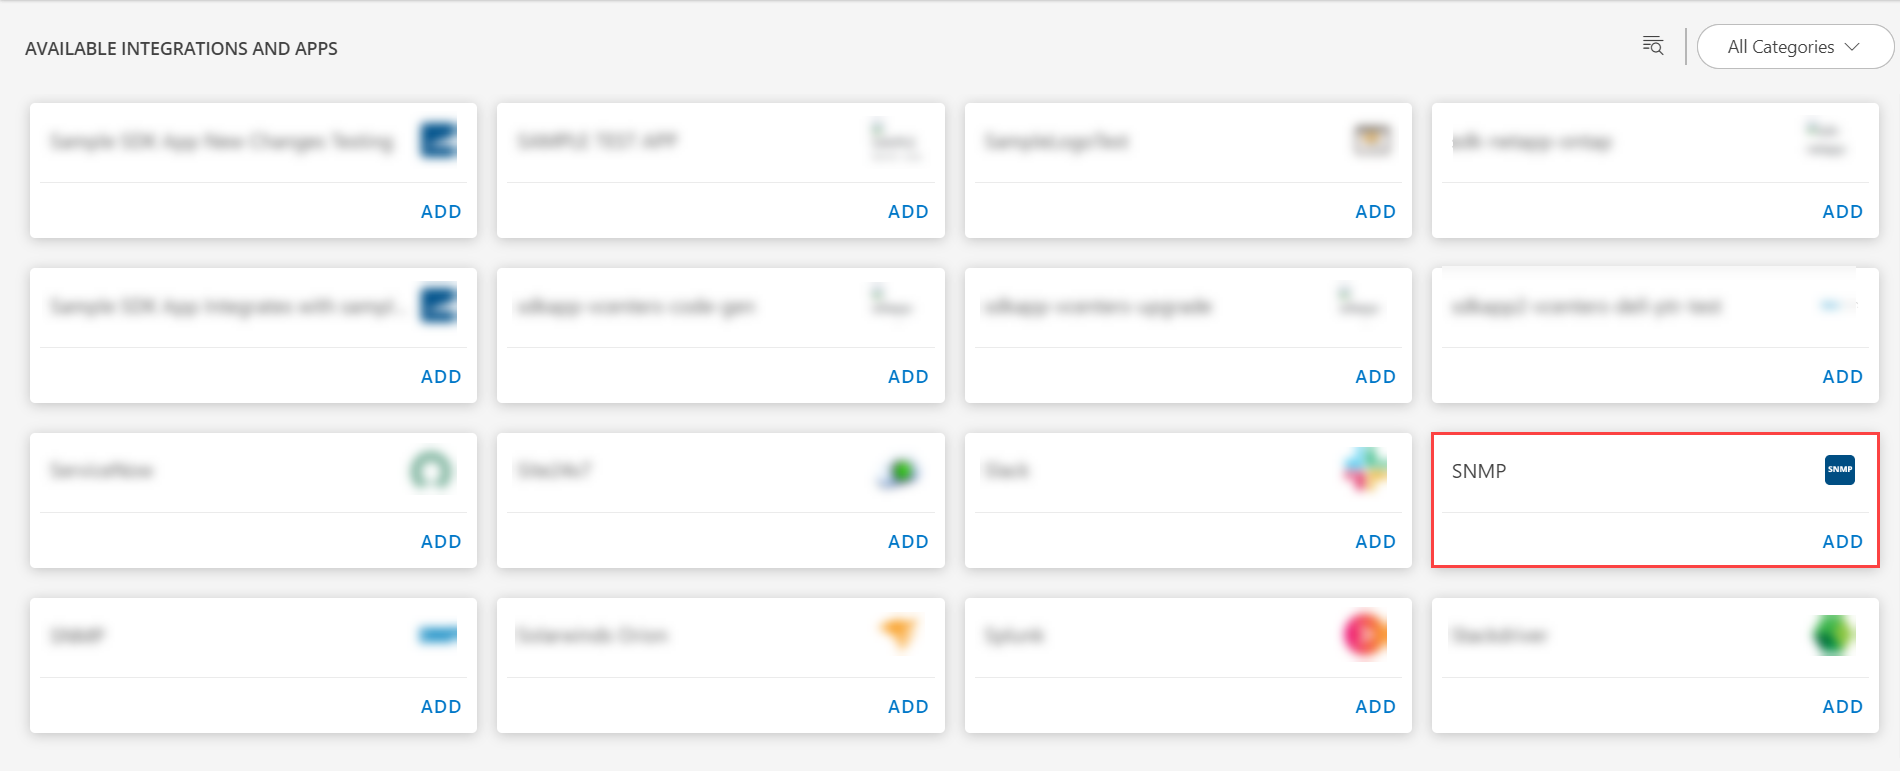
Click ADD on the SNMP tile.
From the Configurations page, click + ADD.
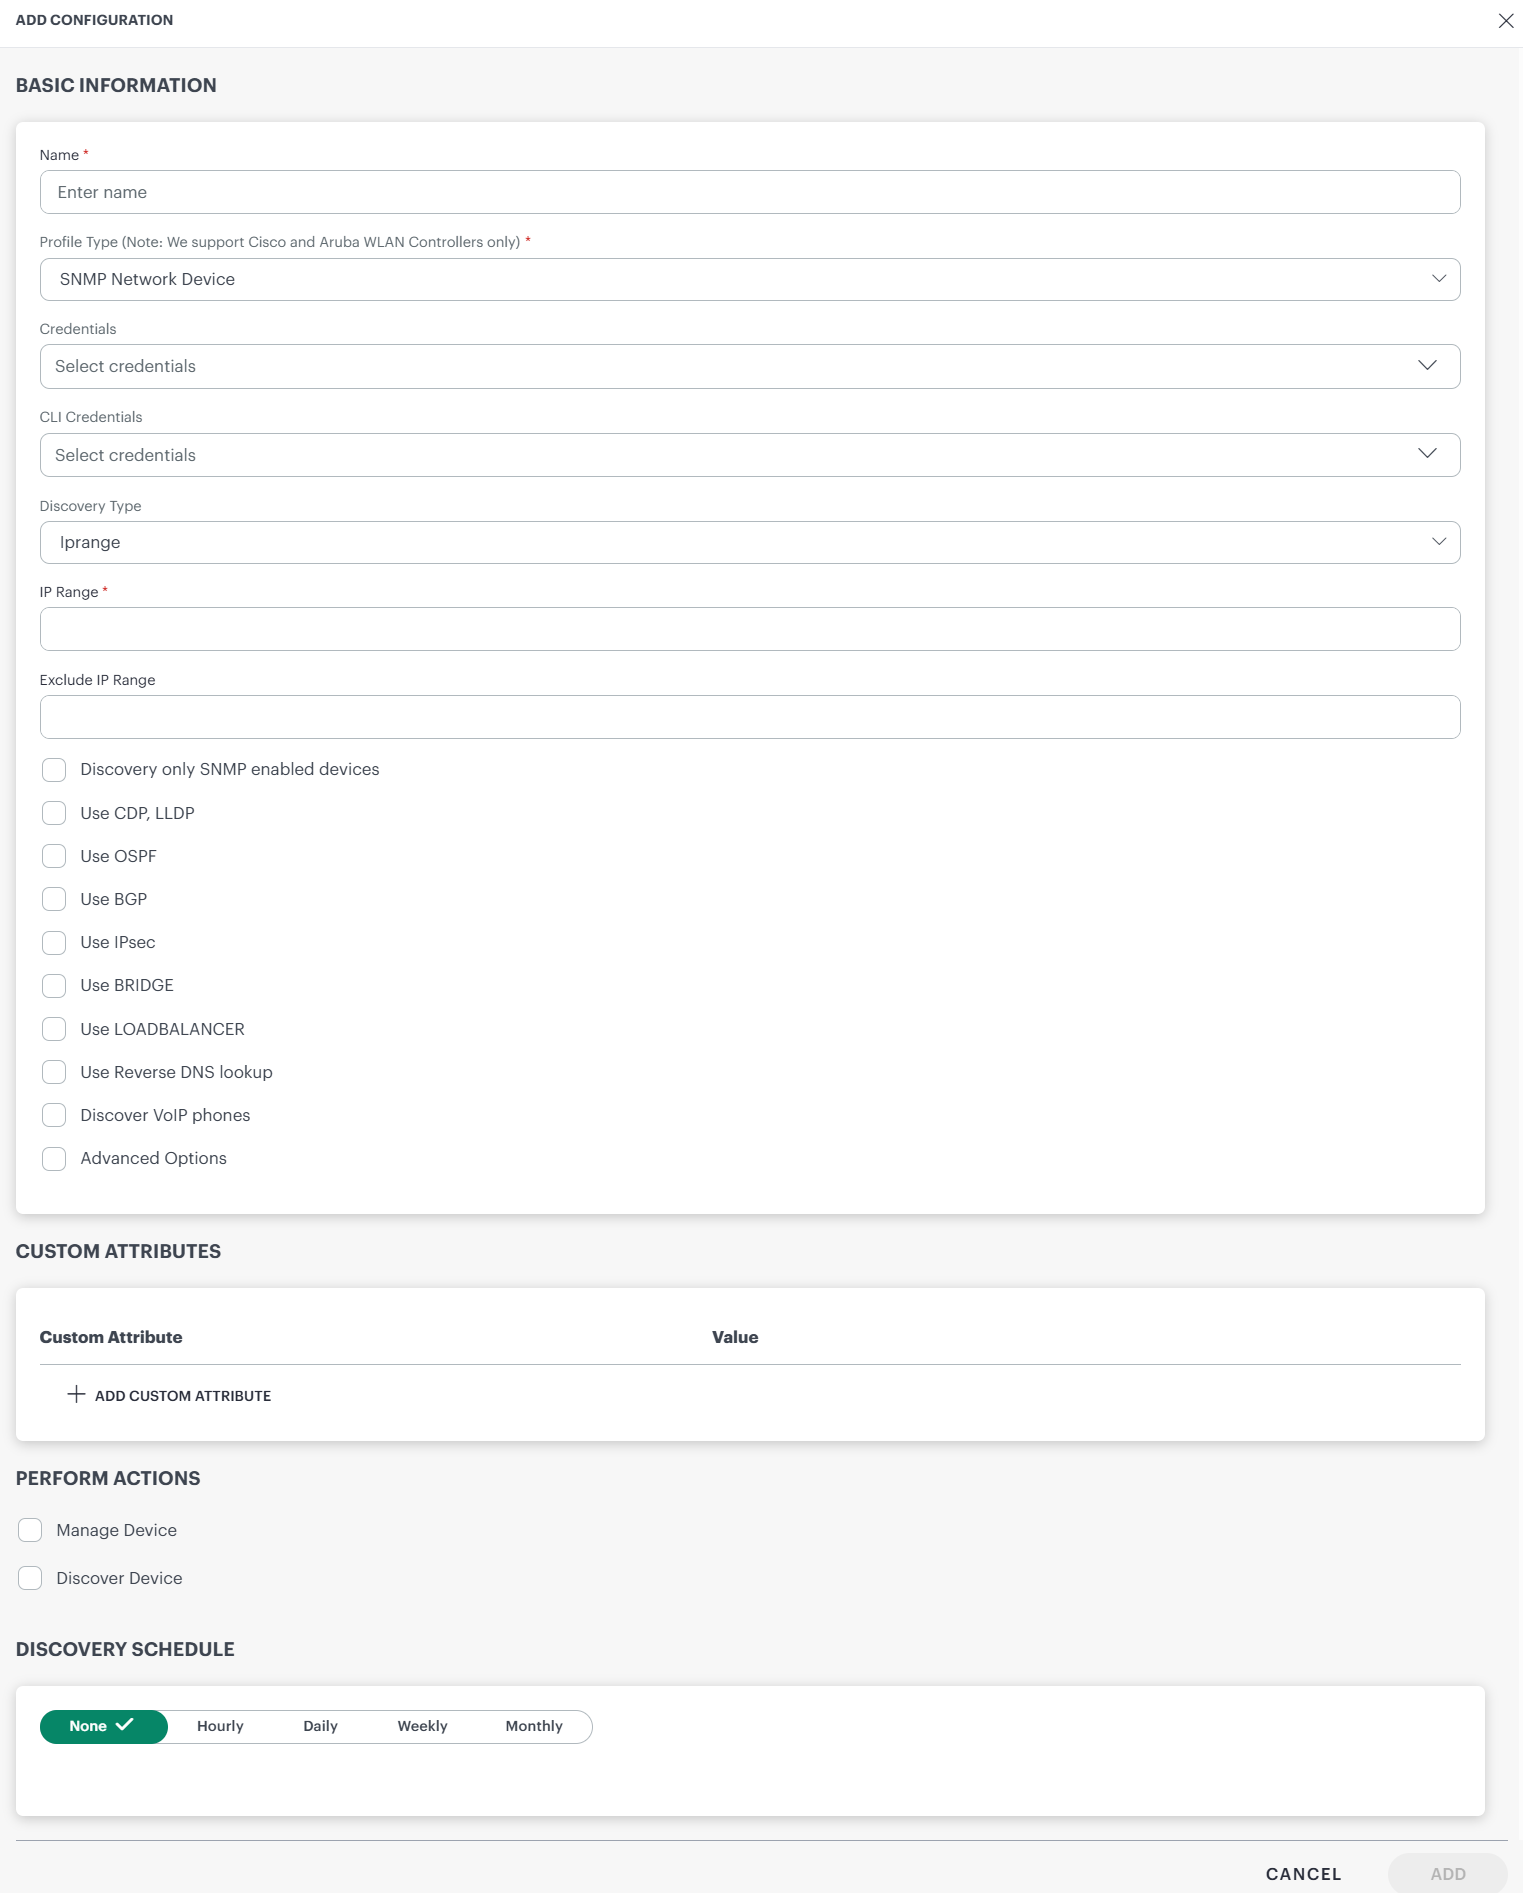
Enter the below mentioned BASIC INFORMATION:
Name: Enter the name for the integration.
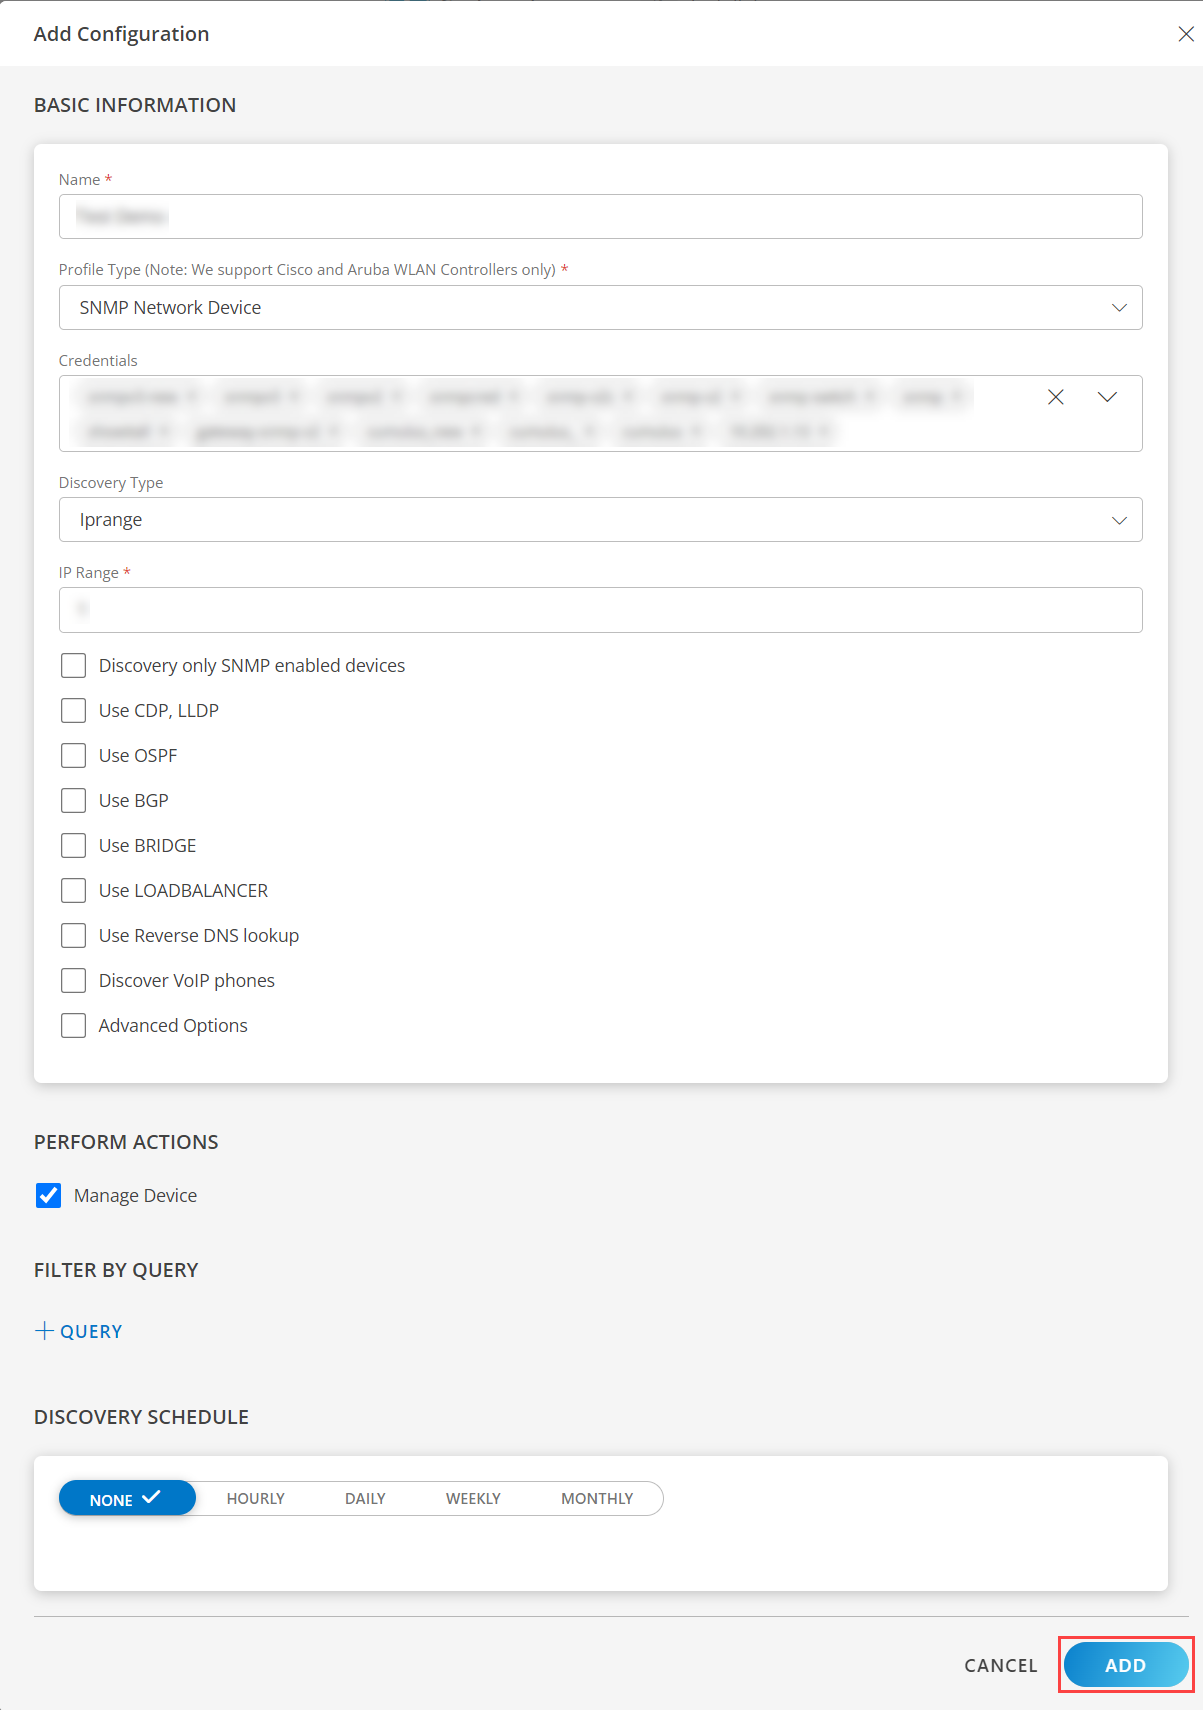
Profile Type (Note: We support Cisco and Aruba WLAN Controllers only): Select any Profile Type.
Note: Based on the profile type selected, the fields for input change.

- Credentials: Select a credential from the drop-down list. This credential refers to the access, authorization, or authentication credentials assigned to your devices managed by the network administrators.
- (Optional) Click + Add to create a credential. The ADD CREDENTIAL window is displayed. Enter the following information.
- Name: Credential name.
- Description: Brief description of the credential.
- SNMP Version: Select a version. Default is V1. Click here for more information.
- Port: Enter the port. Default is 161. Click here for more information.
- Community: Enter the community string. Default is public. Click here for more information.
- Connection Timeout(ms): Specify the connection timeout in milliseconds. Click here for more information.
- (Optional) Click + Add to create a credential. The ADD CREDENTIAL window is displayed. Enter the following information.
- CLI Credentials: Select a credential from the drop-down list. This credentials refer to the Command Line Interface credentials used to remotely log in to a network device via SSH or Telnet to retrieve additional device configuration
(Optional) Click + Add to create a credential. The ADD CREDENTIAL window is displayed. Enter the following information.
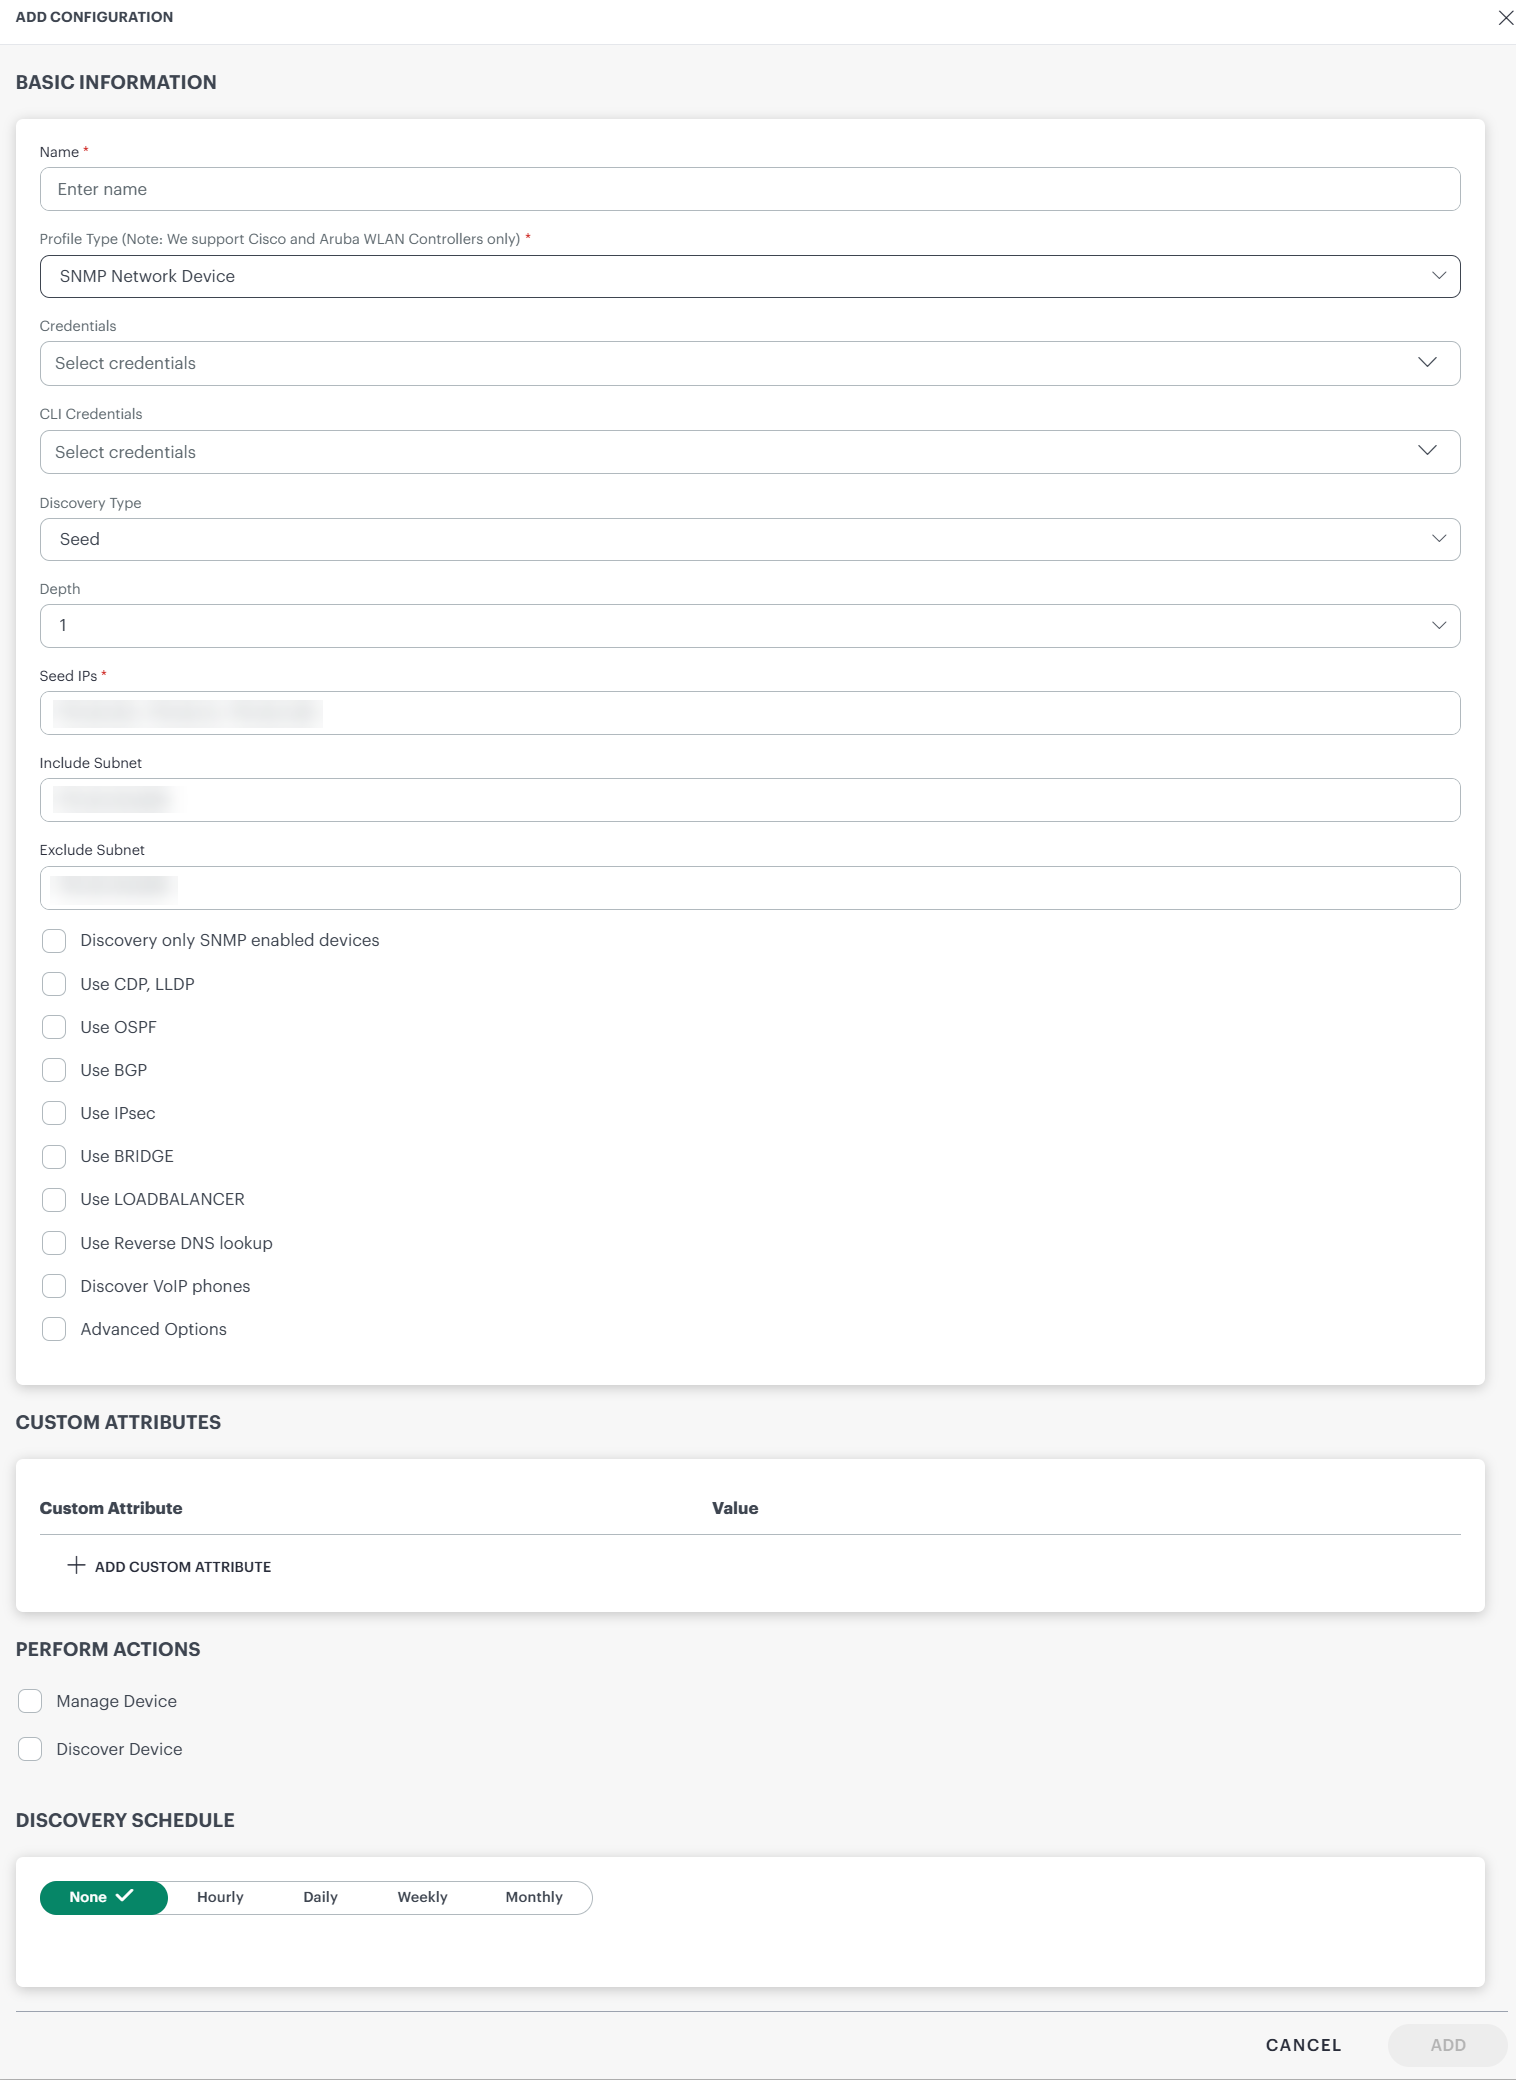
Discovery Type: Select one of the following options - IP Range or Seed.IP Range - When IP Range is selected, the following fields are displayed.
- IP Range: Select this option if you have an IP range and enter all the IP addresses in the box separated by a comma, or enter a range of IP addresses to be discovered.Note:Ensure not to add duplicate IP addresses to the IP Range filed in the discovery profile. Duplicate entries can prevent the application from saving the corresponding resource to the database.
The IPRange field supports subnet masks of /20 or smaller. Larger subnets (For example, /16, /15, and so on) are not supported. - Exclude IP Range:Select this option if you want to exclude specific IPs from the provided IP Range field. It supports comma-separated individual IPs, subnets, and IP ranges.
When the Exclude IPs option is used, the tool automatically removes the network and broadcast addresses from any subnets specified in the IP range field.
Note: Applicable from 19.1.0 GW release and 2025.04-U1 SaaS version.
Seed - When IP Seed is selected, the following fields are displayed.
- Depth: Select the depth from the drop-down list. The devices are scanned at a depth starting from the IP of the root device. Depth defines the level of the network you want to scan.
Example:Depth 1 indicates the seed or the root device and its immediate neighbors. Depth 2 indicates seed or the root device including its immediate neighbors and their immediate neighbors. - Seed IPs: Enter the IP address of the root or the seed device. Seed IP defines the range of IP addresses where network discovery starts a scan.
When a seed IP is defined, the root device and the adjacent neighbors of the root device are scanned. - Include Subnet: Select this option if you want to discover devices of a specific subnet.
To discover a specific subnet in the Seed IP, enter the subnet IP in CIDR format.
Example: You want to discover devices from IPs<IP address>to<IP address>in a subnet, provide IP in CIDR format as<IP address> - Exclude Subnet: Select this option if you want to discover devices excluding those of a specific subnet.
To exclude discovery of a specific subnet in the Seed IP, enter the subnet IP in CIDR format.
Example: You want to exclude IPs<IP address>to<IP address>in a subnet, provide IP in CIDR format as<IP address>.
- IP Range: Select this option if you have an IP range and enter all the IP addresses in the box separated by a comma, or enter a range of IP addresses to be discovered.Note:Ensure not to add duplicate IP addresses to the IP Range filed in the discovery profile. Duplicate entries can prevent the application from saving the corresponding resource to the database.
Discover only SNMP enabled devices: If we enabled this flag then OpsRamp application will discover only SNMP responding devices.
Use CDP, LLDP: If enabled, the application will collect neighbourhood information from Layer two protocols (CDP and LLDP).
Use OSPF, BGP, IPsec, BRIDGE: If enabled the application will collect neighbourhood information from four Layer protocols (OSPF, BGP, IPsec and BRIDGE).
Use LOAD BALANCER: If enabled, the discovered device type is load balancer and the application will collect additional info.
Use reverse DNS lookup: If enabled, the application will get the DNS name of the device.
Discover VoIP phones: If enabled, and if the discovered devices are voip devices then the application will collect additional info.
Advanced Options: Two options are displayed when you select advanced options.
- TCP Ports for Host Discovery: The OpsRamp tool does the port scan for the mentioned TCP port(s).
Specify ports as a comma-separated list. If no port is specified, ports 80 and 443 are used by default. - Perform SNMP scan against discovered host: If you select this option, OpsRamp performs NMAP discovery first, followed by SNMP discovery for devices that respond to NMAP.
If you do not select this option, NMAP discovery is skipped, and SNMP discovery is performed directly. - Packets to send per second for the scan: Select a desired packet rate from the dropdown.
- Default: Select default to let the OpsRamp tool automatically adjust packet transmission rate during device reachability scans based on available network bandwidth.
- Select a specific value from the list of values
(100, 200, 300, 400, and 500) to manually control the rate. Note: The Packet Count feature is supported only from Gateway version 19.2.0 onwards.
- TCP Ports for Host Discovery: The OpsRamp tool does the port scan for the mentioned TCP port(s).
- Credentials: Select a credential from the drop-down list. This credential refers to the access, authorization, or authentication credentials assigned to your devices managed by the network administrators.
- (Optional) Click + Add to create a credential. The ADD CREDENTIAL window is displayed. Enter the following information.
- Name: Credential name.
- Description: Brief description of the credential.
- SNMP Version: Select a version. Default is V1. Click here for more information.
- Port: Enter the port. Default is 161. Click here for more information.
- Community: Enter the community string. Default is public. Click here for more information.
- Connection Timeout(ms): Specify the connection timeout in milliseconds. Click here for more information.
- IP Address: Enter the IP address. You may enter a single IP address or multiple IP addresses separated by commas. Loopback IP addresses are not allowed.
- Monitor Access Points: Select this checkbox, if you want to monitor the access points. Select the frequency (in minutes). The access points monitoring data for the selected frequency will be displayed on the device details page.
- (Optional) Click + Add to create a credential. The ADD CREDENTIAL window is displayed. Enter the following information.
SNMP Network Device
If you select SNMP Network Device as profile type, provide inputs for the following fields:
WLAN AP
If you selected WLAN AP as profile type, provide inputs for the following fields:
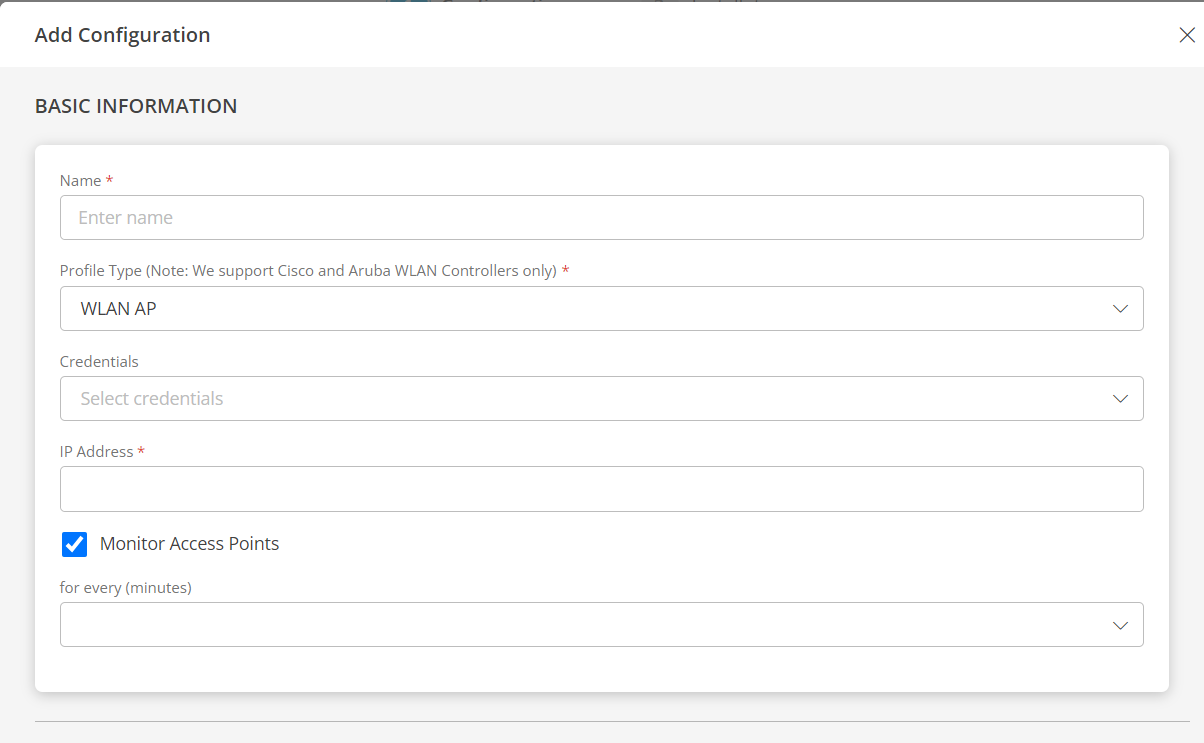
- Credentials: Select a credential from the drop-down list. This credential refers to the access, authorization, or authentication credentials assigned to your devices managed by the network administrators.
- (Optional) Click + Add to create a credential. The ADD CREDENTIAL window is displayed. Enter the following information.
- Name: Credential name.
- Description: Brief description of the credential.
- SNMP Version: Select a version. Default is V1. Click here for more information.
- Port: Enter the port. Default is 161. Click here for more information.
- Community: Enter the community string. Default is public. Click here for more information.
- Connection Timeout(ms): Specify the connection timeout in milliseconds. Click here for more information.
- IP Address: Enter the IP address. You may enter a single IP address or multiple IP addresses separated by commas. Loopback IP addresses are not allowed.
- (Optional) Click + Add to create a credential. The ADD CREDENTIAL window is displayed. Enter the following information.
WLAN Controller
If you selected WLAN Controller as profile type, provide inputs for the following fields:
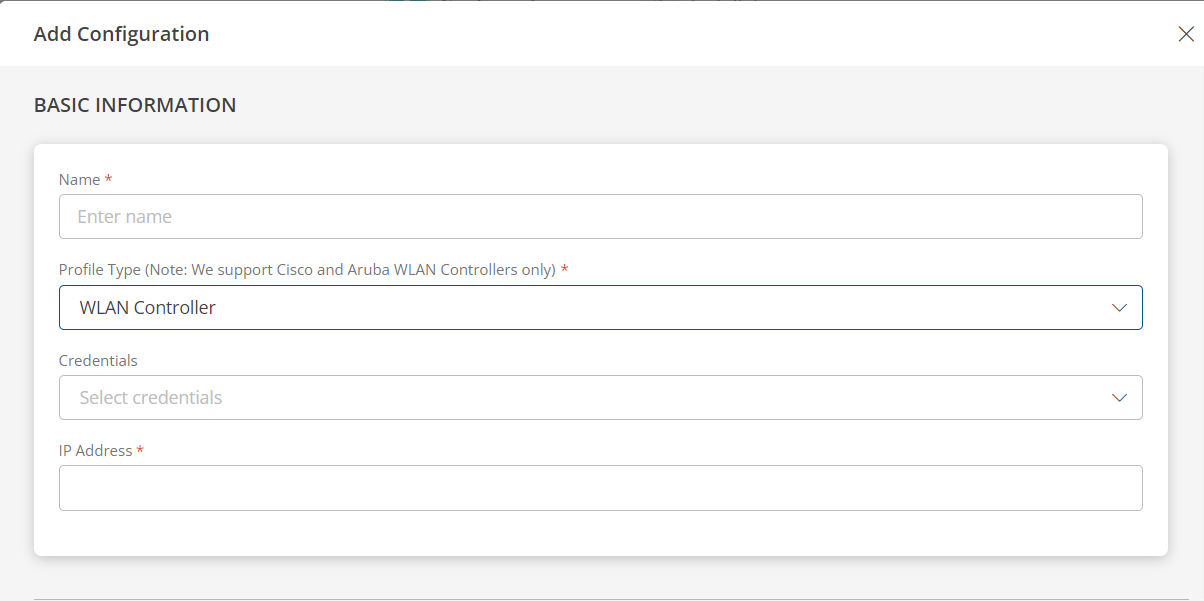
Note
Choosing WLAN Controller as the profile type during WLAN Controller discovery activates the additional Thin Access Points tab on the WLAN Controller device level, which provides details about the access points connected to the controller.- From the PERFORM ACTIONS section, choose Manage Device to set the resources as managed.
- From the FILTER BY QUERY, click + QUERY and select the Attributes, Operator, or use </> to enter the Input query.
- In the DISCOVERY SCHEDULE section, select recurrence pattern to add one of the following patterns:
- Minutes
- Hourly
- Daily
- Weekly
- Monthly
- Click ADD.
Now the configuration is saved and displayed on the configurations page after you save it. Note: From the same page, you may Edit and Remove the created configuration.
- Click NEXT.
- (Optional) Click +ADD to create a new collector by providing a name or use the pre-populated name.
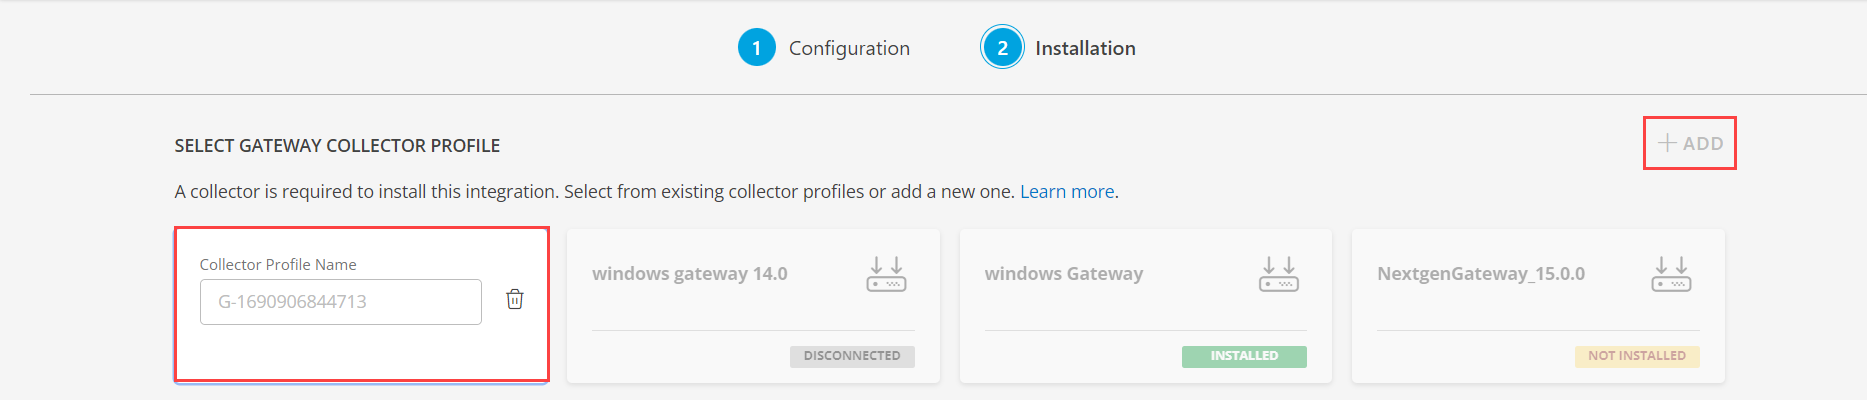
- Select an existing registered profile.
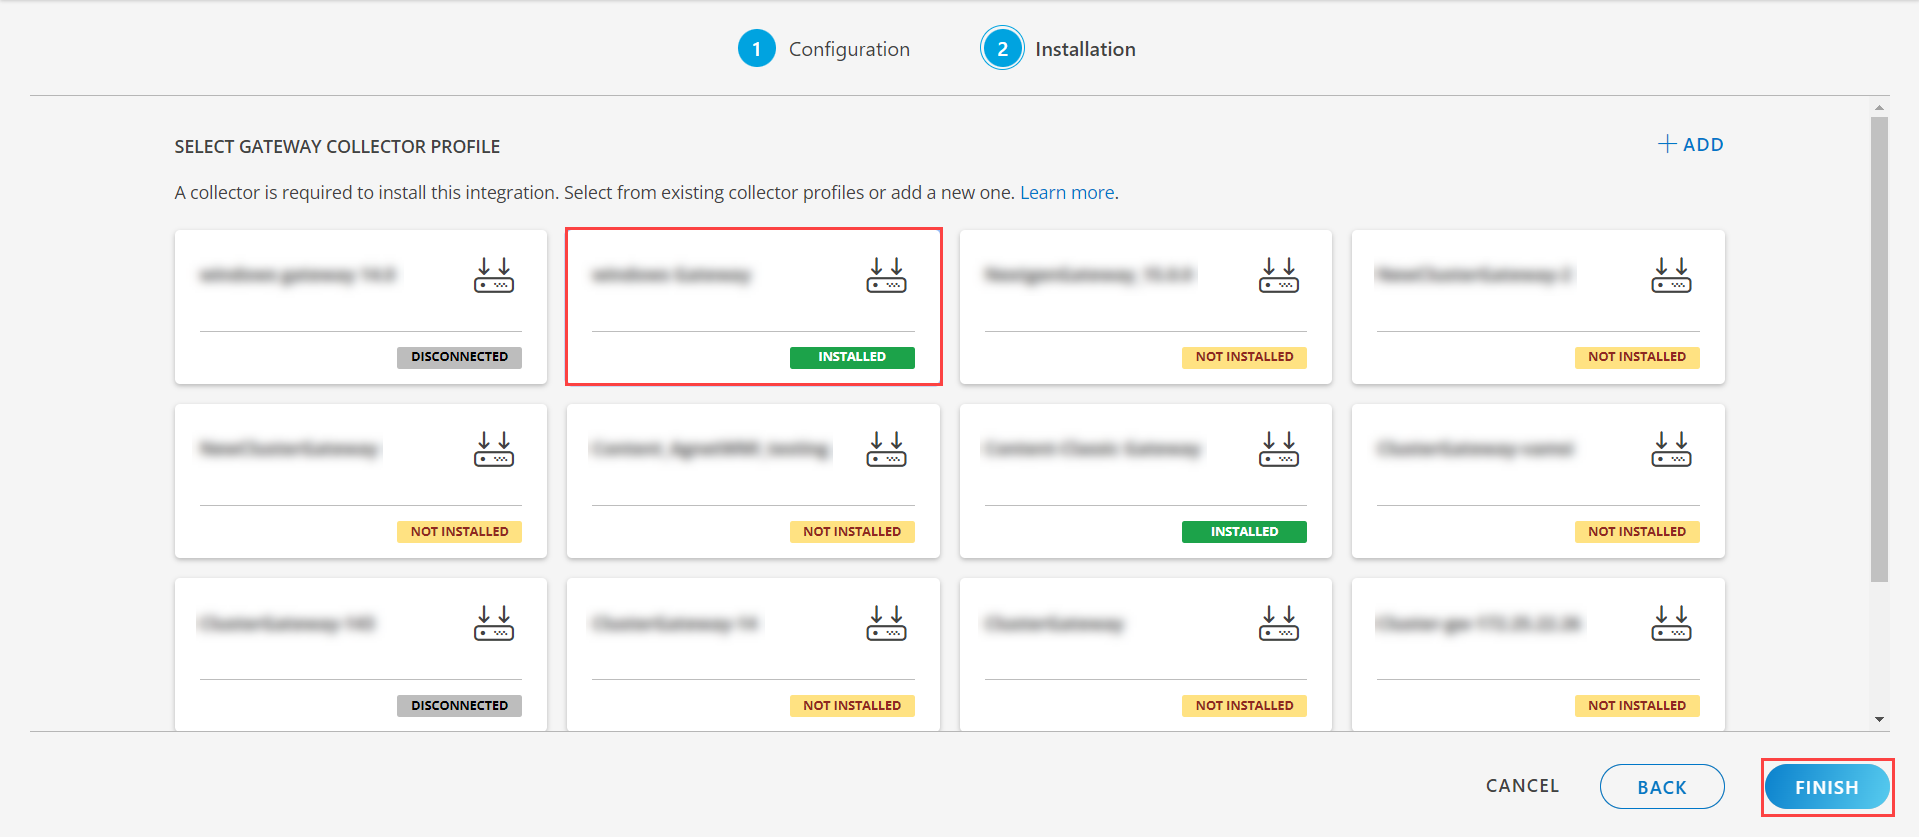
- Click FINISH.
The application is now installed and displayed on the Installed Integration page. Use the search field to find the installed application.
Note: By default, the Discovery Status is displayed as Completed, for recurring schedules, but actual discovery scan will start at the scheduled time. The Discovery scheduling is updated in the Gateway when configuration is saved.
Modify the Installed Integration
See Modify an Installed Integration or Application article.
Note: Select the SNMP application.
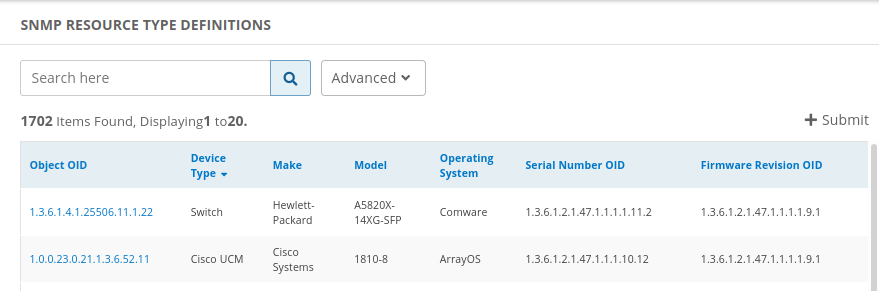
SNMP Resource Type Definitions
SNMP Resource Type Definitions define how OpsRamp detects and classifies SNMP-enabled devices during discovery for accurate monitoring.
Access SNMP Resource Type Definitions
You can access the list of SNMP Resource Type Definitions from two locations:
- While adding an SNMP integration – visible at the top-right corner of the Configuration page.

- After installation – accessible by expanding the SNMP integration card on the Installed Integrations page.
See SNMP resource type definitions for more information.
Device Attributes from SNMP Discovery
As a part of SNMP discovery we are showing below attribute details on the end device:
| Field | Description |
|---|---|
| Basic Information |
|
| More Information |
|
| Hardware Information |
|
| Inventory Tab |
|
| Software Modules |
|
| Interface Tab |
|
SNMP Definition Requests
You can view and submit SNMP definitions for review.
Only Service Provider (SP) and partner-level users can submit SNMP definition requests. All user levels, including SP, partner, and client, can view existing definitions.
View SNMP definition requests (deprecated)
- Go to Setup > Resources.
- Click SNMP Device Type Definitions. This displays the list of available definitions, as shown in the example:
Submit SNMP definition request (deprecated)
Go to Setup > Resources.
Click SNMP Device Type Definitions.
Click the +Submit button.
In the Add SNMP Device Type Definition page, enter the following information:
Device Type Definition:
Field Required Description Object OID Yes Object identifier. Make Yes Choose the make from the drop-down list. Model No If you selected Model, choose the model from the drop-down list. Model OID No If you selected Model OID, enter a model identifier. Device Type Yes Choose a device type from the drop-down list. Operating System Yes Choose an operating system from the drop-down list. Serial Number OID No Serial number identifier. Firmware Revision OID No Firmware revision identifier. Hardware Revision OID No Hardware revision identifier. Software Revision OID No Software revision identifier. SNMP OIDs for Network Interface Information:
Field Required Number of Interfaces No Name No Alias No Index No Type No Speed No Operational Status No Admin Status No Click Cancel to discard your definition or click Submit, which displays the following advisory message:
This definition will reflect on devices only after it is reviewed by a vistara admin. You can check the status on the definition listing page.Click Yes to continue and submit your definition for review.
SNMP Discovery Troubleshooting Steps
Devices not visible under Discovery Profiles?
Enable the device with SNMP protocol or device should be reachable from the gateway. To verify the device reachability, run the following command to check connectivity.
ping <ipaddress>Verify that the SNMP credentials assigned in the discovery profile are valid by confirming the device responds to SNMP queries when SNMP is enabled. To validate this, run an SNMP walk using the assigned credentials.
Run commands on Classic Gateway
- Launch the gateway cli and enter sudo su.
- Run the SNMP walk command based on the version.
Run commands on Next-Gen Gateway
- Launch the gateway cli and enter sudo su.
- Check NextGen gateway Pod should already be running or not. Command:
kubectl get pod <podName>. - If pod is running, launch debug container using the following command:
kubectl debug -it nextgen-gw-0 --image=us-docker.pkg.dev/opsramp-registry/gateway-cluster-images/gateway-debugger:1.0.0 --share-processes -- /bin/bash - Run the SNMP walk command based on the version.
SNMP walk command syntax
Use the appropriate command based on the SNMP version.
- SNMP version 1:
Basic Syntax
snmpwalk -v1 -c <community> <ipaddress> <OID>- Example: snmpwalk -v1 -c community 10.10.10.10 1.3.6.1.2.1.1
- SNMP version 2:
Basic Syntax
snmpwalk -v2c -c <community> <ipaddress> <OID>- Example: snmpwalk -v2c -c community 10.10.10.10 1.3.6.1.2.1.1
- SNMP version 3:
Basic Syntax
snmpwalk -v3 -l `<noAuthNoPriv|authNoPriv|authPriv> -u <username> -a <MD5|SHA> -A <MD5|SHA key> -x <DES|AES> -X <DES|AES key> -n <context> <ipaddress> <OID>`- Example: snmpwalk -v3 -l authPriv -u user4 -a MD5 -A 1234567890abcdef -x DES -X 1234567890abcdef `
` 1.3.6.1.2.1.1
Devices not visible under Discovery Profiles even though SNMP is working?
- If the SNMPwalk command is functioning correctly, it is essential to verify the SNMPget command as well. This is crucial as we rely on the SNMPget command to retrieve information from the NetSNMP.
Run commands on Classic Gateway
- Launch the gateway cli and enter sudo su.
- Run the SNMP get command.
Run commands on Nextgen gateway
- Launch the gateway cli and enter sudo su.
- Check whether the NextGen gateway pod is running using the following command.
kubectl get pod <podName> - If pod is running, launch debug container using the following command
kubectl debug -it nextgen-gw-0 --image=us-docker.pkg.dev/opsramp-registry/gateway-cluster-images/gateway-debugger:1.0.0 --share-processes -- /bin/bash
Basic Syntax
snmpget -v2c -c <community> <ipaddress>- Example: snmpget -v2c -c Ac-5nmp! 192.168.147.26 1.3.6.1.2.1.1.5.0
If SNMPwalk is operational but the SNMPget command is not functioning, resulting in request timeouts, credentials cannot be obtained. Without valid credentials, device discovery using SNMP becomes impossible. Therefore, it is imperative to ensure the functionality of both commands.
If the device responds to SNMP, it is crucial to confirm that the SNMP credentials utilized align with those assigned in the discovery profile. The SNMP credentials eliciting a response from the device should precisely match the credentials specified in the SNMP discovery profile.
Ensure that the correct gateway selected in the discovery profile is being utilized.
If SNMPv3 credentials are in use and a context name is specified in the credentials, it is important to note that when checking SNMPwalk or SNMPget commands from the gateway, the context name must be explicitly included in the command. In the event of a request timeout, it is advised to remove the context name from the credentials and initiate a re-discovery process.
Syntax
snmpwalk -v3 -l <noAuthNoPriv|authNoPriv|authPriv> -u <username> -a <MD5|SHA> -A <MD5|SHA key> -x <DES|AES> -X <DES|AES key> -n <context> <ipaddress> <OID>- Note:In general context is used to differentiate multiple instances managed by the SNMP Agent.
Device is reachable from the gateway and responds to both SNMP walk and SNMP get, but still does not appear under Discovery Profiles.
Run commands on Classic Gateway
- Launch the gateway cli and enter sudo su.
- Run the tail command to view the on-going discovery logs.
Run commands on Nextgen gateway
Launch the gateway cli and enter sudo su.
Check whether the NextGen gateway pod is running.
kubectl get pod <podName>Execute command
kubectl exec -it nextgen-gw-0 -c vprobe -n <namespace> -- bashNote: Replace
if applicable, otherwise execute the following command. kubectl exec -it nextgen-gw-0 -c vprobe – bash
Run the tail command to view the on-going discovery logs for both Classic Gateway and Nextgen Gateway.
Check the vprobe logs in the gateway. The vprobe logs is saved in
/var/log/app/vprobe.log.Issue the following command to check the ongoing discovery logs.
tail -f /var/log/app/vprobe.logPerform SNMP discovery again and observe the logs.
logs analyzation:
- SNMP started: Snmp session intialized
- ************ Discovery scan started for profile 3008 ************
- Device not reachable from gateway: Resource failed to discover V4:172.26.1.16, sourceNMAP
- Device SNMP credential timeout: V4:172.26.1.14
- Device discovery failed with SNMP: Resource failed to discover V4:172.26.1.14, sourceSNMP
- Discovery is completed: Snmp session disconnected.
If no conclusive information is found, consider enabling additional debug logs for a more detailed analysis.
How to enable more debug logs?
Run commands on Classic Gateway
- Launch the gateway cli and enter sudo su.
- Execute the gcli command to enable to gateway cli mode.
vgprompt# gcli + enter - Execute the following command.
gcli@gateway>nd log on <30 no of mins>Eample: nd log on 30 - Execute the exit command to exit from gcli.
Run commands on Nextgen gateway
- Login to gateway CLI.
- Execute command.
kubectl exec -it nextgen-gw-0 -c vprobe -n <namespace> -- bashNote: Replace theif applicable, otherwise execute the following command. kubectl exec -it nextgen-gw-0 -c vprobe -- bash - Execute the
gclicommand to enable gateway CLI mode. - Enter the flags(nd log on 45) in the
gcliprompt. - Execute exit command to exit from gcli.
Perform the discovery process again after executing the following command.
tail -f /var/log/app/vprobe.logAfter the completion of the discovery process, analyze the vProbe logs as indicated in the previous comments.
logs analyzation:
- Device snmp timeout: com.vistara.gateway.plugin.discovery.error.snmp.SnmpTimeOutException: Snmp is not working with any credential for device :V4:
.
- Successfully discovered devices json files: Response is saved to /var/log/app/tmp/network-discovery-chunk-1559559930044.json
- Note
- Upon discovery, devices will transmit their information to the cloud, and this data is logged in files. Kindly review the log files located in the /var/log/app/tmp/ directory for further details.
- File name start from network-discovery-chunk-
.json - To view the timestamps of the most recent files, execute the following commands:
cd /var/log/app/tmp/ folder
ll network-discovery-chunk-*.json
- Device snmp timeout: com.vistara.gateway.plugin.discovery.error.snmp.SnmpTimeOutException: Snmp is not working with any credential for device :V4:
Why is OpsRamp not correctly identifying a device’s attributes like Make, Model, Device Type, or OS, or showing them as “Other”?
First, verify whether the device’s sysObjectID is supported by OpsRamp.
To Identify the sysObjId of a Device.Using the OpsRamp Interface (for Onboarded Devices) - Navigate to the device’s Attributes page: - Go to Device → Attributes. - Scroll down to the More section. - Locate the field labeled Object ID. - The value displayed here is the device’s sysObjId.
To verify the SysObjId is supported by OpsRamp- Navigate to Setup → Resources → SNMP Resource Type Definitions. - Search for the device using its sysObjectID (sysObjId). - If found, then SysObjId is supported by OpsRamp.
OpsRamp uses the sysObjectID to determine the device’s Make, Model, Device Type, and OS based on its SNMP device type definitions.
These SNMP device type definitions are created after reviewing the device’s SNMP full walk and MIBs.
If the device’s sysObjectID exists in the SNMP device type definitions, check whether the Make, Model, Device Type, and OS are correctly displayed.
Incorrect or missing device data may occur in the following case:
- Check the file
/var/log/app/tmp/network-discovery-chunk-<1559559930044>.jsonto verify whether the device data is correct. - If the data is incompatible with the fields in the SNMP device type definitions within the UI, the device data may become inconsistent.
- In such cases, navigate to the corresponding Management Profile.
- Synchronize the SNMP Device Type Definitions to push them back to the respective gateway.
- Rescan the SNMP Discovery Profile to ensure the changes are reflected in the device.
- If the attributes are still shown as “Other”, reach out to OpsRamp Support with the SNMP full walk and device details to request discovery support.
- Check the file
How to capture SNMP packets on specific device?
Run commands on Classic Gateway
- Login to gateway cli and enter sudo su
- Execute the following command and perform the discovery.
tcpdump -v -i any 'ip host <ip> && udp port <port>' -s 3000 -w /home/ruser/{filename}.pcapExample: tcpdump -v -i any “host<IP address>&& port 161” -s 3000 -w /home/10.10.10.10.pcap - To stop the above command press ‘ctrl + enter’
Run commands on NextGen Gateway
Launch the gateway cli and enter sudo su
- Check whether the NextGen gateway pod is running using the following command.
kubectl get pod <podName> - If pod is running, launch debug container using the following command.
kubectl debug -it nextgen-gw-0 --image=us-docker.pkg.dev/opsramp-registry/gateway-cluster-images/gateway-debugger:1.0.0 --share-processes -- /bin/bash - Once the prompt appears, run the
tcpdumpcommand to start capturing packets.tcpdump -v -i any 'ip host <ip> && udp port <port>' -s 3000 -w /home/ruser/{filename}.pcapExample: tcpdump -v -i any “host<IP address>&& port 161” -s 3000 -w /home/10.10.10.10.pcap - To stop the above command press ctrl + enter.
- Check whether the NextGen gateway pod is running using the following command.
TcpDump command can be used to check the device behavior while discovery is going on. As well as we can analyze the collected data.
Read the tcpdump generated file with help of wireshark tool.
Although the credentials work for the devices during a manual walk, the V3 credential devices are not being discovered in OpsRamp; only one device is discovered out of all of them
- For V3 credentials, the contextEngineID of the same model devices causes this issue. We need to check the contextEngineID of the devices. If it is same, need to check with the vendor.
- ContextEngineID: The contextEngineID is a key concept in the Simple Network Management Protocol (SNMP), particularly in SNMP version 3 (SNMPv3). It uniquely identifies an SNMP engine within an administrative domain. This identifier is crucial for accessing and managing information in different contexts within the SNMP framework.
- How to retrieve the contextEngineID in SNMPv3?Use the snmpget command.
snmpget -v3 -l <noAuthNoPriv|authNoPriv|authPriv> -u <username> -a <MD5|SHA> -A <MD5|SHA key> -x <DES|AES> -X <DES|AES key> -n <context> <ipaddress> <OID>Example: snmpget -v3 -l authPriv -u user4 -a MD5 -A 1234567890abcdef -x DES -X 1234567890abcdef 10.10.10.10<IP address>3.10.2.1.1.0
FAQs
Is it possible to configure the same IP address in two different profiles within the same integration?
Yes, you can configure the same IP address in two different profiles within the same integration. However, in the device attributes, only the details from the most recently updated profile will be displayed.
What happens when the same device is discovered through two different integrations?
The device attributes are updated from both integrations. However, the profile name displayed will correspond to the most recent discovery. You can view the latest discovery details in the UI(infrastructure → resource → attributes).
What are the implications of deleting a discovery profile?
If an SNMP discovery profile deleted:
- Only the discovery profile will be deleted.
- Resources already discovered and mapped using that profile will remain unaffected.
Thin Access Points not displayed after WLAN Controller via SNMP Discovery?
The WLAN Controller was successfully discovered through SNMP, and the device appears in the UI. However, the Thin Access Points do not appear under the Thin Access Point tab.
This is expected behaviour because when a WLAN Controller is discovered using SNMP, the OpsRamp platform does not retrieve Thin Access Point information.
To collect and display Thin Access Points, the device must be discovered using the WLAN Controller integration.
How Does OpsRamp Collect MAC Addresses of a Device?
OpsRamp collects the MAC address of a device using SNMP queries based on the IP-MIB. The process involves identifying the interface index associated with an IP address and then retrieving the MAC address tied to that interface.
Standard Method:
- Retrieve Interface Index:
- OID: 1.3.6.1.2.1.4.20.1.1 (ipAdEntIfIndex)
- This OID maps an IP address to its corresponding interface index.
- Retrieve MAC Address:
- OID: 1.3.6.1.2.1.2.2.1.6 (ifPhysAddress)
- Using the interface index from the previous step, this OID returns the MAC address.
Alternative Method (Gateway Version 18.2.0 and Above)
If the device does not support the standard ipAdEntIfIndex OID, OpsRamp uses an alternative approach:
- Retrieve Interface Index:
- OID: 1.3.6.1.2.1.4.34.1.3.1 (ipAddressIfIndex).
- This OID provides the interface index for IPv4 addresses.
- Retrieve MAC Address:
- Similar to standard method, the ifPhysAddress OID is used to fetch the MAC address using the interface index.
Example Command:snmpwalk -v2c -c public 10.x.x.x 1.3.6.1.2.1.4.34.1.3.1
Sample Output:IP-MIB::ipAddressIfIndex.ipv4.“127.0.0.1” = INTEGER: 1IP-MIB::ipAddressIfIndex.ipv4.“10.x.x.x” = INTEGER: 33IP-MIB::ipAddressIfIndex.ipv4.“10.x.x.y” = INTEGER: 34The interface index (e.g., 33 ) from this output is then used with ifPhysAddress(1.3.6.1.2.1.2.2.1.6) to retrieve the corresponding MAC address.
Example Command:
snmpwalk -v2c -c public 10.x.x.x 1.3.6.1.2.1.2.2.1.6
Sample Output:IF-MIB::ifPhysAddress.1 = STRING:IF-MIB::ifPhysAddress.33 = STRING: b8:ca:3a:70:1f:e4IF-MIB::ifPhysAddress.34 = STRING: b8:ca:3a:70:1f:e4
How many characters are supported in the IP Range text box?OpsRamp currently support up to 65,535 characters.
How to Identify the sysObjId of a Device
Using the OpsRamp Interface (for Onboarded Devices)
Navigate to the device’s Attributes page:
- Go to Device → Attributes
Scroll down to the More section.
Locate the field labeled Object ID.
- The value displayed here is the device’s sysObjId.
Using an SNMP Command
You can retrieve the sysObjId directly from a device using the SNMP OID: 1.3.6.1.2.1.1.2.0
Command Syntax:
snmpget -v2c -c
<community> <ipaddress>1.3.6.1.2.1.1.2.0 -OnReplace
<community>with the SNMP community string (e.g., public).Replace
<ipaddress>with the target device’s IP address.Example: snmpget -v2c -c public 10.x.x.x 1.3.6.1.2.1.1.2.0 -On
Note
If the sysObjId retrieved does not match any known SNMP device type definitions in OpsRamp, please reach out to OpsRamp Support to request the addition of support for that device’s discovery model.Serial number missing or not displayed for a device in OpsRamp?
If the serial number is not displayed for a device in OpsRamp, it may be due to a missing or incorrect SNMP OID mapping. Perform the following steps.
Check SNMP Device Type Definitions in the OpsRamp UI:
- OpsRamp maps the serial number OID for each device based on its sysObjId.
- Navigate to:Setup → Resources → SNMP Resource Type Definitions and search using the device’s sysObjId.
Verify Serial Number OID:
- The OpsRamp Gateway retrieves the serial number using the Serial number OID specified in the SNMP device type definition.
Contact Support:
- If you find that the serial number OID is missing or incorrect, please contact OpsRamp Support for assistance in updating the device type definitions with the SNMP full walk and details of the device.
Serial number not displayed for a device in OpsRamp even though Serial Number Oid in the definition?
Verify Serial Number OID:
- Navigate to Setup → Resources → SNMP Resource Type Definitions.
- Search for the device using its sysObjectID (sysObjId).
- Confirm that the Serial Number OID is correctly defined for the device type.
Validate OID Response:
- Perform an SNMP walk on the device using the Serial Number OID.
- If the SNMP walk returns a value, but the serial number is still not displayed in OpsRamp, proceed to the next step.
Re-discover the Device:
- Initiate a device re-discovery in OpsRamp.
- After re-discovery, check the device attributes to confirm if the serial number is now populated.
What are the challenges with Net-SNMP sysObjectID Discovery?
For adding discovery support, the device is providing a generic Linux-based SysObjectID (netSnmpAgentOIDs.10: 1.3.6.1.4.1.8072.3.2.10 ). This represents a Linux system only and is not an enterprise or device model-specific SysObjectID. There are also a few other vendor devices that use the same SysObjectID. Therefore, we can categorize this device only as a Linux system, and we cannot add hardware details such as model, make, or serial number to this object definition in the OpsRamp device type definitions table.
Note: Similarly, there are other OIDs that follow the same pattern and can only be categorized at a generic system level. Detailed device-specific attributes cannot be captured unless the vendor provides a unique enterprise SysObjectID.
| netSnmpTCs | .1.3.6.1.4.1.8072.3.1.1 |
| hpux9 | .1.3.6.1.4.1.8072.3.2.1 |
| linux | .1.3.6.1.4.1.8072.3.2.10 |
| bsdi | .1.3.6.1.4.1.8072.3.2.11 |
| openbsd | .1.3.6.1.4.1.8072.3.2.12 |
| win32 | .1.3.6.1.4.1.8072.3.2.13 |
| hpux11 | .1.3.6.1.4.1.8072.3.2.14 |
| aix | .1.3.6.1.4.1.8072.3.2.15 |
| macosx | .1.3.6.1.4.1.8072.3.2.16 |
| dragonfly | .1.3.6.1.4.1.8072.3.2.17 |
| sunos4 | .1.3.6.1.4.1.8072.3.2.2 |
| unknown | .1.3.6.1.4.1.8072.3.2.255 |
| solaris | .1.3.6.1.4.1.8072.3.2.3 |
| osf | .1.3.6.1.4.1.8072.3.2.4 |
| ultrix | .1.3.6.1.4.1.8072.3.2.5 |
| hpux10 | .1.3.6.1.4.1.8072.3.2.6 |
| netbsd | .1.3.6.1.4.1.8072.3.2.7 |
| irix | .1.3.6.1.4.1.8072.3.2.9 |
Here are some possible reasons why this happens:
Default Net-SNMP Configuration
Net-SNMP uses
.1.3.6.1.4.1.8072.3.2.10as its default sysObjectID. Net-SNMP is a widely used open-source SNMP agent installed on many Linux/Unix systems and embedded devices.If the vendor or administrator does not override or configure a custom sysObjectID, Net-SNMP falls back to its default:
No Vendor Customization
The device vendor may not have customized the SNMP agent to use their own enterprise OID. Many generic or white-label appliances — especially those running Linux with a default Net-SNMP agent(Devices are shipped (delivered or sold) with the Net-SNMP agent preinstalled) without vendor-specific SNMP configuration and therefore report the default Net-SNMP sysObjectID.
Misconfiguration or Oversight
The device may be reporting a generic sysObjectID due to a misconfiguration or firmware oversight where the vendor-specific SNMP settings were not applied, causing the SNMP agent to retain the default Net-SNMP identifier.
However, in some cases:
The device firmware may ship with a default Net-SNMP configuration instead of a customized one.
A software update or custom build might overwrite the vendor-specific settings and revert to the default Net-SNMP sysObjectID (1.3.6.1.4.1.8072.3.2.10).
Incorrect or incomplete SNMP configuration during deployment may leave the sysObjectID at its default placeholder value.
Firmware Updates or Custom Builds
When a device is upgraded using stock, open-source, or custom firmware (such as OpenWRT or a generic Linux build), the vendor-specific SNMP configurations may not be included in the new firmware image. As a result, the SNMP agent may fall back to its default settings—typically the Net-SNMP default sysObjectID (1.3.6.1.4.1.8072.3.2.10). This happens because custom firmware often replaces or resets configuration files, removing the vendor’s enterprise OID and any customized SNMP identifiers. Therefore, after such firmware updates, the device may identify itself as a generic Net-SNMP agent instead of its actual hardware or product type
Virtual or Cloud Devices
Virtual appliances and cloud-hosted network devices often run lightweight or generic Linux builds where the SNMP agent is installed as is, without any vendor-specific customization. In these cases, the vendor may not embed their enterprise OID or device identity into the SNMP configuration. As a result, the device reports the default Net-SNMP sysObjectID (1.3.6.1.4.1.8072.3.2.10), since no branding or product-specific identifiers were added to distinguish the virtual appliance from a standard Net-SNMP installation.
Recommendations to Fix
Check with the Vendor
Contact the device vendor to confirm whether a firmware update or an enhanced SNMP agent is available that sets the correct enterprise OID instead of the default Net-SNMP sysObjectID.
Configure Net-SNMP Manually
You cannot randomly assign a sysObjectID, as it is intended to uniquely identify the device type, model, and vendor. Assigning an arbitrary OID may result in incorrect device identification in monitoring and inventory systems.
Steps:
Check Vendor Support
Before making any changes, confirm with the device vendor whether a device-specific
sysObjectIDis available and if it is supported to update manually.Obtain the official OID from the vendor, which accurately represents the device or model.
Edit SNMP Configuration (if permitted)
Open the SNMP daemon configuration file:
/etc/snmp/snmpd.confAdd or modify the
sysObjectIDline:sysObjectID <vendor-provided-OID>Example:
sysObjectID .1.3.6.1.4.1.12345.1.1
Restart SNMP Daemon
Apply changes by restarting the SNMP service:
sudo systemctl restart snmpd
Verify
- Perform an SNMP walk or query to confirm that the
sysObjectIDnow reflects the vendor-specific value.
⚠️ Note: Manual configuration is only recommended if the vendor confirms it is supported. Unauthorized changes may result in inaccurate monitoring and inventory data.
- Perform an SNMP walk or query to confirm that the
Request Vendor to Customize SNMP Agent
If you use commercial hardware, request the vendor to use their own enterprise OIDs and customize SNMP agent settings.
Monitor for Regressions
After fixing, ensure that future firmware updates or device changes do not revert sysObjectID to the generic value.
References:
SNMP Version History
| Application Version | Bug fixes / Enhancements |
|---|---|
| 21.2.0 |
|
| 21.1.0 |
|
| 20.1.0 |
|
| 19.1.0 |
|
| 18.2.0 | Added support for detailed discovery activity information in SNMP, Linux, and WMI discoveries, including the number of reachable devices and the count of successful SNMP, WMI, or SSH connections. |
| 18.1.0 | Added support for visualizing BGP and OSPF links within the network topology. |
| Added support to exclude broadcast IPs from discovery within the specified subnet. | |
| 18.0.0 | Implemented a fix to allow SNMP discovery to proceed even if component OIDs fail to respond on the end device. |
| Added a fix to retrieve BGP Neighbors using the getNext operation during SNMP discovery. | |
| 15.1.0 | Addressed an issue to ensure RAM attribute values are correctly displayed for devices discovered via SNMP. |
| 14.0.0 | SNMP v3 credential support now includes AES-192-C and AES-256-C privacy protocols. From Gateway version 14.0.0, you can discover and monitor devices using these protocols by enabling them while creating SNMP credentials in OpsRamp. |