| Supported Versions |
|---|
| SCOM 2019 |
Introduction
Microsoft SCOM is a cross-platform data center monitoring and reporting tool that checks the status of objects defined in operating systems and hypervisors.
OpsRamp uses the Webhook API to receive alerts.
The integration involves configurations in OpsRamp and SCOM. After the successful integration, OpsRamp displays the alerts.
OpsRamp configuration
Step 1: Install the integration
- From All Clients, select a client.
- Navigate to Setup > Account.
- Select the Integrations and Apps tab.
- The Installed Integrations page, where all the installed applications are displayed. Note: If there are no installed applications, it will navigate to the Available Integrations and Apps page.
- Click + ADD on the Installed Integrations page. The Available Integrations and Apps page displays all the available applications along with the newly created application with the version.
- Search for the application using the search option available. Alternatively, use the All Categories option to search.
- Click ADD on the SCOM tile.
Inbound (Optional):
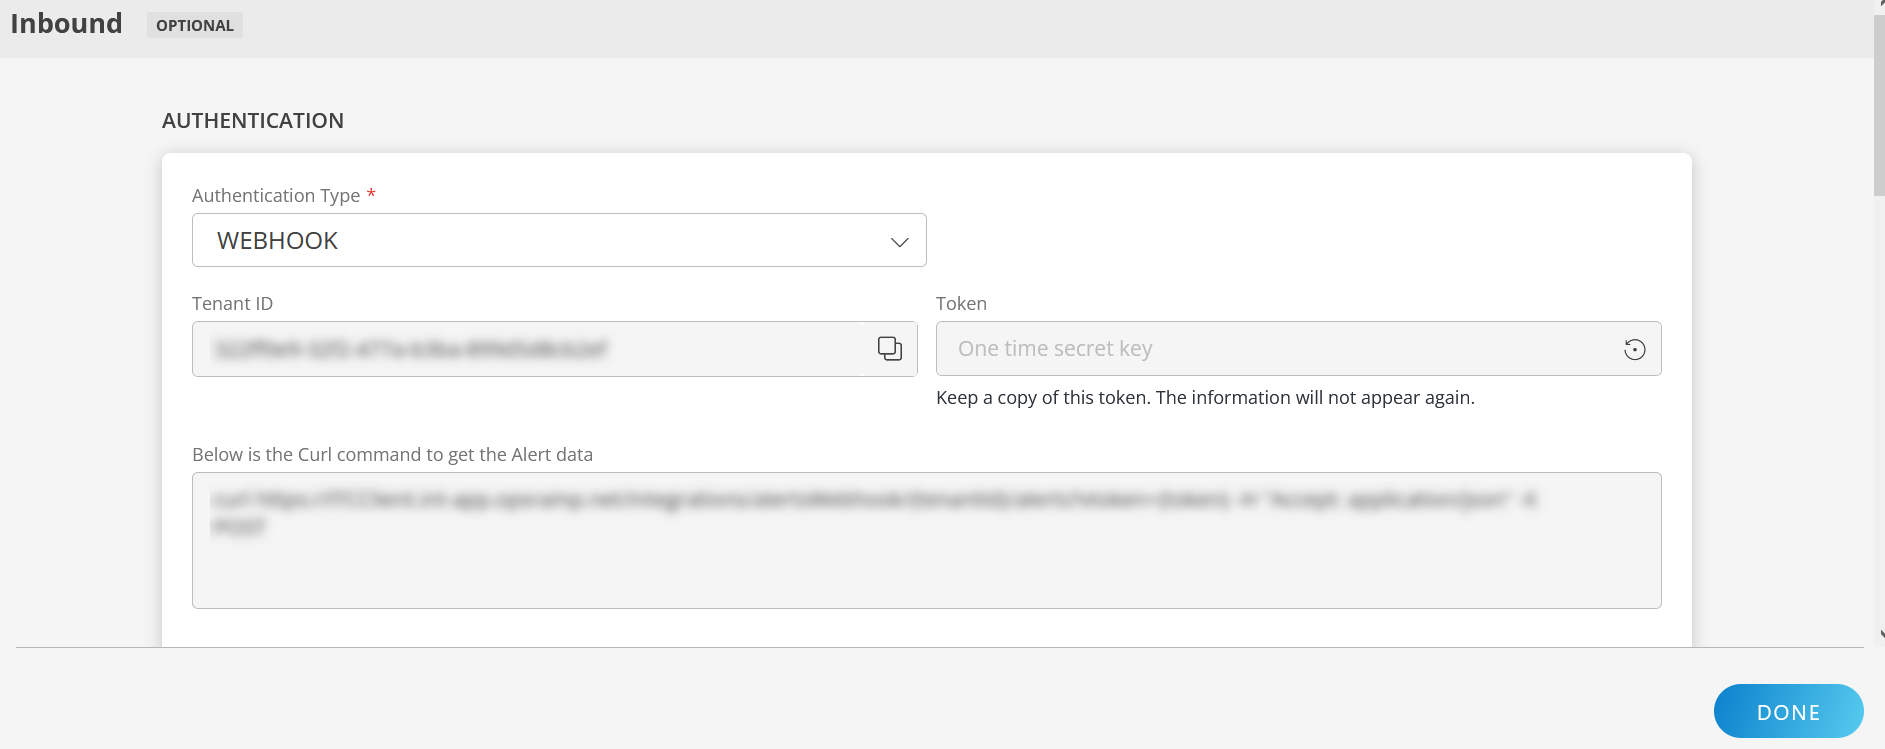
To configure the inbound, follow these steps:
Authentication:
Select the Authentication Type as either Webhook or OAuth2.
Webhook: By default, Webhook is selected as the Authentication Type.
Make a note of Tenant ID, Token and Webhook URL.
These details are used while creating an HTTP Request template during SCOM configuration.OAuth2: Select OAuth2 from the dropdown and click on Generate Key to generate the Key and Secret.
Note: Keep a copy of the token as the information will not appear again. Read information about the Access Key.
Map Attributes: Map OpsRamp entity attributes with SCOM attributes.
Click +Add from the Map Attributes section.
From the Add Map Attributes window, enter the below information:
- OpsRamp Entity: Select Alert from the dropdown.
- OpsRamp Property: Select the OpsRamp property from the dropdown.
- SCOM Entity: Enter the SCOM entity value in the box and click the +value from the dropdown to add it. You can add multiple values.
- SCOM Property: Enter the SCOM property.
Parsing Condition:
- Click +Add and provide the parsing condition:
- Select an operator from the dropdown and enter a value in the fields accordingly. Based on the operator selected, the fields vary.
- Click Save. Click +Add to add more conditions.
Property Values:
- Click +Property Value.
- Enter a value in the SCOM Property Value box and select the appropriate value from the OpsRamp Property Value dropdown.
The options in the OpsRamp Property Value dropdown appear based on the OpsRamp Property selected. - Click Save.
- Click +Property Value to add more property values.
Default Value: Alternatively, you can enter/select a default value in the box.
Note: To map more attributes, click +Entity.
Click Add Map Attributes. The mapped attributes list is added.
- Click the three dots icon at the end of each row to edit or remove the map attributes.
- Use the Filter option to filter the map attributes.
Additional Settings: Select the Drop alerts from unmanaged resources checkbox if you do not want to trigger alerts from unmanaged resources.
Enrich and Create Alert: Select a process definition from the dropdown. You can customize the incoming alerts according to the properties defined in the process definition.
Click Finish.
The following table shows the property mappings.
| Third-Party Entity | OpsRamp Entity | Third-Party Property | OpsRamp Property (non-editable) | ||||||||||
|---|---|---|---|---|---|---|---|---|---|---|---|---|---|
| Problem | Alert | State
| alert.currentState | ||||||||||
| Problem | Alert | MonitoringObjectFullName | alert.serviceName | ||||||||||
| Problem | Alert | Description | alert.description | ||||||||||
| Problem | Alert | MonitoringObjectDisplayName | alert.deviceName | ||||||||||
| Problem | Alert | AlertId | alert.extAlertId | ||||||||||
| Problem | Alert | Name | alert.subject |
Mappings can be modified when required.
SCOM configuration
Step 1: Create a channel
- From the Operations Console left pane, go to Administration, Notifications, Channels.
- Right-click Channels and click New Channel Command.
The Command Notification Channel window opens. - From Command Notification Channel, enter the following information in Descriptions and click Next.
- Channel Name: Enter a unique name.
- Description: Enter the detail.
- In the Settings screen, enter the information according to the location of the path.
- For Full Path of the Command-Line, find and specify the path of powershell.exe file.
For example,C:\Windows\System32\WindowsPowerShell\v1.0\powershell.exe - For Command-Line Parameters, consider the following and specify details:
- The path where you stored the script that is executed automatically when alerts are created in SCOM.
AlertIDas a parameter.
For example,“C:\scripts\Alert.ps1” ‘”$Data[Default=’Not Present’]/Context/DataItem/AlertId$”‘
- On the command link, provide a path for a startup folder.
For example:C:\Windows\System32\WindowsPowerShell\v1.0
- For Full Path of the Command-Line, find and specify the path of powershell.exe file.
- Click Finish. A confirmation message is displayed.
Step 2: Create subscriber
- From the Operations Console left pane, go to Administration, Notifications, Subscribers.
- Right click Subscribers and create New Subscriber.
Notification Subscribe Wizard is displayed where you need to enter a description, schedule, and address. - In Description, enter a unique name as Subscriber Name and click Next.
- In the Schedule tab, select one of the following options and click Next:
- Always send notifications: Recommended
- Notify only during the specific time: Specify the date range.
- In the Address tab, click ADD and enter the following in the Subscribe Address window:
- General: Address name and click Next.
- Channel: enter the following and click Next:
- Channel Type: Select a command from the drop-down menu.
- Command Channel: Select the name of the channel that you created.
- Delivery address for the selected channel: Leave blank.
- Schedule: select one of the following options and click Next:
- Always send notifications: Recommended
- Only send notification during the specified time: Specify the date range.
- Click Finish.
Step 3: Create a subscription
From the Operations Console left pane, go to Administration, Notifications, Subscriptions.
Right-click Subscriptions and click New Subscription.
The Notification Subscription Wizard is displayed where you need to enter details in the respective tabs.For the Description tab, enter a unique subscription name,
provide a description to create a notification subscription, and click Next.For the Scope tab, modify the subscription scope only if necessary and click Next.
For the Criteria tab, click +Insert, provide an expression, enter the following details as provided in the example in the Subscription Criteria window, and click Next:
- Criteria: Severity
- Operator: Equals
- Value: All (Information, Warning, Critical)
Unless specified do not insert any expression and leave the fields empty.
In the Subscriber tab, click ADD and enter:
- Enter the subscriber name created earlier in the Filter by box and click Search.
The subscriber detail is displayed in the Available subscribers column. - Click Add to reflect in the Selected subscribers column.
- Click OK.
- Click Next.
- Enter the subscriber name created earlier in the Filter by box and click Search.
In the Channels tab, click ADD and enter:
- Enter the channel name created earlier in the filter by box and click Search. The channel detail is displayed in the available channels column.
- Click Add to reflect in the selected channels column.
- Click OK.
- In the Channels tab, for Alert aging, select Send notifications without delay.
- Click Next.
In the Summary tab, review the details, select Enable the notification subscription.
Click Finish.
After configuration, alerts are sent directly to OpsRamp using the channel created using the Webhook URL.
Example script
$postFile = "C:\scripts\postResult10.txt"
$args | Out-File $postFile -Append
function Create-Body {
param(
[parameter(Mandatory=$true)]$alert
)

$ResolutionStates=0,247,248,249,250
$SeverityStates=0,1,2

$bodyObject = @{
AlertId = $alert.Id;
Name = $alert.Name;
Description = $alert.Description;
UnformattedDescription = $alert.UnformattedDescription;
MonitoringObjectId = $alert.MonitoringObjectId;
MonitoringClassId = $alert.MonitoringClassId;
ClassId = $alert.ClassId;
MonitoringObjectDisplayName = $alert.MonitoringObjectDisplayName;
MonitoringObjectName = $alert.MonitoringObjectName;
MonitoringObjectPath = $alert.MonitoringObjectPath;
MonitoringObjectFullName = $alert.MonitoringObjectFullName;
IsMonitorAlert = $alert.IsMonitorAlert;
ProblemId = $alert.ProblemId;
MonitoringRuleId = $alert.MonitoringRuleId;
RuleId = $alert.RuleId;
ResolutionState = $alert.ResolutionState;
Priority = $alert.Priority;
Severity = $alert.Severity;
Category = $alert.Category;
Owner = $alert.Owner;
ResolvedBy = $alert.ResolvedBy;
TimeRaised = $alert.TimeRaised;
TimeAdded = $alert.TimeAdded;
LastModified = $alert.LastModified;
LastModifiedBy = $alert.LastModifiedBy;
TimeResolved = $alert.TimeResolved;
TimeResolutionStateLastModified = $alert.TimeResolutionStateLastModified;
CustomField1 = $alert.CustomField1;
CustomField2 = $alert.CustomField2;
CustomField3 = $alert.CustomField3;
CustomField4 = $alert.CustomField4;
CustomField5 = $alert.CustomField5;
CustomField6 = $alert.CustomField6;
CustomField7 = $alert.CustomField7;
CustomField8 = $alert.CustomField8;
CustomField9 = $alert.CustomField9;
CustomField10 = $alert.CustomField10;
TicketId = $alert.TicketId;
Context = $alert.Context;
ConnectorId = $alert.ConnectorId;
LastModifiedByNonConnector = $alert.LastModifiedByNonConnector;
MonitoringObjectInMaintenanceMode = $alert.MonitoringObjectInMaintenanceMode;
MonitoringObjectHealthState = $alert.MonitoringObjectHealthState;
ConnectorStatus = $alert.ConnectorStatus;
RepeatCount = $alert.RepeatCount;
NetbiosComputerName = $alert.NetbiosComputerName;
NetbiosDomainName = $alert.NetbiosDomainName;
PrincipalName = $alert.PrincipalName;
SiteName = $alert.SiteName;
MaintenanceModeLastModified = $alert.MaintenanceModeLastModified;
StateLastModified = $alert.StateLastModified;
Parameters = $alert.Parameters;
TfsWorkItemId = $alert.TfsWorkItemId;
TfsWorkItemOwner = $alert.TfsWorkItemOwner;
ManagementGroupId = $alert.ManagementGroupId;
}

if(($ResolutionStates -contains $alert.ResolutionState) -and ( $alert.Severity -eq 2))
{
$bodyObject.State="Critical"
}
elseif(($ResolutionStates -contains $alert.ResolutionState) -and ( $alert.Severity -eq 1))
{
$bodyObject.State="Warning"
}
elseif(($ResolutionStates -contains $alert.ResolutionState) -and ( $alert.Severity -eq 0))
{
$bodyObject.State="Informational"
}
elseif(($ResolutionStates -notcontains $alert.ResolutionState) -and ( $SeverityStates -contains $alert.Severity))
{
$bodyObject.State="Ok"
}

return $bodyObject
}
function Send-Alert {
param(
[parameter(Mandatory=$true)]$body = ""
)
$method = "POST"
$uri ="https://example.opsramp.net/integrations/alertsWebhook/{tenant_id}/alerts?vtoken=cEhsdfwqejq3939dnlsMUDa6efQqeA9BQ8"

$body = ConvertTo-Json $body
[Net.ServicePointManager]::SecurityProtocol = [Net.SecurityProtocolType]::Tls12
Invoke-WebRequest -Uri $uri -Body $body -Method $method -ContentType application/json
}

#Import-Module OperationsManager

Import-Module "C:\Program Files\Microsoft System Center\Operations Manager\Powershell\OperationsManager\OperationsManager.psm1"

try {
write-output "Connection to OpsRamp Status" | Out-File $postFile -Append
}
catch {
out-file -InputObject "Exception Type: $($_.Exception.GetType().FullName) Exception Message: $($_.Exception.Message)" -FilePath $postFile -Append
}
$alert_info = Get-SCOMAlert -Id $([String]$args)
$body = Create-Body $alert_info
Send-Alert -body $body
$alert_info | Out-File $postFile -Append
Be sure to replace the URI with the Webhook URL and in the Import Module and
specify the path of the OperationsManager.psm1 file.
For example: C:\Program Files\Microsoft System Center\Operations Manager\Powershell\OperationsManager\OperationsManager.psm1.
Example request payload
{
"ClassId": "b9bce7fb-0053-7c3d-933b-496a197e503d",
"Description": "The \u0027Print Spooler\u0027 service on computer WIN-MBPBJ0U32JV.INTEGRATIONS.OPSRAMP has stopped running",
"MonitoringObjectHealthState": 3,
"TimeResolutionStateLastModified": "\/Date(1583324728293)\/",
"IsMonitorAlert": true,
"TfsWorkItemId": null,
"StateLastModified": "\/Date(1583324728293)\/",
"MonitoringObjectPath": "WIN-MBPBJ0U32JV.INTEGRATIONS.OPSRAMP",
"TimeAdded": "\/Date(1583324728607)\/",
"MonitoringObjectInMaintenanceMode": false,
"CustomField4": null,
"TimeResolved": null,
"ResolutionState": 0,
"ConnectorStatus": 1,
"MonitoringClassId": "b9bce7fb-0053-7c3d-933b-496a197e503d",
"CustomField1": null,
"TfsWorkItemOwner": null,
"RuleId": "7f061679-7e44-5766-4a42-e3cf1bc61d67",
"MonitoringObjectFullName": "ServiceStateProbePage_fab70142d90240f7a3894afe177f727c:WIN-MBPBJ0U32JV.INTEGRATIONS.OPSRAMP;Spooler",
"Priority": 2,
"ProblemId": "7f061679-7e44-5766-4a42-e3cf1bc61d67",
"Severity": 2,
"ManagementGroupId": "55dd0f32-ecfa-0717-70f5-884769171c24",
"CustomField6": null,
"CustomField10": null,
"ResolvedBy": null,
"CustomField5": null,
"TimeRaised": "\/Date(1583324728293)\/",
"Category": 8,
"SiteName": null,
"CustomField8": null,
"Parameters": ["Print Spooler", "WIN-MBPBJ0U32JV.INTEGRATIONS.OPSRAMP"],
"LastModifiedBy": "Connector Framework Alert Write Action",
"LastModified": "\/Date(1583324778873)\/",
"CustomField3": null,
"ConnectorId": "7431e155-3d9e-4724-895e-c03ba951a352",
"Owner": null,
"NetbiosDomainName": "INTEGRATIONS",
"MaintenanceModeLastModified": "\/Date(-2208960000000)\/",
"CustomField2": null,
"UnformattedDescription": "The \u0027Print Spooler\u0027 service on computer WIN-MBPBJ0U32JV.INTEGRATIONS.OPSRAMP has stopped running",
"PrincipalName": "WIN-MBPBJ0U32JV.INTEGRATIONS.OPSRAMP",
"CustomField7": null,
"LastModifiedByNonConnector": "\/Date(1583324778873)\/",
"NetbiosComputerName": "WIN-MBPBJ0U32JV",
"State": "Critical",
"MonitoringObjectId": "ca84aabb-cbfc-1574-b6c8-fbefdd3faf96",
"CustomField9": null,
"TicketId": null,
"RepeatCount": 0,
"MonitoringObjectDisplayName": "Print Spooler",
"Name": "Windows Service Stopped",
"AlertId": "77cdc39c-2da3-4349-a673-ef23343ee2e5",
"MonitoringObjectName": "Spooler",
"MonitoringRuleId": "7f061679-7e44-5766-4a42-e3cf1bc61d67"
}
Viewing alerts
- Go to the Alerts page, search with the source name as
SCOM.
Related alerts are displayed. - Click Alert ID to view.
Error Codes - Inbound Webhook Event integration
See Integrations for information on the error codes.