Prisma Public Cloud provides continuous visibility, security, and compliance monitoring across public multi-cloud deployments. This enables organizations to safely embrace the public cloud through its intelligent SaaS security platform
OpsRamp configuration
Step 1: Install the integration
- From All Clients, select a client.
- Go to Setup > Account.
- Select the Integrations and Apps tab.
- The Installed Integrations page, where all the installed applications are displayed. Note: If there are no installed applications, it will navigate to the Available Integrations and Apps page.
- Click + ADD on the Installed Integrations page. The Available Integrations and Apps page displays all the available applications along with the newly created application with the version.
- Search for the application using the search option available. Alternatively, use the All Categories option to search.
- Click ADD on the Prisma Public Cloud tile.
Inbound (Optional):
To configure the inbound, follow these steps:
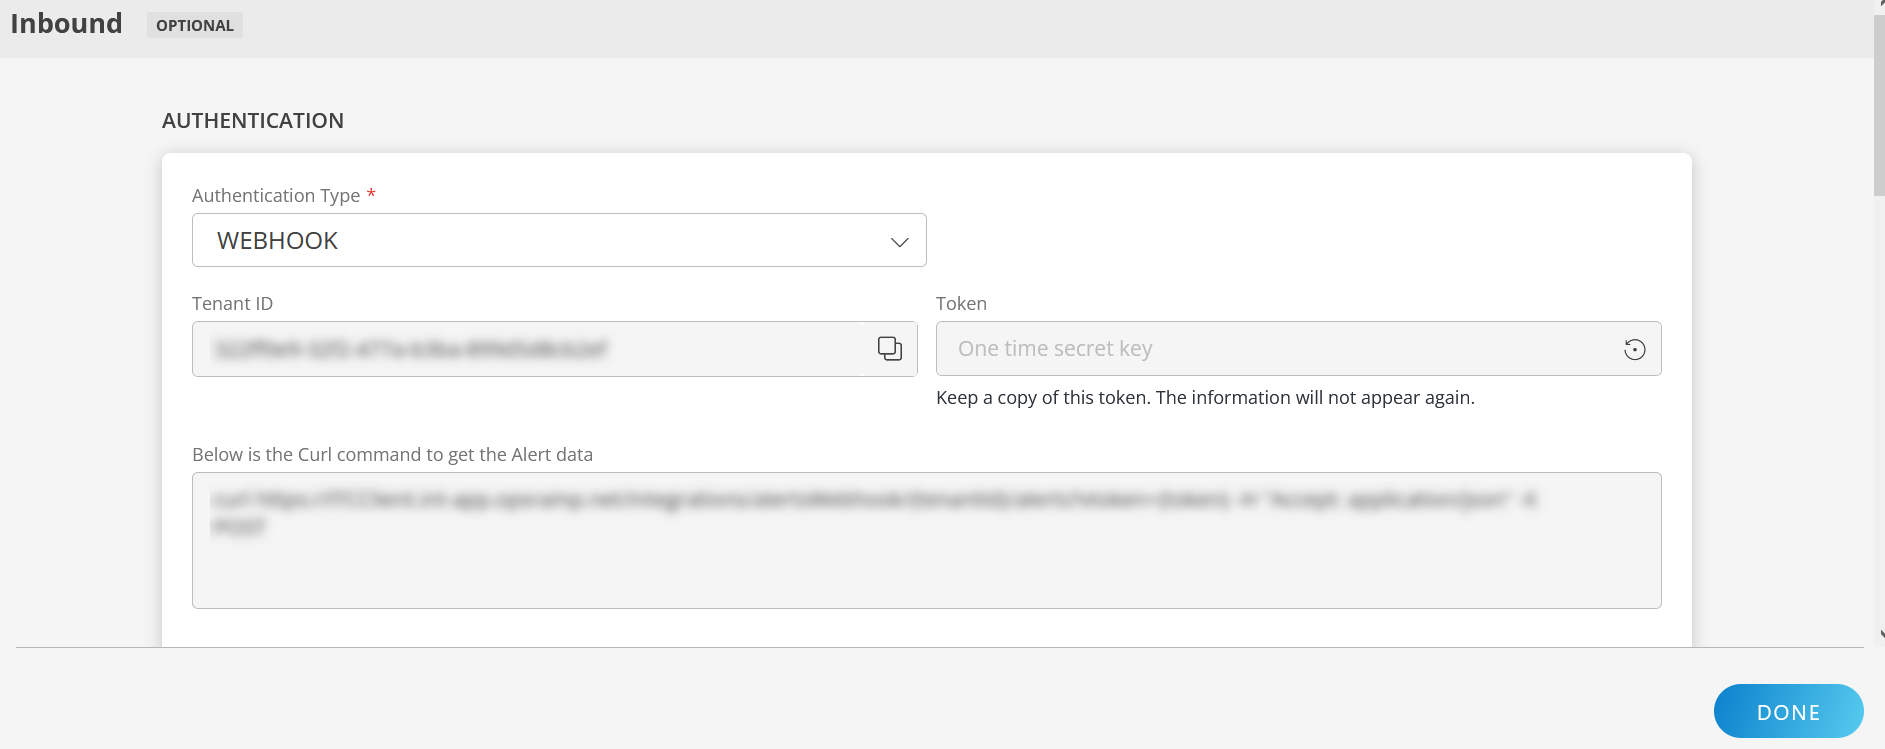
Authentication:
Select the Authentication Type as Webhook.
- Webhook: By default, Webhook is selected as the Authentication Type.
Make a note of Tenant ID, Token and Webhook URL.
These details are used while creating an HTTP Request template during Prisma Public Cloud configuration.
- Webhook: By default, Webhook is selected as the Authentication Type.
Map Attributes: Map OpsRamp entity attributes with Prisma Public Cloud attributes.
Click +Add from the Map Attributes section.
From the Add Map Attributes window, enter the below information:
- OpsRamp Entity: Select Alert from the dropdown.
- OpsRamp Property: Select the OpsRamp property from the dropdown.
- Prisma Public Cloud Entity: Enter the Prisma Public Cloud entity value in the box and click the +value from the dropdown to add it. You can add multiple values.
- Prisma Public Cloud Property: Enter the Prisma Public Cloud property.
Parsing Condition:
- Click +Add and provide the parsing condition:
- Select an operator from the dropdown and enter a value in the fields accordingly. Based on the operator selected, the fields vary.
- Click Save. Click +Add to add more conditions.
Property Values:
- Click +Property Value.
- Enter a value in the Prisma Public Cloud Property Value box and select the appropriate value from the OpsRamp Property Value dropdown.
The options in the OpsRamp Property Value dropdown appear based on the OpsRamp Property selected. - Click Save.
- Click +Property Value to add more property values.
Default Value: Alternatively, you can enter/select a default value in the box.
Note: To map more attributes, click +Entity.
Click Add Map Attributes. The mapped attributes list is added.
- Click the three dots icon at the end of each row to edit or remove the map attributes.
- Use the Filter option to filter the map attributes.
Additional Settings: Select the Drop alerts from unmanaged resources checkbox if you do not want to trigger alerts from unmanaged resources.
Enrich and Create Alert: Select a process definition from the dropdown. You can customize the incoming alerts according to the properties defined in the process definition.
Click Finish.
The following table shows the attribute mappings.
| OpsRamp Attributes | Prisma Public Cloud Attributes | ||||
|---|---|---|---|---|---|
| Alert metric | message | ||||
| Alert state | message
| ||||
| Alert time | sentTs | ||||
| Alert subject | message | ||||
| Alert resource name | message |
Mapping the first payload validation
- Enter the Webhook URL in Webhooks URL field,
authentication token in the Auth Token field in the Integrations tab, and click Test.
A success message is displayed.
- Prisma Public Cloud sends a response message as confirmation to OpsRamp.
The following show a sample response:
{
    "sender":"RedLock",
    "sentTs":'1557951571335',
    "message":"HELLO"
}
Mapping the final payload
- May the webhook payload attributes to the OpsRamp alert attributes.
- The Prisma Public Cloud webhook sends a sample payload to OpsRamp.
The following table shows the mapping for the cloud security vulnerability events webhook payload attributes with the OpsRamp Alert entity attributes.
| OpsRamp Attribute | Prisma Public Cloud Attribute | ||||||||
|---|---|---|---|---|---|---|---|---|---|
| External alert ID | >alertId | ||||||||
| Alert metric | >resourceCloudService | ||||||||
| Alert state | severity
| ||||||||
| Alert time | >alertTs | ||||||||
| Alert subject | >policyName | ||||||||
| Alert description | >policyDescription | ||||||||
| Alert resource name | >resourceName |
Example response
{

        "resourceId": "subnet-5c03e227",
        "alertRuleName": "Kfarr Email Test",
        "accountName": "2W-ProductDevelopment5",
        "hasFinding": false,
        "resourceRegionId": "ap-south-1",
        "alertRemediationCli": null,
        "source": "RedLock",
        "cloudType": "aws",
        "callbackUrl": "https://app.redlock.io/alerts?filters#alert.id=P-1975&timeType=to\_now&timeUnit=epoch",
        "alertId": "P-1975",
        "policyLabels": \[\],
        "alertAttribution": null,
        "severity": "medium",
        "policyName": "AWS VPC subnets should not allow automatic public IP assignment",
        "resourceName": "subnet-5c03e227",
        "riskRating": "B",
        "resourceRegion": "AWS Mumbai",
        "policyDescription": "This policy identifies VPC subnets which allow automatic public IP assignment. VPC subnet is a part of the VPC having its own rules for traffic. Assigning the Public IP to the subnet automatically (on launch) can accidentally expose the instances
 in this subnet to the internet and should be edited to 'No' post creation of the Subnet.",
        "policyRecommendation": "1. Sign into the AWS console.\\n2. In the console, select the specific region from the region drop-down on the top right corner, for which the alert is generated.\\n3. Navigate to the 'VPC' service.\\n4. In the navigation pane, click 'Subnets'.\\n5. Select the identified Subnet and choose the option 'Modify auto-assign IP settings' under the Subnet Actions.\\n6. Disable the 'Auto-Assign IP' option and save it.",
        "accountId": "162213212942",
        "resourceConfig": {
            "subnetId": "subnet-5c03e227",
            "subnetArn": "arn:aws:ec2:ap-south-1:162213212942:subnet/subnet-5c03e227",
            "availabilityZoneId": "aps1-az2",
            "cidrBlock": "172.31.32.0/20",
            "ownerId": "162213212942",
            "availabilityZone": "ap-south-1c",
            "assignIpv6AddressOnCreation": false,
            "tags": \[\],
            "vpcId": "vpc-f515f69c",
            "mapPublicIpOnLaunch": true,
            "defaultForAz": true,
            "state": "available",
            "ipv6CidrBlockAssociationSet": \[\]
        },

        "resourceCloudService": "Amazon VPC",
        "alertTs": 1557856406801,
        "findingSummary": null,
        "resourceType": "Subnet"
    }
]
Prisma Public Cloud configuration
Prerequisites
- The Webhook URL copied during Prisma Public Cloud installation.
- Authentication code generated during Prisma Public Cloud installation.
Step 1: Integrate with OpsRamp
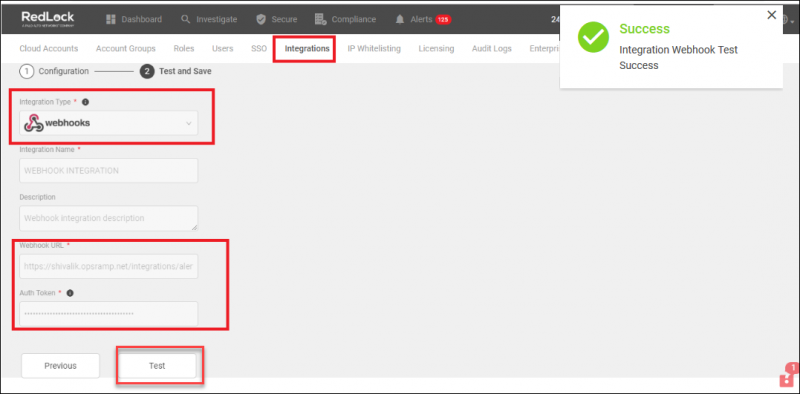
- Log into Prisma Public Cloud Service and select Settings Integrations.
- Select + Add New and set the Integration type as Webhooks.
- Enter the Webhook URL and Auth Code and click Next.
- Click Test. Test successful confirmation message is displayed.
- Click Save.
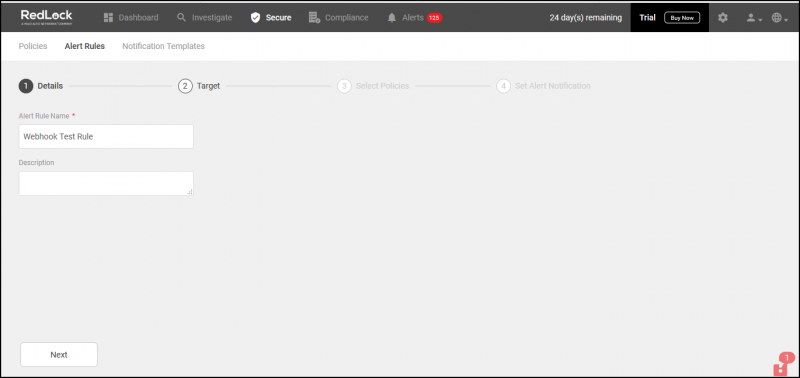
Step 2: Create an alert rule
- Select Secure Alert Rules and click +Add New.
- Enter a name for Alert Rule Name and a Description for rule and click Next.
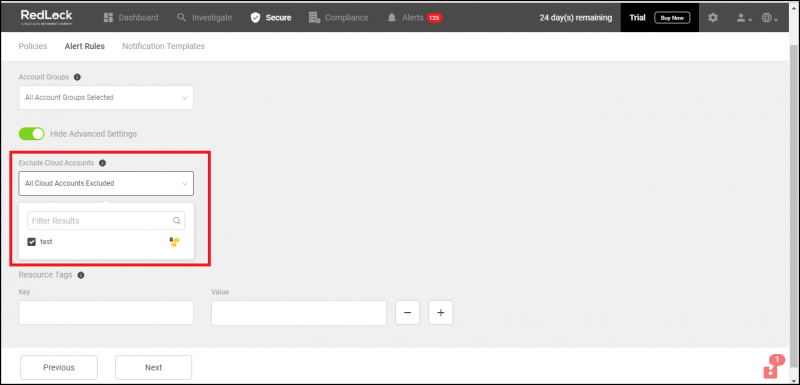
- To apply the alert rule, select Account Groups and click Next.
- To see advanced settings for target setting, toggle View Advanced Settings.
- To exclude any cloud accounts from the selected Account Group, enter the accounts in Exclude Cloud Accounts.
- Choose your region.
- To manage or identify your resources, add Tags. Tags apply to Config and Network Policies only.
- Click Next.
- To add more details to this rule, click View Advanced Settings to provide more details in the following fields:
- To exclude more cloud accounts from triggering alerts, mention the cloud accounts in the Exclude Cloud Accounts.
- To trigger alerts only for specific regions for the cloud accounts in the selected account group, select one or more Regions from the list.
- To trigger alerts only for specific resources in the selected cloud accounts,
enter the key and value of the Resource Tag you created for the resource in your cloud environment.
Tags apply to Config and Network Policies only.
- Click Next.
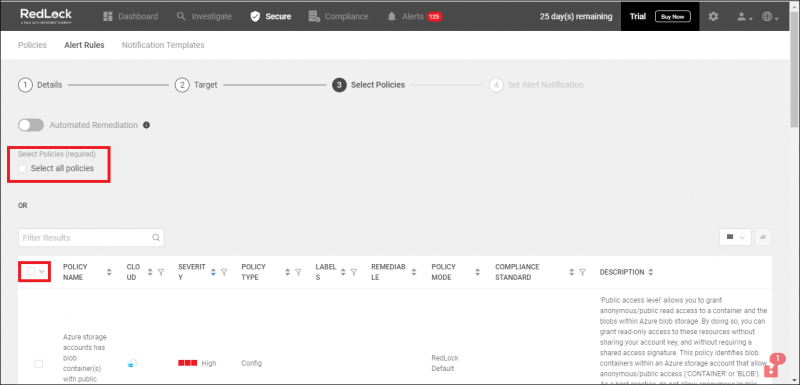
- To trigger alerts for this rule, either Select all policies or select a Specific Policy.
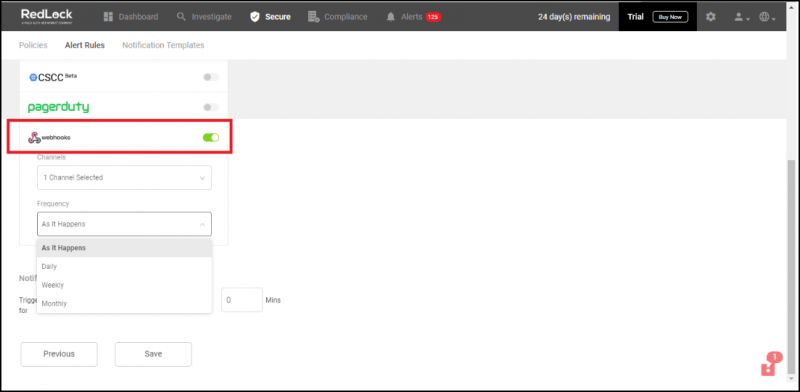
- To send notifications to OpsRamp, configure Set Alert Notifications.
- On the Set Alert Notification page of the alert rule, select webhooks.
- Select the Webhook Channels to send alert notifications triggered by this alert rule.
- Set the Frequency at which to send POST notifications.
- As it Happens: A notification is sent to the selected Webhook channels when an alert is triggered by the alert rule.
- Daily: A single notification is sent to the selected Webhook channels once every day with all alerts triggered by the alert rule in a day.
- Weekly: A single notification is sent to the selected Webhook channels once a week with all alerts triggered by the alert rule during a week.
- Monthly: A single notification is sent to the selected Webhook channels once a month with all alerts triggered by the alert rule during a month.
- Save the alert rule to finish the integration process.
After the successful integration of Prisma Public Cloud with OpsRamp, the security vulnerable events of Prisma Public Cloud are ingested into OpsRamp and displayed as alerts.
Next steps
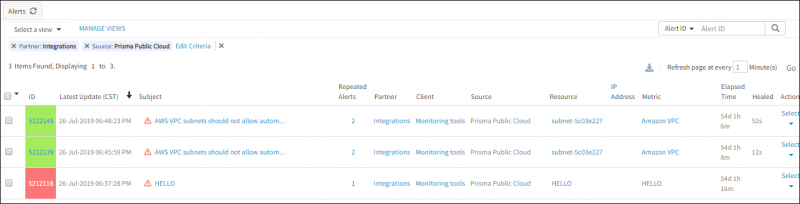
- View the Prisma Public Cloud security vulnerable events as alerts:
- In OpsRamp, go to Alerts. The Alert Browser is displayed.
- Click Edit Criteria and select Source as Prisma Public Cloud. The Alert Browser displays alerts matching the selected criteria.
Error Codes - Inbound Webhook Event integration
See Integrations for information on the error codes.