Introduction
OpsRamp provides a common platform to integrate different tools and applications used by an organization and provides a single interface to view and monitor all the events arising out of the IT infrastructure.
The main objective of integration is to ingest and integrate third-party events. During the integration process, you can define the integration events that you want to monitor. Integration Events are configured for Monitoring and Collaboration integration types. Using the Outbound configuration, you can define the integration events.
OpsRamp categorizes the tools and applications that are used to generate and monitor the events of a resource in an IT infrastructure.
Following table displays the available Integration categories at Service Provider, Partner, and Client levels.
| Scope | Available Category | ||||||
|---|---|---|---|---|---|---|---|
| Service Provider | Automation | Custom | Events | Exports | OS Patching | ||
| Password Vaults | SNMP | SSO | Ticketing | ||||
| Partner | Automation | Custom | Events | Exports | OS Patching | ||
| Password Vaults | SSO | Ticketing | |||||
| Client | Automation | App Definitions | Audio Video Devices | Backup and Recovery | Compute | ||
| Container Orchestration | Custom | Databases | Data Protection | Events | |||
| Exports | Hyperconverged Infrastructure | Internal | Metrics | Metrics, Logs, Traces | |||
| Network | Network Security | Network Services | OS | OS Patching | |||
| Other | Password Vaults | Public Cloud | Remote Access | SNMP | |||
| SSO | SAAS Applications | SAN Management | Servers and VMs | Software Defined Network | |||
| Software Defined Storage | Software Defined WAN | Storage | Ticketing | Virtualization | |||
| Virtualization Management | VoIP | Web Services | Wifi Network | ||||
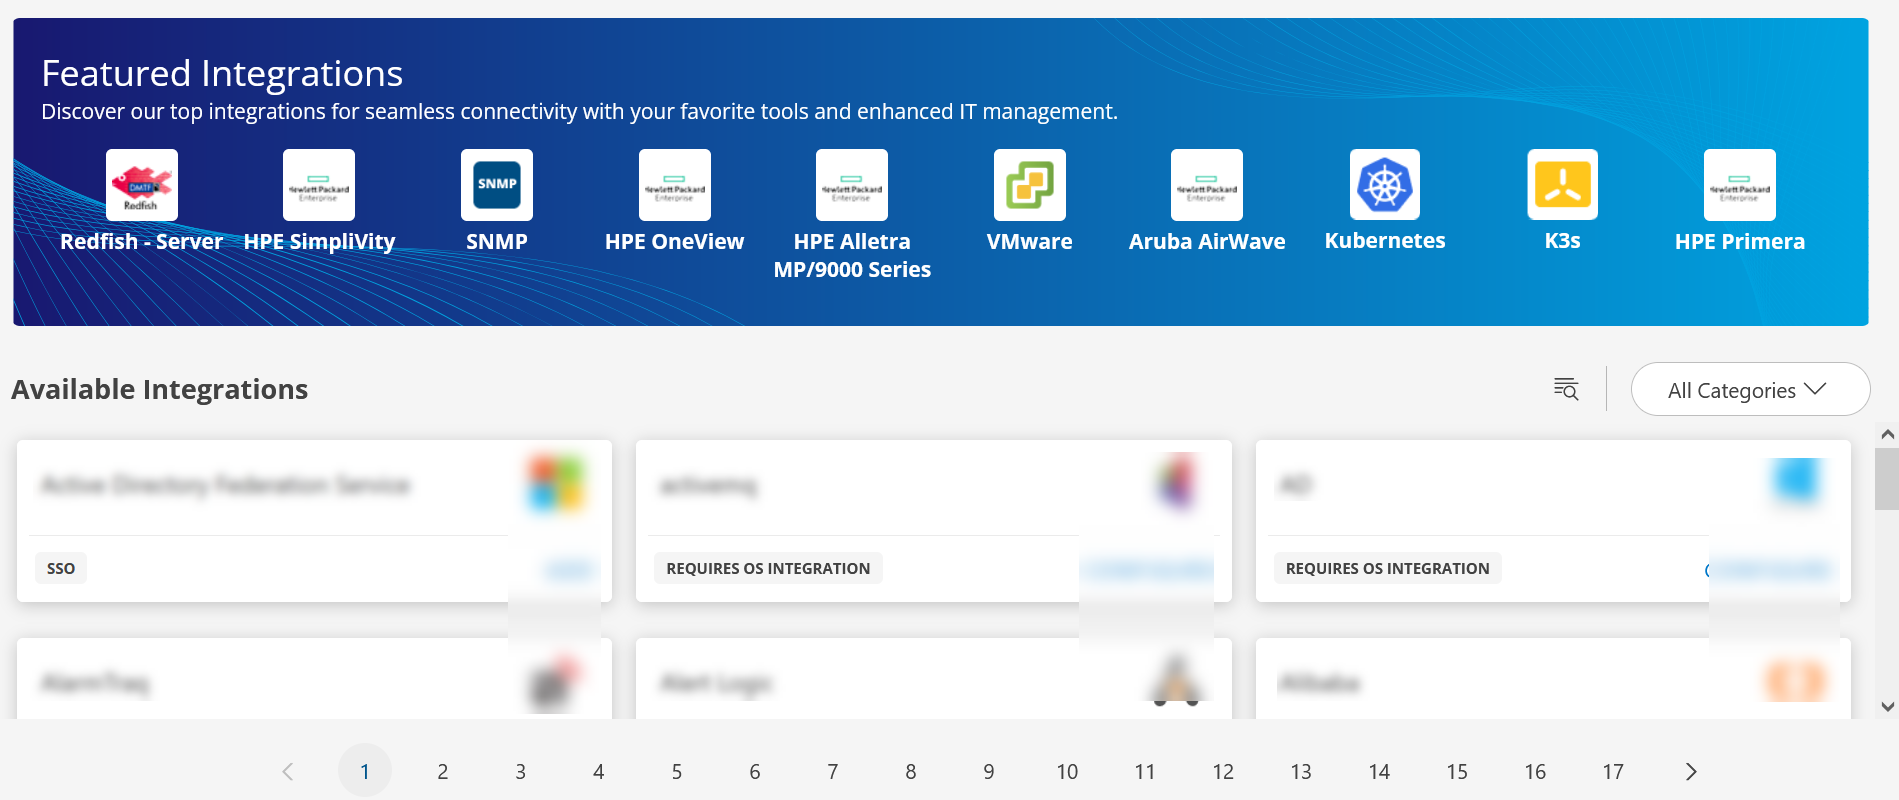
View Integrations
From All Clients, select a client.
Go to Setup > Account.
Select the Integrations and Apps tab.
Note
SP level users can install integrations by selecting All Partners > All Clients.The Available Integrations and Apps page is displayed.
Note: This page is visible to the users who have not installed any integrations, yet.
Install an Integration
To install an integration from the Available Integrations and Apps page:
- Search for the application category wise and select from the results.
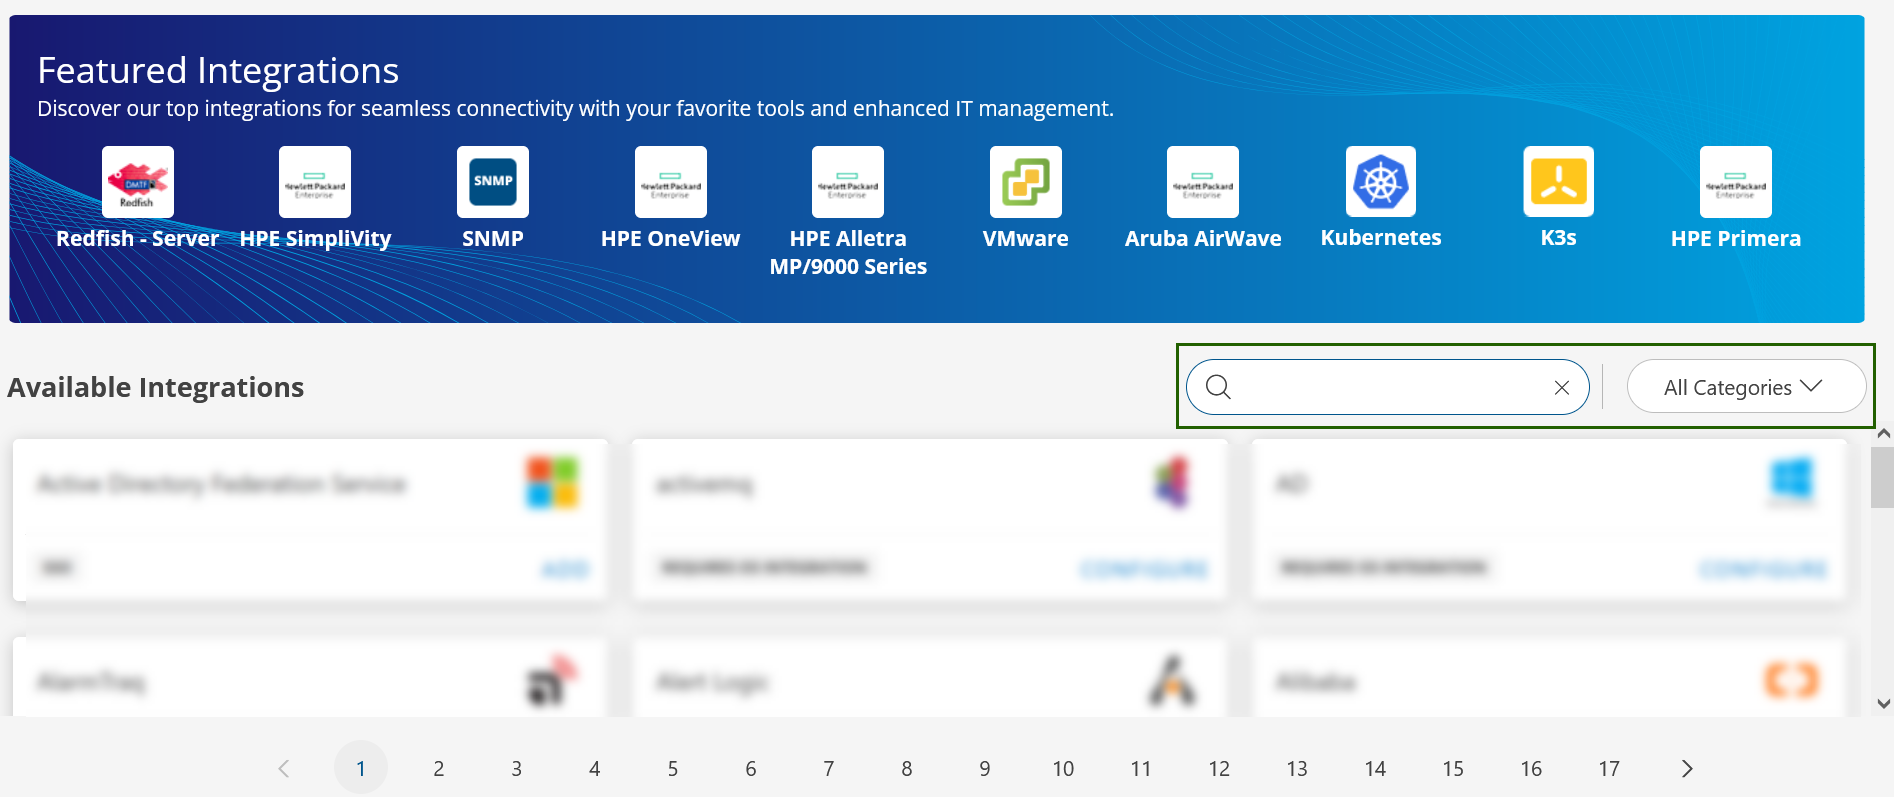
- Click ADD on the application card and follow the instructions on the screen.
To install an integration from the Installed Integration page:
- From the Installed Integrations page, search for the application you want to install, and select the application.
Note: If the application is not available, click +ADD. The Available Integrations and Apps page is displayed. Follow the instructions mentioned in points 1 and 2 above, to install the integration.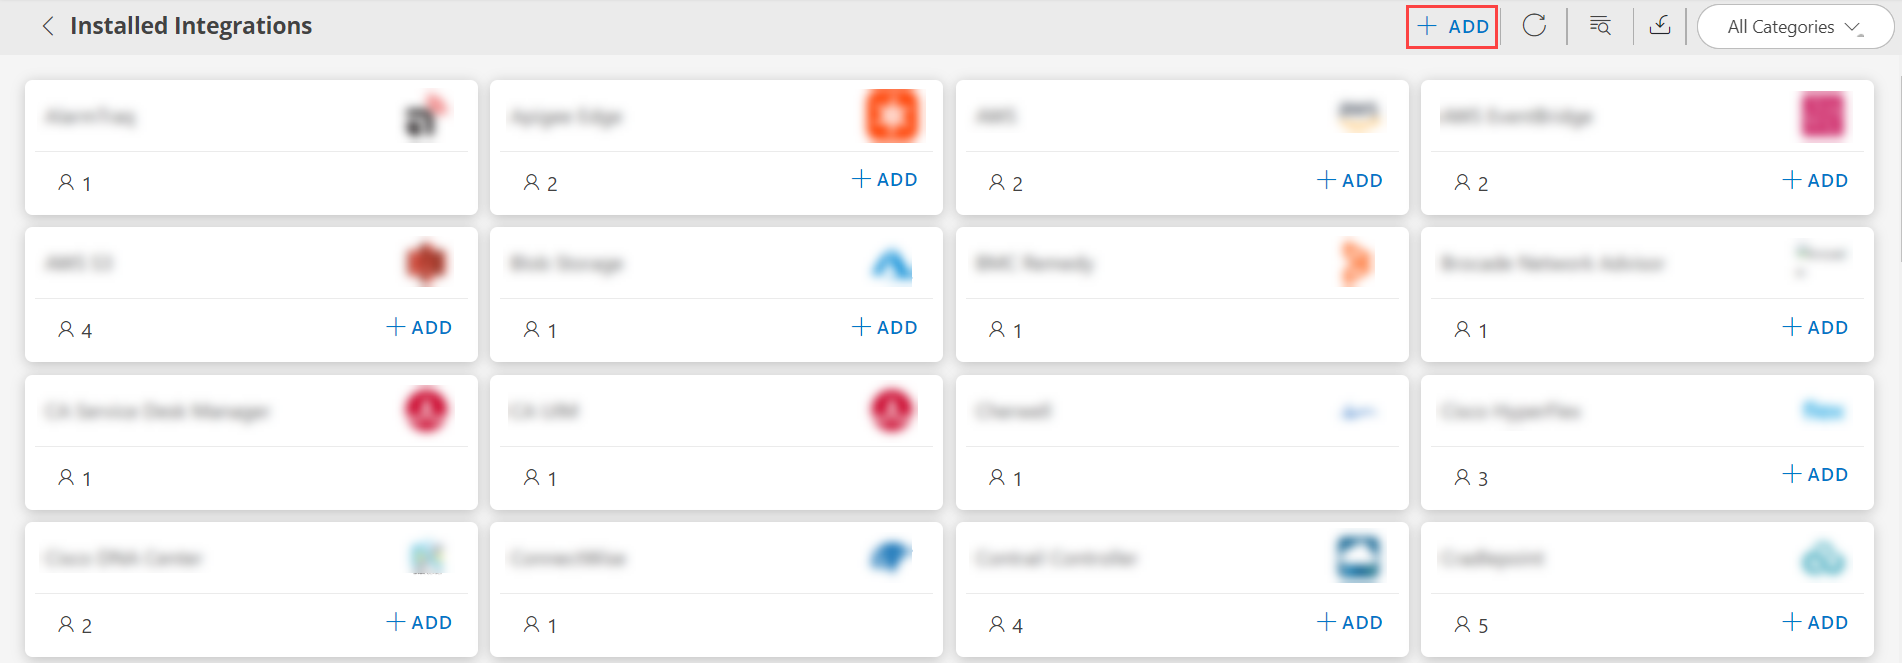
- Click +ADD on the application card and follow the instructions on the screen.
Notes
- The +ADD on the card indicates that multiple integrations can be created.
- If the +ADD is not present on the card, it indicates that multiple integrations cannot be created.
For example, the Linux Patch Feed and Windows Patch Feed applications as seen in the Installed Applications page illustration. - The count next to the user icon indicates the number of integrations that have already been installed.
Configure Native Types
The Native Types section in the configuration settings allows you to control how individual native types are discovered, filtered, and mapped for a specific integration. After an integration is configured, OpsRamp retrieves the native types supported by the integration and displays them in the Native Types section. For each native type, you can:
- Enable or disable discovery of that native type.
- Define resource filtering criteria.
- Configure third-party incident resource mapping and control whether resources of that type participate in incident correlation and ticketing workflows.
| Field name | Field dependency | Description |
|---|---|---|
| Native Types | N/A | Select the native type to configure. The dropdown list displays all native types discovered for the integration. |
| Third party incident CI map | N/A | Select this checkbox to enable third-party incident resource mapping for the selected native type. Integratable resources are directly associated with incidents. If the resource is non-integratable, you must map the native type to a third-party incident resource. |
| Enabled/Disabled | N/A | Determines whether the selected native type is available for discovery and monitoring. Note: When disabling a native type, OpsRamp displays a confirmation message. If the native type is currently selected in third-party incident mapping configurations for its child native types, those mappings may be removed. |
| Resource Filter | Displayed only when you select Enabled for the native type. | Defines the criteria for filtering resources of the selected native type. This allows you to include or exclude specific resources based on attributes such as name, type, or other properties. Click +QUERY to add a new filter condition. |
| Is Integratable Resource | Displayed only when Third party incident CI map checkbox is selected and when the native type is Enabled. | Indicates whether the selected native type can be directly used as a third-party incident resource. Select Yes if the selected native type is an integratable resource and no additional mapping is required because the resource itself can be used as the third-party incident resource. Select No if the selected native type cannot be directly used as a third-party incident resource. In this case, you must select another native type to represent third-party incidents generated by this native type. |
| Incident Resource | Displayed only when you select No for Is Integratable Resource. | Select the native type to which third-party incidents should be mapped. |
View App Information
To view information about the app, click anywhere on the card. The options slide-out screen is expanded. To collapse the slide-out, click anywhere on the card.
The following information is available:
- Name displays the name of the account.
- Version displays the version of the app.
- Collector Profile displays the name of the collector profile.
- Status displays the status of the account and is available only for some accounts.
- Added On displays the date and time when the account was added, along with information about the user who added it.
- Updated On displays the date and time when the account was modified, along with information about the user who modified it.
- Enabled indicates whether the integration is enabled or disabled and is available only for some accounts.
Modify an Installed Integration or Application
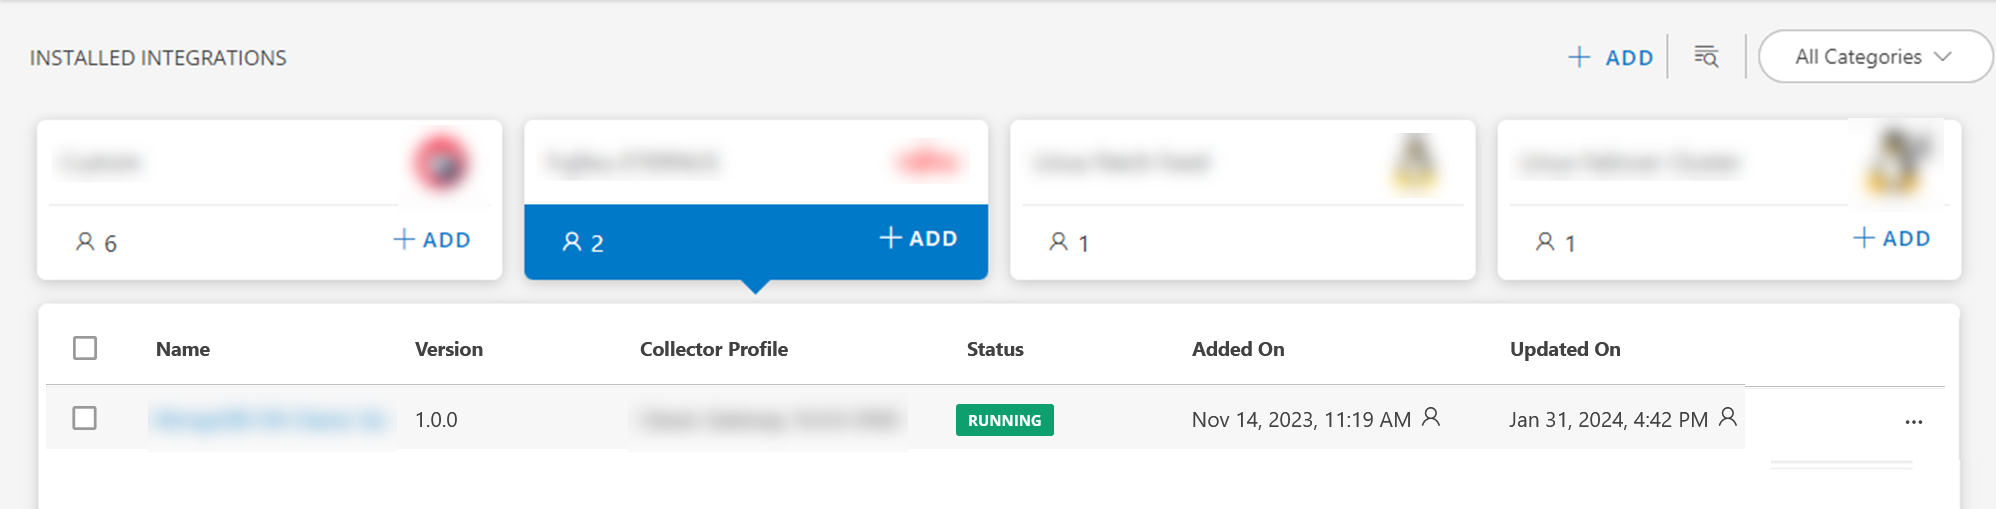
Click the name of the integration or application. A list of installed integrations is displayed with the following information. These options are displayed based on the type of Integration or Application.
Name - Displays the name of the integration or application.
Version - Displays the version details of the integration. You can update the version by clicking the Update dropdown and selecting version.
Collector Profile - Displays the name of the collector profile.
Status - Displays the status of the collector profile. The status is a combination of both the gateway and application. For example, if the gateway status is up and the application status is installed, then the status is Running.
Note: The following statuses are applicable to SNMP, Linux, and SDK integrations.
Gateway Status Application Status Installed Enabled Up Running Running Down Stopped Stopped Not Installed/Deployed/Registered Configured Configured Added On - Displays the date and time details of the added integration or application. The user icon next to the time indicates the user who added the application.
Updated On - Displays the date and time details of the updated integration or application. The user icon next to the time indicates the user who modified the installed application. This information appears whenever an action is performed such as modifying discovery configuration, mapping attributes, or inbound/outbound events.
Actions on integration
Following are the actions you can perform on an integration:
Click the action (three dots) menu against each integration, to view the following options. These options are displayed based on the type of integration or Application:
- View resources: To view the resources discovered by selected integration instance, click this button.
- Edit: To modify or edit an integration, click this option.
- Copy Id: To copy an integration id, click this option.
- Uninstall: To uninstall an integration, click this option.
Note: Uninstalling the integration cannot be reversed. Once uninstalled, the metrics, resources, alerts, and incidents related to that particular integration are impacted. - Rescan: Click this option to discover the resources. The Rescan option is present only for the integrations that have discovery profiles available such as public cloud integrations.
- Export and Import: This option allows you to export and import integrations from one client under a partner to another client under the same partner or a different partner.
- Export OIDs: This option allows you to export OIDs in JSON format.
- View Logs: View logs for the integration.
- Assign template: Assign template to monitor integration failures.
- Change Collector Profile: migrate Gateway-based integrations between collector profiles.

View Resources
- Click the View resources from the three dots.
- The Infrastructure Search appears with related resources of integration instance.
Note: See Related Resources for more details.
Edit an Integration
- Click Edit from the three dots or click on the name of the integration. Based on the type of integration, the page is displayed to modify.
Example: For integrations like SNMP, the Configurations page is displayed with a list of available configurations specific to the selected integration. - Click the three dots available for the configuration and click Edit.
- In the Edit Configuration window that appears, edit the configuration and click Update.
- Click Done.
Copy an Integration Id
Click the three dots available for the integration and click Copy Id. The integration id is copied.
Uninstall an Integration
Click the three dots available for the integration and click Uninstall.
In the Uninstall Integration window that appears, mention the reason for uninstalling and click UNINSTALL. The configuration is uninstalled.
Note: When you uninstall an integration, the resources associated with all configurations are also deleted.
Rescan
Click the rescan option from the action (three dots) menu. The resources are discovered. The scan requested date and time and the last scanned date and time are also shown.
Export and Import
You can export and then import an integration from one client into another.
To export:
- Click Setup > Account.
- From the Account Details page, click Integrations tile.
- On the Installed Integrations page, search for the integration and click on the App card.
- Hover the mouse over the integration row and click the action menu (three dots) against the integration.
- Click Export to download the JSON file on to your computer. This file has all the data related to the integration.
You can now import the downloaded JSON file.
To import:
- Click the import icon available at the right-upper corner of the page.
- Click Upload File from the popup window.
- Select the JSON file.
- Click Open and then click Import. The integration is imported.
Note: You can import an integration into another client under the same partner or select another partner and a client.
Import an SDK application
Prerequisites:
- Add credentials
- Get the collector profile Id, collector profile name, UUID, and other mandatory fields.
Follow these steps to import an SDK application:
- Select the client from where you want to export the application.
- Export the application using the above steps.
- Open the JSON file that is in the Downloads folder of your computer.
- Replace the collector profile Id, collector profile name, UUID, and other mandatory fields in the JSON file.
- Save the JSON file.
- Select the client where you want to import the application.
- Click the import icon at the right-top corner of the page.
- Upload the updated JSON file.
- Click IMPORT. The SDK App is installed and a confirmation message appears.
Export OIDs
You can export OIDs in JSON format.
To export:
- Click the action menu (three dots) against the integration and select Export OIDs to download the JSON file on to your computer. This file has the OIDs separated by commas.
View Logs
You can view logs for the integration.
Follow these steps to view the logs:
- Click on the Actions (three dots) icon for the integration and click on View Logs.
- The logs information is displayed on the View Logs window.
- Switch between the Outbound/Inbound logs by clicking on the down arrow available at the top right corner.
- Use the Filter option to filter the logs based on Created Time and Status.
Assign Template
You can assign templates to the integration for monitoring the integration failures.
Modify a Configuration
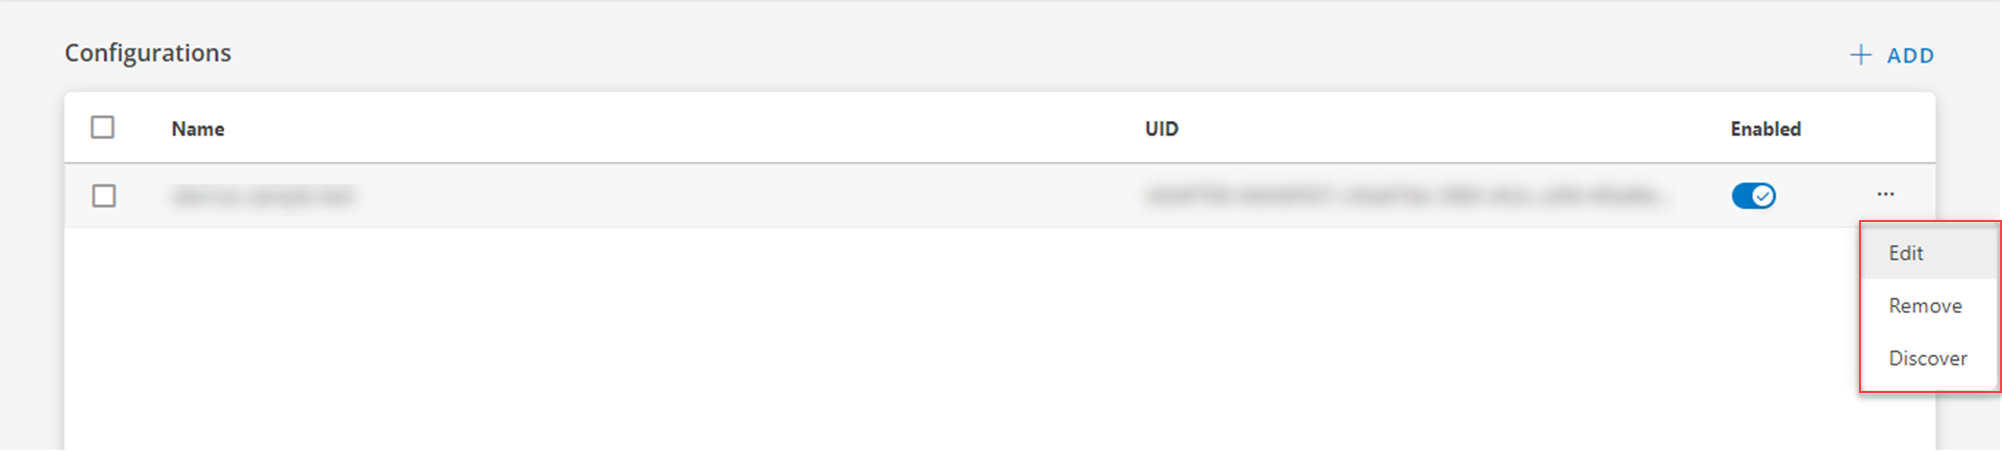
Configurations are available for each integration. The following actions can be performed on the configurations from the three dots next to each configuration:
- Edit: To edit a configuration, click Edit.
- Remove: To remove a configuration, click Remove.
- Discover: To discover the resources, click Discover.
Edit a Configuration
Click Edit from the three dot menu icon against a configuration.
From the Edit Configuration window, edit the configuration and click Update.
Notes:
- You can change the collector profile. To do this, click Change, select the collector profile from the dropdown, and click Update. The collector profile is updated successfully. This is applicable for all discovery related apps.
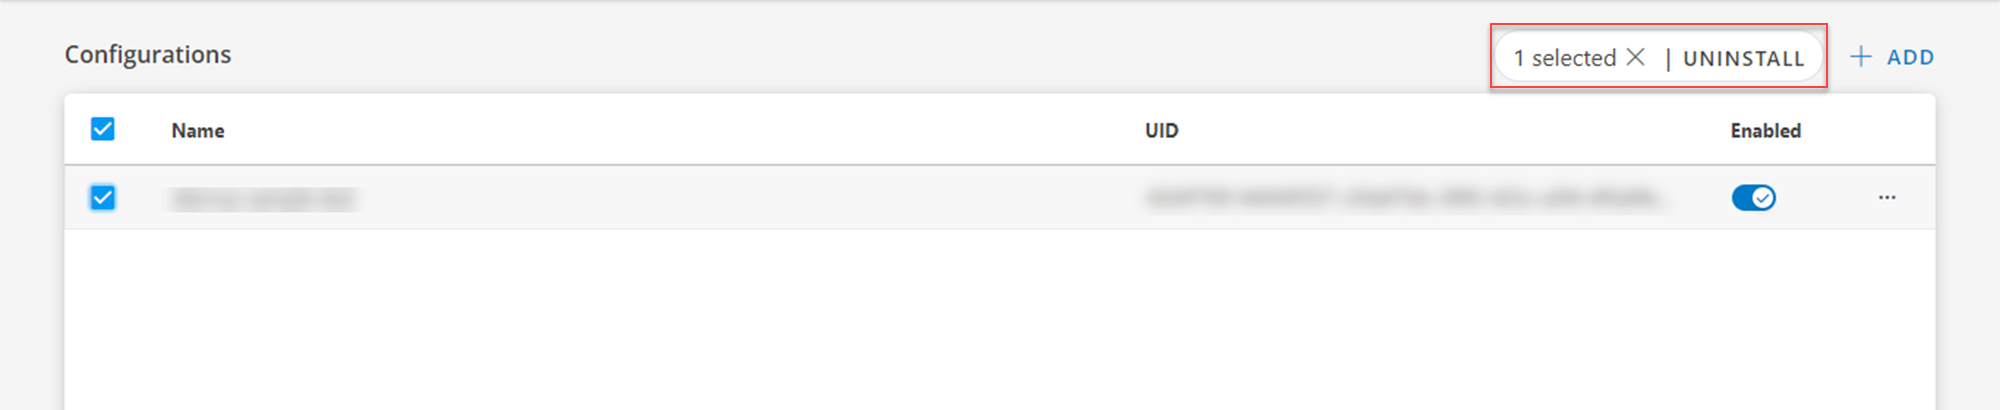
- You may also uninstall multiple configurations at the same time. Select configurations from the list from the Edit Configuration page and click Uninstall at the top right.
- You may also add a new configuration from the Edit Configuration page by clicking +Add.
Remove a Configuration
Click Remove from the three dots of a configuration that you want to remove. A confirmation message appears.
Click Delete to remove the configuration. Click Cancel to go back.
Note: When you remove a configuration, the resources and the related metrics associated with that configuration are also deleted.
Discover a Configuration
- Click the three dots available for the configuration and click Discover. A discovery is initiated and the status is displayed in the Discovery status column.
The number of devices that are discovered are displayed in the Devices column.
- Click the hyperlink to view the discovered devices.
Other Details like Name, Discovery status, Last discovery time, UID and Enabled are displayed.
- Name: Name of the configuration.
- Discovery status: Status of the discovery like Completed, Queued and
In Progress. - Last discovery time: The last discovery date and time.
- UID: Configuration UID.
- Enabled: Enable or disable the configuration. When it is Disabled, discovery does not happen.
Note: The above columns vary based on the integration.
Assign Templates
You can assign templates to the devices.
To assign templates:
- Click the hyperlink in the Devices column to view the discovered devices.
- Click the resource name.
- From the slide-out, click the three dots available at the upper-right corner.
- Click View details. The resource details page is displayed.
- From the monitors tab, assign the templates.
You can view graphs from the Metrics tab.
The device states are also shown in the resources listing page.
Discovered: The Discovered state is shown if a device is only discovered.
Active: The Active state is shown if a device is managed.
Migrate Gateway Integrations Between Collector Profiles
You can migrate gateway-based integrations between collector profiles using the Change Collector Profile capability. This feature allows you to move integrations from one gateway to another without uninstalling or reinstalling the integration.
When you migrate an integration, the platform transfers the associated discovery and monitoring configurations to the new gateway, enabling a seamless transition with minimal manual effort. This feature is supported in all types of gateways: Classic Gateway, Nextgen Gateway, and Windows Gateway.
Use this feature in the following scenarios:
- Balance Gateway Load: If a gateway is overloaded, move selected integrations to another gateway to distribute discovery and monitoring workloads evenly.
- Segregate Integrations: If you want to organize integrations across multiple gateways (for example, separating SNMP and VMware integrations), move them without uninstalling and reinstalling the integration.
Advantages
When you uninstall and reinstall integrations, all resource discovery, monitoring, and alerts history becomes obsolete. Using this feature, you do not need to uninstall the integration from one gateway and reinstall it on another gateway. The system automatically moves the integrations in the background.
Prerequisites
Before you migrate an integration, ensure both gateways are connected to OpsRamp.
Procedure
To migrate a gateway integration to a different collector profile, follow these steps:
- Navigate to Setup > Account > Integrations.
- Click the gateway-based integration you want to migrate.
- In the Configurations screen, click the Action icon (three dots) next to the integration.
- Click Change Collector Profile.
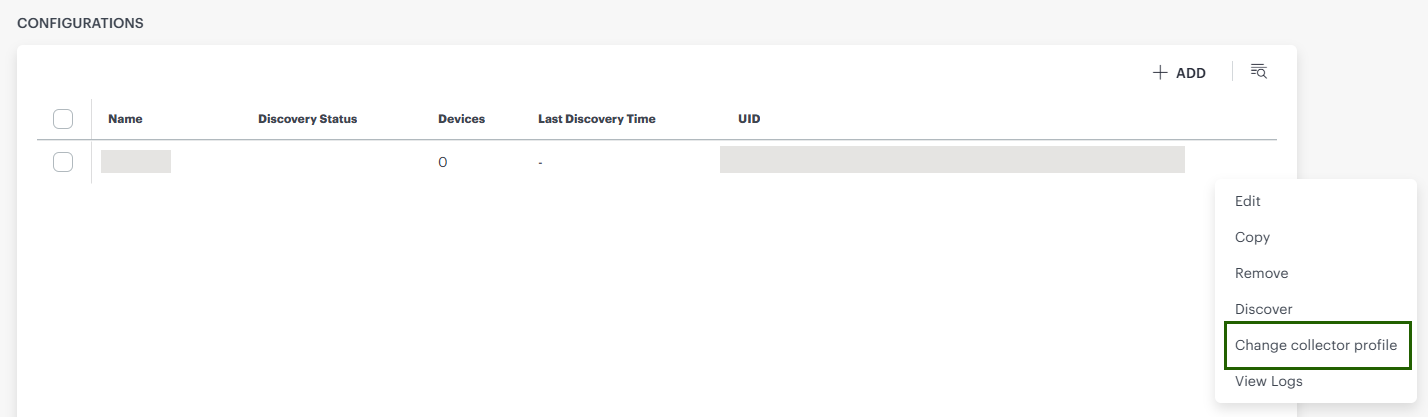
- In the Change Collector window, follow the instructions and select the collector profile you want to change to.
Note
- Ensure that both gateways are connected to OpsRamp before changing the Collector Profile.
- Discover and manage the resources using the existing gateway.
- Wait for the discovery process to complete successfully.
- Select the other gateway profile.
- Click CHANGE COLLECTOR PROFILE.
- Wait for OpsRamp to move the discovery and monitoring configurations to the other gateway.
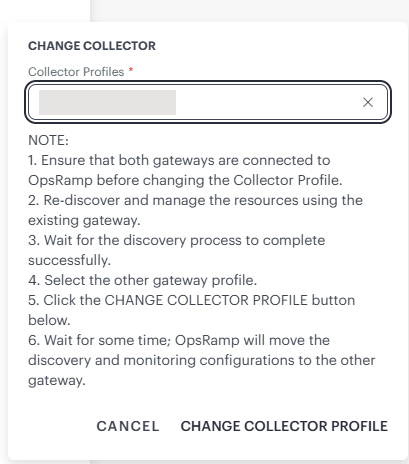
- Click Change Collector Profile.
Post-Migration Behavior
After migration:
- Discovery and monitoring are initiated on the other gateway.
- Monitoring templates are synced to the other gateway automatically.
- Open alerts before gateway migration do not automatically heal after migration completion. You must track open alerts from the first gateway and manually heal them after migration.
Client and Partner Integrations
Clients and partners can directly install and configure integrations. However, clients and partners have different access:
Clients can install all the supported integrations.
Clients can edit integration configurations installed directly by a partner.
- Every modification creates a separate copy for the client.
- After modification, the partner configuration does not apply to the client for the modified configuration.
- Every modification creates a separate copy for the client.
Partners can install only some of the integrations for clients (for example, monitoring and collaboration).
Custom Integration is an exception where while assigning integration to every client, providing configuration details for every client is required.
Multiple Client Integration
Partners can install and configure an integration without selecting a client and apply the same configuration to multiple clients selecting one client at a time. As a result, multiple clients can be assigned the installed and configured integration without repeating the same effort.
In the following scenario, a partner has six clients and wants to install a collaboration integration with the same configuration for five clients, but a different configuration for the sixth client.
Solution: A partner performs the following steps:
- Install and configure the integration without selecting a client.
- Select the name of one client.
- Search for the configured integration by name and click to open the integration.
- Then, from that integration screen, click the Install button. A click Install takes care of both installation and configuration.
- Repeat steps 2-4 for the other four clients. All five clients get integration installed with the same configuration.
- Repeat steps 2-4 for the sixth client.
- Change the configuration. The sixth client receives the same installed integration but with a different configuration.
Authentication Type
OpsRamp uses the following industry-standard authentication types to establish a connection between OpsRamp Platform and the third-party tools:
OAuth 2.0:
- OAuth 2.0 is a protocol that allows an application to authenticate against the server as a user.
- OAuth 2.0 relies on HTTPS for security and provides secured delegate access to a resource based on the user.
- OAuth 2.0 provides security by allowing a token to be issued by the Identity Provider to these third-party applications, with the approval of the user. The client then uses the token to access the resource on behalf of that user.
- OAuth 2.0 is a protocol that allows an application to authenticate against the server as a user.
Webhook:
- Webhook is a token-based REST API.
- Webhook enables third-party services to send real-time updates to OpsRamp.
- Updates are triggered by some event or action by the Webhook provider and pushed to OpsRamp using HTTP requests. When OpsRamp receives the request and handles with some custom logic, like sending an email or storing the data in a database.
- Webhook is a token-based REST API.
Connection Direction
After the connection is established using the authentication type, you need to define the direction of the integration between OpsRamp platform and the third-party tool. OpsRamp supports the bi-directional flow of information between the third-party tool and OpsRamp.
OpsRamp supports the following types of integration directions:
| Direction | Description |
|---|---|
| Inbound | Information about the events from the third-party tool is absorbed and displayed in OpsRamp. |
| Outbound | Information about the events from OpsRamp is sent to the third-party tool. |
| Inbound-Outbound | Information about the events is sent and received from both third-party tool and OpsRamp. |
Select the Integration Direction depending on the integration category.
Attribute Maps
The attributes or properties of the third-party tool and OpsRamp are not uniform in nature. They differ in their naming structure and format. To have a uniform structure and to process the information exchange, you need to map the attributes of a third-party tool with those of OpsRamp. Depending on the type of integration, OpsRamp supports an extensive list of attributes and properties which can be configured/mapped as per the requirements.
Once the attributes are mapped, OpsRamp processes the information received from the third-party tool and displays them in the portal.
For some webhook-based Integration, default attributes are already configured during installation. You do not need to map attributes manually. For example, Pingdom, Stackdriver, New Relic, OMS,
Integration Events
The main objective of integration is to ingest and integrate third-party events into OpsRamp. During the integration process, you can define the integration events that you want OpsRamp to monitor. Integration Events are configured for Monitoring and Collaboration integration types. Using the Outbound configuration, you can define the Integration Events.
OpsRamp supports creating/adding integration events for ServiceDesk and Resource entities. For each of these entities, you can define the required entity types and for each entity type, you can define an entity type event. For every event, placeholders are defined. You can select these placeholders (attributes) for the API payload.
For integrations that support outbound events, like Custom, Ticketing, and Custom (Ticketing) integrations, use placeholders in the following fields:
- Endpoint URL
- Payload
- Attachment endpoint URL
- Attachment payload
How to use: To add a placeholder in a field, type ‘$’ and select the placeholder. If you want to append a placeholder to an existing string, give a space after the string and type ‘$’.
Remove the unwanted spaces.
Examples:
- To concatenate two or more strings using the ConcatenateStrings function.
- Add
subjectandincidentIdin the start and end strings of Concatenate string.$utils.concatenateStrings($incident.subject,$incident.uniqueId)
- Add
- To create an incident with a substring:
- Add an
enddelimiter to the main string.$utils.substring(<String>,<startDelimiter>,<endDelimiter>)
- Add an
Note: Based on entity type values, the placeholder tokens change.
Monitoring
All the events getting ingested from the third-party tool into OpsRamp are monitored based on predefined metrics created by OpsRamp. The related metrics are grouped into a monitor and monitors are grouped to create a template. The created template is applied to a selected resource or uses integration to monitor the events arising from the third-party tool.
Audit Logs
OpsRamp captures all the communication events happening between the third-party tool and OpsRamp platform.
Log information provides payloads events and their corresponding status.
You can view audit log information for the following integration categories:
- Events
- Ticketing
- Custom
- OS Patching
- SSO
To view the audit logs:
- Click the menu (three dots) icon at the upper-right corner of the Installed Integrations screen.
- Select Audit Logs. The View Logs window displays the Outbound and Inbound log information of all the installed integrations.
Note: Event, SSO, OS patching have only Inbound logs.
The logs are displayed with Request URL, Event Name, Processed Time, Status, Status Message, Entity Id, Request Payload, Response Payload details.
- Select from the dropdown to view the Outbound and Inbound logs.
- Use the Filter dropdown to filter the logs by Created Time, Status, and/or Entity Id.
Outbound event configuration
In all Ticketing (collaboration) applications, when Events are configured in Outbound integrations, if the outbound payload contains any integer values, they are sent as string, by default, to the third party. That is, integer values are enclosed in quotes.
To normalize the integer values in the Outbound payloads, a header is added in the Headers section.
Configure the header as follows:
- Select the Key as
Normalize_payload_datatypeand the Value astrueand save it.
The strings (the integer values within double quotes) are automatically sent as integer values.
Example:
The below image shows the newly added header and the value:
- Header:
Normalize_payload_datatype - Value:
true
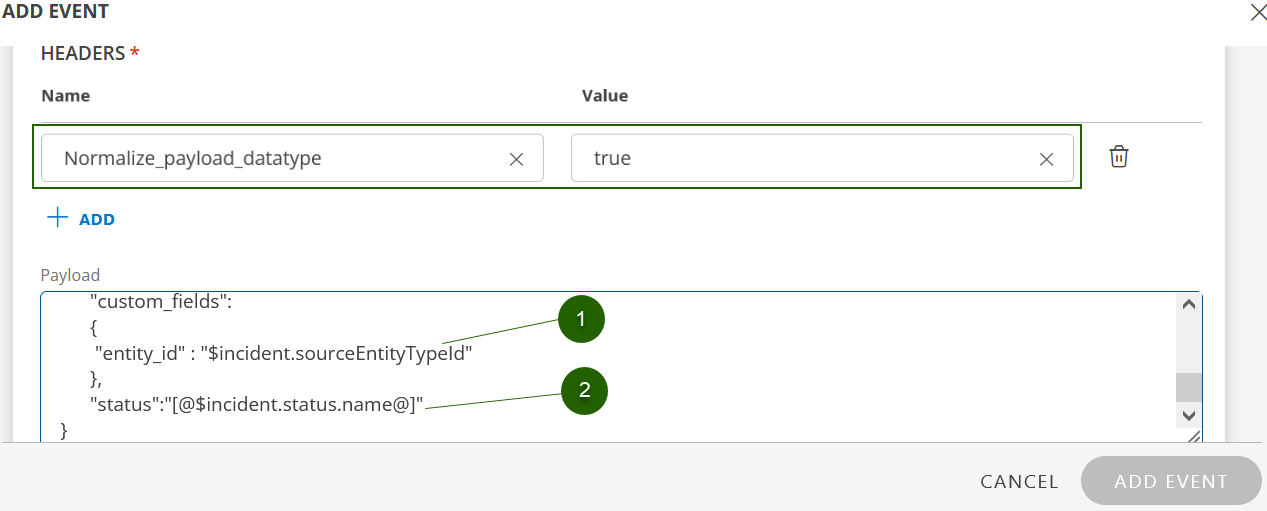
Call-outs #1 and #2 show entity_id and status values as strings. These are sent to the third party without quotes.
Custom integrations
The Custom integration that was previously available with five categories in it is now split as separate integrations for each category. Click the links to navigate to the respective integration:
Retry status notification
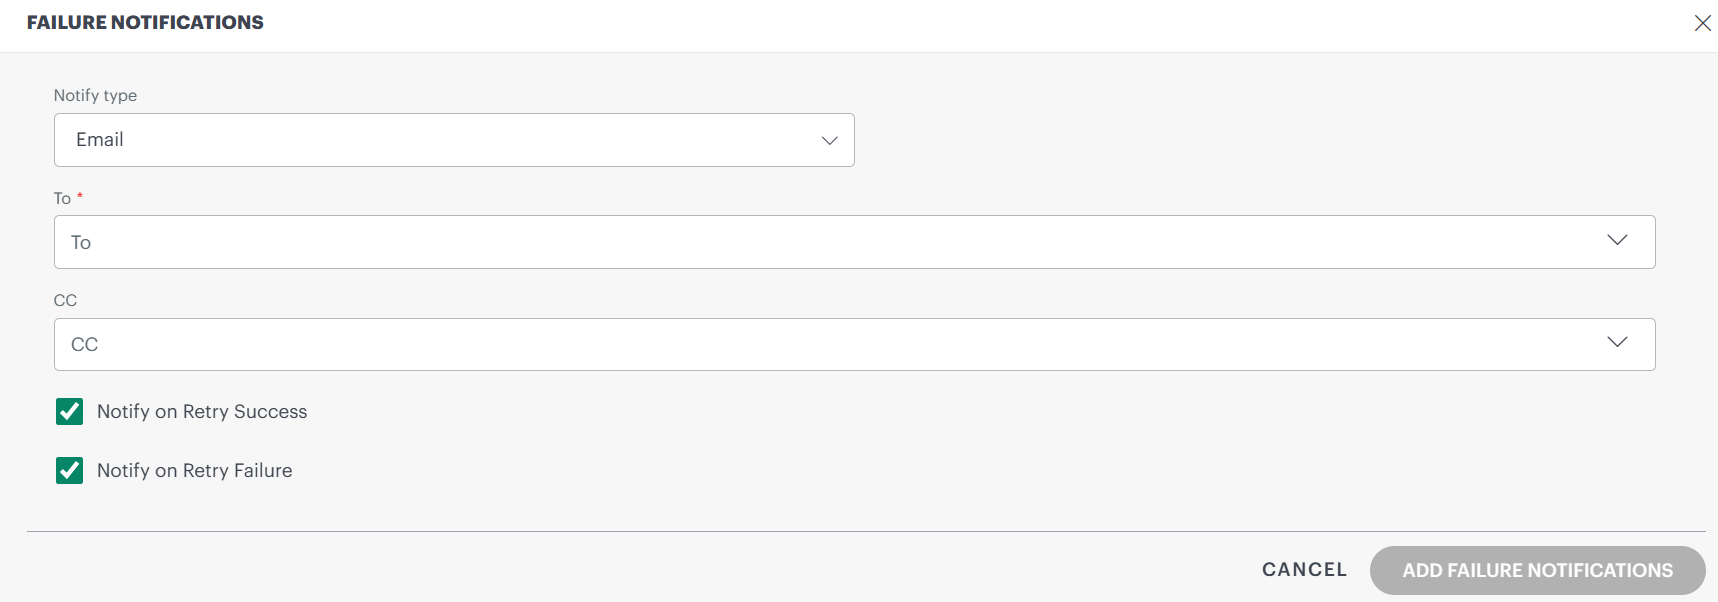
Whenever the retry mechanism is triggered for outbound-failure events, email notifications are sent from OpsRamp based on the below selections:
Notify on Retry Success: When selected, you will receive email notifications for successful retry attempts.
Notify on Retry Failure: When selected, you will receive email notifications for failed retry attempts.
If both options are selected, notifications are sent for all retry outcomes, whether successful or failed.
No retry notifications are sent if both the options are not selected.
Note: This applies to integrations that support outbound events, like Custom, Ticketing, and Custom (Ticketing) integrations.
Collector Profile registration prompt
After installing an integration, specifically SDK and DNM — require a Collector Profile to be registered to complete the setup process.
If the selected collector profile is not registered after installation, you will be prompted to either complete the registration of the Collector Profile or skip directly to the Installed Integrations page. This prompt ensures that the necessary configuration is completed for the integration to function correctly.
While installing the above integrations, you will be directed to the SELECT COLLECTOR PROFILE page. On this page, perform the following steps:
- Search for the collector profile and click on the tile.
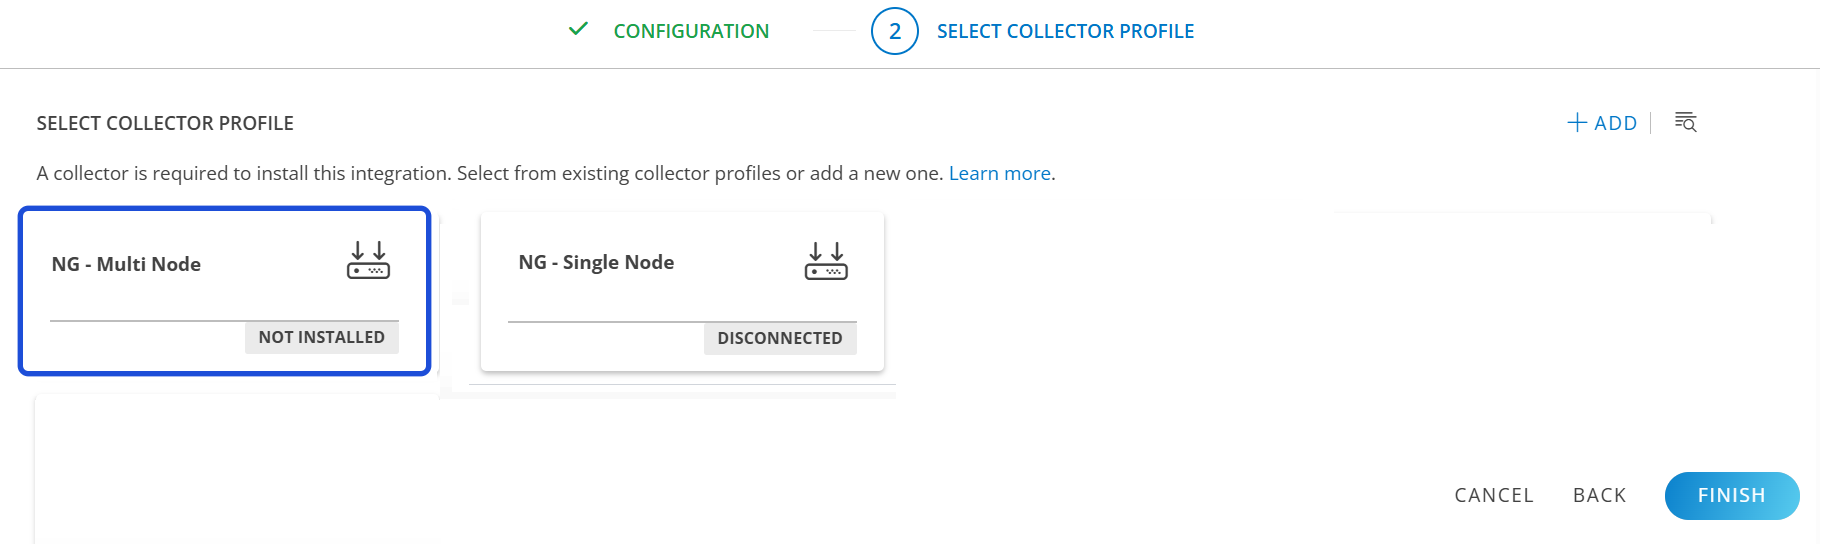
- Click FINISH.
- A confirmation dialog box is displayed.
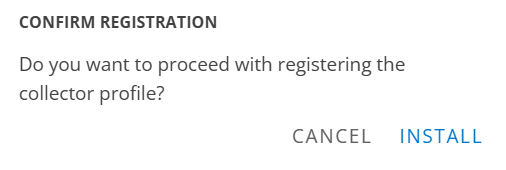
- You can choose to register the profile immediately or cancel the process and complete it later.
- Follow these steps to start with registration of the profile:
- Click INSTALL to navigate to the Collector Profile Registration page.
- Complete the registration process as guided
- To cancel and return:
- Click CANCEL to go back to the Installed Integrations page.
- You can also initiate the registration from this page later.
- Follow these steps to register from the Installed Integrations page:
- Click on the installed integration tile.
- The profile status will show CONFIGURED.
- Mouse hover over the exclamation icon and click INSTALL NOW to open the Collector Profile Registration page.
- Complete the registration process.
- Follow these steps to start with registration of the profile:
Error Codes - Inbound Webhook Event integration
Following are the available error codes and their meaning for Inbound Webhook Event integration:
Error Code: 500 – Internal Server Error
- Alert Validation Failure
{
"message": "Failed to process Alert webhook Reason is : Alert Validation Failed 0001-device-Either Device object or Resource object or resourceId should be provided;"
}
Meaning: This error occurs when a mapping is configured for a resource attribute that does not exist in the webhook request payload. The webhook expects at least one of the following to be present:
DeviceobjectResourceobjectresourceId
- Invalid Content-Type
{
"message": "Invalid Content-Type received:null"
}
Meaning: This error occurs when the webhook API is called without a request payload or when the Content-Type header is missing or null.
- Missing Mapping for Installed Integration
{
"message": "Failed to process Alert webhook Reason is : Failed to get BasicTenantToVistaraMappedProperties For CustomIntg under the orgId :5, Reason: Cannot invoke \"java.util.List.iterator()\" because \"mapping\" is null"
}
Meaning: This error occurs when required mappings are not configured for the installed integration. The system fails while attempting to retrieve mapped properties because the mapping configuration is null.
Error Code: 401 – Unauthorized
<AppDisabledException>
 <error>unauthorized</error>
 <error_description>Integration disabled</error_description>
</AppDisabledException>
Meaning: This error occurs when the webhook API is invoked for an integration that has been installed but is currently disabled.
Error Code: 407 – Invalid Token
<InvalidTokenException>
<error>invalid_token</error>
<error_description>Invalid access token</error_description>
</InvalidTokenException>
Meaning: This error occurs when the webhook API is called using an invalid or expired access token.
Error Code: 410 – Invalid Tenant
<NoTenantFoundException>
<error>invalid_tenant</error>
<error_description>
 Unauthorized, No active organization found with id client_59
</error_description>
</NoTenantFoundException>
Meaning: This error occurs when an incorrect tenant ID is provided in the webhook URL or when no active organization exists for the given tenant.