A First Response policy is used to auto-suppress alerts and to trigger process automation as a first response for non-significant alerts.
Prerequisites
You must have OpsQ View, OpsQ Manage, and also require process automation permissions to manage first response policies.
A training file is required to suppress or snooze specific alerts. The training file includes examples of alerts to be suppressed. See Alert Management Training File for more information.
Create First Response policy
- Navigate to Setup > Account > Alert Policies to open the Command Center AIops Overview page.
- From the POLICIES dropdown, select First Response. Alternatively, you can also navigate to the First Response policy page by selecting First Response from Policy Modes or Policy Types.
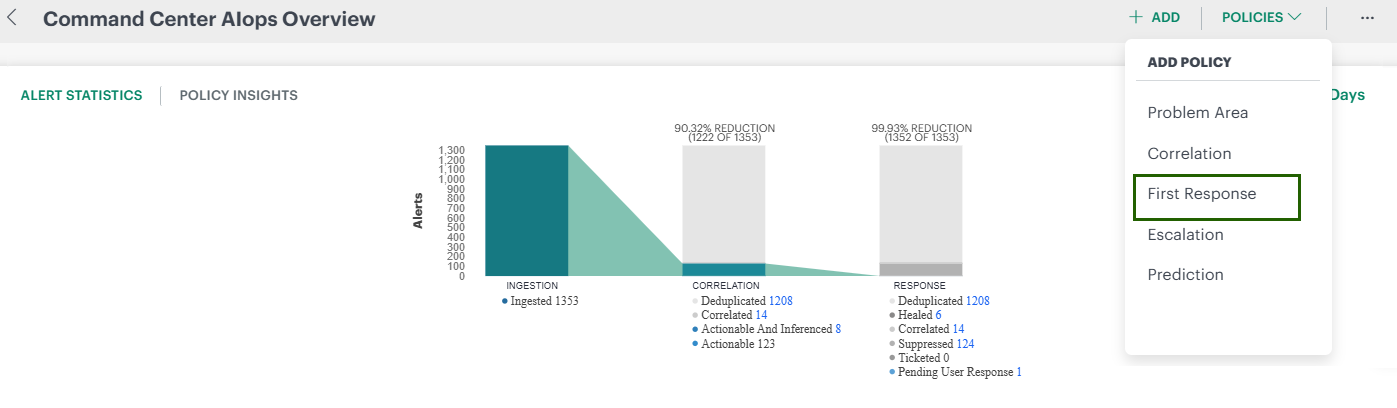
On the First Response Policies page, click +ADD.The First Response policy page is displayed.
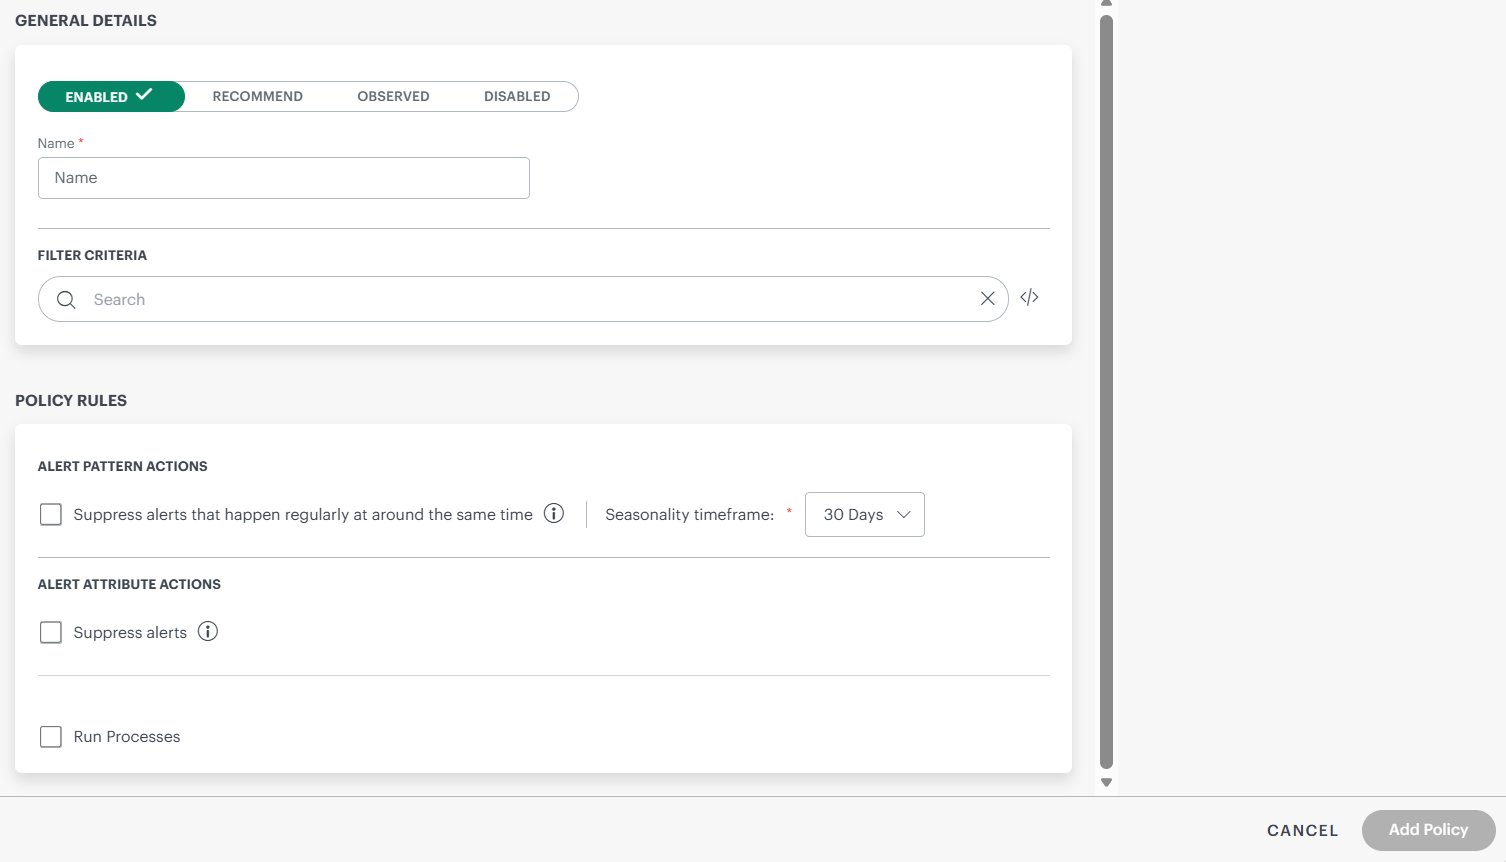
Enter the following information in the General Details section:
Field Description Example Status Select the policy status. - ENABLED – Activate immediately.
- RECOMMEND – The policy creates a recommendation for actions you should take on the alert, based on learned patterns in historical alerts. Includes a link to take the recommended action.
- OBSERVED – Simulate the policy without affecting alerts. Creates an observed alert showing what actions would be taken if the policy were enabled, with a link to the original alert.
- DISABLED – Keep inactive.
Name Enter a unique name for the first response policy. Filter Criteria – Query Define the conditions that alerts must meet to trigger this policy. Specify Attributes, Operators, and Values to match alerts. Example: alertType = Monitoring Under POLICY RULES section, enter the below information:
Field Description ALERT PATTERN ACTIONS Automatically suppress alerts that occur repeatedly at predictable times to reduce noise. Supports seasonality analysis over a 30-day timeframe. See Alert Pattern Actions section for more details. ALERT ATTRIBUTE ACTIONS Trigger actions based on specific alert attributes to automate handling and remediation. Supports alert suppression and process automation execution. See Alert Attribute Actions section for more details. Run Process Manually execute predefined automation processes to remediate issues or perform operational tasks. Allows selecting a process definition and running it immediately on demand. See the Run Process section for more details. Review your changes.
Click Add Policy to create and activate the first response policy.
Alert pattern actions
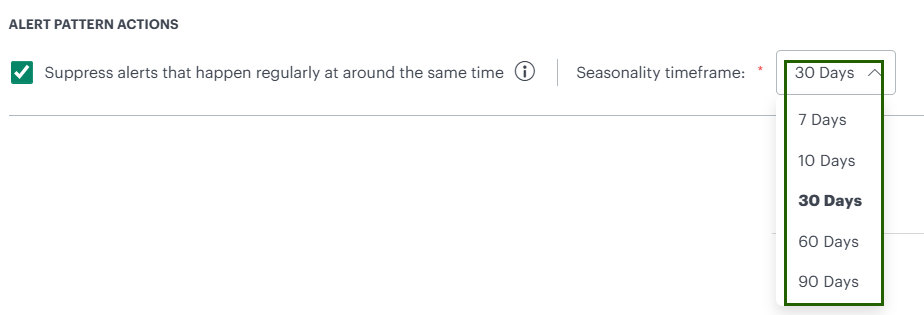
Alert Pattern Actions allow you to automatically suppress alerts that occur repeatedly with a predictable pattern, helping reduce noise and alert fatigue.
Use this action when alerts:
- Occur repeatedly at similar times
- Are expected and non-actionable
- Do not require manual investigation every time they occur
To configure:
- Select Suppress alerts that happen regularly at around the same time.
- Choose a Seasonality Timeframe from the available options: 7, 10, 30, 60, or 90 days.
Alert Attribute Actions
Alert Attribute Actions allow you to trigger automated responses based on specific alert attributes, helping control alert noise and streamline remediation.
Available Actions
You can choose one of the following actions for matching alerts:
- Do Not Suppress – Ensures alerts are always visible and not suppressed.
- Suppress Always – Permanently suppresses matching alerts.
- Time-Based Suppression – Temporarily suppresses alerts for a defined duration:
- 5 Minutes
- 10 Minutes
- 20 Minutes
- 30 Minutes
- 1 Hour
- 2 Hours
- 4 Hours
- 6 Hours
- 8 Hours
- 12 Hours
- 24 Hours
- 48 Hours
- 72 Hours
Machine Learning
When the Machine Learning checkbox is enabled:
- The system applies learned patterns to improve alert suppression accuracy.
- Click View to open the Machine Learning – Alert Policies page.
- On this page, you can configure the training data table used to train and refine machine learning–based alert policies.

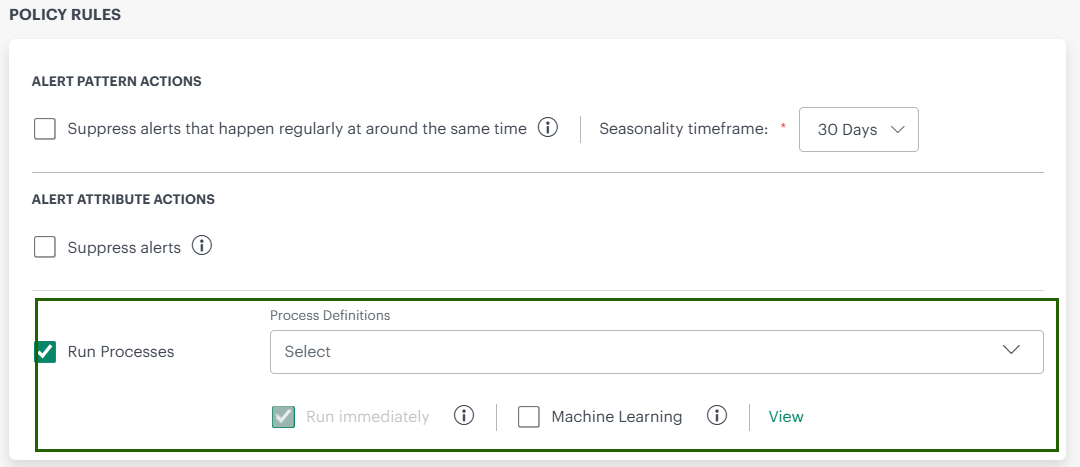
Run Processes
The Run Processes action enables automatic execution of predefined process automation jobs when alerts meet the specified conditions.
Configuration Options
- Process Definitions – Select one or more predefined process automation jobs to execute.
- Run Immediately – When selected, the chosen processes are executed immediately as soon as the alert condition is met. If not selected, the processes follow the configured policy timing.
Machine Learning
When the Machine Learning checkbox is enabled:
- The system applies learned alert patterns when triggering process execution.
- Click View to open the Machine Learning – Alert Policies page.
- On this page, you can configure the training data table used to train and refine machine learning–based process execution.
Use a training file or machine learning
The Machine Learning – Alert Policies page allows you to define and manage training data used for first-response automation. Using this data, the system learns when to suppress alerts, apply snooze durations, or trigger predefined actions based on similar alert conditions.
This page supports:
- Creating and managing training data
- Controlling how alerts are learned and handled
- Improving alert accuracy through continuous learning
If there is no training data available, the page will display two primary options to help you get started:
- Configure Table
- Start by manually creating a training table.
- Add input and output rows to define alert characteristics and desired actions.
- Import CSV Training File
- Upload an existing CSV file containing training data.
- The Input and Output columns will be automatically populated from the file.
Page Layout
Header Section
- Title: Machine Learning – Alert Policies
- Policy Type: First Response (active)
- Status Indicators:
- ML (Green): Machine learning is enabled
- SP (Yellow): Indicates current policy status
Training Data Configuration
Training Data Table
The training data table is where you define examples that teach the system how to respond to alerts.
- Input fields represent alert characteristics used for learning.
- Output fields define the actions the system should take.
- Each row represents one training example.
- Use this table to control how similar alerts are automatically handled in the future.
Adding Training Data
- Click +Add to create a new training data row.
- Enter appropriate input values and expected outcomes.
- Save your changes to include the row in model training.
Import and Export Training Data
You can manage training data in bulk using CSV files:
- Import CSV training file: Upload an existing training file.
- Export Table as CSV: Download the current training data for review or reuse.
Managing Input and Output Columns
You can customize which fields are used for learning and action execution.
Add Columns
- Click + Add to include new input or output fields.
- Newly added fields appear in the training data table and can be used immediately.
Configure Columns Using Settings
- Click the Settings (gear) icon to open the column configuration panel.
- Input columns define what alert information the system learns from.
- Output columns define how the system responds to alerts.
- You can hide input fields and exclude them from model training if they are not required.
Note: Hidden input fields are not used in training and do not influence learning outcomes.
- Click Apply to save column changes.
Continuous Learning
Use the Continuous Learning checkbox to control whether the system continuously improves its model using new alert behavior.
- When enabled, the model adapts over time.
- When disabled, the model uses only the existing training data.
Model Training Workflow
Once training data is prepared:
- Review the input and output configuration.
- Click Continue to Model Training.
- Click Train Model to start training.
- Review the model accuracy shown in the summary.
- Click Review, then Save.
The first response policy is created and displays on the First Response Policies page. Click the Number of suppressions to view detailed information.
Training file Requirements
The training file should meet the following requirements:
- All column names must match the names displayed in the UI section of the portal.
- Each column value is case-sensitive and should contain only the values displayed in our portal (for example, names, group names, resource names, and other values).
- Validate any regular expressions used in column values before uploading.
- Do not provide multiple empty values.
- The file must be uploaded in CSV format.