Introduction
An Alert Escalation Policy defines how alerts are escalated within your organization until they are acknowledged, resolved, or suppressed. This ensures that no critical alert goes unattended and that the right stakeholders are notified at the right time.
OpsRamp provides flexible options to configure escalation policies, including escalation duration, user groups, notification rules, and incident rules.
Prerequisite
Both OpsQ View and OpsQ Manage permissions are required to access the Alert Escalation Policy.
A training file is required to suppress specific alerts or to snooze specific alerts. The training file must include examples of alerts that need to be suppressed.
Create Escalation policy
- Navigate to Setup > Account > Alert Policies to open the Command Center AIops Overview page.
- From the POLICIES dropdown, select Escalation. Alternatively, you can also navigate to the Escalation policy page by selecting Escalation from Policy Modes or Policy Types.
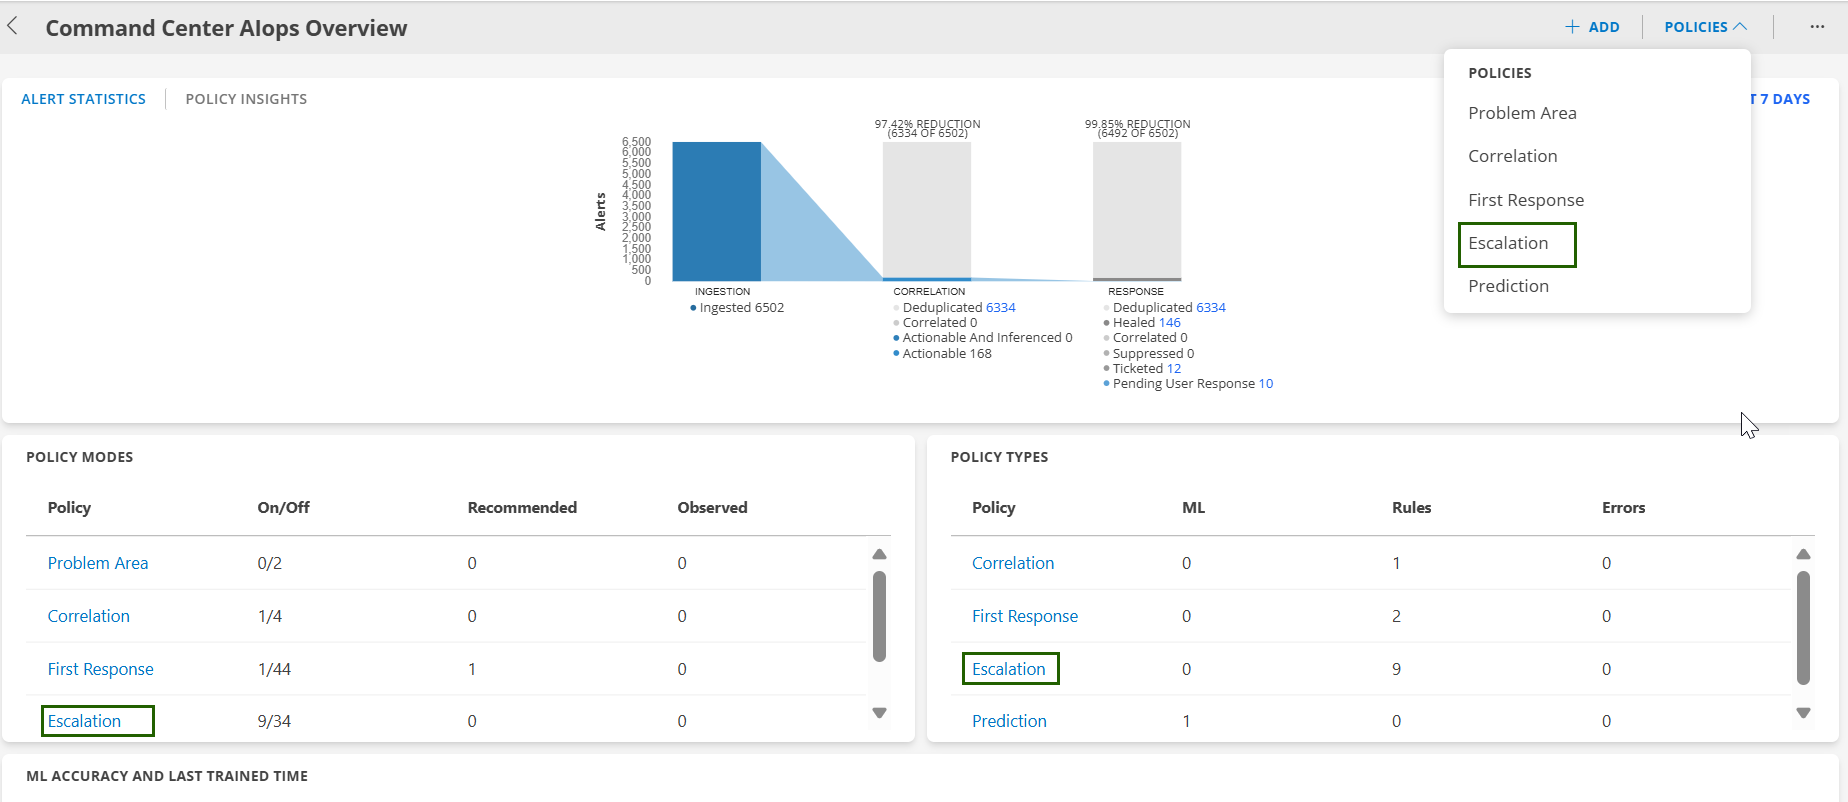
On the Escalation policy page, click +ADD.The Add Alert Escalation Policy page is displayed.
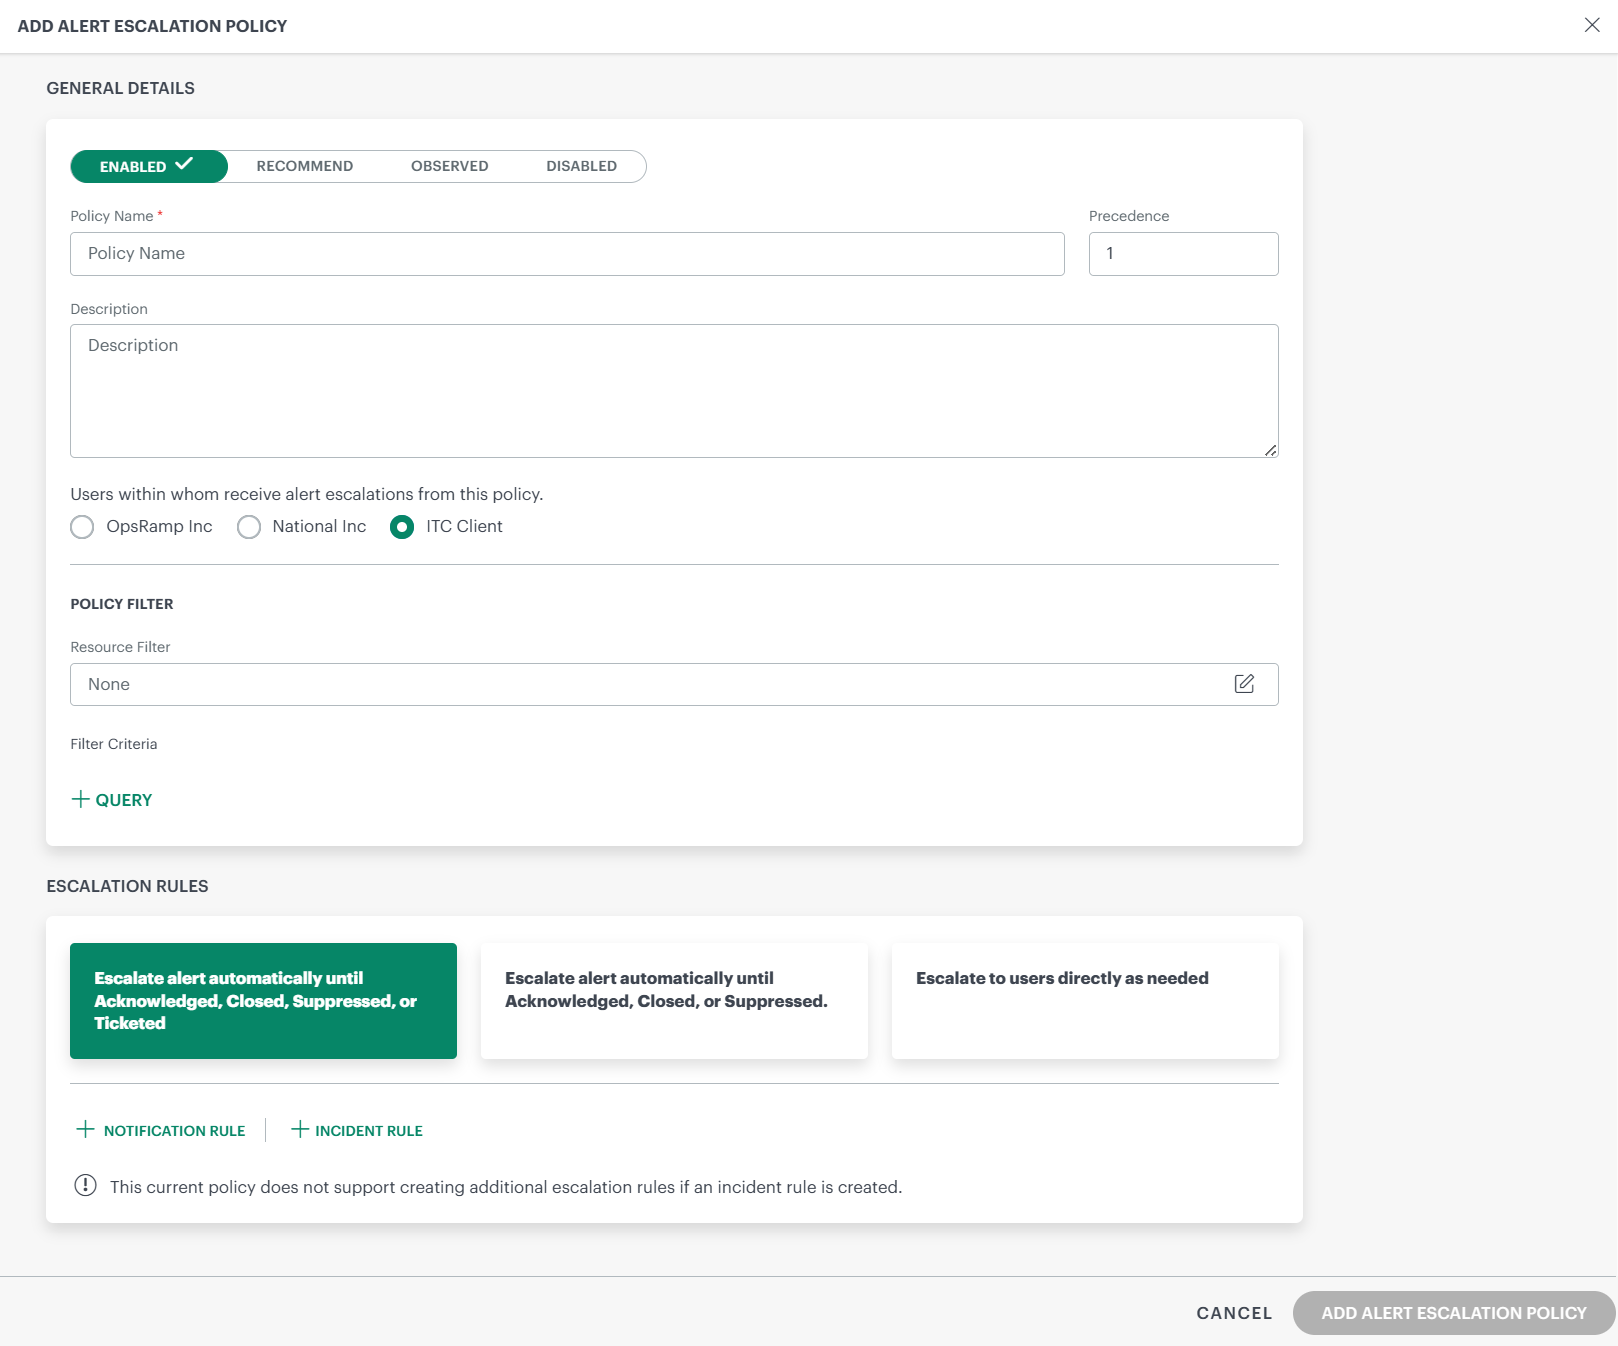
Enter the following information in the General Details section:
| Field | Description | Example |
|---|---|---|
| Status | Select the policy status.
| |
| Policy Name | Enter a unique name for the escalation policy. | |
| Precedence | Set the priority order; lower numbers are higher priority.Note
| |
| Description | Provide a short summary of the policy’s purpose. | |
| Users | Select users or groups who should receive escalations. | |
| Policy Filter – Resource Filter | The Resource Filter is used only to preview the resources that match the specified filter criteria. It helps you validate and confirm the scope before defining the actual query conditions in the alert escalation policy. The Resource Filter does not select or associate resources with the policy. Resource selection is determined by the configured query conditions. | |
| Filter Criteria – Query | Define the conditions that alerts must meet to trigger this policy. Specify Attributes, Operators, and Values to match alerts. Example: alertType = Monitoring |
Under ESCALATION RULES section, enter the below information:
Field Description Escalate alert automatically until Acknowledged, Closed, Suppressed, or Ticketed Escalate an alert as a notification until an action is taken. No further level of escalation can be added since the alert escalation will end as soon as the incident is created. Escalate alert automatically until Acknowledged, Closed, or Suppressed Escalate an alert as notification even if an incident is created. Escalate to users directly as needed Select the users who should be directly contacted on an on-demand basis. Escalating directly is a manual process. No automatic actions are taken.If you select Escalate directly as needed, you only select users who get notifications. Notification Rule Defines how and when users are notified for the escalation. See the Define Notification Rule section for more details. Note
- You can create multiple notification rules by assigning different templates to different user groups or users.
- Once an Incident Rule is created, you cannot create further Notification Rules.
Incident Rule Defines whether an incident (ticket) should be created automatically for this escalation. See the Define Incident Rule section for more details. Review your changes.
Click Add Alert Escalation Policy to create and activate the escalation policy.
Define Notification Rule
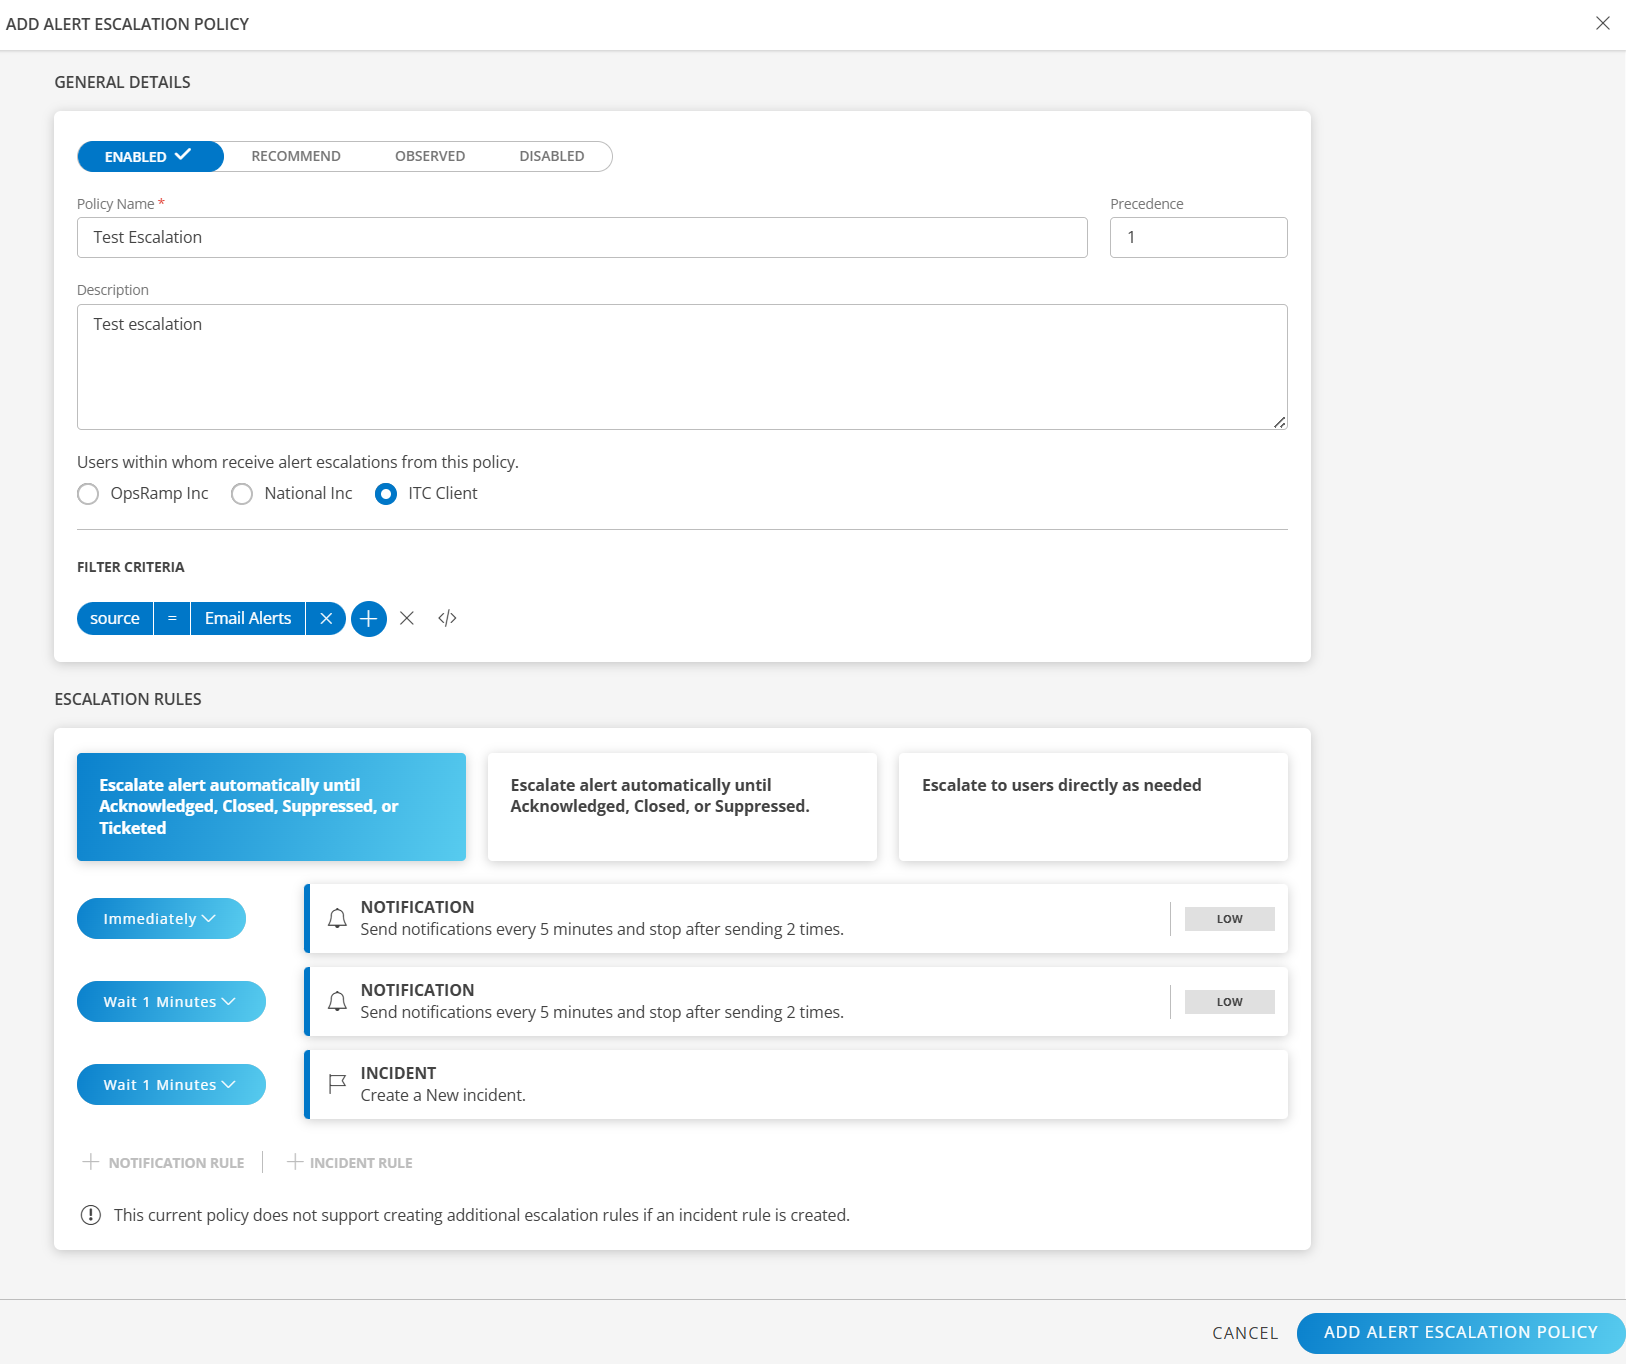
The Notification Rule section defines how and when notifications are sent to users or groups for a particular alert escalation.
To define notification rule:
Click + NOTIFICATION RULE.The NOTIFICATION RULE page is displayed.
Enter the below information:
| Field | Description |
|---|---|
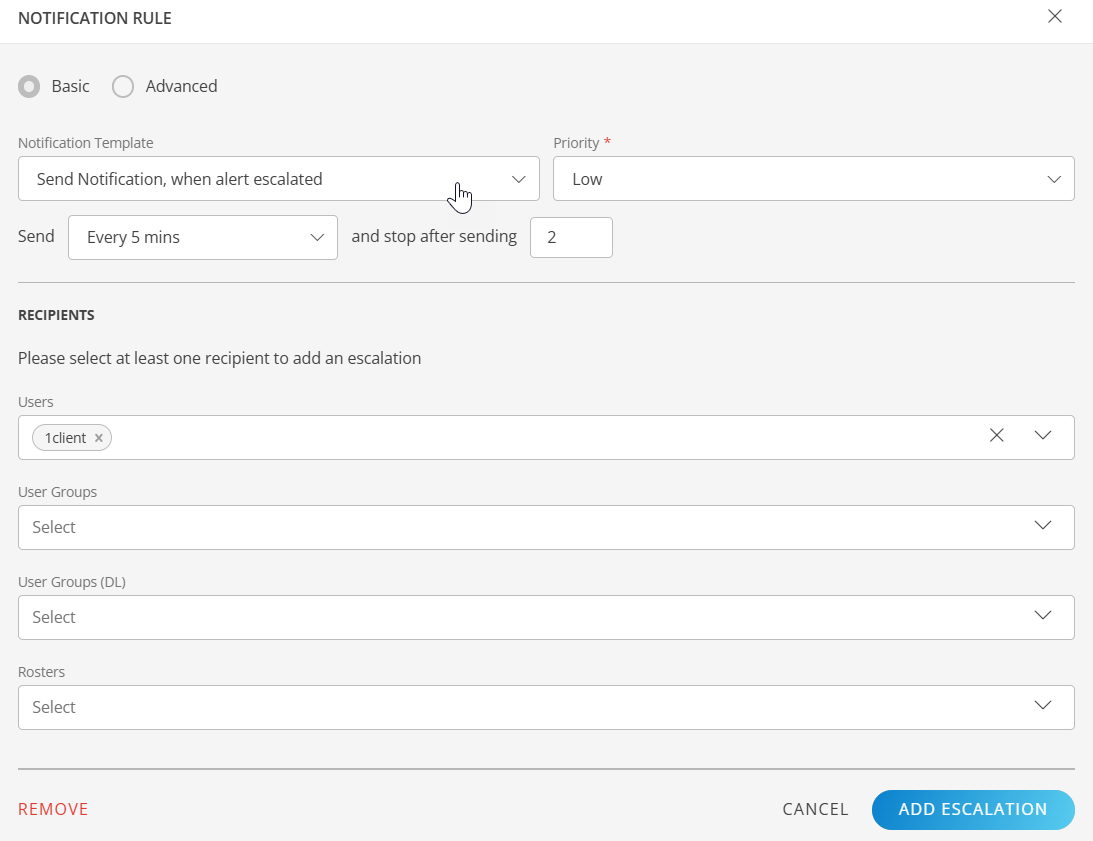
| Notification Type | Choose between quick setup or detailed configuration: Basic for standard options, Advanced utilize machine learning for granular controls. |
| Notification Template | Select a predefined template for the notification message. |
| Priority | Assign a priority to indicate urgency: Low, Medium, High, or Critical. |
| Send | Define how often notifications are sent and when they stop. |
| Recipients | Select at least one recipient: Users, User Groups, User Groups (DL), or Rosters. |
- Click Add Escalation to save and apply the notification settings to the escalation policy.
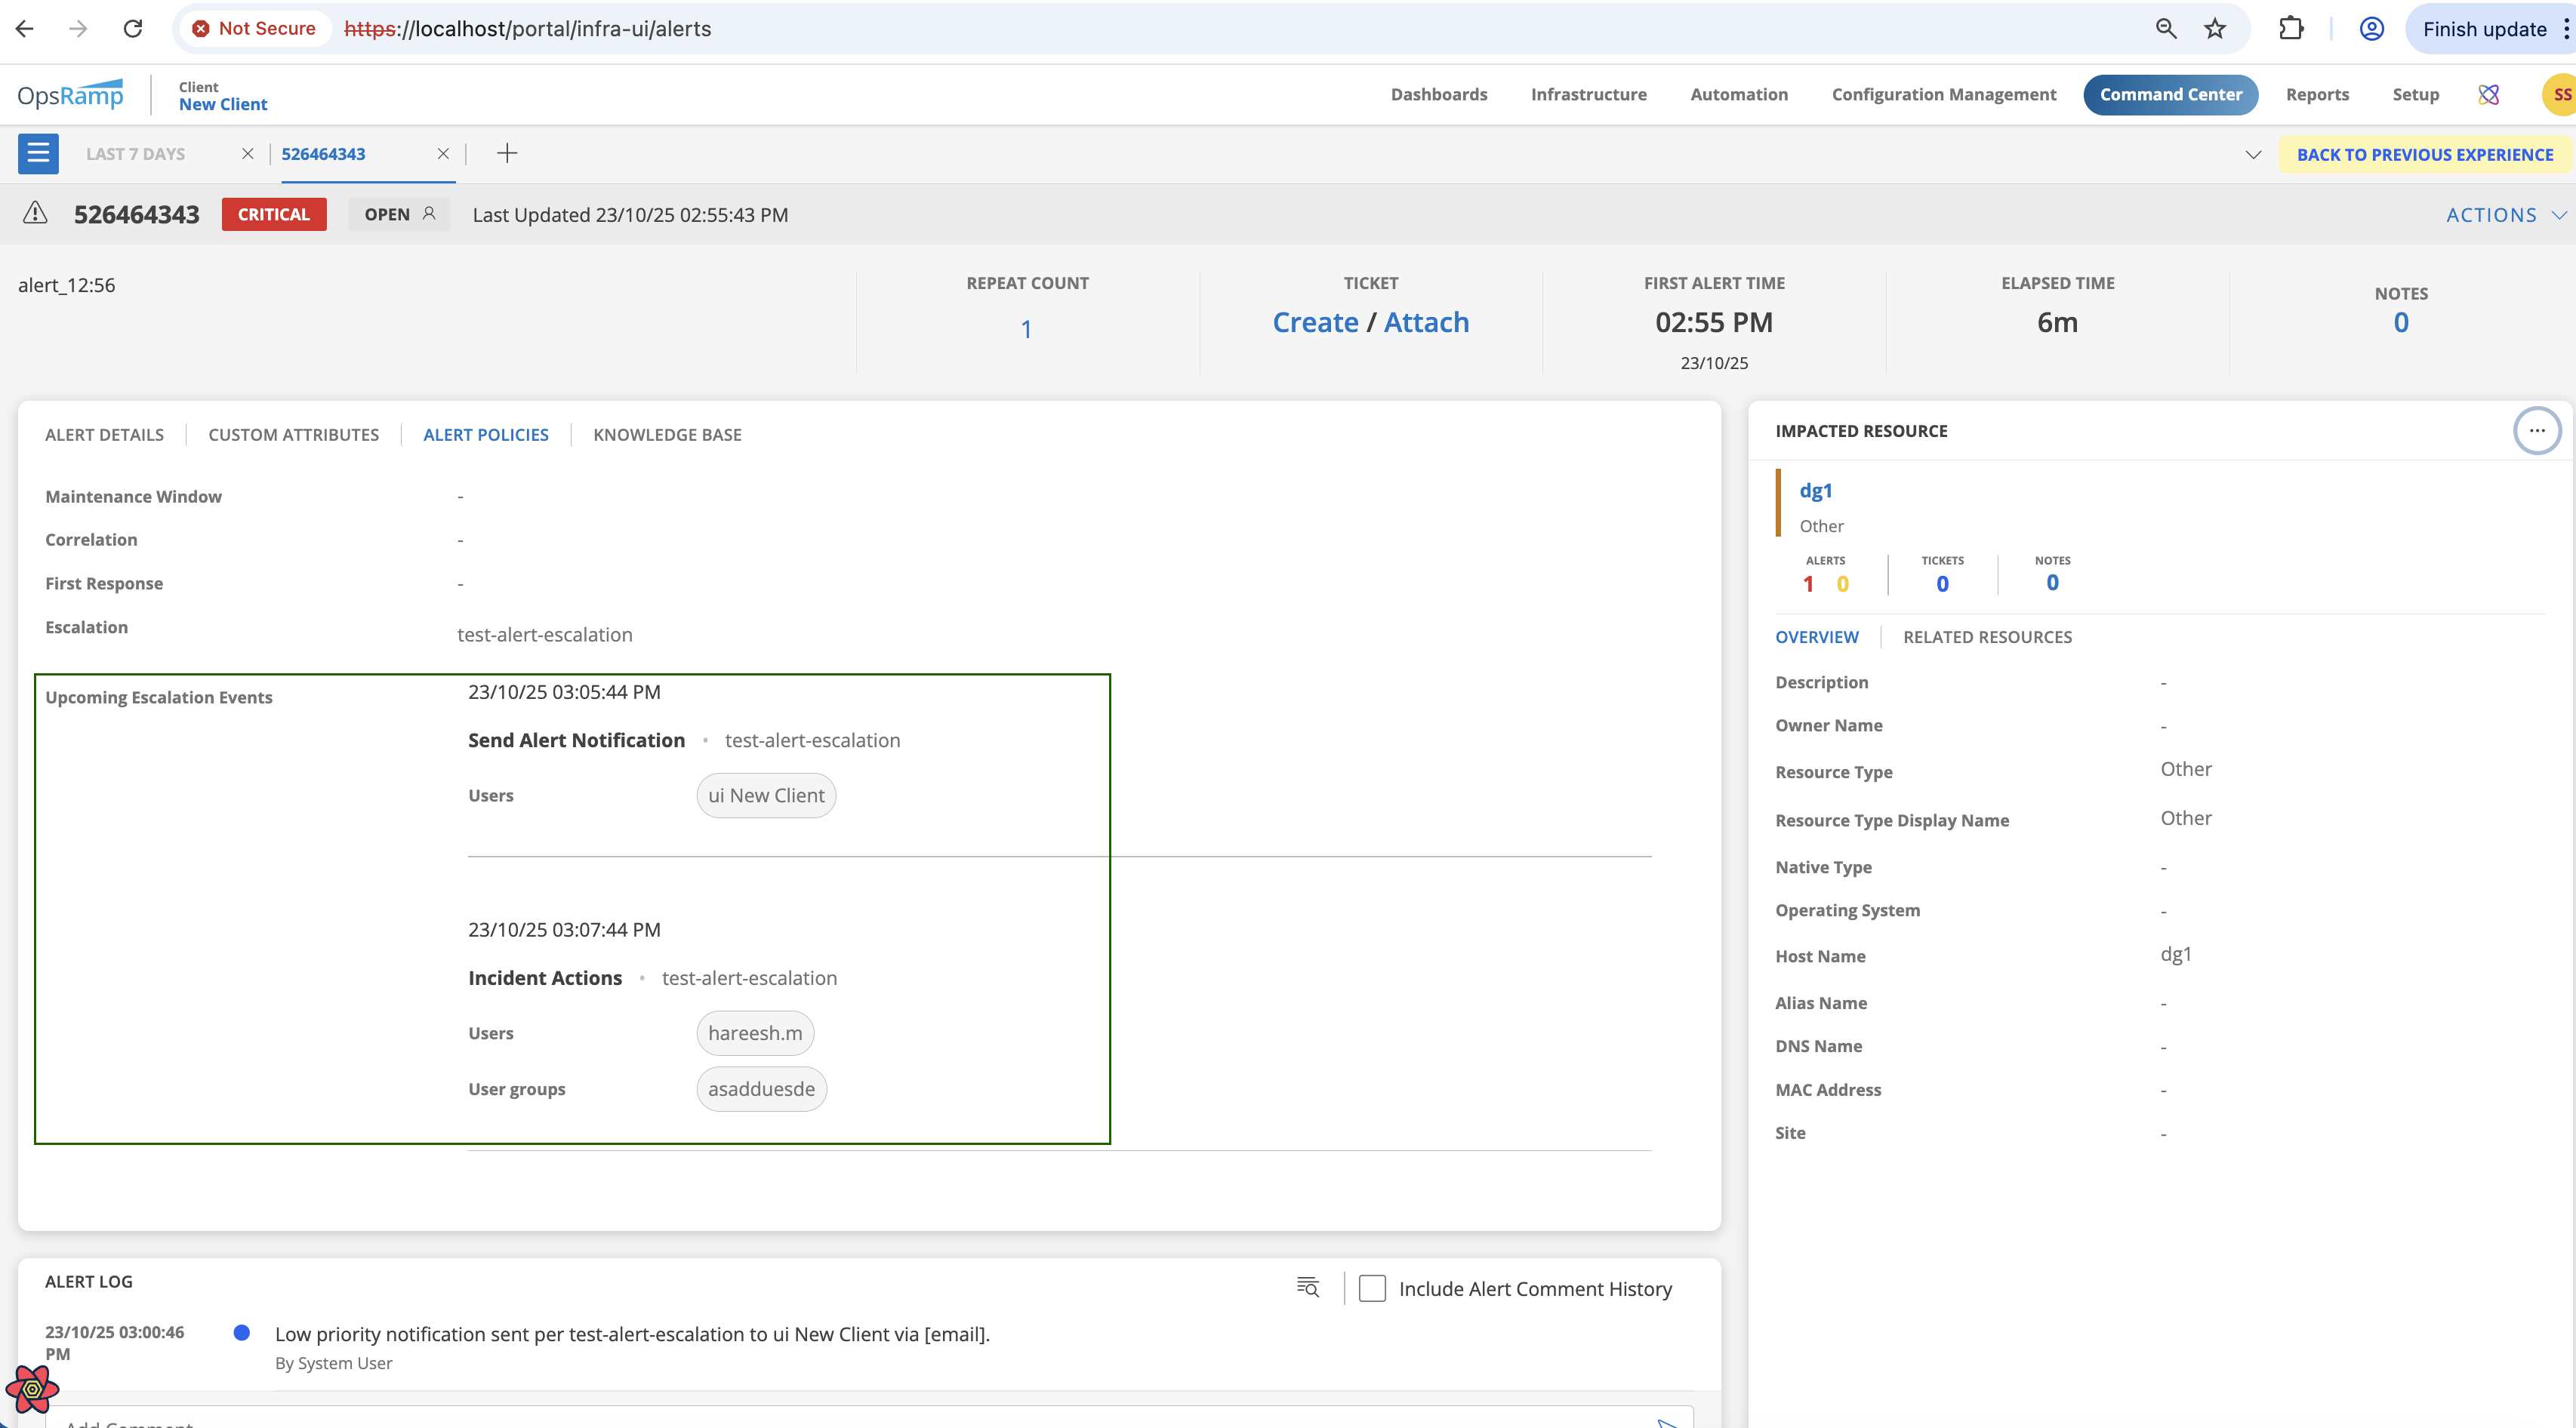
Once the Notification Rule is created, whenever an alert matches the escalation policy that includes these rules, the Alert Details page displays an Upcoming Escalation Events section.This section lists the next scheduled escalation actions in the policy, such as Send Alert Notification or Incident Actions, along with the corresponding time, policy name, and target recipients (users or user groups), as shown below.
Define Incident Rule
Defines how an alert is converted into an incident (ticket). When an alert is triggered, the rule determines whether an incident should be created automatically, who it should be assigned to, and how its priority is set based on the alert severity.
Note
You cannot escalate an alert that displays an OK state as an incident.Click + INCIDENT RULE.The INCIDENT RULE page is displayed.
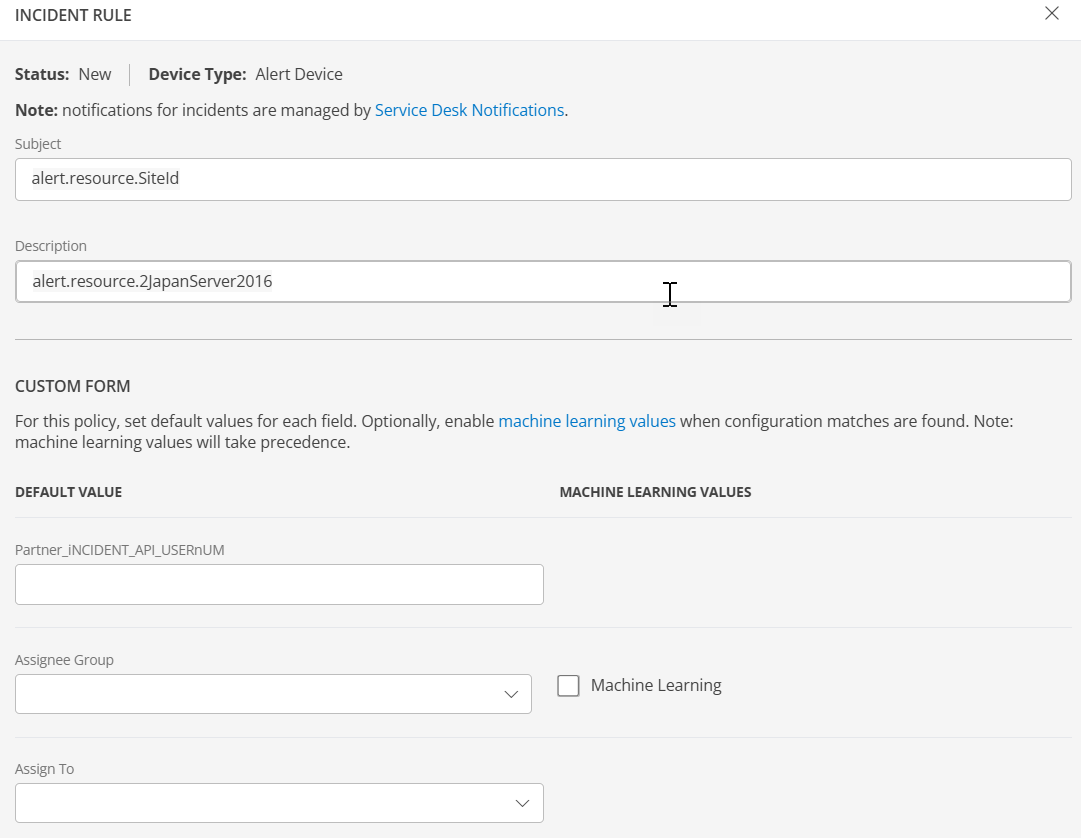
The page displays below information:
| Field | Description |
|---|---|
| Status | Displays the current status of the incident. |
| Device Type | Shows the device type. |
| Subject | Enter the incident subject. Use $ to insert field references. |
| Description | Enter the incident description. Use $ to insert field references. |
| Default Value / Machine Learning | Specify default or machine learning-derived values for fields such as Assignee Group, Assign To, Category / Sub Category, Business Impact, Priority, Notify Roster, Knowledge Articles, To / Cc, Dropdown-list and other fields. |
| Urgency | Specify urgency of the incident. Machine learning values can be applied. |
| Additional Users / MultiText | Fields for adding additional users or partner information. |
| Default Input / Disable Partner Update | Control whether partner fields can be updated or disabled. |
| Incident Partner Precedence Order | Defines the order of partner escalation. |
| Update Incident After Created | Configure how to update existing incident of an escalated alert. The incident gets updated every time an escalated alert repeats with a state change. Once you select the checkbox, the following options become available:
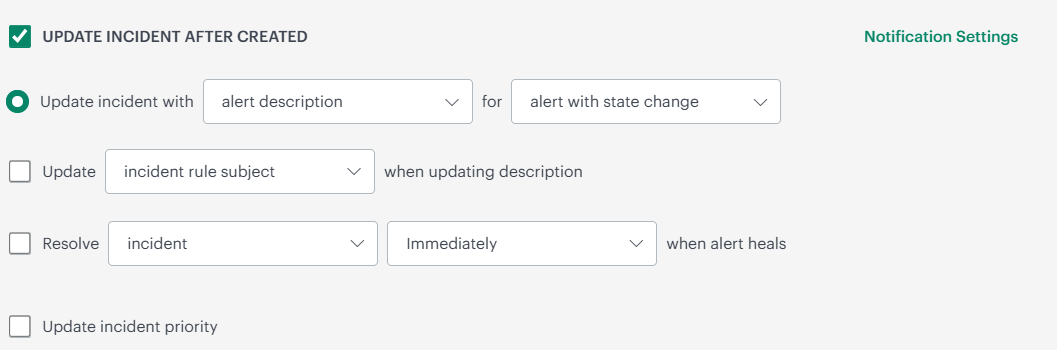 |
- Click Add Escalation to save and apply the incident settings to the escalation policy.
Notification and Incident Timing Options
The timing options control when notifications are sent or when incidents are created after an alert is triggered. You can configure these settings to ensure timely response while avoiding unnecessary repeated alerts.
- Select Immediately on the timeline to escalate an alert as soon as the alert is generated. If the alert does not have correlation or first response policies, the algorithm moves the alert to Alert Escalation. If the alert does have correlation and first response policies, the algorithm starts the escalation process and finishes after the correlation is complete.
- Select Wait Minutes/Hours on the timeline to escalate after the alert has elapsed and the policy conditions are met.
- For example, if a user configured 5 minutes delay escalation and the alert is triggered at 11:00 AM, the alert must be escalated at 11:05 AM. But, based on the design, an additional processing time in between 01 second to 02 minutes is added and the alert will be escalated between 11:05:01 AM to 11:07 AM.
Note
The additional processing delay is applicable for the SLA durations provided under “Define escalation rules” of the alert escalation policy.
- For example, if a user configured 5 minutes delay escalation and the alert is triggered at 11:00 AM, the alert must be escalated at 11:05 AM. But, based on the design, an additional processing time in between 01 second to 02 minutes is added and the alert will be escalated between 11:05:01 AM to 11:07 AM.
Alert tokens
An alert token is a placeholder added to an alert that is escalated as an incident so that the incident includes the data the token represents. For example, if $alert.serviceName (Alert metric) is added to an incident after the alert is escalated as an incident, the incident includes the alert metric name.
Tokens are divided into three categories:
- Alert: Alert category is divided into Alert specific tokens and Alert Resource tokens
- Policy: Policy category consists of the Policy name token.
- Functions: Functions category consists of the Substring token.
A substring is a string between a pointer for reference start character and reference end character. A reference pointer is a delimiter. The substring function token allows you to create a dynamic description for an incident. A delimiter is used to specify boundaries for identifying the appropriate string in a data stream. The startDelimiter indicates the beginning element in a character string, and the endDelimiter indicates the end element in a character string.
For example, a user wants to extract the Site Account from the Alert Description and set the account number to the Account Id of the Incident record.
To extract the Account ID from the Alert Description, use the substring ($function.substring(<String>,<startDelimiter>,<endDelimiter>) ) function, and enter the following values:
Note: You must enclose the startDelimiter or endDelimiter in either single or double quotes.
- String =
$alert.description - startDelimiter =
"AT SITE ACCOUNT NO=" - endDelimiter does not need to be configured to indicate a natural end delimiter
($function.substring($alert.description,AT SITE ACCOUNT NO=,<endDelimiter>)