The following tables describe and list the properties of the process definition objects.
Process Definition Events
Process definition includes the following event references.
| Symbol | Name | Description | Properties |
|---|---|---|---|
| Generic Start Event | (default) Process initial state. |
| |
 | Timer Intermediate Catch Event | Puts the process on hold until the specified time or duration. Transition to the next process step is triggered with the elapse of time or duration. |
|
 | Message Start Event | Triggers a workflow automatically when a matching message is received from an external source like Slack. |
|
| Timer Start Event | Process initial state. Transition to the next process step is triggered by a time event. |
| |
| Signal Start Event | Process initial state. Transition to the next process step is triggered by an alert, incident, or resource signal event. |
| |
 | Timer Boundary Event | Enables the task to complete within the specified duration. If the task is not completed within the duration, the process moves to the next step. |
|
 | End Event | Process end state. |
|
Supported Task Types
You must define one of the following task types.
| Symbol | Name | Description | Properties |
|---|---|---|---|
 | Send Task | Sends an email notification to the specified users, user groups, or rosters. In the Message Recipient field, click Add/Modify to find the recipients. The recipient list is displayed based on the login authentication such as partner or client. NoteWhen Roasters is selected, users receive email notifications according to the shift timing configured during profile creation. |
|
 | Script Task | Runs an agent-based script or agentless script using the Ansible control node. The agent-based task can be implemented using a Python, PowerShell, or shell script. See Ansible Integration to learn more about Agentless script tasks. NoteRBA scripts will not run during a scheduled maintenance window unless the Run RBA scripts option is explicitly enabled in the maintenance window configuration. During this period, the script task remains in a running state because no response is received from the agent. |
|
 | Service Task | Runs an external, REST API, local platform, and utility service. | |
 | User Task | A user task models work that requires human intervention. When the task runs, a new service desk entity task is created and is displayed in the assignee/assignee group task list. In the Assignee Group field, click Add/Modify to select the assignee group. In the Assignee field, click Add/Modify to select the assignee. The assignee/assignee group is displayed based on the login authentication such as partner or client. The workflow transitions out of the user task and to the next stage On receipt of a Closed or Resolved indication from the service desk entity. Any properties you define in Setup > Service Desk > Custom Fields Form are also displayed here as additional properties. |
|

Type of Services under Service Tasks
There are three types of services under Service Task.
- REST Web Service: Configure the REST API calls with integration setup.
- Platform Service: The platform service tasks are available for the service task.
- Utility Server: This service allows you to parse the server.
- Jenkins Service: This will help to trigger jenkins operations like trigger build, get build status, get build logs, stop build.
1. REST Web Service
REST Web Service task enables your automated workflows to interact with external APIs. This allows your processes to seamlessly integrate with and leverage the capabilities of other web-based services.
When you incorporate a REST Web Service task into your process definition, you need to configure the following parameters:
| Option | Description |
|---|---|
| Name | Enter a name for the REST web service task. |
| ID | The ID is populated automatically. |
| Service | Select the REST Web Service task from the drop-down. |
| Asynchronous Service Invocation (optional) | Select or deselect the toggle. An asynchronous service invocation follows the Request, Acknowledge, and Callback pattern. Once invoked, the process is put on hold on this task until the REST application calls back. |
| Integration | Select - Choose a custom integration from a list of previously created integrations. Only the selected custom integration is triggered during the process workflow. To create a custom integration for Process Automation, see the Configure custom automation integration section. |
| Event | Select - Choose a custom event from a list of previously created events. Only the selected custom event integration is triggered during the process workflow.To create a custom event for Process Automation, see EVENTS (after Step 9) in the Configure custom automation integration section. |
| Input | Enter the input. To provide multiple inputs for different tasks, enter the multiple inputs separated by commas. For example, $StartEvent_1bedsev.alert, $Create_SR, $Create_INCNote: The input value provided must be the same as the option selected in the On field in the Configuring the event section in Configure custom automation integration section. See the Input examples section for information about providing input values. - If the event type set is to "Alert" we can configure all properties related to alert and resource along with resource custom attributes from the tokens section to the payload. - If the event type is set to "Resource" we can configure all properties related to resource along with resource custom attributes from the tokens section to the payload. |
| Input a JSON | Select this checkbox to provide JSON‑formatted input. When enabled, the above input field becomes optional, but providing JSON input is mandatory. |
Input examples
| On field Integration Event | REST Web service Input field | Input Example |
|---|---|---|
| Resource | Resource | $taskId.alert.resource, $taskId.resource |
| Alert | Alert | $taskId.alert |
| Task | Task | $taskId.task |
| Incident | Incident | $taskId.alert.incident, $taskId.incident |
| Json Object | Json Object | $taskId |
2. Platform Service
Platform Service tasks are pre-built actions that allow your automated workflows to interact directly with core OpsRamp functionalities and data. These tasks provide a way to automate common operational procedures within the OpsRamp platform itself, without needing to write custom scripts or integrate with external systems for these specific actions.
| Entity | Platform Service Task | Description |
|---|---|---|
| Alert | Close Alert | Closes an alert using the alert ID. |
| Create/Update Alert | Creates and updates an alert. The Create/Update Alert lets you customize the alerts that are inbound through the integrations. By configuring a custom process definition for an integration, you can customize the incoming alerts according to the properties defined in the process definition. Enter the attribute values. The input text here is provided as an example:
This process definition is available for selection in the Enrich and Create Alert section while creating custom integrations. See the Configure the custom integration for webhook section to learn more about the Enrich and Create Alert option. | |
| Find Alerts | Finds a list of alerts that match a PromQL query string.NoteWhen using the PromQL query, it is important to note that there is a limitation of retrieving only 100 results at a time. | |
| Get Alert | Gets an alert using the alert ID. | |
| Heal Alert | Heals an alert using the alert ID. | |
| Post Alert Comment | Posts a comment using the alert ID. | |
| Set Alert Priority | Sets an alert priority using the alert ID. | |
| Update Alert Custom Tags | Updates or adds custom tags for a specific alert. | |
| Incident | Find Incidents | Finds a list of Incidents that match a PromQL query string.NoteWhen using the PromQL query, it is important to note that there is a limitation of retrieving only 100 results at a time. |
| Get Incident | Gets an incident using the incident ID.
| |
| Update Incident | Updates the following incident attributes using the incident ID.
| |
| Service Request | Find Service Request | Finds a service request. |
| Get Service Request | Fetches a service request. | |
| Update Service Request | Updates a service request | |
| Problems | Find Problems | Fetches problem records that match the defined search conditions. |
| Get Problem | Fetches detailed information of a specific problem record using its identifier. | |
| Update Problem | Updates the details of an existing problem record. | |
| Change Requests | Find Change Requests | Retrieves a list of change requests based on specified filters and criteria. |
| Get Change Request | Retrieves detailed information of a specific change request using its identifier. | |
| Update Change Request | Updates the details of an existing change request. | |
| Resources | Create Maintenance Window | Creates a maintenance window for selected resources based on the specified schedule and duration. |
| Find Resources | Finds a list of resources that match a PromQL query string.NoteWhen using the PromQL query, it is important to note that there is a limitation of retrieving only 100 results at a time. |
Note
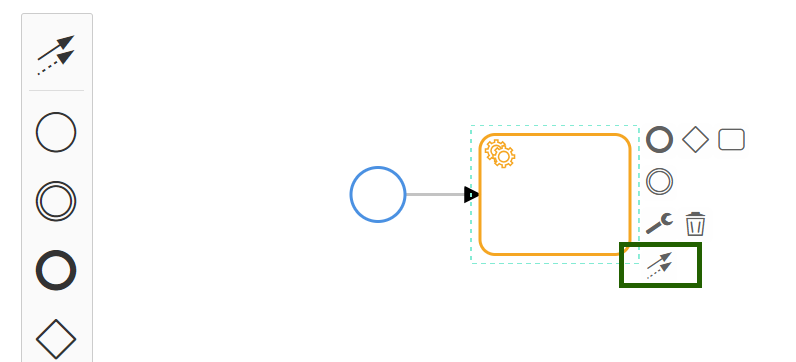
To configure query in the “Find alerts” or “Find resources or “Find incidents” task, please refer the Query Language Reference document for more details.An example of a Platform Service is provided below:
To Close Alert Task (see image below).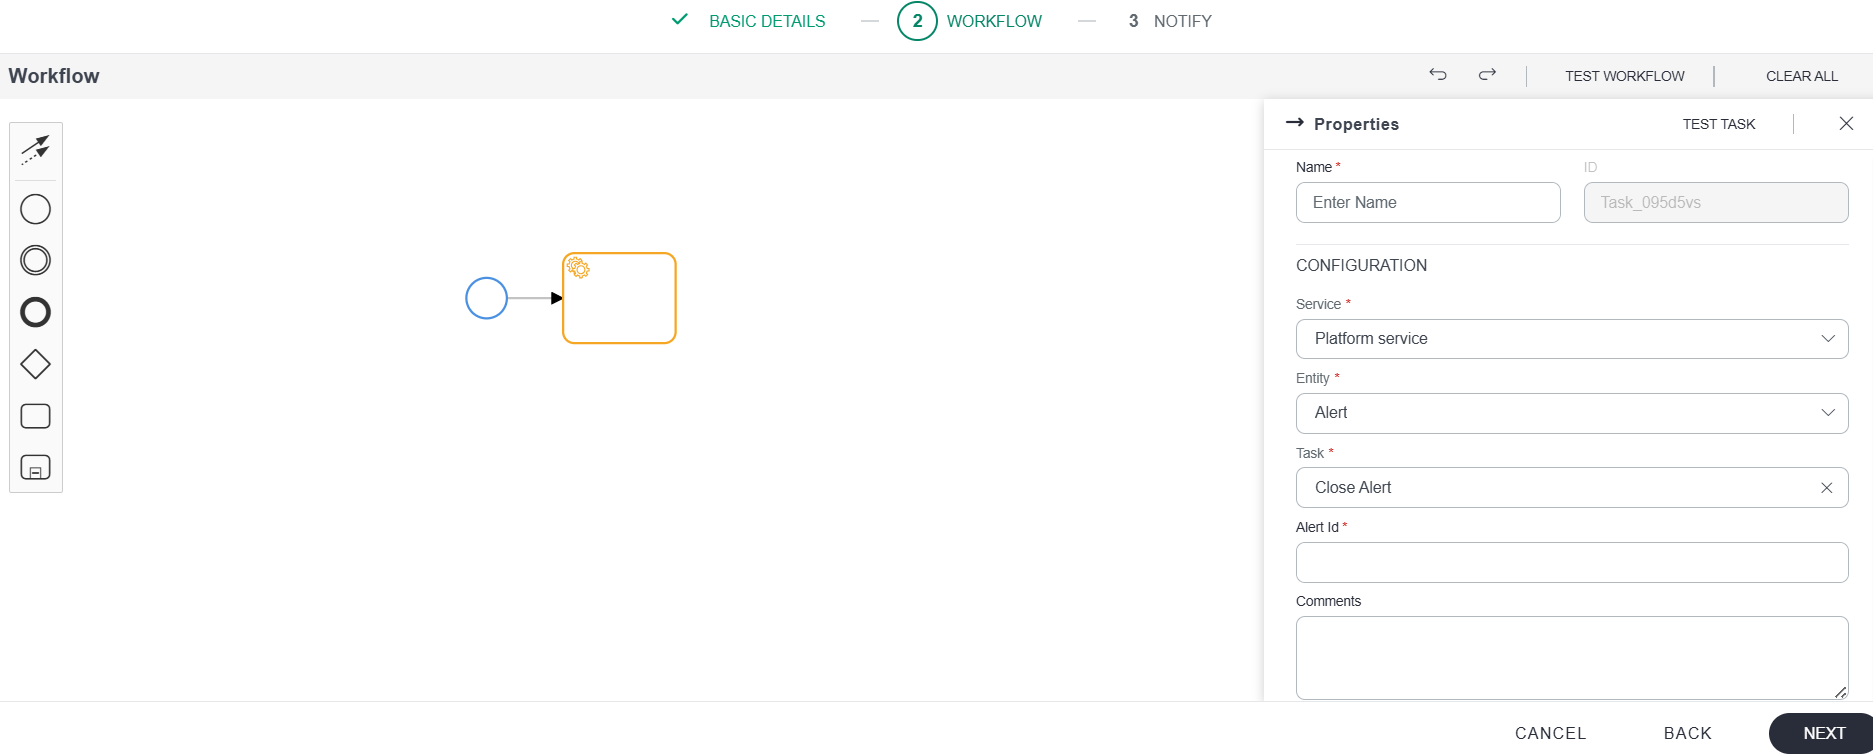
By default, the default flow was allowed under status change (see image below).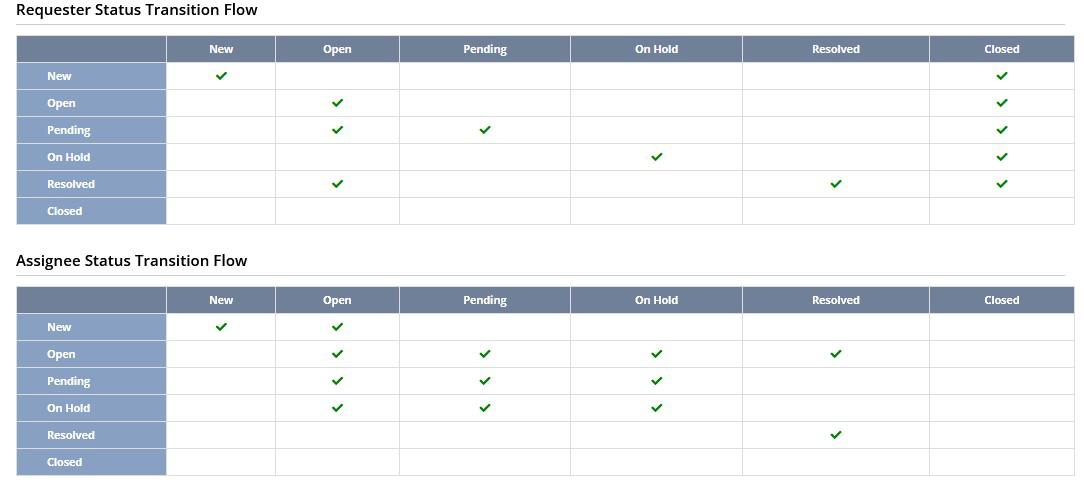
You can configure the status flow at the Partner/Client level if necessary.
Go to Setup » Service Desk » Status Flow to configure the custom status flow.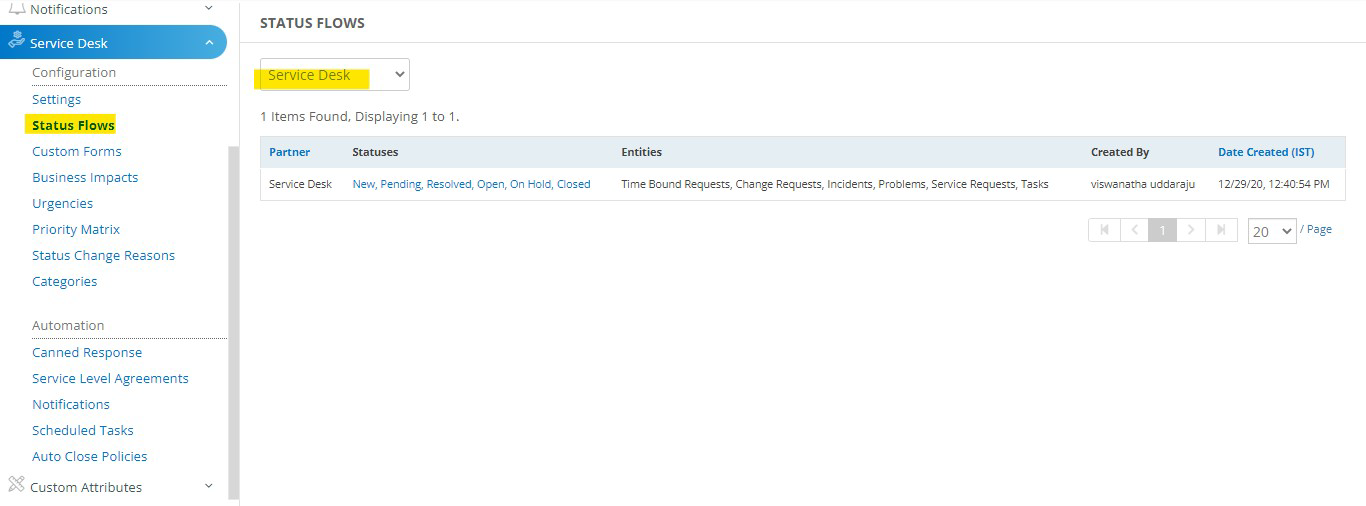
3. Utility Service
The Utility Service in OpsRamp Process Automation helps manage data and control workflow execution, enabling workflows to process, transform, and structure information for downstream tasks.
The Utility Service includes the following task types:
- Parser- Processes structured data and extracts values for use in subsequent workflow steps. The Parser task now supports both JSON objects and arrays of JSON objects as input.
- Text to Json- Converts unstructured or text-based data into JSON objects or arrays of JSON objects based on a defined format. This enables workflows to work with structured data that can be easily processed by other tasks.
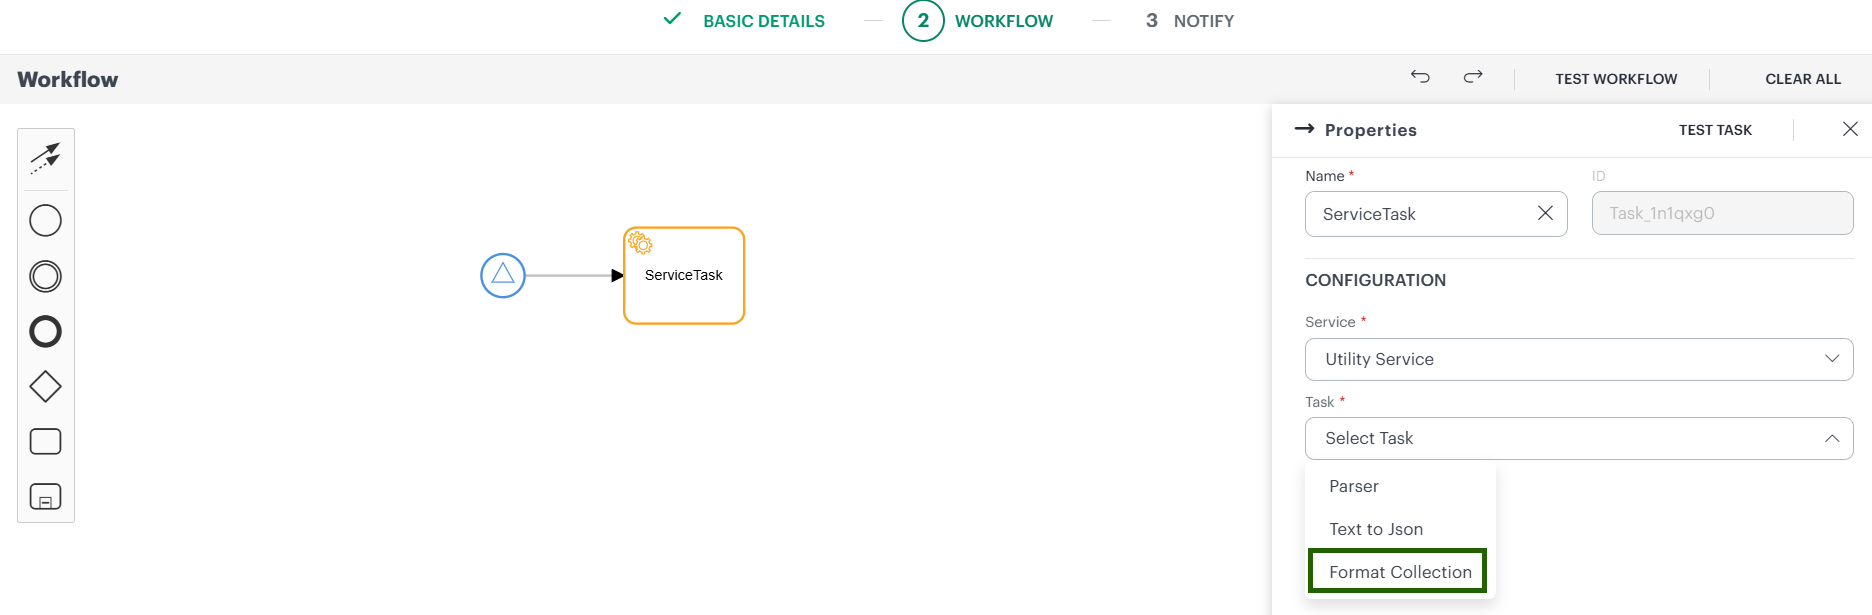
- Format Collection- Organizes and formats data into a structured collection, making it easier to pass information between workflow tasks and use it in automation processes.
Workflows can use the Text to JSON task to convert text-based resource information into JSON format. The Parser task can then process the JSON data, extract the required values, and dynamically iterate through resources to execute subsequent tasks based on the extracted information.
A. Parser Task
The Parser task is a Utility Service task that extracts structured key-value pairs from plain text or dynamic runtime tokens. It is useful when you need to pull specific pieces of information — such as percentages, hostnames, alert IDs, or status descriptions — from large or complex text inputs and pass them as inputs to subsequent tasks in a workflow.
What you can parse
The Parser task supports two types of input:
- Plain text — Any static string containing values you want to extract.
- Dynamic runtime tokens — Token values that are resolved at runtime, for example:
$.alert.uuid$.resource.hostName
The extracted values can represent metrics, descriptions, numbers, file paths, or any other text-based data needed by downstream tasks.
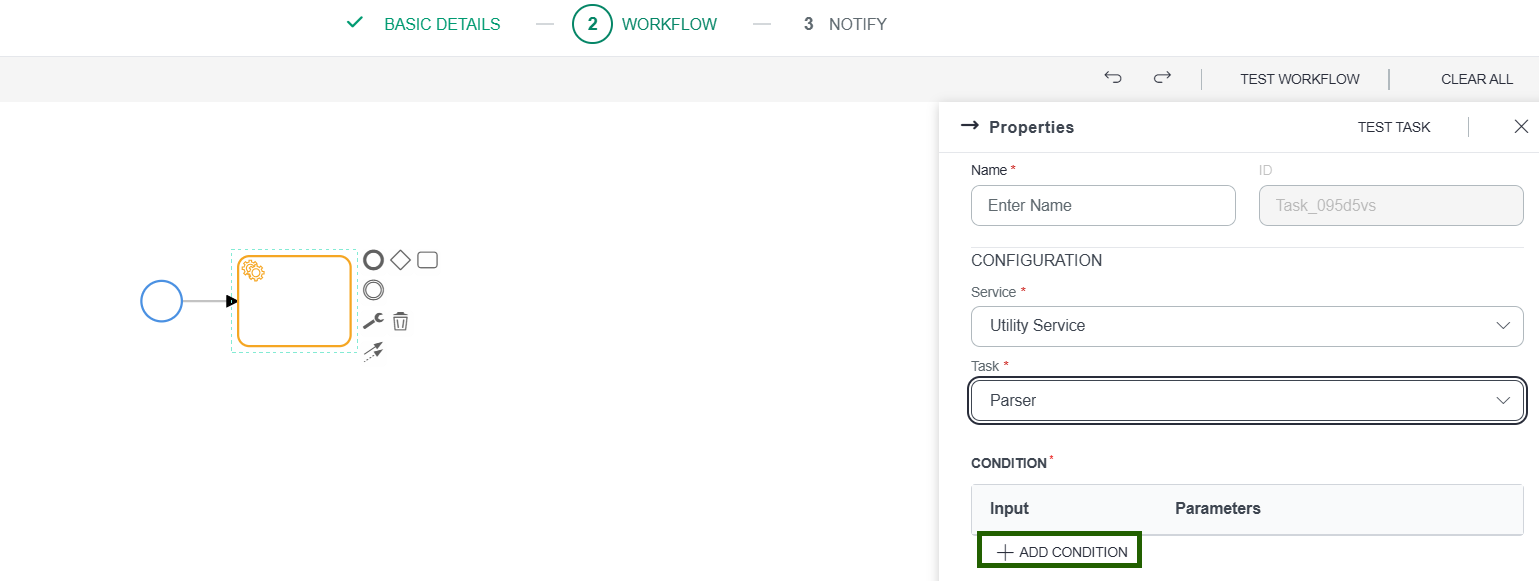
To configure the Parser task:
- Add a Service task to your workflow canvas.
- In the Configuration panel, select Utility Service from the Service drop-down.
- Select Parser from the Task drop-down.
- Click + Add Condition. A configuration panel opens where you define a single parser condition.
- Enter a Key name - this is the output variable that will hold the parsed value.
- Enter the Input text or token to parse.
- Select the Type for the condition - either String or Date.
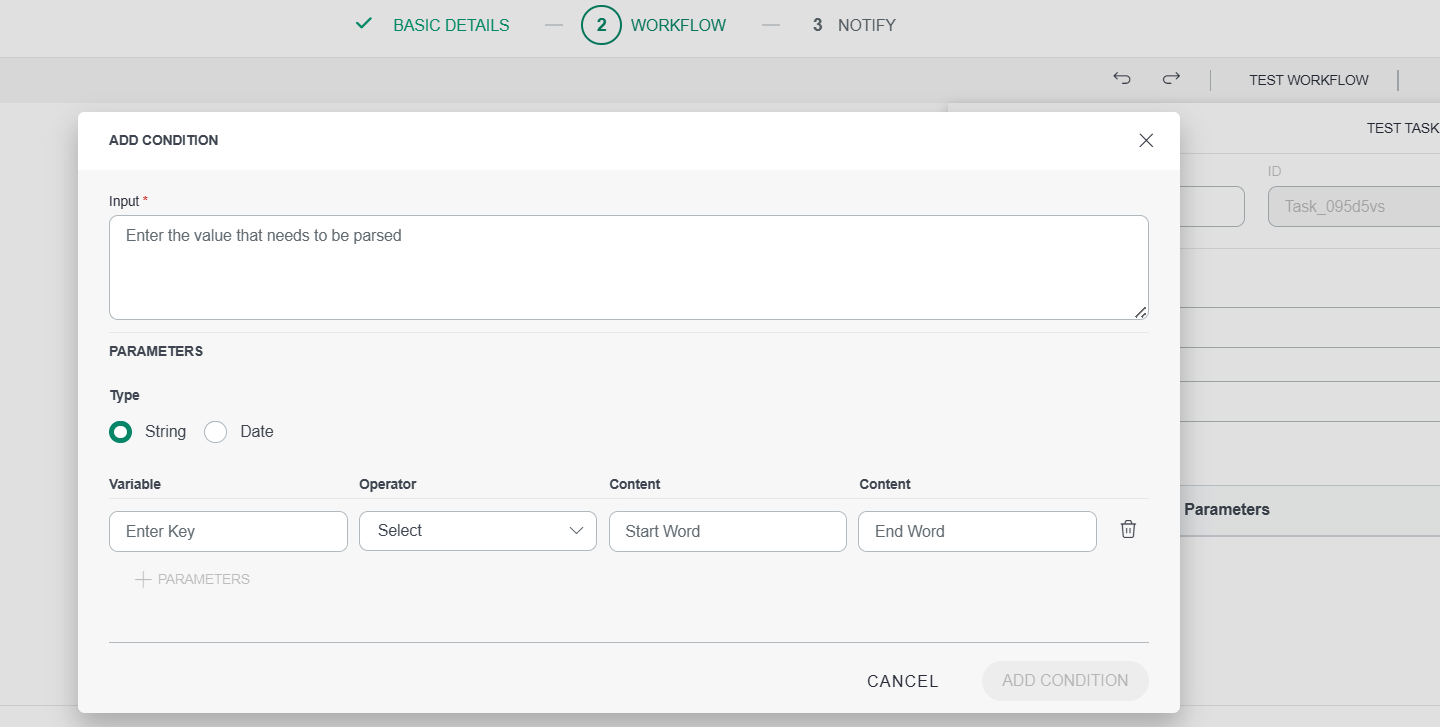
String operators
Use the following operators when the condition type is String:
| Operator | Description |
|---|---|
| After | Extracts all text that appears after a specified word or delimiter. |
| Before | Extracts all text that appears before a specified word or delimiter. |
| Between | Extracts text that appears between a defined start word and end word. |
| Pre Pend | Prepends (inserts) a specified string before the input value. |
| Post Pend | Appends (inserts) a specified string after the input value. |
| Trim | Removes leading and trailing whitespace from the input value. |
| Regex | Extracts text matching a regular expression pattern from the input. |
| Uppercase | Converts the entire input string to uppercase. |
| Lowercase | Converts the entire input string to lowercase. |
| Split | Splits the input string at a specified delimiter and returns the resulting parts. |
Date operators
Use the following operators when the condition type is Date:
| Operator | Description |
|---|---|
| Add | Adds a specified number of days to the input date. |
| Subtract | Subtracts a specified number of days from the input date. |
| Now | Returns the current date and time at the point of execution. |
| Format | Converts the input date to a specified format and timezone. Provide both the target date format (for example, `yyyy-MM-dd`) and the timezone (for example, `UTC` or `America/New_York`). |
- After configuring the key, input, type, and operator, click Add Condition to save the condition.
- To add more parsed key-value pairs to the same task, click + Parameters and repeat the steps above for each additional condition.
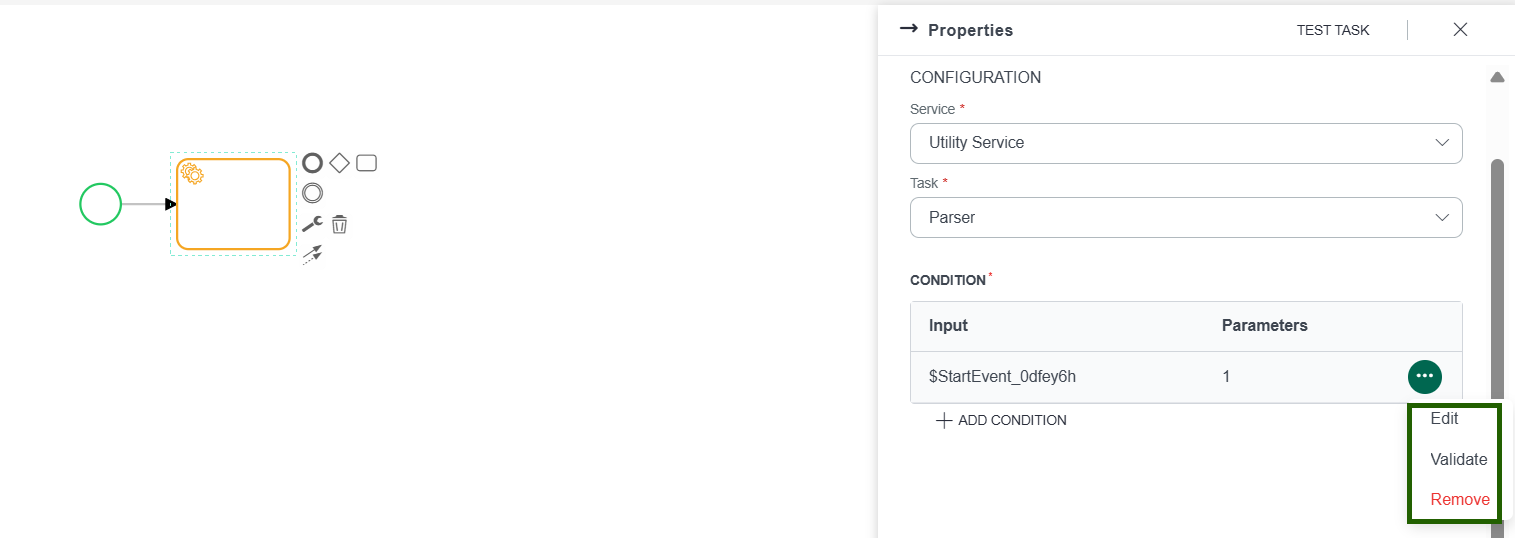
Managing existing conditions
Once a condition is created, you can:
- Edit — Modify the key, input, or operator.
- Validate — Test the condition against a sample input to verify the parsed output before running the workflow.
- Remove — Delete the condition from the parser configuration.
Example:
The following example demonstrates the validation of a plain text alert input using all the five available parsing operators.
The Physical Memory Usage on the device is 56%. The Virtual Memory Usage on the device is 43%.
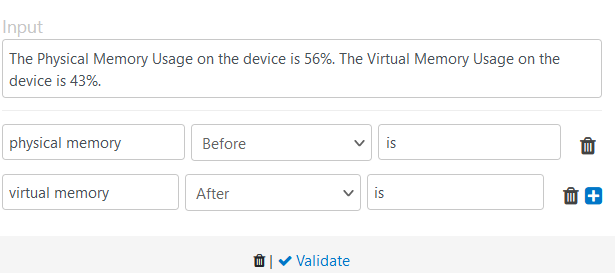
The following is the parsed text result:
{  "physical memory": "The Physical Memory Usage on the device",
  "virtual memory": "43%."}
Parsing Dynamic Values in Run Time
The following example demonstrates providing dynamic values as inputs, parsing dynamic values in run time, and using the parsed values in the next task in the process workflow.
For example, the first task in the workflow is the Parser utility task and the next task is the Post Alert Comment platform service task.
Parser Utility Task
The input query for the Parser task is as follows:
Alert created # $StartEvent_10g1j00.alert.uuid on device $StartEvent_10g1j00.alert.resource.hostName. Subject: $StartEvent_10g1j00.alert.subject.
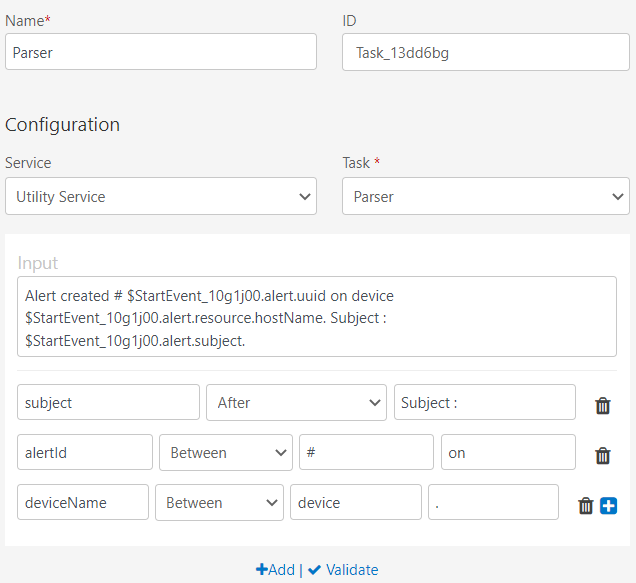
The validation response for this input is:
{
  "subject": "$StartEvent_10g1j00.alert.subject",
  "alertId": "$StartEvent_10g1j00.alert.uuid",
  "deviceName": "$StartEvent_10g1j00"
}
The subject, alertId, and deviceName parameters are the outputs of the Parser task. The actual values are replaced with tokens in the run time.
Note that the values are not yet assigned to these parameters. These are provided as inputs for the Post Alert Comment task.
Post Alert Comment task
The following parameters are provided as inputs after parsing the text:
- Alert Id - The alert id is generated from the parser task.
$Parser.alertId - Subject - The name of the subject is appended from the parser task.
$Parser.subject - Device - The name of the device is appended from the parser task.
$Parser.deviceName
The result of the Post Alert Comment task is as follows:
Alert Id: 24475 Subject: Testing the parser task. Device: Think-pad
B. Text to Json Task
The Text to Json task converts unstructured or semi-structured text containing resource information into structured JSON objects or arrays of JSON objects.
- The enhanced Parser task can then process this JSON data to facilitate dynamic iteration within the workflow.
- Previously, workflow iteration in Process Automation was limited to static numbers or predefined values. With Text to Json task, you can perform workflow iteration based on multiple resource details provided within the Alert subject or description, often in a comma-separated format.

Text To Json Limitations and Supported Formats
The TextToJson utility supports specific special characters to differentiate between:
- Key and Value:
:,=,>,@,#,< - Key-Value Pairs:
|,,,&,@,?
Note
- Multiple special character combinations in a single input are not supported.
- To generate multiple JSON objects, use a comma , after each key-value pair group.
Supported Key-Value and Pair Separators:
| Key-Value Separator | Pair Separator(s) |
|---|---|
| > | | , ? , & , @ |
| : | | , @ , ? |
| = | | , & , @ , ? |
| @ | | , ? |
| # | | , & , ? |
| < | | , ? |
Working Format Examples:
| Input Text | Output |
|---|---|
| |
| |
| |
| |
| |
C. Format Collection
The Format Collection task is a utility function that transforms collection-based outputs (such as lists, maps, or JSON arrays) into structured, human-readable formats. This is ideal when workflows generate complex data outputs like alert lists, patch results, or resource inventories.
Key Benefits:
- Convert complex data into easy-to-read tables or structured output
- Extract only relevant fields from large datasets
- Improve readability for stakeholders (Ops teams, managers, customers)
- Enable seamless integration with downstream tasks
Configuration Steps
- Add a Service Task
- Create a new Service Task in your workflow
- Configure the Service and Task
- In the Configuration section, select Utility Service from the Service dropdown
- Select Format Collection from the Task dropdown
- Enter the Required Fields
| Field | Description |
|---|---|
| Collection | Specifies the input collection to be formatted. This is typically the output from a previous task that contains one or more data records. |
| Columns | Defines the fields to extract from each item in the collection. Only the selected fields are included in the formatted output. |
| Headers (Optional) | Specifies custom column names for the output. If provided, the number and order of headers must match the selected columns. |
| Format | Specifies the output format. Supported formats include HTML Table for email templates and reports, Plain Text for logs and messages, and JSON for downstream processing and integrations. |
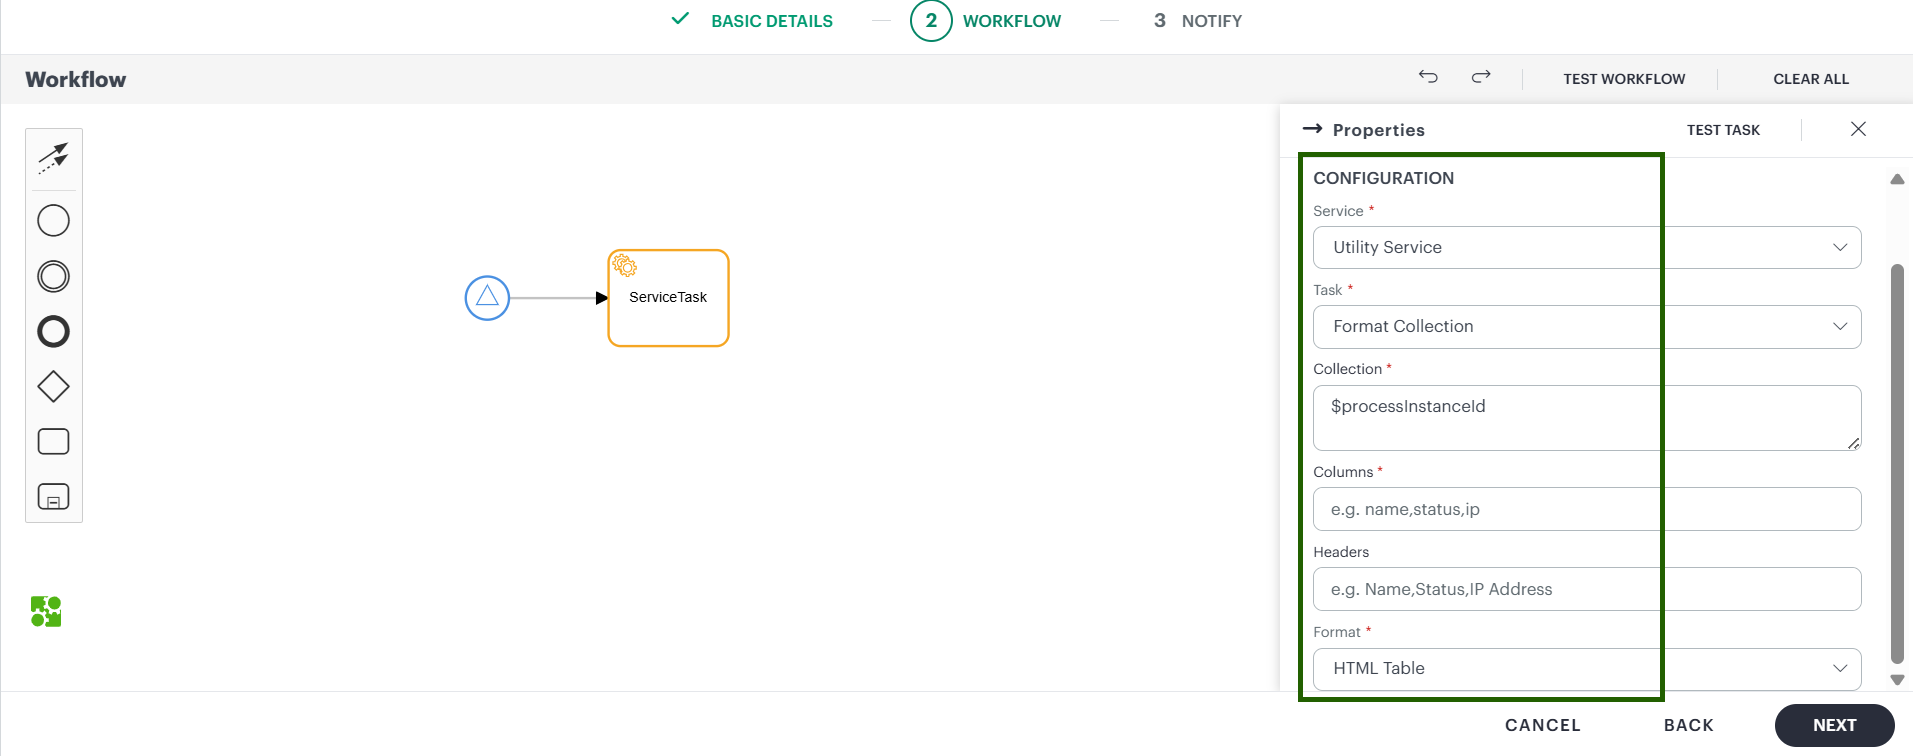
Note
- You can use dynamic tokens from previous tasks, plain text, or a combination of both.
- The input supports JSON, XML, and YAML formats.
4. Jenkins Service (Outbound Integration)
OpsRamp Process Automation supports Jenkins Service Integration through an outbound connector. This enables users to automate Jenkins CI/CD operations directly from OpsRamp without switching between tools. By configuring the Jenkins connector, you can trigger builds, monitor build activity, retrieve build data, and manage job execution all from within an automated workflow.
Key Benefits
- Centralized Automation: Run Jenkins jobs as part of broader OpsRamp automation flows such as deployments, remediation, or change management.
- Faster DevOps Operations: Trigger CI/CD jobs automatically based on alerts, schedules, approvals, or external events.
- Real-Time Visibility: Retrieve live build statuses, logs, and job information for monitoring and validation inside your workflow.
- Seamless Integration: Uses standard Jenkins authentication (username + API token) over a secure connection.
Configuring Jenkins Service
Follow the steps below to configure the Jenkins Outbound Connector in OpsRamp Process Automation:
- Select Jenkins Service
- While creating an automation task, choose Jenkins Service from the service dropdown menu.
- A Jenkins icon will appear on the task to indicate the integration is active.
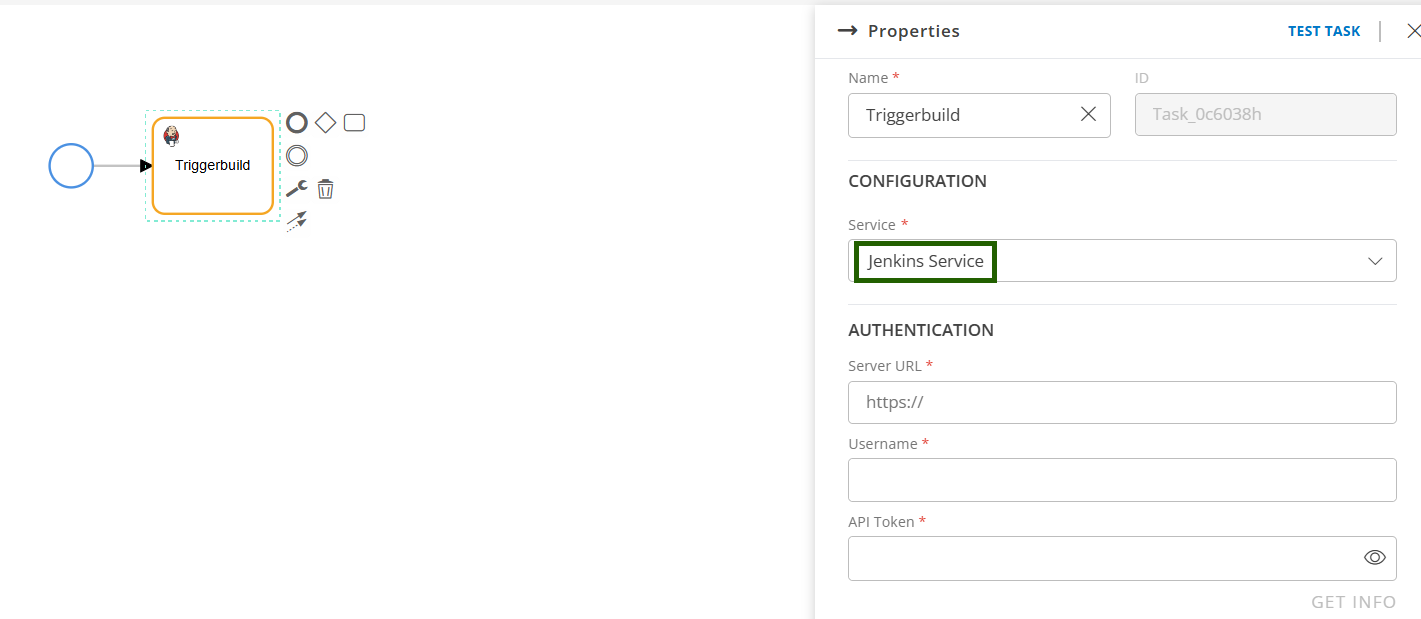
To connect OpsRamp with your Jenkins instance, enter the following details from your Jenkins account:
- Server URL
- Username
- API Token
These credentials are required to fetch job and build data from Jenkins.
- Validate the Connection
- Click Get Info to verify and authenticate your Jenkins details.
- If any information is invalid, an authentication error will be displayed.
- Select and Configure Actions
- After successful authentication, select a Job Name from Jenkins.
- Choose one of the supported Jenkins operations listed below:
Supported Jenkins Operations
| Operation Type | Description | Use Cases |
|---|---|---|
| Trigger Build | Triggers the specified Jenkins job. | Basic job execution, scheduled builds, pipeline kickoff |
| Trigger Build with Parameters | Starts parameterized build jobs for dynamic and controlled executions. | Automated deployments, parameter-based testing, on-demand builds |
| Get Build Status | Retrieves the current status of running or completed builds. | Progress tracking, error handling, quality gate enforcement |
| Get Build Information | Fetches detailed build metadata including artifacts, logs, timestamps, and parameters. | Release validation, troubleshooting, compliance reporting |
| Stop Build | Terminates an active Jenkins build safely. | Emergency cancellation, resource optimization, failed pipeline management |
| Get Jobs Information | Retrieves details of Jenkins jobs including configuration and execution history. | Build discovery, capacity planning, pre-build checks |
- Save and Deploy
Once all details and operations are configured, click Save and Deploy to finalize the integration.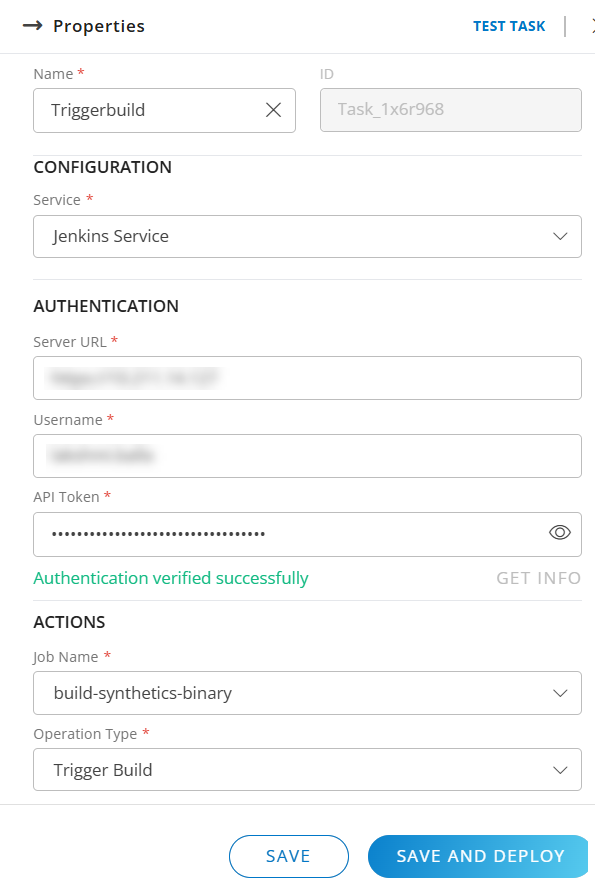
Call Activity
A Call Activity is a set of tasks that is defined and executed independently from the main process definition workflow. It is a reusable process that can be called by multiple process definitions. A call activity performs the defined set of tasks by creating a new process instance, executes the task, and the main process definition continues afterwards.
Assign a call activity to a process definition
To assign a call activity to a process definition, do the following:
- Create a new process definition by clicking +Add.
- In the display canvas, enter a required Name for the process. You can enter an optional process Description.
- Add a start event and append a task.
- For the task, click the Change type and choose Call Activity.
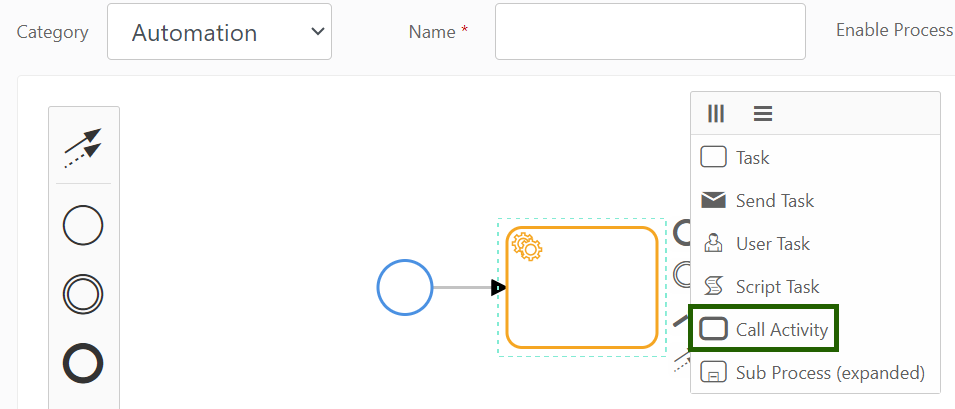
- Click the task to view the task properties and enter the following:
- Name - Enter the name.
- ID - The ID is auto-generated.
- Process - Select the specific process definition created for the call activity from the available list.
- Input - Enter the input.
When the signal input is triggered, the call activity is also triggered and performs the tasks as defined in the process selected from the Process field and moves to the subsequent tasks in the process definition.
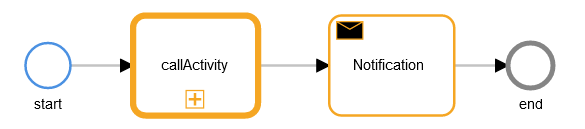
The following is a sample process definition with call activity. The call activity is indicated by a thicker border and a + sign.
Sub Process (expanded)
A Sub Process is a set of tasks that is defined and executed independently within the main process definition workflow. It can contain:
- Other activities
- Gateways
- Events

The following are some of the points to remember about the Sub Process:
- Runs only within the main process.
- Only None start event is available.
- Must have at least one end event.
- The outputs of the sub process cannot be used as the inputs of the subsequent tasks.
- Contains only the Name property. The ID is auto-populated.
- Additional properties such as Multi-instance is available when it is defined from the previous task.
The following is a sample sub process definition: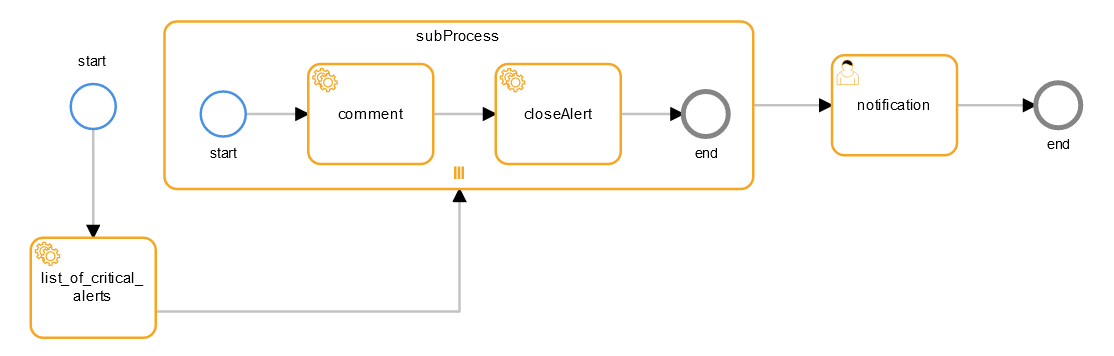
The sample sub process definition can be explained in the following way:
- The list_of_critical_alerts task contains a list of critical alerts.
- The subProcess is defined within the main process definition. The task of the subprocess is to comment and close the alerts coming from the previous list_of_critical_alerts task.
- The three vertical lines indicate that a multi-instance loop is added to the sub process. A multi-instance loop indicates that a particular task has to be performed multiple times.
The following additional properties are available for a sub process when a loop is added:- Parallel Multi instance: Indicated by three vertical lines. All tasks are executed concurrently and independently from each other.
- Sequential Multi instance: Indicated by three horizontal lines. All tasks are executed one after the other.
- Collection: Enter the array list from the list_of_critical_alerts task. For example:
$list_of_critical_alerts.alerts - Element Variable: Enter the variable in which the alert will be stored. For example:
xSo, if five alerts come through the task, each alert will be repeated. For example, the first alert is mapped to the x variable, the action is performed, and then the second alert is mapped until all five alerts go through this process. - Loop Cardinality: The number of times a process is iterated. Select the Number of loops from the range. If you select 3, the tasks will be iterated three times either parallely or sequentially based on the multi-instance selection.
- Accessing Sub-Process Activity Output: To access the output of a sub-process activity in subsequent workflow activities, use the following variables:
$subProcess.closeAlert.loopOutput[0]- This will returns the output from the first execution of the Close Alert task.$subProcess.closeAlert.loopOutput[1]- This will returns the output from the second execution of the Close Alert task.
Multi-Instance Activities
A multi-instance activity is a process of defining repetition for a task in the sub process. All the following tasks can be used to define a multi-instance activity:
- Service Task
- Send Task
- User Task
- Business Rule Task
- Script Task
- Sub-Process
- Call Activity
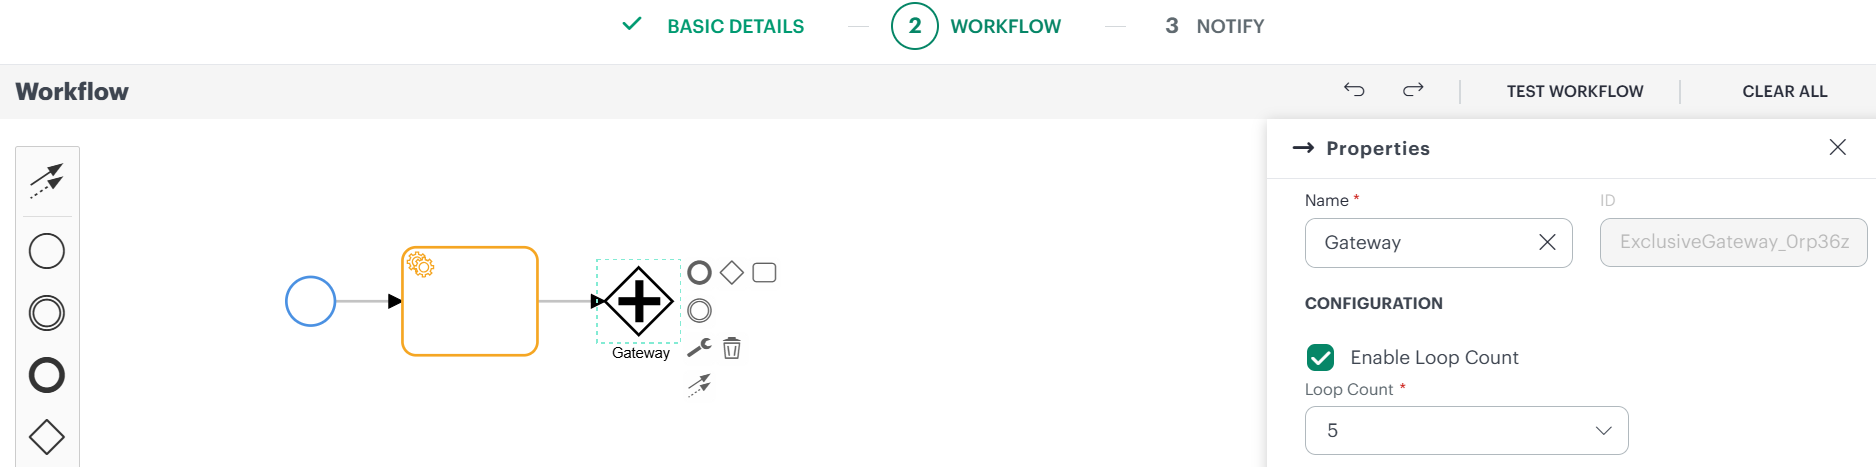
Gateway Reference
Process definition includes the following gateway references.
| Symbol | Name | Description | Properties |
|---|---|---|---|
 | Exclusive Gateway | (default) Specifies conditional task execution. Use the connector symbol to specify the branching condition. |
|
 | Parallel Gateway | Specifies concurrent task execution. |
|
Note
Loop Count: For Exclusive and Parallel Gateways, you can configure the loop count restrictions to prevent infinite loops. The default loop count is 5. If you need a higher limit, you can configure it up to a maximum of 20.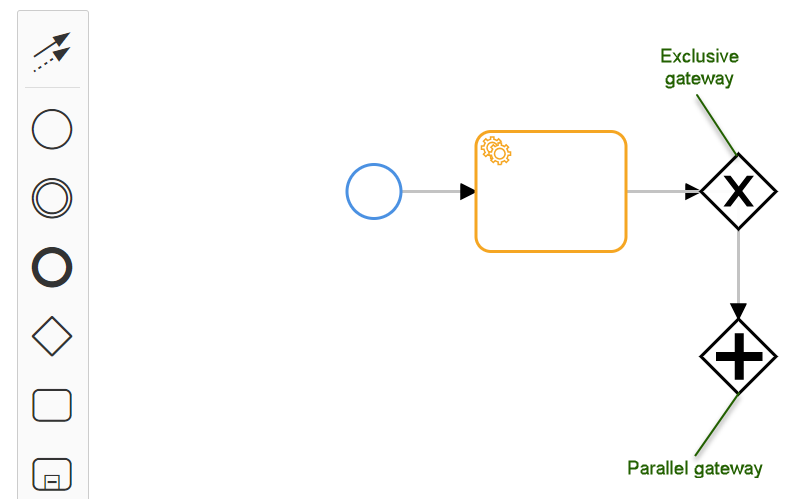
Connector Reference
Process definition includes the following connector references.
| Symbol | Name | Description | Properties |
|---|---|---|---|
 | Sequence Flow | Connects two components in a directed, sequential workflow. |
|
 | Default Flow | Connects two components in a conditional workflow. Default processing continues in the direction of this connector if the specified condition is not satisfied. |
|