This page describes the installation of Kubernetes using the OpsRamp ISO/OVA for both single-node and multi-node setups.
Overview
The OpsRamp-provided ISO and OVA images come pre-bundled with Kubernetes, a lightweight Kubernetes distribution. This integration simplifies the Kubernetes installation process, allowing you to bring up a functional cluster using a single command with no complex configuration required.
About Kubernetes in OpsRamp Gateway
Kubernetes is used to host and run the NextGen Gateway as a collection of Kubernetes-native applications. These applications are deployed using Helm charts and rely on Docker container images. During installation and runtime, access to a container registry is essential.
- By default, the Gateway is configured to use the OpsRamp cloud-hosted container registry to pull the required Helm charts and images.
- Alternatively, organizations can configure their own private or public registry to meet internal security or compliance requirements.
Registry Configuration (Optional)
Before installing Kubernetes, it is recommended to review your container registry configuration. This step is optional if you plan to use the default OpsRamp registry.
When You Can Skip Registry Configuration
If you are using the OpsRamp registry to pull Helm charts and Docker images, no additional configuration is required. The Gateway will automatically connect to OpsRamp’s registry during deployment.
When You Must Configure a Custom Registry
If you choose not to use the OpsRamp registry and instead prefer to use your own registry (public or private), you must configure it before installing Kubernetes.
Note
If you are using a private registry, you are responsible for syncing your repository with the OpsRamp registry to pull the necessary Helm charts and Docker images. This synchronization process must be handled on your end.Steps to Configure a Custom Registry (Optional)
Note
- This configuration is required only for Gateway versions earlier than 22.0.0.
- The private registry configuration must be applied individually on each node in the cluster using the same settings to ensure consistency across the deployment.
- Open the registry configuration template:
vi /var/cgw/asserts_k3s/registries.yaml.template - Uncomment the
configssection and update it with your registry credentials and endpoint:
Ensure proper YAML indentation to avoid syntax issues during deployment.mirrors: artifact.registry: endpoint: - "https://{your-private-repo}" configs: "{your-private-repo}": auth: username: "{your-username}" password: "{your-password}"
Example:mirrors: artifact.registry: endpoint: - "https://hub.testrepo.com" configs: "hub.testrepo.com": auth: username: "test-user" password: "test-password"
Installation Steps
Initialize Kubernetes (K8s) Cluster
- Run the following command to open the Terminal UI:
opsramp-collector-start terminal-ui - Select Initialize Kubernetes (K8s) Cluster to install Kubernetes on the first node.
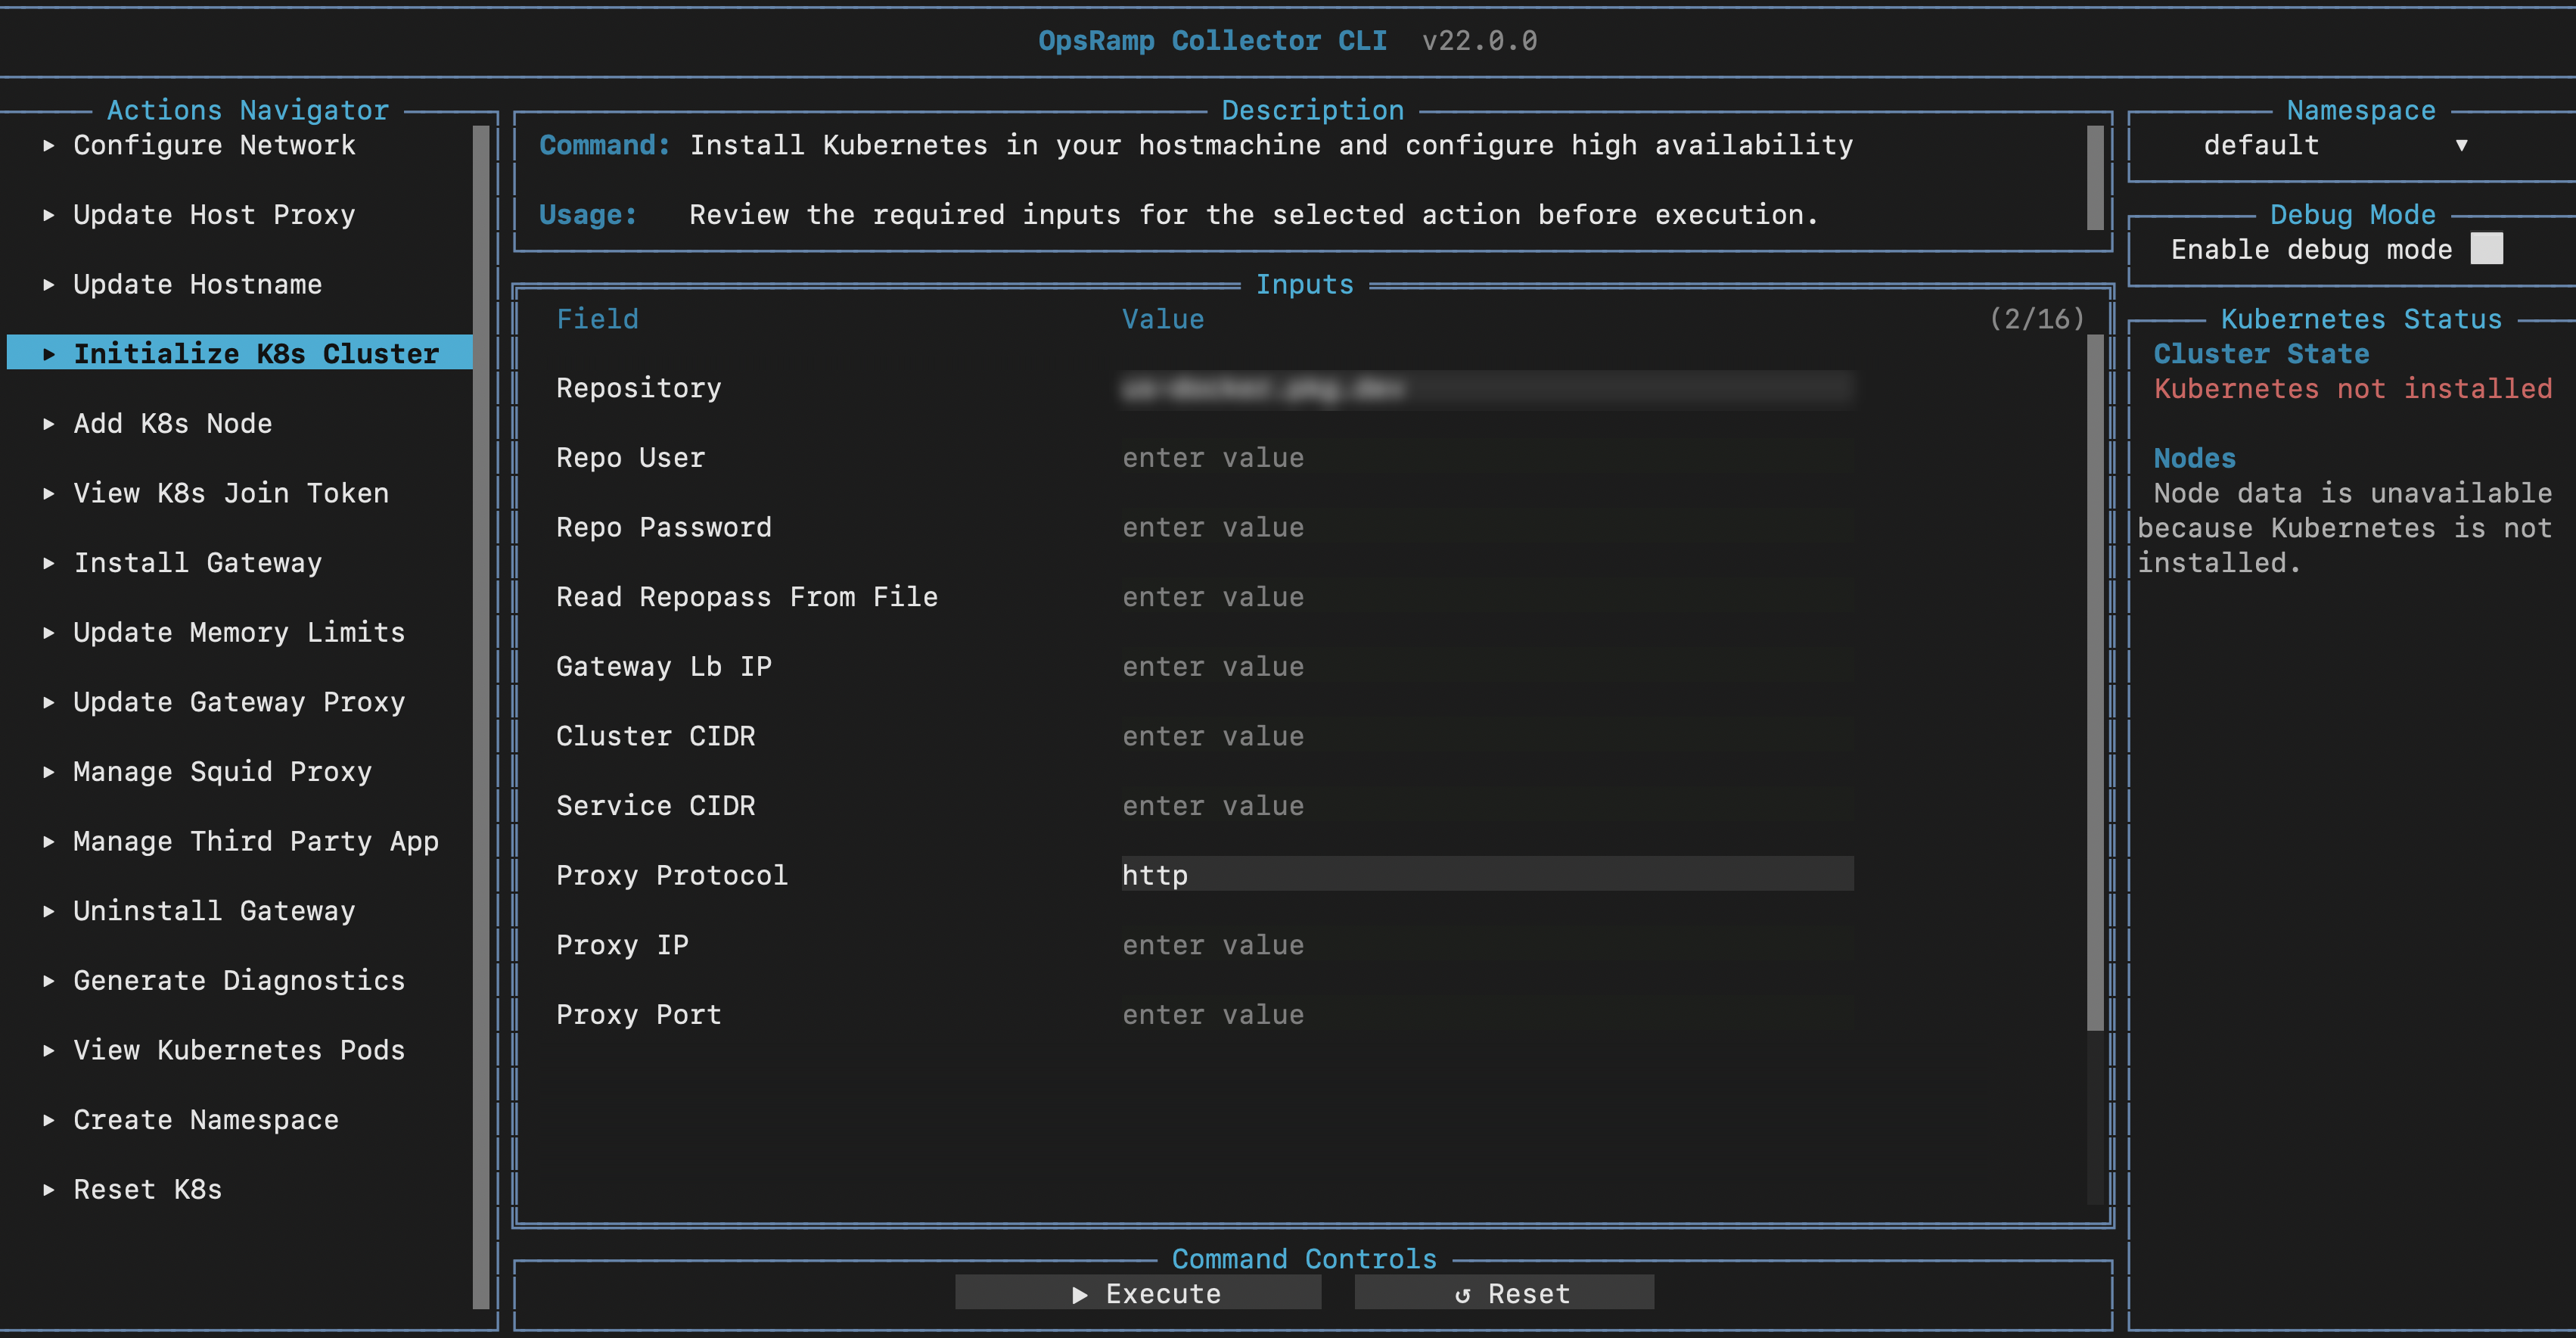
Field Description Repository Container image repository. Repo User Repository username. Repo Password Repository password. Read Repopass From File Reads the repository password from a file. Cluster CIDR Kubernetes cluster network CIDR. Service CIDR Kubernetes service network CIDR. Proxy Username Proxy Username Proxy Password Proxy Password Proxy Protocol Proxy protocol Proxy IP Proxy server IP address Proxy Port Proxy Port Skip Prechecks Skip Prechecks Container Attestation Enabled Container Attestation Enabled Note
Do not provide a /16 subnet mask or any subnet range in this field. Only enter the individual IP address. The required /16 subnet range will be automatically applied by the bootstrap tool during configuration.Note
- Kubernetes uses CIDR ranges to allocate IP addresses to pods and services so they can communicate. If the default ranges overlap with other devices or connected networks, use non-overlapping ranges to avoid IP conflicts and routing failures. The default pod CIDR is 10.42.0.0/16 and the default service CIDR is 10.43.0.0/16; if these overlap with your network, you must change them during cluster initialization.
- If you do not specify these flags, the default CIDR ranges are:
- Cluster CIDR:
10.42.0.0/16 - Service CIDR:
10.43.0.0/16
Ensure custom CIDRs are within the/16subnet to maintain compatibility.
- Cluster CIDR:
Select Execute to save the entered information.Warning
You can update the CIDR only during the initial Kubernetes cluster setup. After Kubernetes installation, updating the CIDR is not supported. Similar to the hostname and IP address, do not change the CIDR configuration after Kubernetes has been installed. For reference, see Install Gateway Using ISO, which states: “Do not change the hostname and IP address after Kubernetes has been installed.” - Press
ESCto close the Terminal UI.
Notes
- Additional fields may be available depending on deployment requirements.
- Repository credentials are required when using a private repository.
Step 1: Installing Kubernetes
Once registry configuration is complete (if applicable), install Kubernetes using the following command:
opsramp-collector-start setup initNote
TheSetup and Init options are only visible to users who are using OpsRamp ISO/OVA. These options are not available for users on other platforms.Optional: Custom Pod and Service CIDR Ranges
Note
Do not provide a /16 subnet mask or any subnet range in this field. Only enter the individual IP address. The required /16 subnet range will be automatically applied by the bootstrap tool during configuration.opsramp-collector-start setup init --cluster-cidr <pod-cidr> --service-cidr <service-cidr>Note
If you do not specify these flags, the default CIDR ranges are:
- Cluster CIDR:
10.42.0.0/16 - Service CIDR:
10.43.0.0/16
Ensure custom CIDRs are within the/16subnet to maintain compatibility.
Note
You can update the CIDR only during the initial Kubernetes cluster setup. After Kubernetes installation, updating the CIDR is not supported. Similar to the hostname and IP address, do not change the CIDR configuration after Kubernetes has been installed. For reference, see Install Gateway Using ISO, which states: “Do not change the hostname and IP address after Kubernetes has been installed.”Step 2: Verifying Kubernetes Installation
root@node1:/home/gateway-admin# opsramp-collector-start setup init
Installing RKE2
Installed RKE2
CoreDNS is ready
Check the Kubernetes service status:
service rke2-server statusExpected output:
● rke2-server.service - Rancher Kubernetes Engine v2 (server)
     Loaded: loaded (/usr/local/lib/systemd/system/rke2-server.service; enabled; preset: enabled)
    Drop-In: /etc/systemd/system/rke2-server.service.d
             └─10-environment.conf
     Active: active (running) since Tue 2026-09-29 06:53:47 UTC; 5h 55min ago
 Invocation: 4f2994dbfaf74c1a86ca4b840b1079ea
       Docs: https://github.com/rancher/rke2#readme
    Process: 1920859 ExecCondition=/bin/sh -c if systemctl is-active --quiet rke2-agent.service; then echo "Error: rke2-agent is running!"; exit 1; fi (code=exited, status=0/SUCCESS)
    Process: 1920861 ExecStartPre=/sbin/modprobe br_netfilter (code=exited, status=0/SUCCESS)
    Process: 1920864 ExecStartPre=/sbin/modprobe overlay (code=exited, status=0/SUCCESS)
   Main PID: 1920867 (rke2)
Troubleshooting
If Kubernetes fails to install or the service is not in a running state:
- Review the installation logs.
- Review the Kubernetes service logs to identify the underlying error messages related to the issue (for example etcd timeouts, API server errors, or networking/plugin failures).
sudo journalctl -u rke2-server
Upon successful installation, you will see output similar to:
root@node1:/home/gateway-admin# opsramp-collector-start setup init
Installing K3s
Installed K3s
Check the Kubernetes service status:
service k3s statusExpected output:
● k3s.service - Lightweight Kubernetes
   Loaded: loaded (/etc/systemd/system/k3s.service; enabled; vendor preset: enabled)
   Active: active (running) since Thu 2025-04-24 11:12:21 UTC; 1min 10s ago
   Docs: https://k3s.io
   Process: 1931925 ExecStartPre=/sbin/modprobe br_netfilter (code=exited, status=0/SUCCESS)
   Process: 1931926 ExecStartPre=/sbin/modprobe overlay (code=exited, status=0/SUCCESS)
   Main PID: 1931927 (k3s-server)
Troubleshooting
If Kubernetes fails to install or the service is not in a running state:
- Review the installation logs.
- Check for registry access errors or YAML syntax issues in the registry configuration.
- Review the Kubernetes service logs to identify the underlying error messages related to the issue (for example etcd timeouts, API server errors, or networking/plugin failures).
sudo journalctl -u k3s
Initialize K8s Cluster
- Run the following command to open the Terminal UI:
opsramp-collector-start terminal-ui - Use Initialize K8s Cluster to install Kubernetes on the first node.
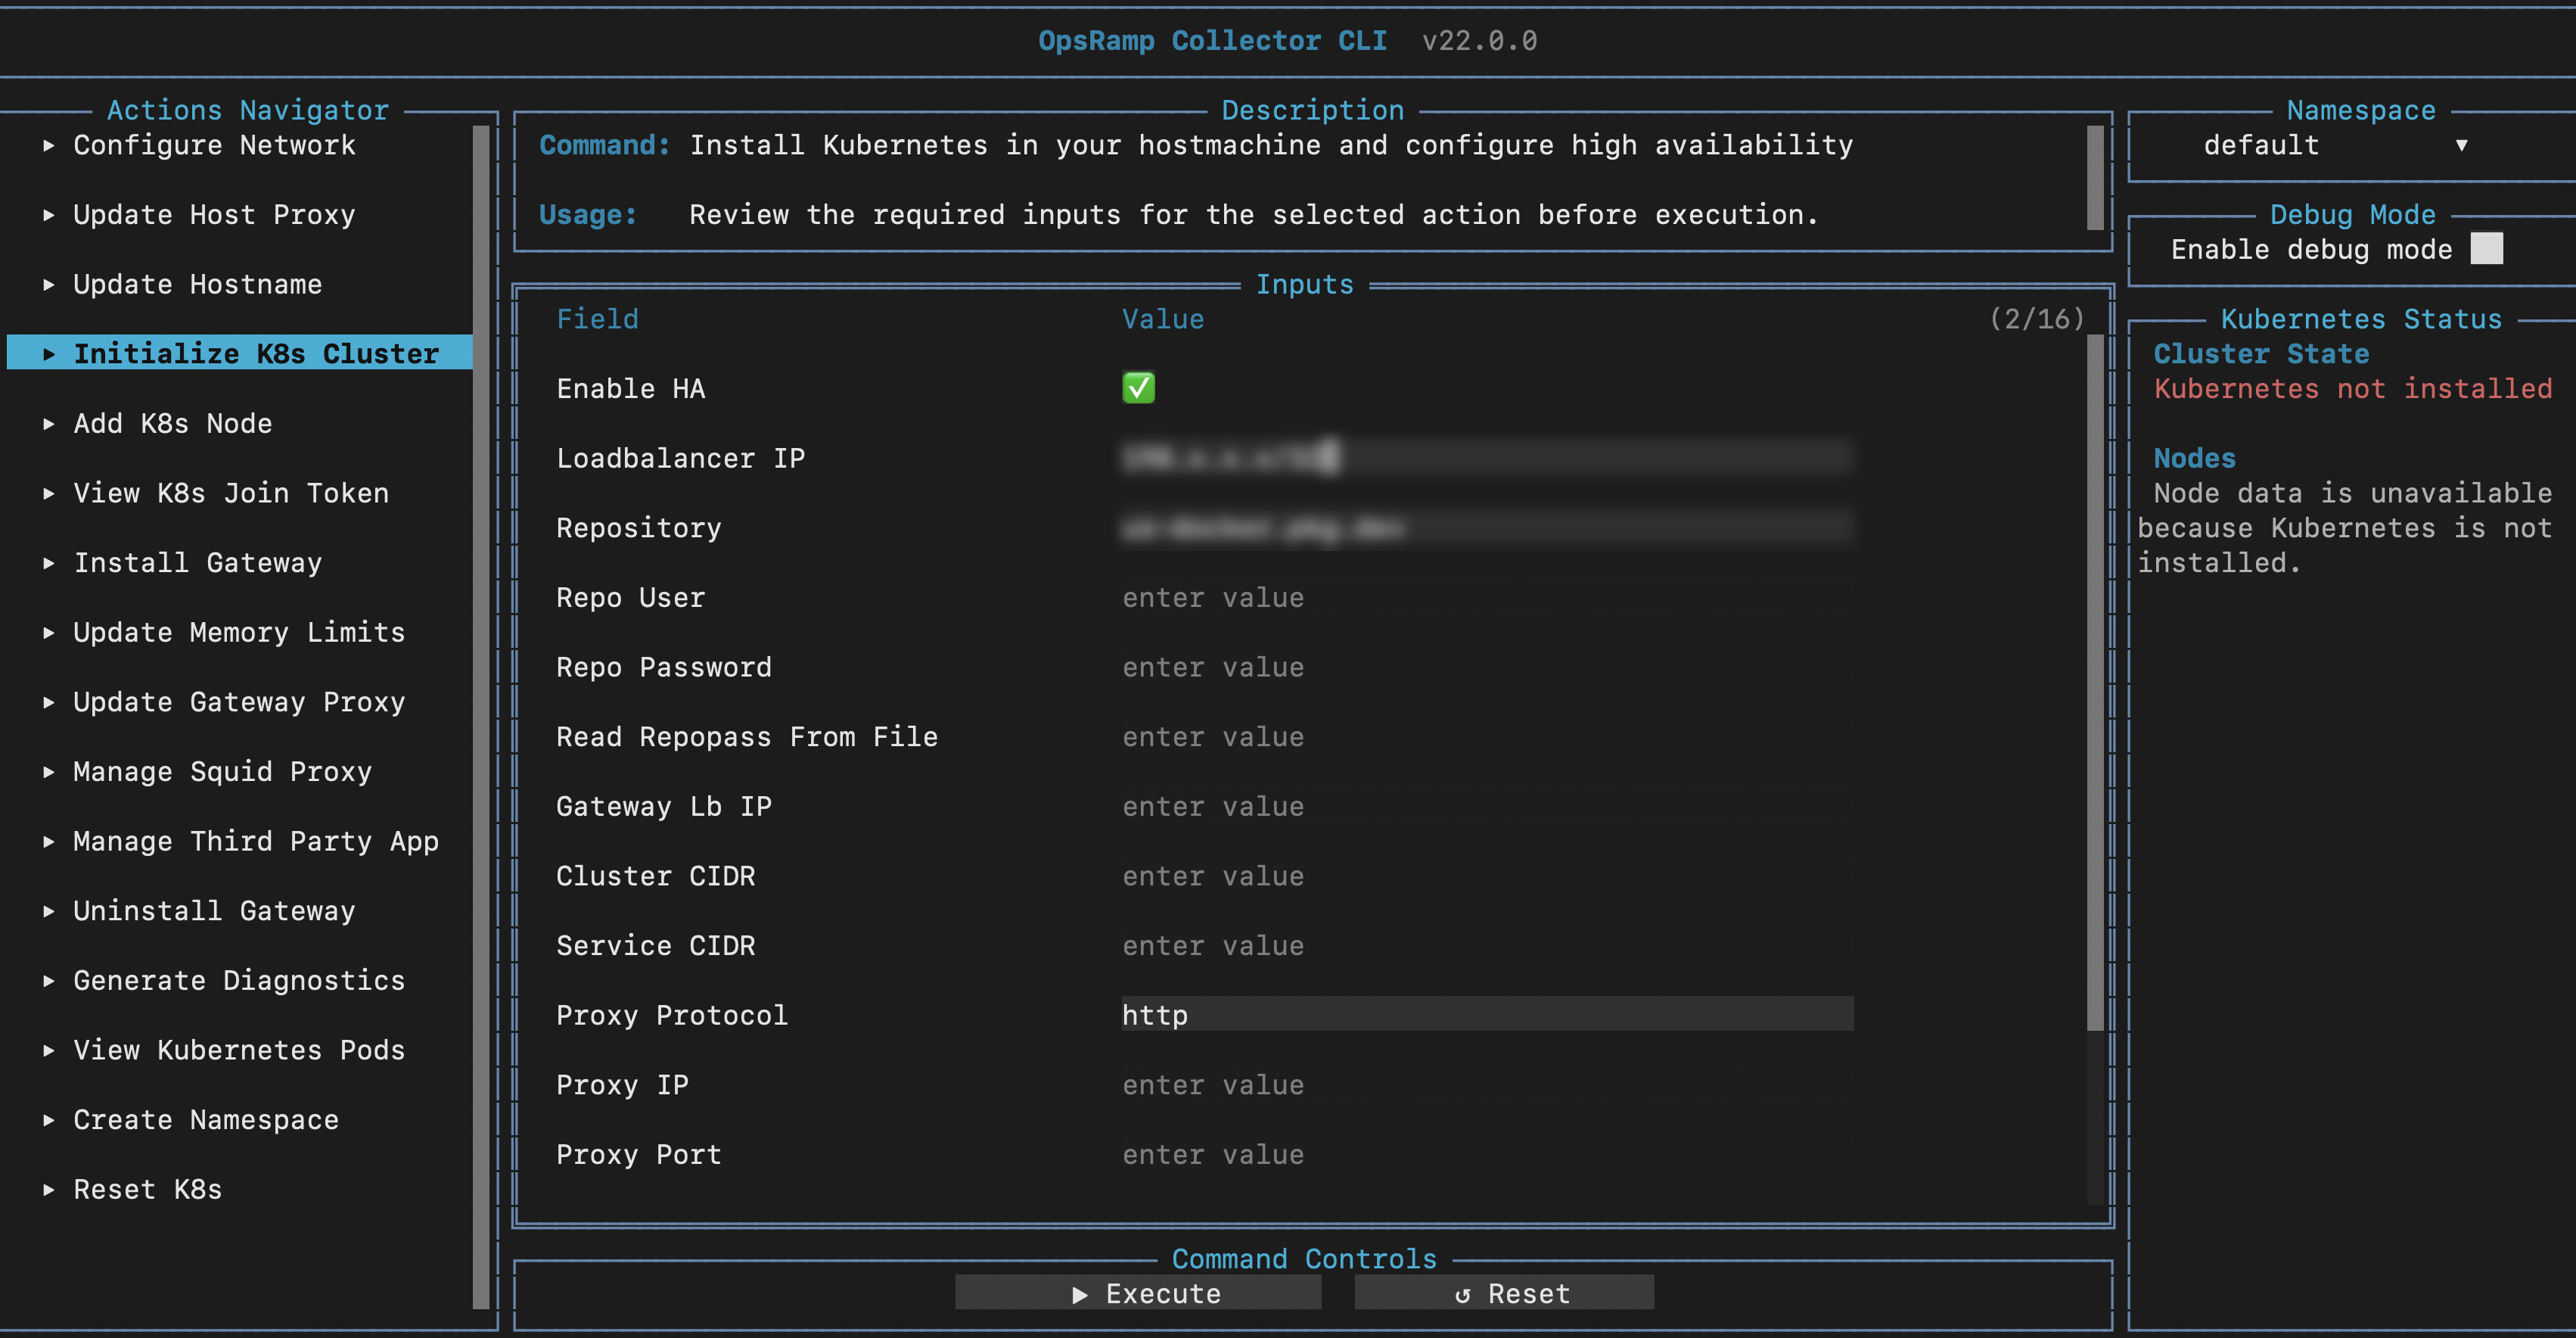
Field Description Enable HA Enables high-availability deployment. Loadbalancer IP Load balancer IP address for HA deployments. Repository Container image repository. Repo User Repository username. Repo Password Repository password. Read Repopass From File Reads the repository password from a file. Cluster CIDR Kubernetes cluster network CIDR. Service CIDR Kubernetes service network CIDR. Proxy Username Proxy Username Proxy Password Proxy Password Proxy Protocol Proxy protocol Proxy IP Proxy server IP address Proxy Port Proxy Port Skip Prechecks Skip Prechecks Container Attestation Enabled Container Attestation Enabled Load Balancer IP Configuration
The {
loadbalancerIp} parameter supports specifying single IPs, IP ranges, or CIDR blocks. Below are the supported formats and examples:IP-range Description Result Value 192.25.254.45/32 This is used to add single metallb IP 192.25.254.45 192.25.254.45/30 This is used to add 4 IPs from a given IP 192.25.254.44 - 192.25.254.47 192.25.254.44 - 192.25.254.49 This is used to add a custom range 192.25.254.44 - 192.25.254.49 Examples of {loadbalancerIp} Usage
- Single IP:
192.25.254.45/32 - CIDR block of 4 IPs:
192.25.254.45/30 - Custom IP range:
192.25.254.44-192.25.254.49 - Multiple IPs and ranges (comma-separated):
192.25.251.12/32,192.25.251.23/28,192.25.251.50-192.25.251.56
CIDR Range Configuration (Optional)
Select Execute to save the entered information.Note
Do not provide a /16 subnet mask or any subnet range in this field. Only enter the individual IP address. The required /16 subnet range will be automatically applied by the bootstrap tool during configuration. - Single IP:
- Press
ESCto close the Terminal UI.
Notes
- Additional fields may be available depending on deployment requirements.
- Repository credentials are required when using a private repository.
Step 1b: Adding Additional Nodes to the Cluster
After completing the setup of the first node, the next step is to add additional nodes to the existing Kubernetes cluster to achieve High Availability (HA).
Step i: View K8s Join Token
- Run the following command to open the Terminal UI:
opsramp-collector-start terminal-ui - Select View K8s Join Token to display the information required to add additional nodes.
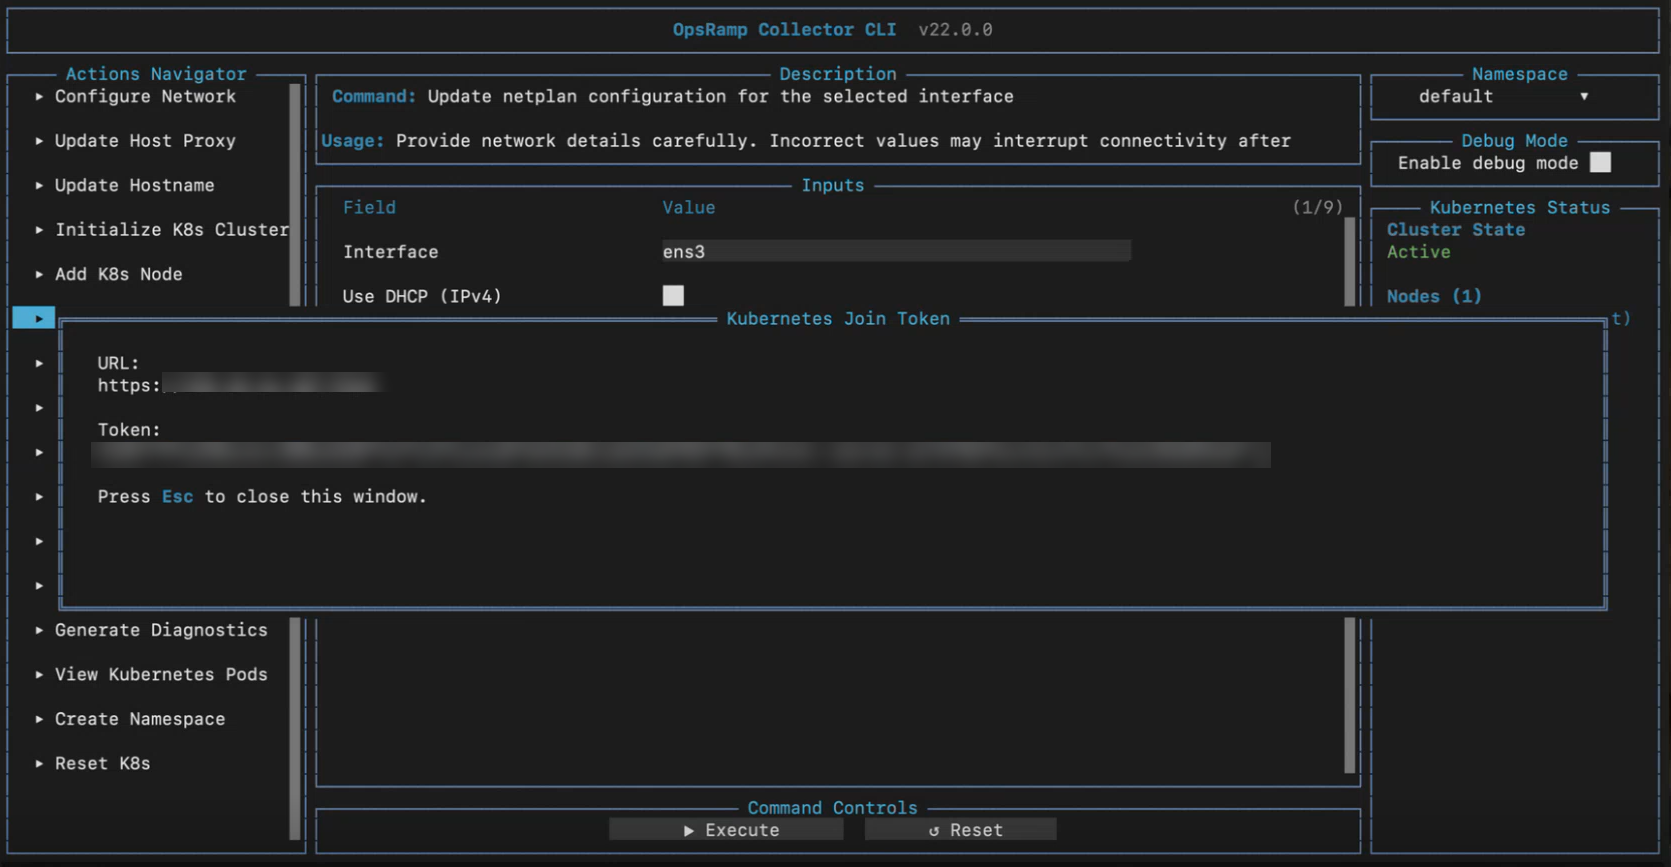
Select Execute to save the entered information.Field Description Kubernetes Cluster URL Cluster endpoint URL. Kubernetes Join Token Token required when joining a node to the cluster. - Press
ESCto close the Terminal UI.
Step ii: Add K8s Node
On each new node that you want to add, run the following command to join it to the existing cluster:
- Run the following command to open the Terminal UI:
opsramp-collector-start terminal-ui - Use Add K8s Node to join a node to an existing Kubernetes cluster.
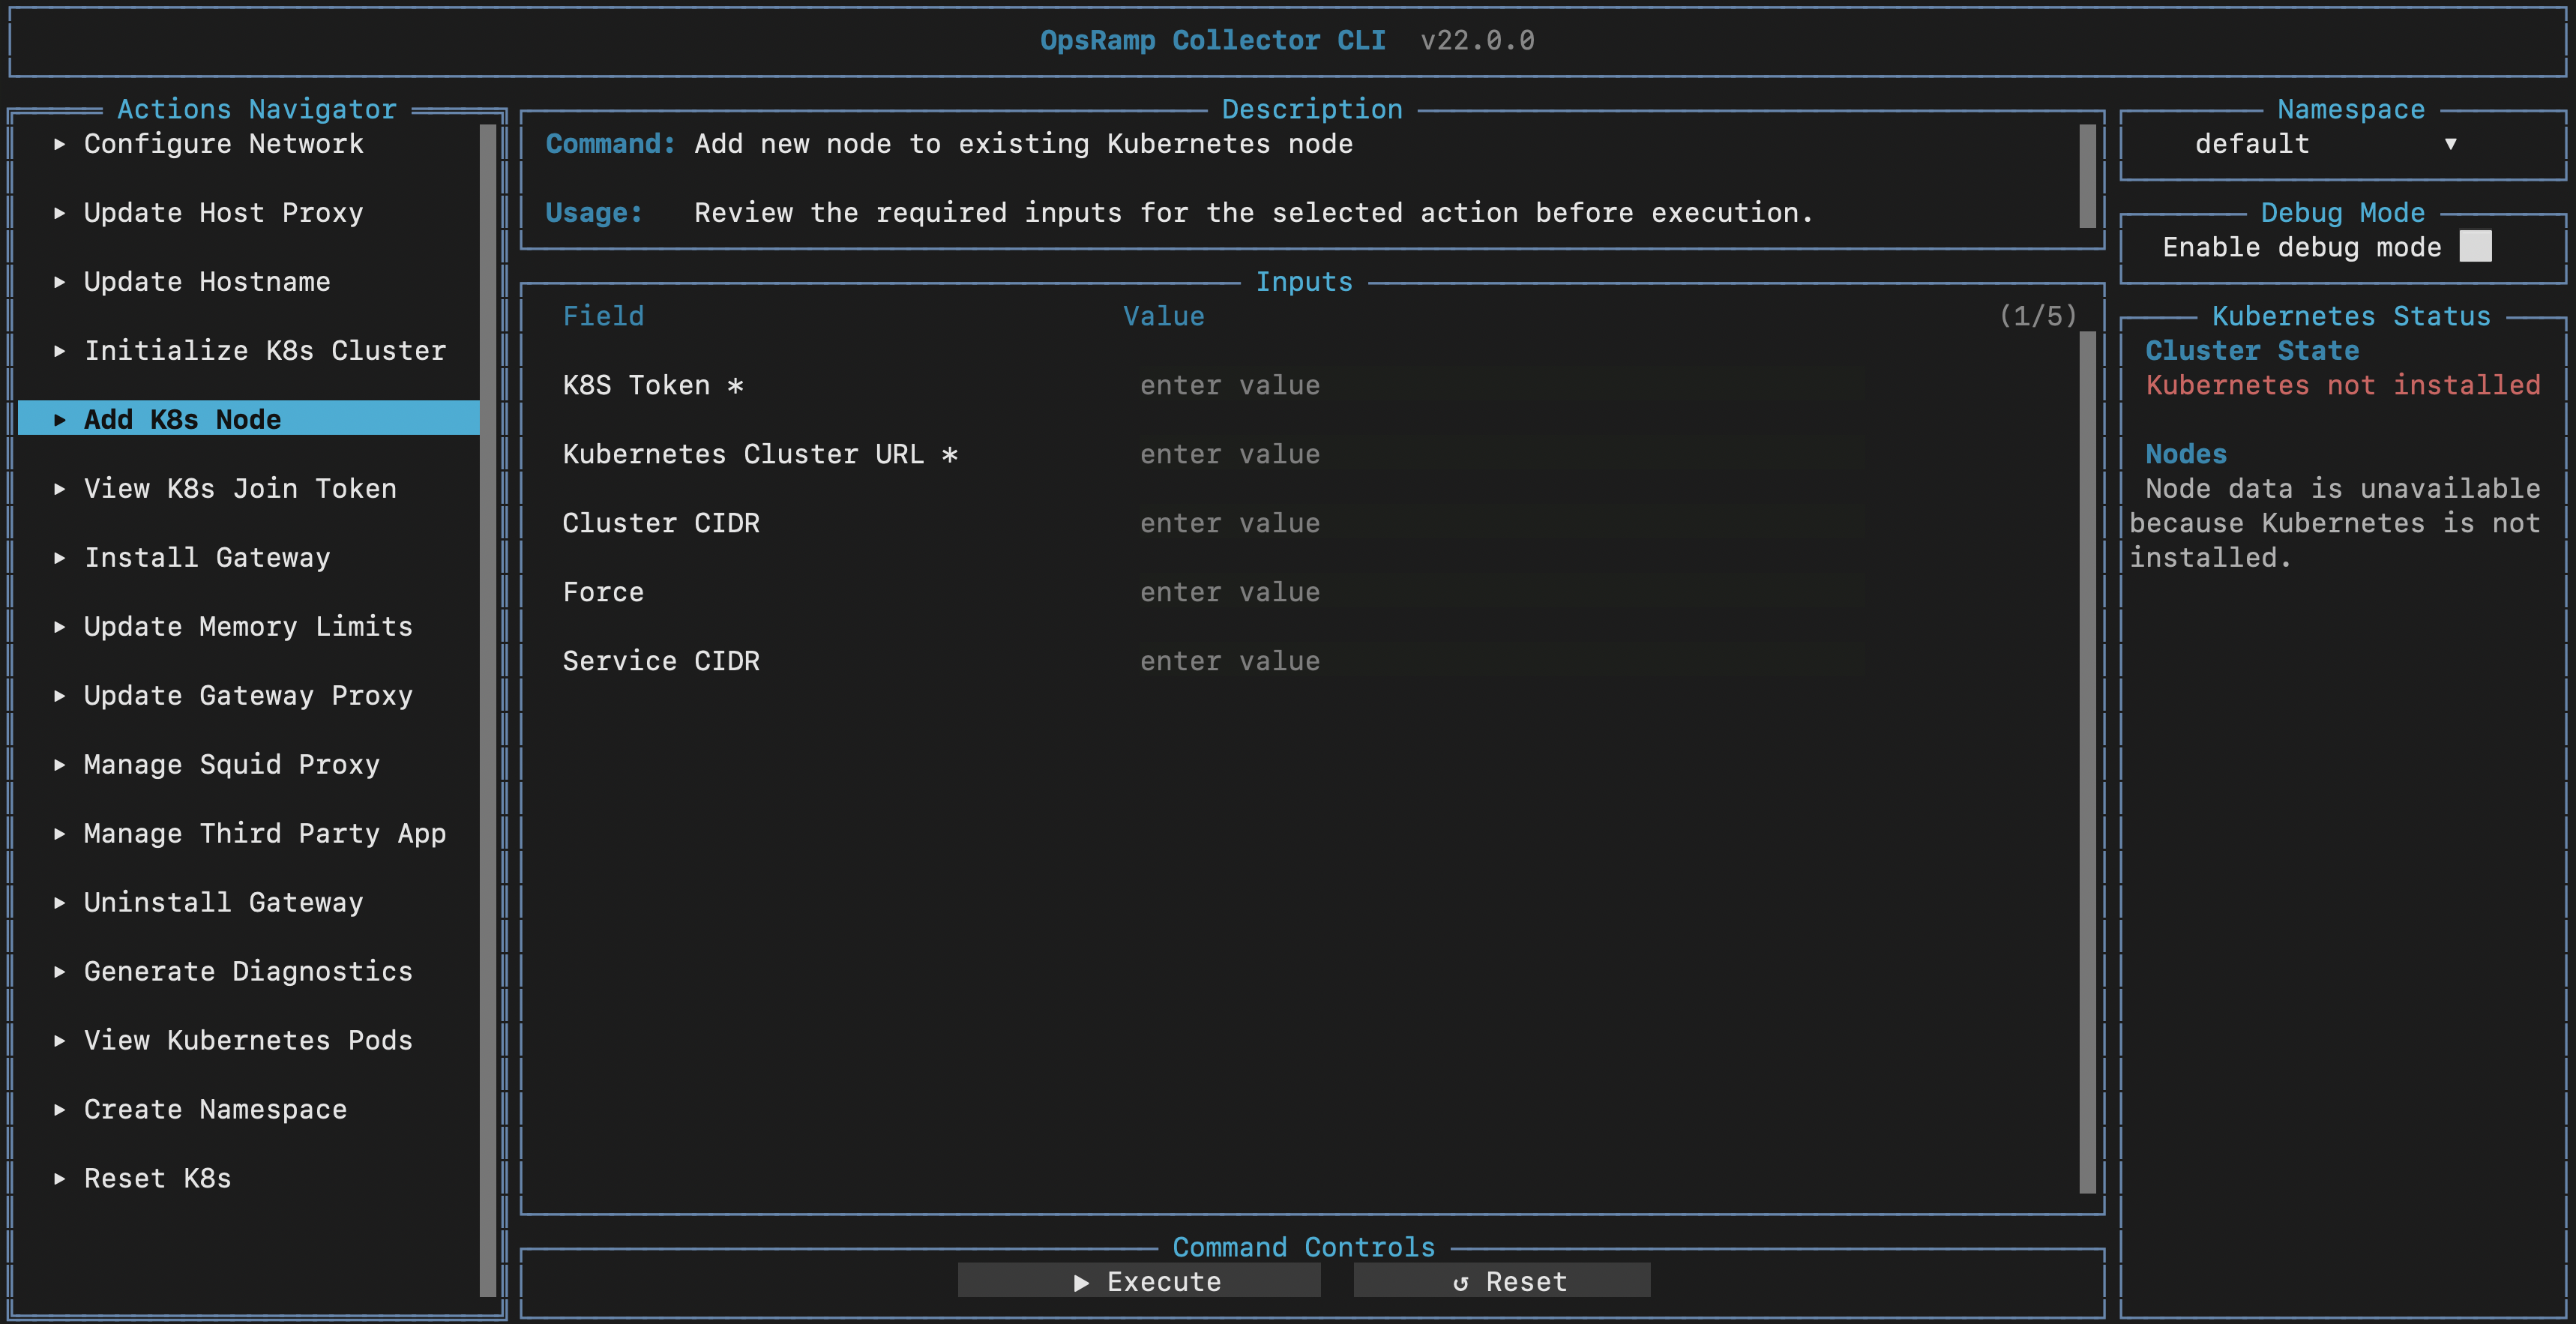
Select Execute to save the entered information.Field Description K8S Token Kubernetes join token. Kubernetes Cluster URL Cluster endpoint URL. Cluster CIDR Kubernetes cluster network CIDR. Service CIDR Kubernetes service network CIDR. Force Forces node join operation. - Press
ESCto close the Terminal UI.
Notes
- Obtain the token and cluster URL using View K8s Join Token.
- This command installs Kubernetes on the new node and joins it to the cluster.
Repeat Step i and Step ii for each additional node to build your HA cluster. For example,
- For a 3-node cluster, add the third node following the above steps.
- For a 5-node cluster, repeat the process on the third, fourth, and fifth nodes. Continue as needed for larger clusters.
Step 1: Installing Kubernetes
Step 1a: Initialize the First Node
To install Kubernetes and initialize the NextGen Gateway on the first node in an HA cluster, use the following command:
opsramp-collector-start setup init --enable-ha=true --loadbalancer-ip {loadbalancerIp}Load Balancer IP Configuration ({loadbalancerIp})
The {loadbalancerIp} parameter supports specifying single IPs, IP ranges, or CIDR blocks. Below are the supported formats and examples:
| IP-range | Description | Result Value |
|---|---|---|
| 192.25.254.45/32 | This is used to add single metallb IP | 192.25.254.45 |
| 192.25.254.45/30 | This is used to add 4 IPs from a given IP | 192.25.254.44 - 192.25.254.47 |
| 192.25.254.44 - 192.25.254.49 | This is used to add a custom range | 192.25.254.44 - 192.25.254.49 |
Examples of {loadbalancerIp} Usage
- Single IP:
--loadbalancer-ip 192.25.254.45/32 - CIDR block of 4 IPs:
--loadbalancer-ip 192.25.254.45/30 - Custom IP range:
--loadbalancer-ip 192.25.254.44-192.25.254.49 - Multiple IPs and ranges (comma-separated):
--loadbalancer-ip 192.25.251.12/32,192.25.251.23/28,192.25.251.50-192.25.251.56
CIDR Range Configuration (Optional)
Note
Do not provide a /16 subnet mask or any subnet range in this field. Only enter the individual IP address. The required /16 subnet range will be automatically applied by the bootstrap tool during configuration.If CIDR ranges are not specified during Kubernetes cluster setup, the following defaults will be applied:
- Cluster CIDR: 10.42.0.0/16
- Service CIDR: 10.43.0.0/16
To use custom CIDR ranges, include the –cluster-cidr and –service-cidr flags, ensuring the CIDRs fall within a /16 subnet:
opsramp-collector-start setup init --enable-ha=true --loadbalancer-ip {loadbalancerIp} --cluster-cidr <cluster-cidr-ip> --service-cidr <service-cidr-ip>
Step 1b: Adding Additional Nodes to the Cluster
After completing the setup of the first node, the next step is to add additional nodes to the existing Kubernetes cluster to achieve High Availability (HA).
Step i: Generate the Kubernetes Token on the First Node
Run the following command on the first node to generate the token required for joining new nodes to the cluster:
opsramp-collector-start setup node tokenStep ii: Add a New Node to the Cluster
On each new node that you want to add, run the following command to join it to the existing cluster:
opsramp-collector-start setup node add -u https://{NodeIp}:6443 -t {token}- Replace {NodeIp} with the IP address of the first node (the cluster master).
- Replace {token} with the token generated in Step 1.
This command installs Kubernetes on the new node and joins it to the cluster.
Step iii: Verify Node AdditionAfter joining the new node, verify that it has successfully been added by running this command on the first node or any node with access to the cluster:kubectl get nodes
kubectl get nodesSample Output:
NAME    STATUS   ROLES                       AGE     VERSION
node1   Ready    control-plane,etcd,master   8m3s    v1.23.5+k3s1
node2   Ready    control-plane,etcd,master   5m13s   v1.23.5+k3s1
Repeat Step i, Step ii, Step iii for each additional node to build your HA cluster. For example,
- For a 3-node cluster, add the third node following the above steps.
- For a 5-node cluster, repeat the process on the third, fourth, and fifth nodes.
- Continue as needed for larger clusters.
Step 2: Verify the Cluster Status
After adding all nodes to your High Availability (HA) cluster, verify that the Kubernetes environment is healthy and all essential components are running correctly.
Step 2a: Confirm Node Readiness
Ensure all nodes in the cluster are in a Ready state:
kubectl get nodesSample Output:
pgsql
CopyEdit
NAME    STATUS   ROLES                       AGE     VERSION
nodea   Ready    control-plane,etcd,master   8m3s    v1.23.5+k3s1
nodeb   Ready    control-plane,etcd,master   5m13s   v1.23.5+k3s1
nodec   Ready    control-plane,etcd,master   4m5s    v1.23.5+k3s1
Step 2b: Verify Helm Chart Deployments
Ensure required Helm-based services like Longhorn (for storage) and MetalLB (for load balancing) have been deployed successfully:
helm list -ASample Output:
NAME              NAMESPACE           REVISION    UPDATED                                    STATUS      CHART                  APP VERSION
ipaddresspool     kube-system         1           2025-07-09 07:10:34 +0000 UTC              deployed    ipaddresspool-2.0.0    1.16.0
longhorn          longhorn-system     1           2025-07-09 07:08:04 +0000 UTC              deployed    longhorn-1.6.2         v1.6.1
metallb           kube-system         1           2025-07-09 07:07:59 +0000 UTC              deployed    metallb-6.3.6          0.14.5
Note
ipaddresspool: Manages IP allocations for MetalLB and load balancing in the Kubernetes cluster.longhorn: Provides distributed block storage for persistent volumes across the cluster.metallb: Handles external IP allocation and load balancer services.
Ensure the STATUS is deployed for all charts. If any chart is missing or in a failed state, re-check your deployment steps or logs for errors.
Step 2c: Check Pod Status Across All Namespaces
Verify that all pods are in a Running state and all containers within them are Ready:
kubectl get pods -ASample Output:
NAMESPACE         NAME                                        READY   STATUS    RESTARTS   AGEdefault           nextgen-gw-0                                4/4     Running   0          23hdefault           stan-0                                      2/2     Running   0          23h
kube-system       coredns-d76bd69b-n8jhh                      1/1     Running   0          23h
kube-system       metallb-controller-7954c9c84d-pm89k         1/1     Running   0          23h
kube-system       metallb-speaker-j69tp                       1/1     Running   0          23h
kube-system       metallb-speaker-mddqj                       1/1     Running   0          23h
kube-system       metallb-speaker-n45g4                       1/1     Running   0          23h
kube-system       metrics-server-7cd5fcb6b7-tvnps             1/1     Running   0          23h
longhorn-system   csi-attacher-76c9f797d7-2jg5w               1/1     Running   0          23h
longhorn-system   csi-attacher-76c9f797d7-qhs85               1/1     Running   0          23h
longhorn-system   csi-attacher-76c9f797d7-qn9pr               1/1     Running   0          23h
longhorn-system   csi-provisioner-b749dbdf9-chjs9             1/1     Running   0          23h
longhorn-system   csi-provisioner-b749dbdf9-hbwx2             1/1     Running   0          23h
Note
All pods should show aSTATUS of Running and READY columns like 1/1, 2/2, or 4/4, indicating all containers within the pod are active.