The NextGen Gateway can be deployed using multiple approaches depending on your infrastructure requirements. You can either use the OpsRamp-provided ISO or OVA for a simplified deployment experience, or deploy the gateway on an existing Kubernetes cluster or a custom Kubernetes environment created using the OpsRamp Bootstrap Tool.
This document provides guidance for deploying the NextGen Gateway when you choose a Kubernetes-based setup instead of the ISO or OVA method.
Note
- The OpsRamp Bootstrap Tool is bundled with the OpsRamp-provided ISO and OVA images, so no additional download is required when using those deployment options.
- For non-ISO/OVA-based Kubernetes clusters, you must download the OpsRamp Bootstrap Tool separately from the OpsRamp UI before starting the deployment.
OpsRamp Collector Bootstrap Tool Overview
The OpsRamp Collector Bootstrap tool is a lightweight and flexible utility designed to simplify and automate the initial (day-0) deployment of OpsRamp’s collector technologies, including the Agent and Gateway across diverse IT environments. It supports a wide range of infrastructure types, such as bare-metal, virtual machines, and cloud-native environments, running on various Linux distributions, whether on-premises or in the public cloud.
Prerequisites
- Ensure the Kubernetes and Helm installed before registration.
- Ensure these prerequisites are met before starting the gateway registration process.
- Have network access to the OpsRamp SaaS platform, either directly or via your proxy.
- Ensure you have the OpsRamp Bootstrap Tool installed and configured on your system.
- For proxy connections, verify that the proxy server details and credentials are correct and accessible.
Note
- When installing the Gateway and registering it with the OpsRamp SaaS platform using the
opsramp-collector-startbinary, the latest version of the NextGen Gateway is deployed by default from the OpsRamp repository. - If you prefer to install a specific version, you can do so by using the
–helmchart-version(or-V) flag during the installation process. Here is the list of available Helm Chart Versions - To avoid deployment issues, ensure that the version of the opsramp-collector-start binary matches the version of the Helm chart specified with the
–helmchart-version(or-V) flag. Version mismatches may lead to installation failures or unexpected behavior.
To get started, you must first download the appropriate binary for your operating system - Linux, macOS, or Windows. Using a straightforward command-line interface (CLI), you can initiate the installation process with a single command.
Note
If you are using the ISO/OVA image, the OpsRamp Collector Bootstrap tool is already included. You do not need to download the bootstrap tool separately.Download the Collector Bootstrap Tool
You can download the Collector Bootstrap Tool to any machine (such as your laptop) for convenience. However, for successful installation and registration, you must execute the tool on the same host where the collector will ultimately run.
Click here to view the steps for downloading the Collector Bootstrap Tool.
- In the OpsRamp portal, select your client from All Clients.
- Navigate to Setup > Account > Collector Profile.
- On the COLLECTOR PROFILES page, click + ADD.

On the configuration page, enter the following details:
- Profile Name: Provide a name for the profile you are creating.
- Profile Type: Select either Standard or Elastic. By default, Standard is selected.
To enable the Elastic option, please contact OpsRamp Support Team. For more information on this feature, refer to the Elastic Collector Profile document. - Description: Add a short description for the profile. (Optional)
- Gateway Collector: Select the CLOUD-NATIVE APPLICATION (INSTALLER) NEXTGEN tile.
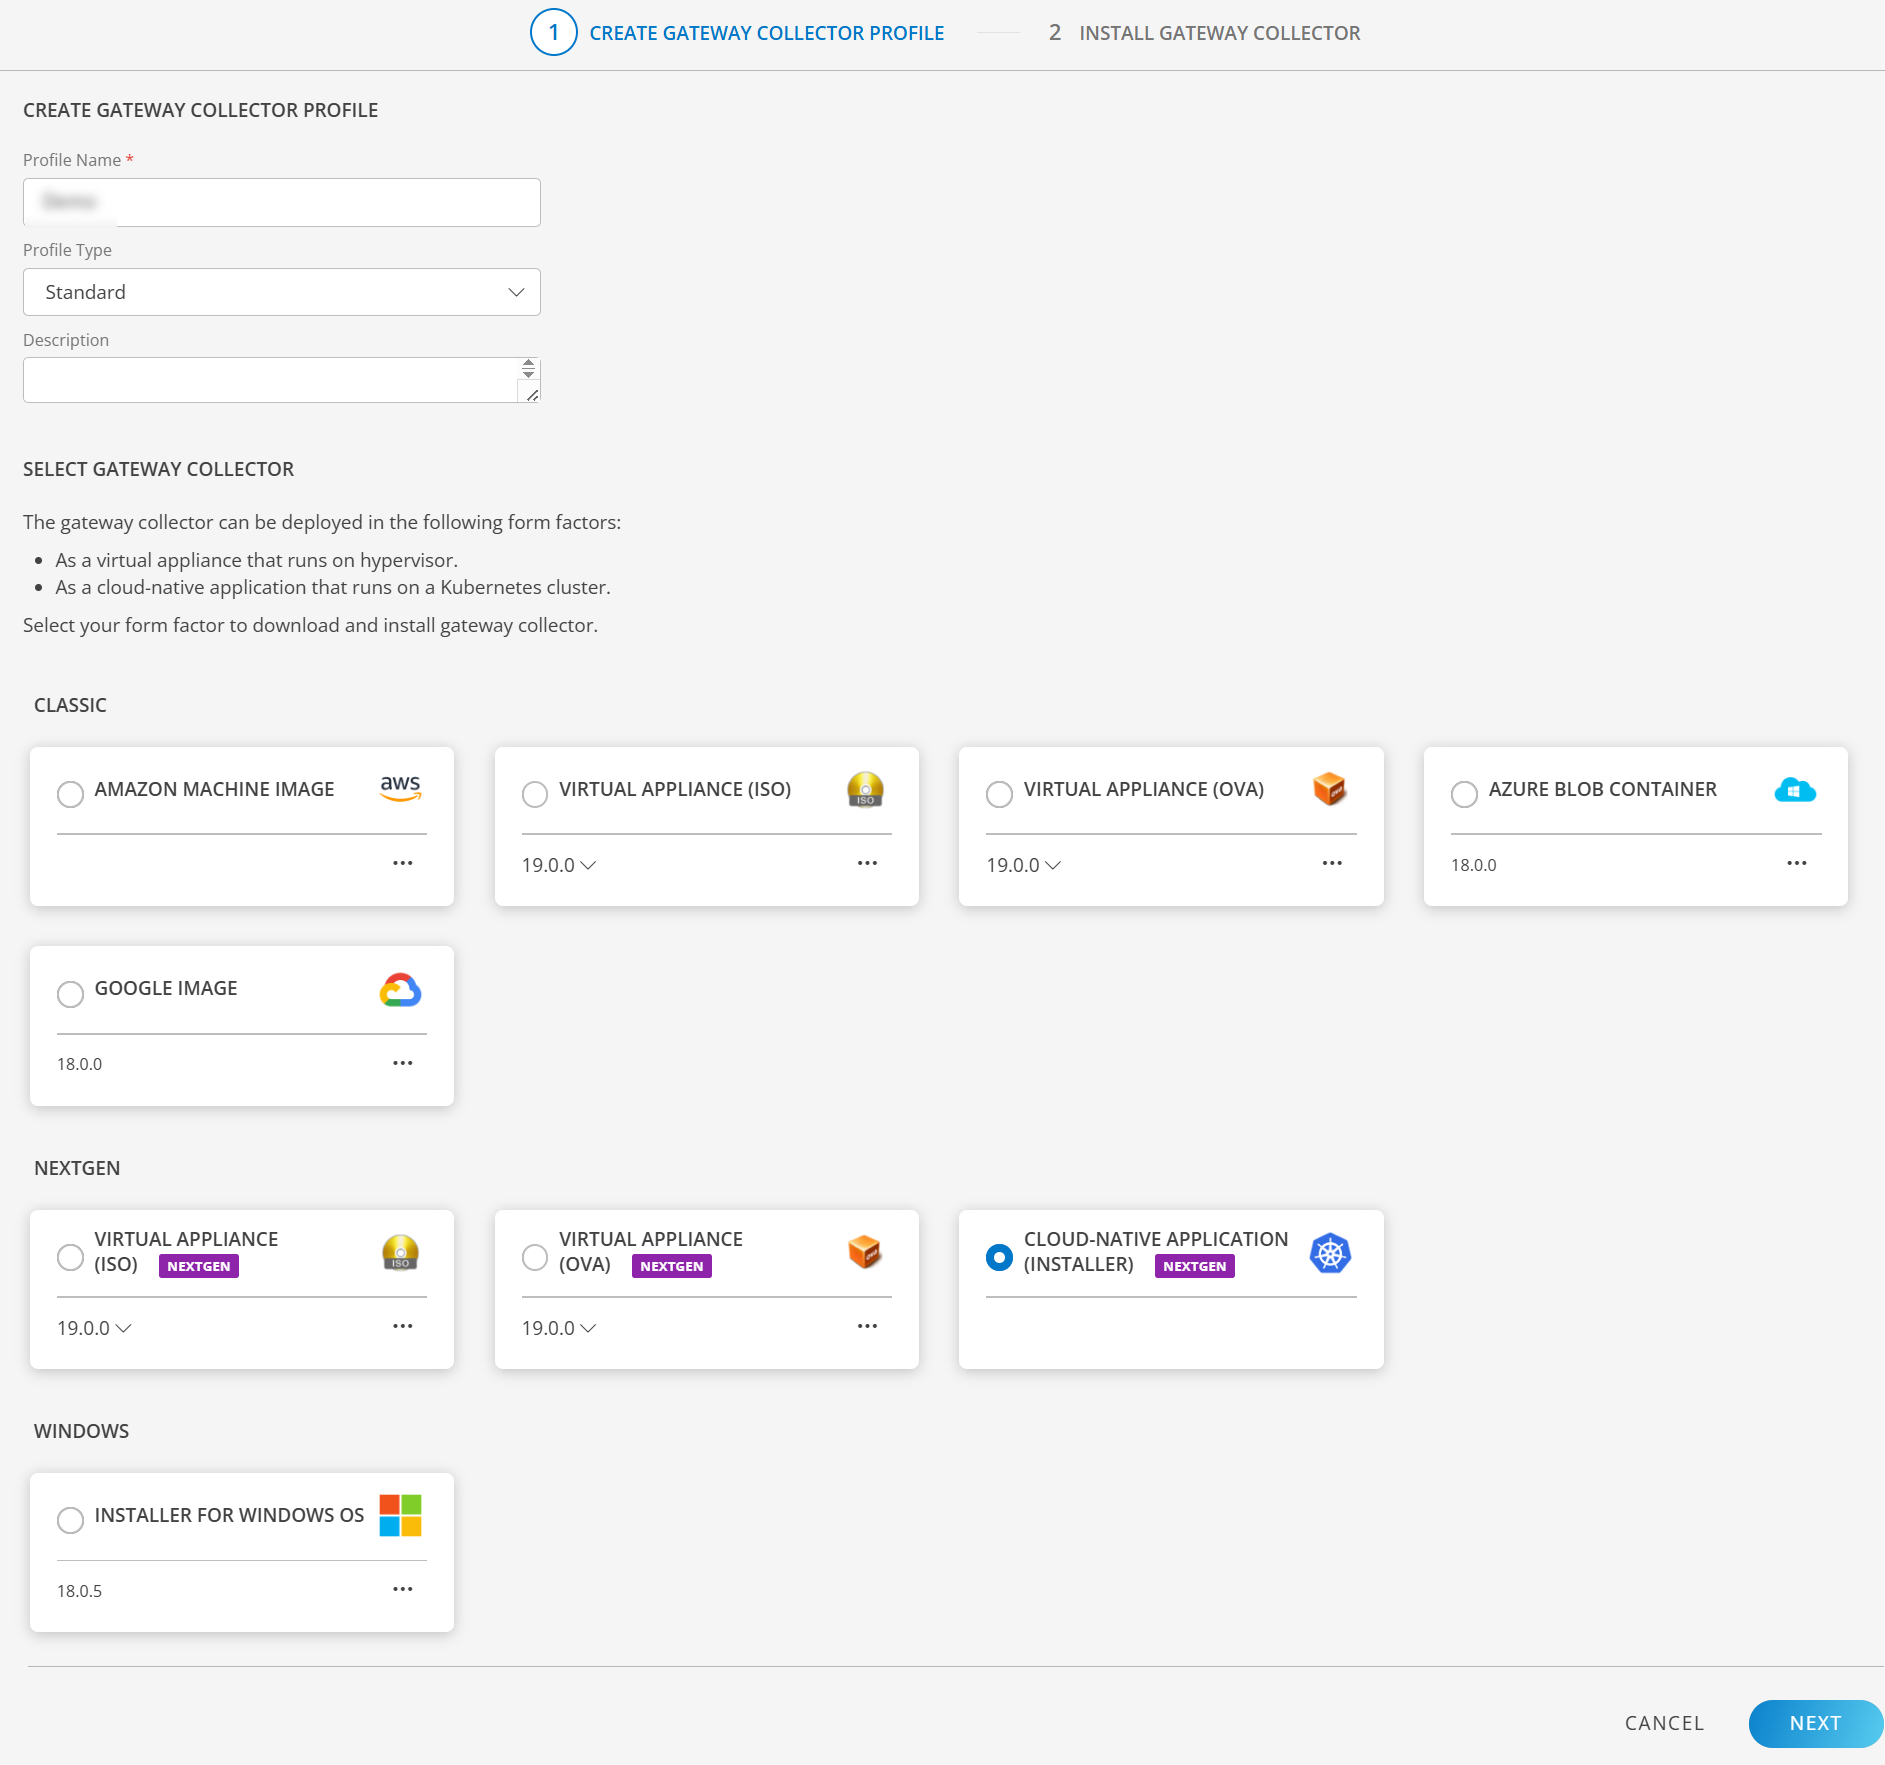
Click NEXT. The instructions page appears.
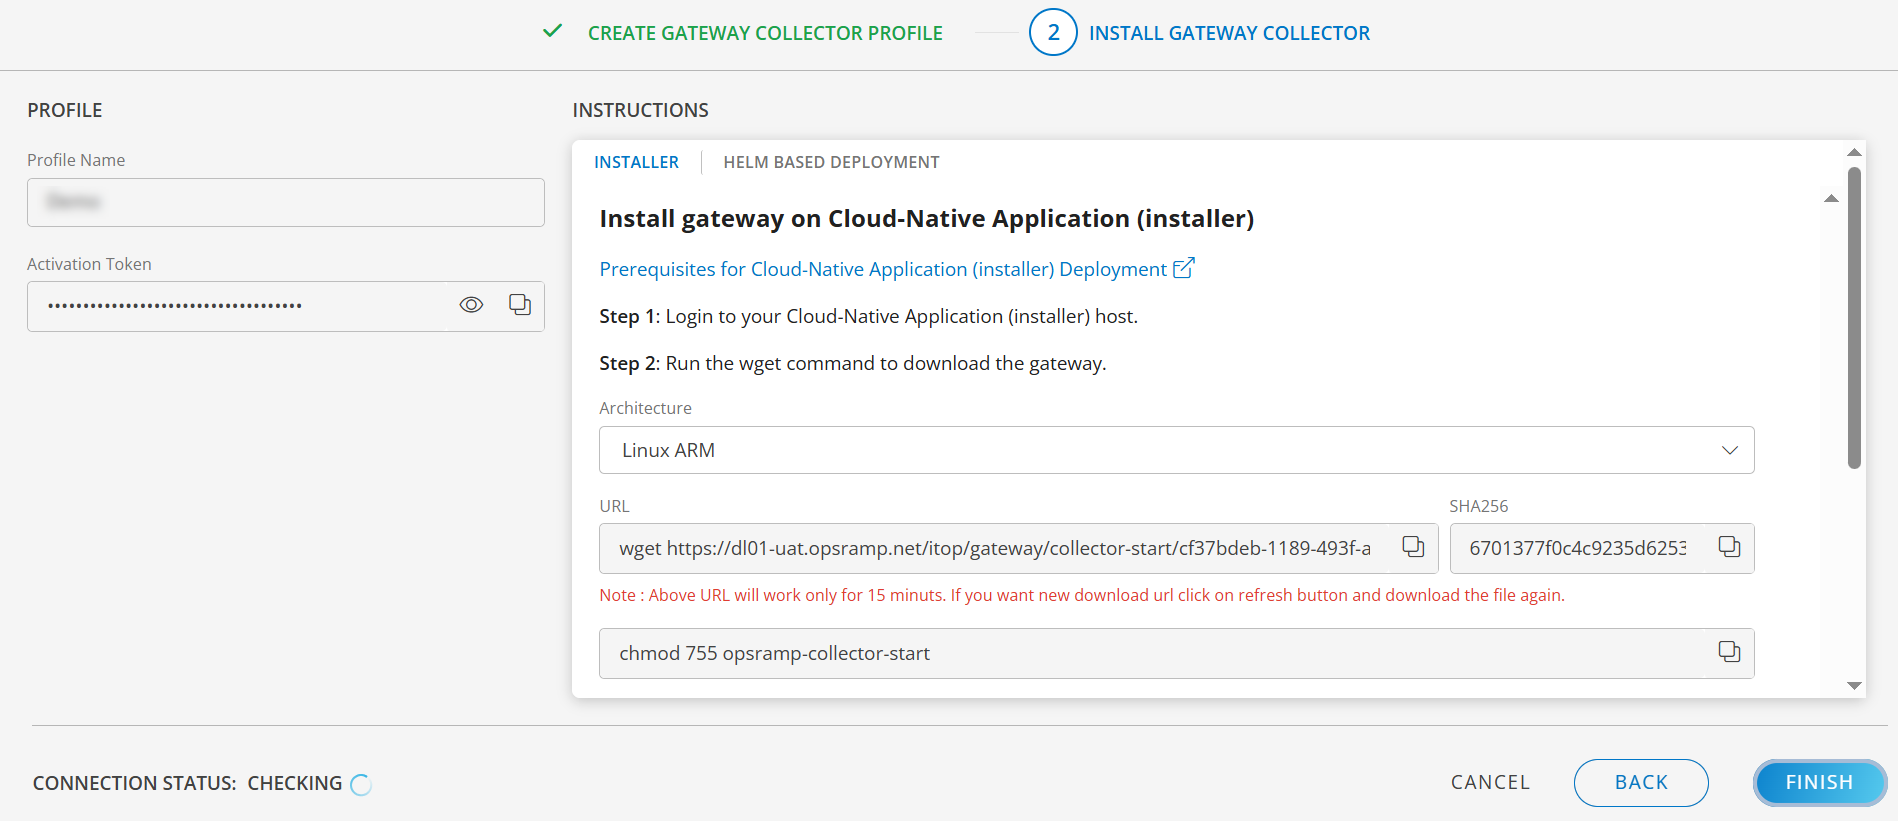
- Login to your Cloud-Native Application (installer) host.
- Select the Architecture from below:
- Linux ARM
- Linux AMD
- Mac ARM
- Mac AMD
- Windows AMD
- Run the wget command provided on the instruction page to download the Gateway. The command varies based on the selected architecture.
Note
The URL is valid for 15 minutes. Click the refresh button to generate a new download link if needed. - Run the commands provided on the instruction page to register the Gateway.
- Use the following command to check the bootstrap tool version.
Sample Response:opsramp-collector-start --versionroot@node1:/home/gateway-admin# opsramp-collector-start --version opsramp-collector-start version 19.0.0
Available Commands
| Commands | Description |
|---|---|
| install | Download and register the collector (agent, gateway) |
| uninstall | Unregister and delete the collector |
| setup | Setup kubernetes and high availability |
Note
The setup command is available only when using the OpsRamp-provided ISO/OVA. If you are not using the OpsRamp-provided ISO/OVA, the command will not be visible, and you will need to set up your own Kubernetes cluster manually.Create a Namespace (optional)
- Run the following command to open the Terminal UI:
opsramp-collector-start terminal-ui - Select Create Namespace to create one or more Kubernetes namespaces.
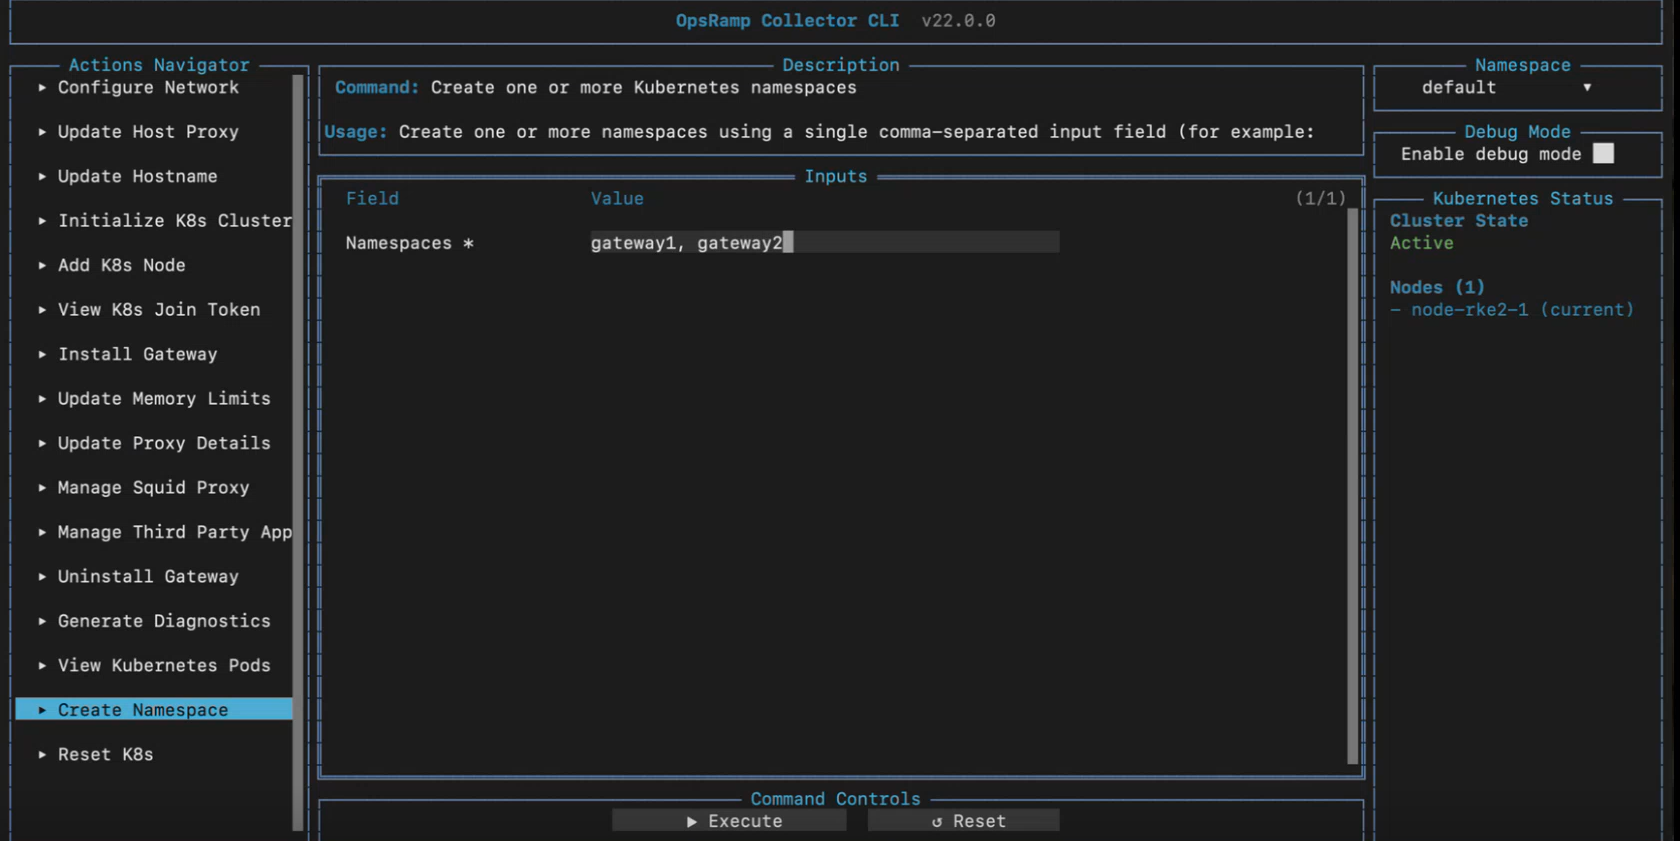
Field Description Namespaces Enter one or more namespace names, separated by commas. Select Execute to save the entered information.Note
You can create multiple namespaces using Create Namespace. After creating the namespaces, select the required namespace from the drop-down list in the upper-right corner. - Press
ESCto close the Terminal UI.
You can create the required namespace by running the following command:
kubectl create namespace <namespace-name>Example:
kubectl create namespace gateway1Verify that the namespace was created successfully:
kubectl get namespacesNote: The above step is optional. If you don’t want to create a custom namespace, you can skip it. If you don’t specify a namespace, the Gateway will be installed in the default namespace.
Installation and Registration Steps
Step 1: Get the activation token
To find the Activation Token, navigate to Setup > Account > Collector Profiles.
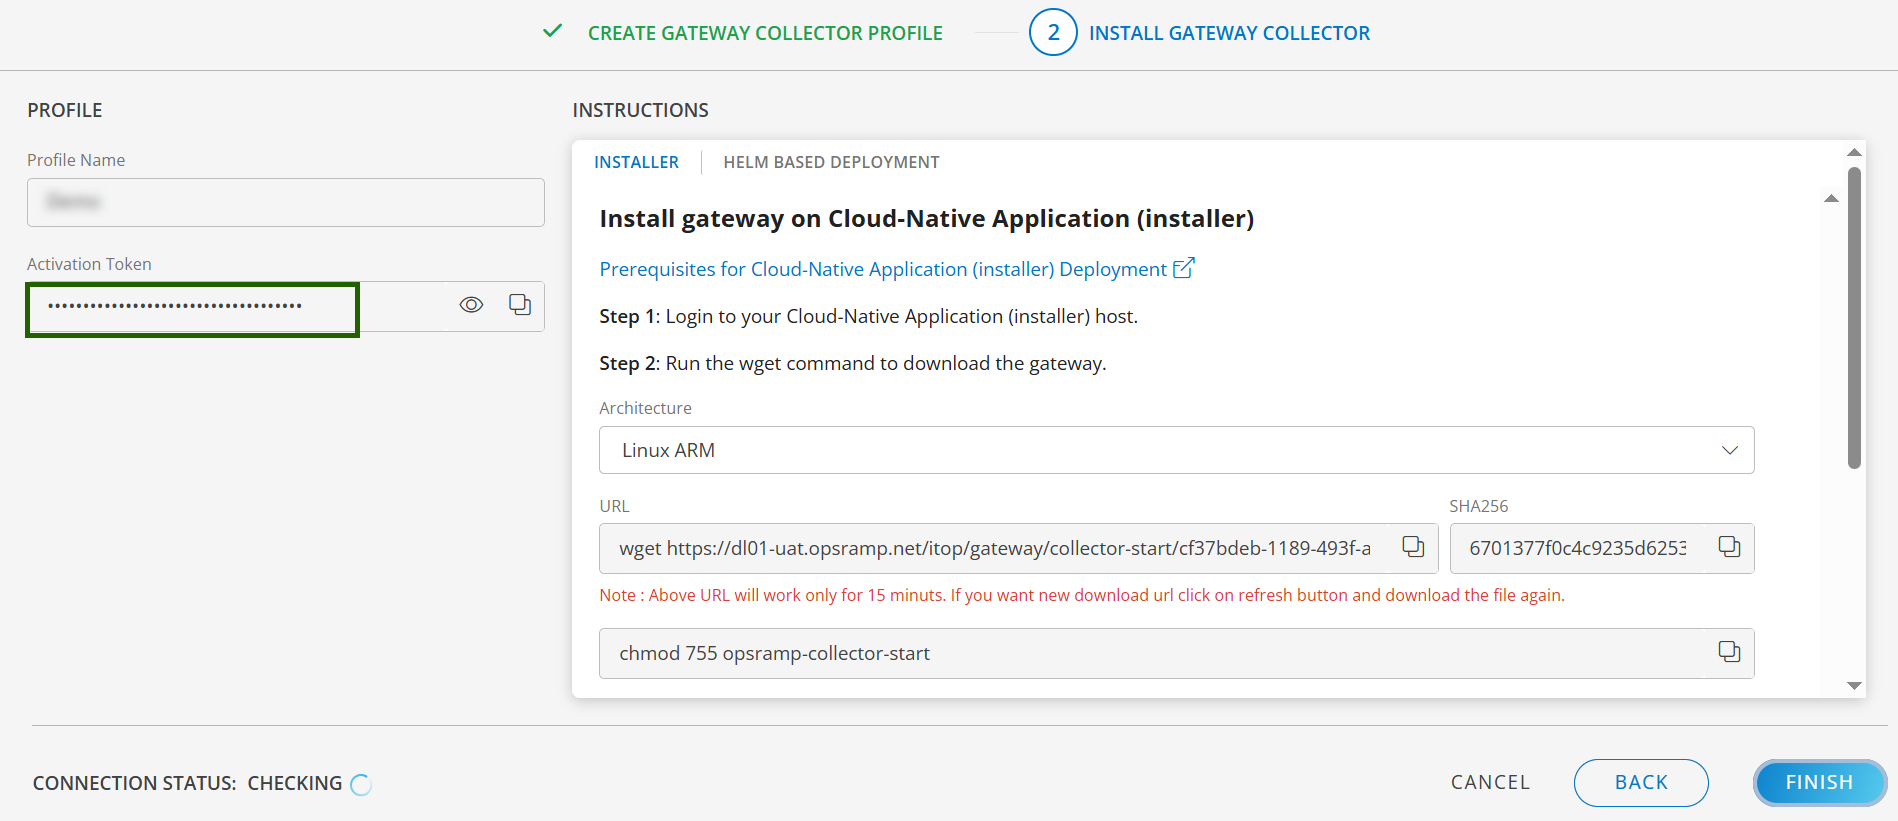
Step 2: Configure Sensitive Data Using Kubernetes Secrets (Optional)
Starting with Gateway 22.0.0, the NextGen Gateway Helm chart supports retrieving sensitive configuration values from Kubernetes Secrets. This helps secure gateway registration and proxy credentials without storing them in plaintext in Helm values files, Git repositories, or deployment pipelines.
Benefits
- Protects sensitive credentials from being exposed in Helm chart values files.
- Reduces the risk of exposing credentials through deployment commands and configuration reviews.
- Allows sensitive configuration to be managed separately from the Helm chart.
- Maintains compatibility with existing Helm-based deployments.
Supported Secret Keys
The NextGen Gateway Helm chart supports the following secret keys:
| Setting | Secret Key | Description |
|---|---|---|
| Gateway registration | API_SERVER | OpsRamp API server URL |
| Gateway registration | ACTIVATION_KEY | Gateway activation key |
| Proxy | PROXY_IP | Proxy server IP address |
| Proxy | PROXY_PORT | Proxy server port |
| Proxy | PROXY_USERNAME | Proxy user name |
| Proxy | PROXY_PASSWORD | Proxy password |
| Proxy | PROXY_PROTOCOL | Proxy protocol |
| Proxy | PROXY_CONNECTION_TYPE | Proxy connection type |
Note
Important: Secret keys must use the exact names shown in the table.Prerequisites
Before installing the Helm chart:
- Create the target Kubernetes namespace.
- Create the Kubernetes Secret that contains the sensitive values.
- Ensure the Secret exists in the same namespace where you deploy the Gateway.
Create a Kubernetes Secret
Create a Secret containing the Gateway registration and proxy configuration values. Replace the placeholders with values from your environment.
kubectl create secret generic gw-credentials \
  --from-literal=API_SERVER=<api-server-url> \
  --from-literal=ACTIVATION_KEY=<activation-key> \
  --from-literal=PROXY_IP=<proxy-ip> \
  --from-literal=PROXY_PORT=<proxy-port> \
  --from-literal=PROXY_USERNAME=<proxy-username> \
  --from-literal=PROXY_PASSWORD=<proxy-password> \
  --from-literal=PROXY_PROTOCOL=<proxy-protocol> \
  --from-literal=PROXY_CONNECTION_TYPE=<connection-type> \
  -n <namespace>
Configure Image Pull Secrets for Private Registries
When container images are stored in a private registry, configure Kubernetes image pull Secrets.
Create an Image Pull Secret
kubectl create secret docker-registry <secret-name> \
  --docker-server=<registry-url> \
  --docker-username=<username> \
  --docker-password=<password> \
  -n <namespace>
Reference the Image Pull Secret During Installation
helm install <release-name> <chart-path> \
  --set imagePullSecrets[0].name=<secret-name> \
  -n <namespace>
The Helm chart uses the specified image pull Secret to authenticate with the container registry before pulling Gateway images.
Security Considerations
OpsRamp recommends using Kubernetes Secrets for production deployments. Secrets help avoid storing sensitive credentials in source control, prevent sensitive values from appearing in Helm installation commands, and improve alignment with organizational security and compliance requirements.
Note
- The Kubernetes Secret and the Gateway deployment must be created in the same namespace.
- Secret-based configuration is recommended for production environments.
- If a value is defined in both a Secret and Helm values, the Secret value takes precedence.
- Replace all placeholders enclosed in angle brackets (
<>) with values from your environment. - Configure image registry credentials using
imagePullSecretsinstead of storing them in Helm values.
Step 3: Install and Register NextGen Gateway
- Run the following command to open the Terminal UI:
opsramp-collector-start terminal-ui - Select Install Gateway to deploy and register an OpsRamp Gateway.
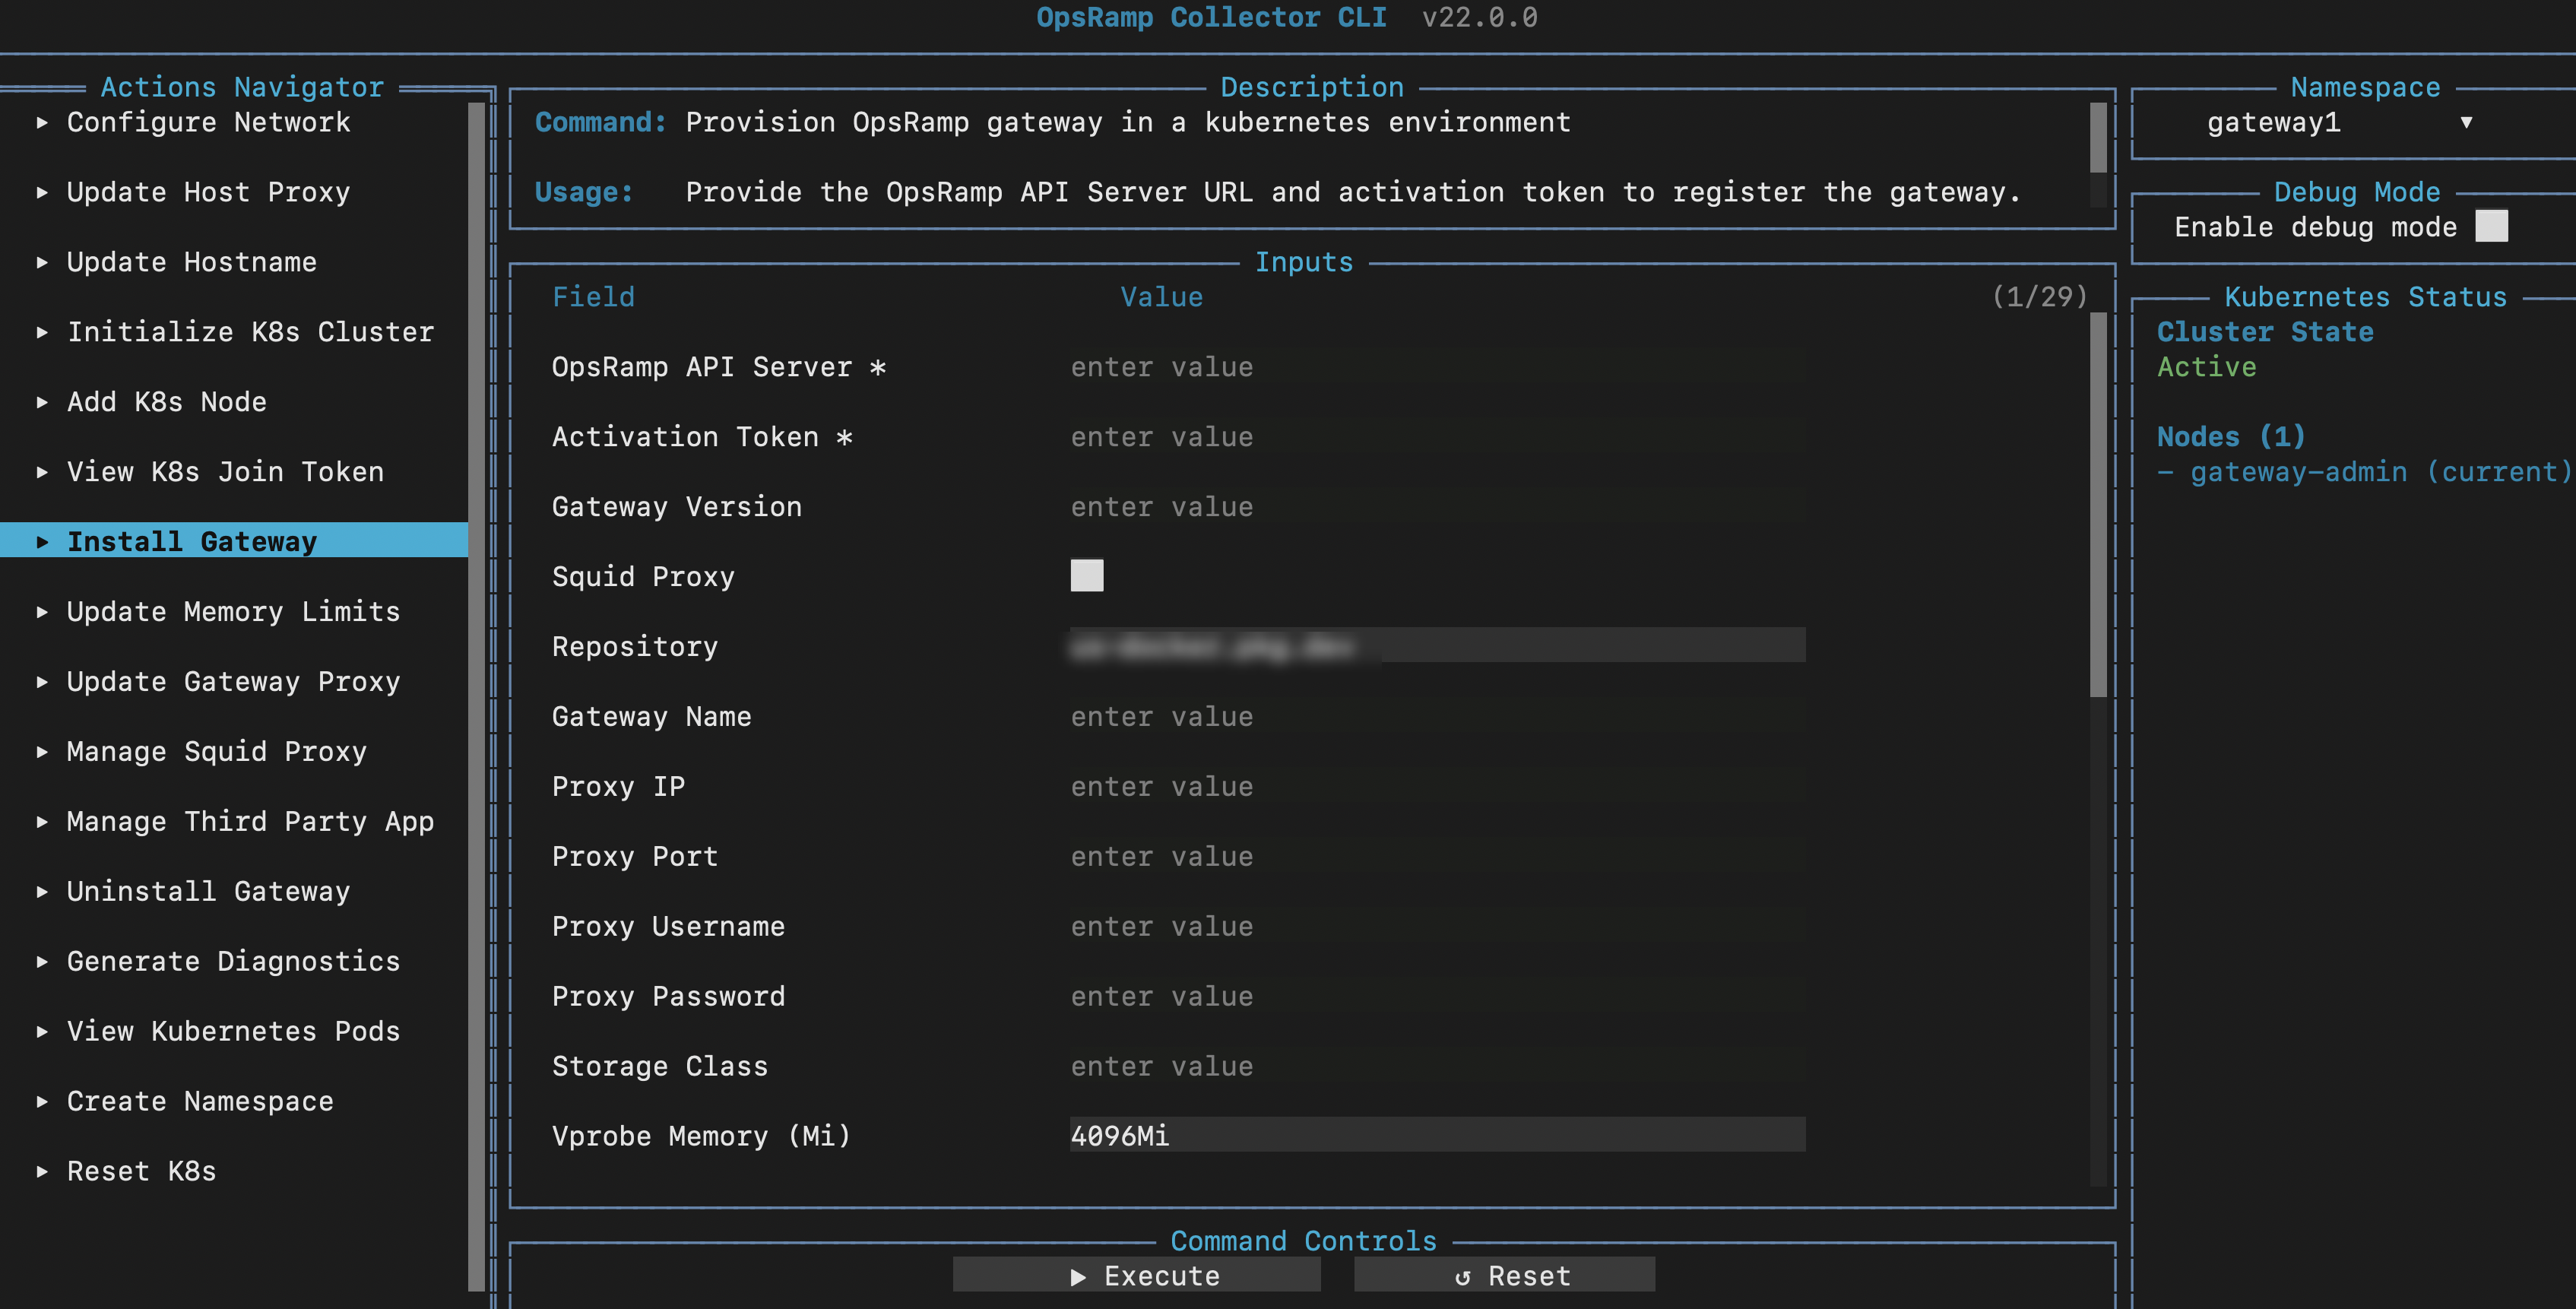
Select Execute to save the entered information.Field Description (Required) OpsRamp API Server OpsRamp platform URL. (Required) Activation Token Registration token. Gateway Version Gateway version to deploy. Repository Container image repository. Repo User Repository username. Repo Password Repository password. Read Repopass From File Reads repository password from a file. Proxy Protocol Proxy protocol. Proxy IP Proxy server IP address. Proxy Port Proxy server port. Proxy Username Proxy username. Proxy Password Proxy password. Storage Class Kubernetes storage class. Cluster Name Kubernetes cluster name. Gateway Name Gateway instance name. Cloud Provider Cloud platform identifier. Credentials Secret Kubernetes secret containing credentials. Registration Config Registration configuration. Config Additional configuration parameters. Webprobe Version Webprobe version. Squid Proxy Enables Squid proxy during installation. Third Party App Enables third-party application integration. Skip Prechecks Skips installation prechecks. - Press
ESCto close the Terminal UI.
Option 1: Registering the NextGen Gateway with direct connection
View details.
Use the OpsRamp Bootstrap Tool for registration. The basic command format is:opsramp-collector-start install --url {OpsRamp Server URL} --key {Gateway unique authentication token}Sample Response
root@node1:/home/gateway-admin# opsramp-collector-start install --url uat.opsramp.net --key 28128ba2-72de-4f92-8c79-362c778d1a6e
System requirements check passed ✔
Repository check passed ✔
Coredns status check passed ✔
Opsramp cloud checks passed ✔
Gateway registration pre-checks passed ✔
Installing Agent
Pulled: us-docker.pkg.dev/opsramp-registry/gateway-cluster-charts/opsramp-nextgen-agent:2.0.0
Digest: sha256:3a445c9d58d4571c03483b1f8bdc85bf0526f21b1774c9554e3d4660a44ceafe
NAME: opsramp-nextgen-agent
LAST DEPLOYED: Thu Apr 24 10:33:30 2025
NAMESPACE: default
STATUS: deployed
REVISION: 1
TEST SUITE: None
Pulled: us-docker.pkg.dev/opsramp-registry/gateway-cluster-charts/nextgen-gw:19.0.0
Digest: sha256:2c4d4fa75d2cbaecc442613b3c9a6cecab2162680cd17d3e01c5ecbd27c5143e
NAME: nextgen-gw
LAST DEPLOYED: Thu Apr 24 10:33:34 2025
NAMESPACE: default
STATUS: deployed
REVISION: 1
TEST SUITE: None
OpsRamp gateway installed successfully
Option 2: Registering NextGen Gateway with proxy connection
View details.
For security reasons, you might not be allowed to permit direct outbound connections from your internal network. Instead, you can configure proxy servers within your environment to control and monitor external access.- All third-party tools and users, including OpsRamp Gateways, must connect to the internet through these proxies.
- Because OpsRamp Gateways are deployed within your environment, any communication with the OpsRamp Cloud must go through the proxy. If you have a proxy in place, use the appropriate command to register the Gateway via the proxy during installation.
- The examples below show how you can register a Gateway using a proxy. Once installed, the
opsramp-collector-starttool will attempt to register the Gateway through your specified proxy server. - The tool supports registration using a proxy with or without authentication credentials, as shown in the examples.
Register through proxy with credentials
opsramp-collector-start install --url {OpsRamp Server URL} --key {Gateway unique authentication token} --proxy-protocol {Proxy Protocol http/https} --proxy-ip {Proxy IP Address} --proxy-port {Proxy Port} --proxy-username {Proxy Username} --proxy-password {Proxy Password}Register through proxy without credentials
opsramp-collector-start install --url {OpsRamp Server URL} --key {Gateway unique authentication token} --proxy-protocol {Proxy Protocol http/https} --proxy-ip {Proxy IP Address} --proxy-port {Proxy Port}Option 3: Registering NextGen Gateway using yaml config file
View details.
Specifying multiple flags during Gateway registration can be cumbersome, especially if your environment requires complex configurations.To simplify this process, you can register the NextGen Gateway using a YAML configuration file. This approach lets you define all required registration parameters in a single file, eliminating the need to pass multiple command-line flags.
With the YAML method, you can:
- Set memory limits for the Gateway pod
- Provide SNMP trap v3 credentials
- Customize other environment-specific settings
To complete the registration process using the YAML method, follow these steps:
Create a YAML file using the sample provided below, incorporating the necessary modifications as required.
Sample YAMLconfig: squid-proxy: disable third-party-app: disable proxy: proxy-protocol: proxy-ip: proxy-port: proxy-username: proxy-password: helmchart-version: 1.6.0 repo: repository: repo-user: repo-password: read-repopass-from-file: gateway-name: storage-class: #Pass the snmp_v3 credentials in below format. Put 2 spaces under the "snmp_trap_v3_credentials" and pass the keys after those spaces (spaces are for yaml intonations) #snmp_trap_v3_credentials: |- # key1 # key2 # key3 # Refer https://docs.opsramp.com/platform-features/feature-guides/monitoring-using-snmp-traps/#configure-snmp-v3-traps for more details on configuring SNMP credentials. snmp_trap_v3_credentials: |- vprobe: resources: limits: memory: "5096Mi" nativebridge: resources: limits: memory: "500Mi" squid: resources: limits: memory: "500Mi" postgres: resources: limits: memory: "1024Mi" global: SingleLBController: "enable", "disable" #Add service types based the requirement and if the servicetype is not passed then by default gateway will use LoadBalancer serviceType. #Use either LoadBalancer or Cluster-IP types. squidproxy-servicetype: "LoadBalancer" gateway-servicetype: "LoadBalancer" trafficDirectorMode: disable webprobeVersion: 21.0.0Save above YAML file with ‘registration.yaml’.
Specify the path to the ‘registration.yaml’ file in the following command to complete the Gateway registration.
opsramp-collector-start install --url {OpsRamp Server URL} --key {Gateway unique authentication token} --registration-config {registration.yaml file path}
Example
opsramp-collector-start install --url uat.opsramp.net --key 2e245f6b-0056-4ad3-84e7-1553f42af1be --registration-config /home/gateway-admin/registration.yamlThe install commands in the above options performs several key tasks:
- Validates the host environment where the collector will run.
- Automates previously manual steps like authentication and registration with the OpsRamp cloud platform.
- Customizing resource settings, such as memory limits for the Gateway pod.
- Optionally, it can also trigger automatic infrastructure discovery, with no extra configuration needed on the cloud side.
By consolidating setup steps into a single command, the Bootstrap tool streamlines the onboarding process, saving time and reducing the chance of errors.
Available Flags
View details.
| Flags | Description |
|---|---|
| --cloud-provider | Specifies the cloud provider for the gateway installation. Supported values: AWS, GCP, AZURE, OCI. |
| --cluster-name | Specifies the name of the Kubernetes cluster. This name will be displayed in the gateway interface. |
| --config (-c) | Specifies the initial discovery configuration file for the Gateway installation. |
| --debug | Enables debug logging for troubleshooting purposes. Default is false. |
| --gateway-name (-N) | Specifies the display name for the Gateway in the management profile. |
| --helmchart-version (-V) | Specifies the version of the Helm chart to deploy in the Kubernetes environment. |
| --help (-h) | Displays help information for installation. |
| --key (-k) | Specifies the unique authentication token required for Gateway registration. |
| --namespace (-n) | Specifies the Kubernetes namespace for Gateway deployment. Default is default. |
| --proxy-ip (-i) | Specifies the IP address of the proxy server used for Gateway registration and communication. |
| --proxy-password (-P) | Specifies the password for the proxy server used during Gateway registration and communication. |
| --proxy-port (-p) | Specifies the port number of the proxy server used for Gateway registration and communication. |
| --proxy-protocol (-r) | Specifies the protocol used by the proxy server for Gateway registration and communication. |
| --proxy-username (-U) | Specifies the username for authenticating with the proxy server during Gateway registration and communication. |
| --read-repopass-from-file (-f) | Specifies a file path from which to read the repository password for authentication during Gateway installation. |
| --registration-config (-F) | Specifies the path to a YAML configuration file containing registration parameters for the Gateway installation. |
| --repo-password (-s) | Specifies the password for authenticating with the custom repository during Gateway installation. |
| --repo-user (-a) | Specifies the username for authenticating with the custom repository during Gateway installation. |
| --repository (-R) | Specifies the custom repository URL from which to pull Helm charts and container images during Gateway installation. |
| --skip-prechecks | Skips environment and system prechecks during Gateway registration. Accepts true or false. Default is false. |
| --squid-proxy (-S) | Enables or disables the Squid proxy service for Gateway registration. Supported values: enable or disable. |
| --storage-class (-C) | Specifies the Kubernetes storage class to use for dynamic provisioning of persistent volumes required by the Gateway. |
| --third-party-app (-t) | Enables or disables integration with third-party applications during Gateway installation. Supported values: enable or disable. |
| --url (-u) | Specifies the OpsRamp SaaS platform URL for Gateway registration and communication. |
| --webprobe-version (-w) | Specifies the version of the Synthetics (WebProbe) component to deploy in the Kubernetes environment. |
| --useSingleLBController | Enables or disables the use of a single load balancer controller for the Gateway. Set to true to use a single controller, or false to use multiple controllers. Supported values: true or false. |
Step 4: Verify for Successful Gateway Registration
After a successful deployment, the Gateway runs as one or more pods within the Kubernetes cluster. To check the status of the Gateway pod, run the following command:
kubectl get pods -n <namespace>Note
If you do not specify a namespace during Gateway registration, the opsramp-collector-start binary will deploy the Gateway in the default Kubernetes namespace.
- If the Gateway is deployed in the default namespace, specifying the namespace in the
kubectlget pods command is optional. - If the Gateway is deployed in a custom namespace, you must include the
-n < namespace >flag when running the command to check the pod status.
Sample Response
root@node1:/home/gateway-admin# kubectl get pods
NAME                        READY   STATUS    RESTARTS   AGE
nextgen-gw-0                3/3     Running   0          2m52s
nextgen-gw-redis-master-0   1/1     Running   0          2m52s
Note
After deployment, ensure that all Gateway pods reach the Running state and that all containers within each pod show a Ready status (e.g., 3/3, 1/1).
- It may take 3 to 5 minutes for the pods to enter the Running state, depending on your network bandwidth, as Kubernetes will pull the required Docker images from the OpsRamp registry. These images can be several gigabytes in size, depending on your cluster setup.
- Once the pod is running, it may take an additional 1 to 2 minutes for all containers within the pod to reach the Ready state. Monitoring pod and container status ensures the Gateway is fully operational before proceeding with further configuration.
Once the gateway-related pods are deployed in your Kubernetes cluster and all pods are in the Running and Ready state, the gateway establishes a secure connection to the OpsRamp Cloud. To verify the gateway connectivity status:
- Log in to the OpsRamp Portal.
- Navigate to Setup > Account > Collector Profiles.
- Confirm that your gateway is listed and shows as connected.
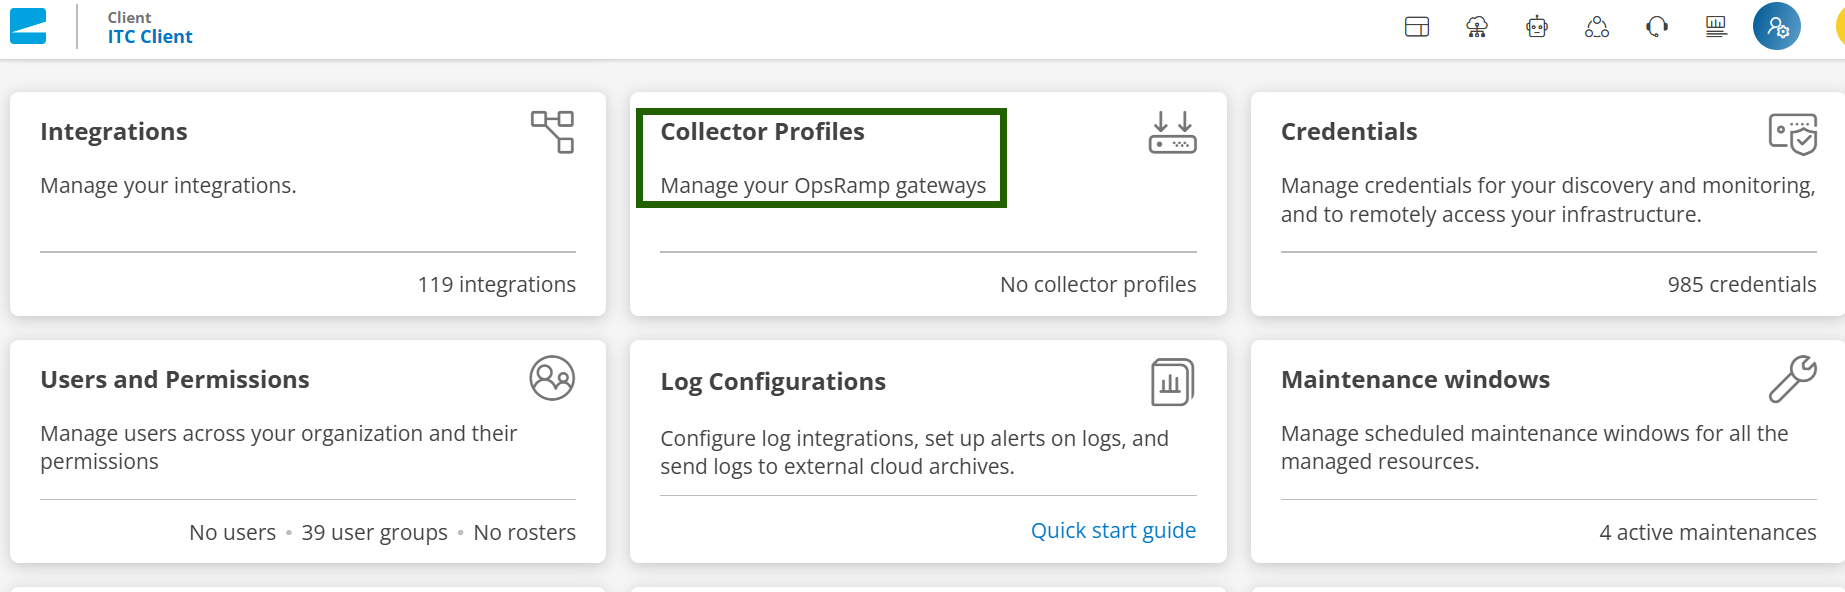
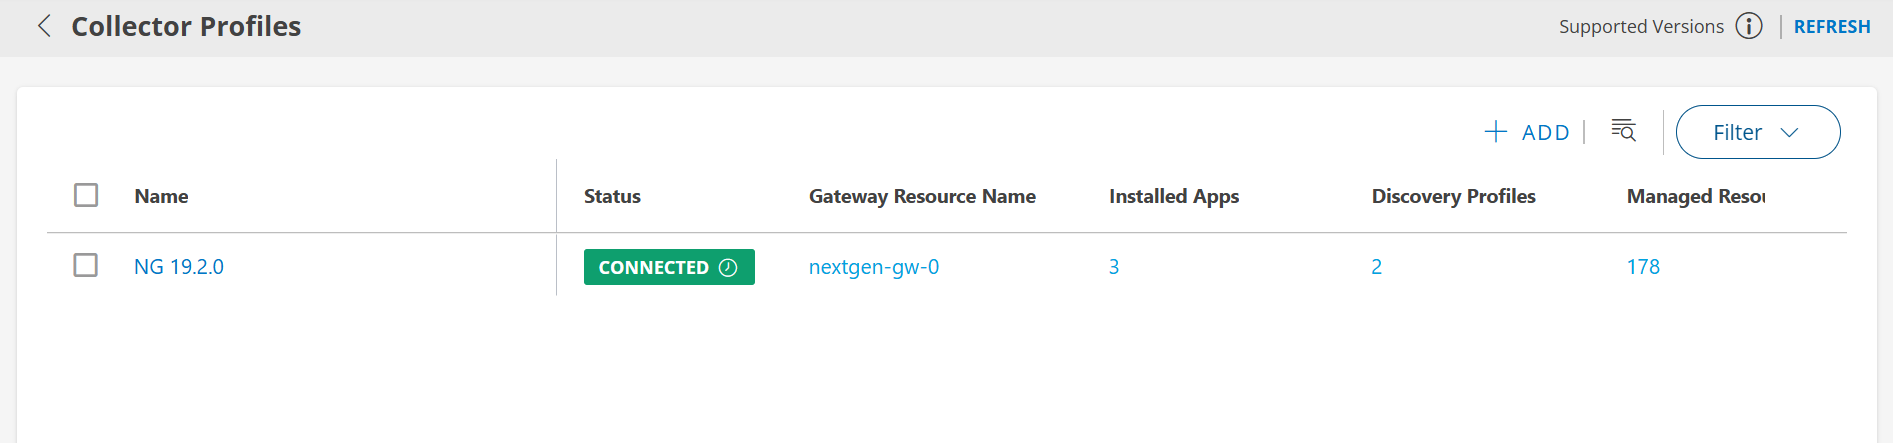
Use Bootstrap Tool to Uninstall the NextGen Gateway
To uninstall the NextGen Gateway using the OpsRamp Bootstrap Tool, run the following command.
sudo opsramp-collector-start uninstall ---namespace {NAMESPACE NAME}Note
If you do not specify a namespace during Gateway registration, the opsramp-collector-start binary will deploy the Gateway in the default Kubernetes namespace.
- If the Gateway is deployed in the default namespace, specifying the namespace in the above command is optional.
- If the Gateway is deployed in a custom namespace, you must include the
--namespace {NAMESPACE NAME}flag when uninstalling the NextGen gateway.
Available Flags
| Flags | Description |
|---|---|
| --namespace (-n) | Specifies the Kubernetes namespace for Gateway uninstallation. Default is default. Required only for Kubernetes environments. |
| --debug | Enables debug logging for troubleshooting purposes. Default is false. |
| --help (-h) | Displays help information for uninstallation. |
Example:
opsramp-collector-start uninstallSample Response:
root@opsram-gateway:/home/gateway-admin# opsramp-collector-start uninstall
Uninstalling the OpsRamp Gateway in K8S environment. Please wait...
release "nextgen-gw" uninstalled

Successfully Uninstalled OpsRamp Gateway in K8s environment.
Upon uninstallation:
- The Gateway will be disconnected from the OpsRamp SaaS platform.
- All Gateway related resources in the Kubernetes cluster - such as pods, config maps, secrets, and services will be cleaned up.
Note
This process does not uninstall Kubernetes itself. Only the resources associated with the Gateway are removed.Once the CLI returns successfully, navigate to Setup > Account > Collector Profiles to check if the Gateway is de-registered successfully.
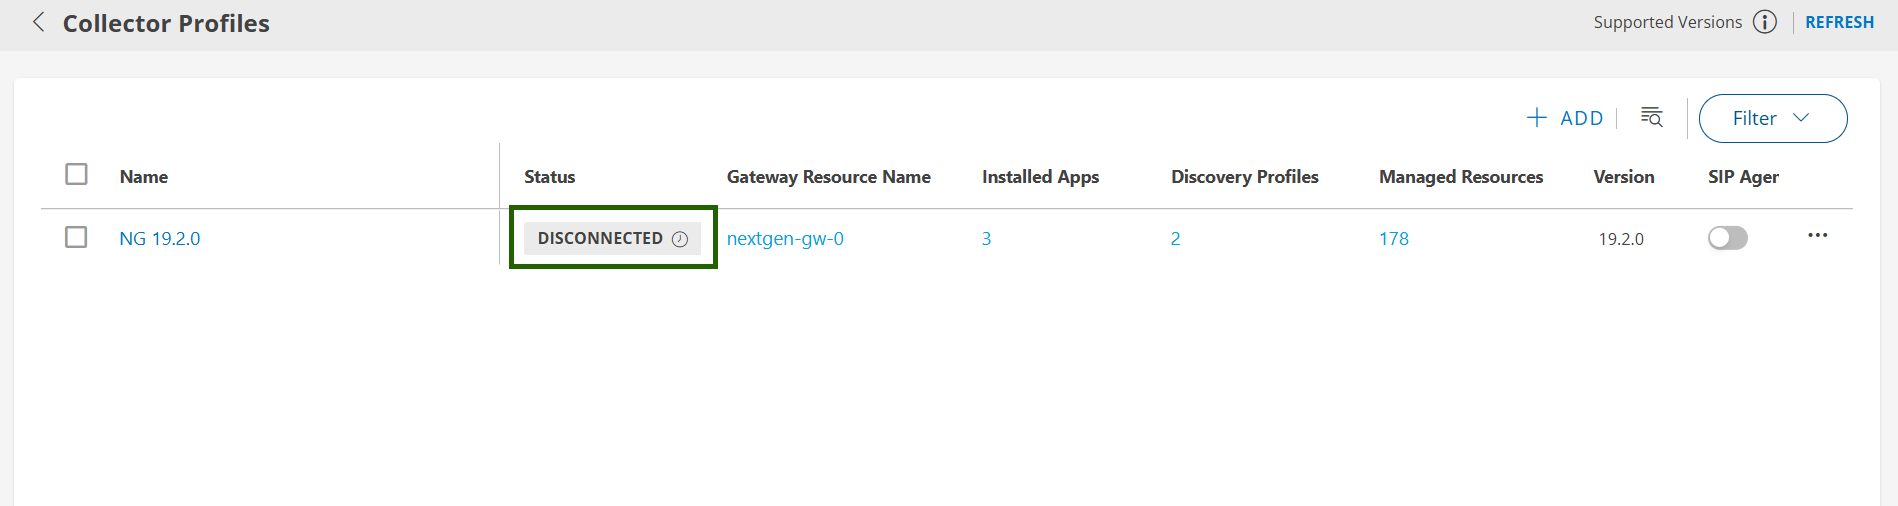
Troubleshooting
If you encounter errors during installation or registration using the OpsRamp Collector Bootstrap Tool, refer to the following common issues and their sample CLI outputs:
Incorrect OpsRamp Cloud API server URL
If the provided URL is invalid or unreachable, you may see an error similar to:root@opsram-gateway:/home/gateway-admin# opsramp-collector-start install --url invalid-url.opsramp.com --key xxxxxxxxx Get "https://invalid-url.opsramp.com/saregandlicdownload.do?action=registrationRequirements&activation_token=1688e815-20fb-4967-9357-107e73b89970": dial tcp: lookup invalid-url.opsramp.com on 127.0.0.53:53: no such hostGateway already registered
Attempting to re-register an already registered Gateway will result in:root@opsram-gateway:/home/gateway-admin# opsramp-collector-start install --url xxx.opsramp.com --key xxxxxxxxx Gateway is already registered to cloudKubernetes server not reachable
If the Kubernetes server is unreachable, the CLI will display:root@opsram-gateway:/home/gateway-admin# opsramp-collector-start install --url xxx.opsramp.com --key xxxxxxxxx Unable to get helm status exit status 1: Error: Kubernetes cluster unreachable: Get "https://127.0.0.1:6443/version": dial tcp 127.0.0.1:6443: connect: connection refused
Additional Recommendations
- Regularly update your Kubernetes and Helm versions to stay aligned with security patches and new features.
- Validate your cluster networking and storage setup before installing the Gateway to avoid common deployment issues.
If you experience installation issues not covered in the Troubleshooting section above, consult your internal Kubernetes administrator for further assistance.