If you choose not to use the OpsRamp-provided ISO or OVA and prefer to deploy the NextGen Gateway on your own Kubernetes cluster especially in cloud-managed environments, you can use the Helm-based deployment method. This guide outlines how to proceed using Helm, a Kubernetes-native packaging system designed for simplicity and scalability.
Helm Overview
Helm provides a standardized and repeatable way to deploy OpsRamp Gateway components in Kubernetes environments. This is especially useful for teams managing clusters in cloud providers (e.g., EKS, GKE, AKS) or those with strict CI/CD and GitOps practices. Using Helm Charts allows for:
- Version-controlled deployments
- Easy rollbacks
- Parameterized configurations
- Seamless integration with existing DevOps workflows
Recommendation
For cloud-managed Kubernetes environments, OpsRamp strongly recommends Helm-based deployments due to their better supportability, scalability, and ease of upgrades.Note
Unsupported ScenariosIf you’re using a custom ISO or OVA (not provided by OpsRamp) to install Kubernetes, OpsRamp will not support the underlying Kubernetes installation. Any security or infrastructure issues arising from such installations will need to be handled by your internal teams.
Prerequisites
Before deploying the NextGen Gateway using Helm Charts, ensure that your Kubernetes environment meets the following requirements to support a reliable and production-ready deployment.
- Ensure the Kubernetes and Helm installed before registration.
- Ensure these common pre-requisites are met before starting the gateway registration process
- Have network access to the OpsRamp SaaS platform, either directly or via your proxy.
- For proxy connections, verify that the proxy server details and credentials are correct and accessible.
Installation and Registration Steps
Step 1: Create Collector Profile
- Login to the OpsRamp portal and select a client from All Clients.
- Navigate to Setup > Account > Collector Profiles.
- Click + ADD on the Collector Profile page.
- Fill in the details on the Add Gateway Collector Profile page:
- Profile Name: Enter a name for the profile.
- Profile Type: Select Standard/Elastic.
- Description: Provide a brief description.
- Choose the Gateway Collector profile for download from the NextGen section:
- Cloud-Native Application (INSTALLER): This format refers to installation packages specifically designed for cloud environments.
- Click Next.
- Copy the Activation Token to create the Collector Profile.
Step 2: Install and Register NextGen Gateway Helm chart
There are multiple options to install the NextGen Gateway Helm chart, as described below:
Option 1: Registering the NextGen Gateway with direct connection
Use the below command for installing helm chart with direct connection:
helm install nextgen-gw oci://us-docker.pkg.dev/opsramp-registry/gateway-cluster-charts/nextgen-gw \
--set opsramp_cloud_native="enable" \
--set vprobe.reginfo.API_SERVER="<API SERVER URL>" \
--set vprobe.reginfo.ACTIVATION_KEY="<ACTIVATION KEY>" \
-n <NAMESPACE>
Option 2: Registering the NextGen Gateway with Proxy Connection
For security reasons, many users are not permitted to allow direct outbound connections from their internal networks. Instead, they configure proxy servers within their environment to control and monitor external access.
- Third-party tools and users, including OpsRamp Gateways, must connect to the internet through these proxies.
- Since OpsRamp Gateways are deployed within customer environments, any communication with the OpsRamp Cloud must go through the proxy. users with a proxy in place should use the appropriate command to register the Gateway via the proxy during installation.
- The examples below demonstrate how to register a Gateway using a proxy.
- Once installed, the helm chart will deploy the required pods and attempt to register the Gateway through the specified proxy server. - The tool supports registration using a proxy with or without authentication credentials, as shown in the examples.
Register through proxy with credentials
helm install nextgen-gw oci://us-docker.pkg.dev/opsramp-registry/gateway-cluster-charts/nextgen-gw \
--set opsramp_cloud_native="enable" \
--set vprobe.reginfo.API_SERVER="<API SERVER URL>" \
--set vprobe.reginfo.ACTIVATION_KEY="<ACTIVATION KEY>" \
--set proxy.ConnectionType="proxy" \
--set proxy.ProxyIp="proxy-server-ip" \
--set proxy.ProxyPort="proxy-server-port" \
--set proxy.ProxyUsername="proxy-server-username" \
--set proxy.ProxyPassword="proxy-server-password" \
-n <NAMESPACE>
Register through proxy without credentials
helm install nextgen-gw oci://us-docker.pkg.dev/opsramp-registry/gateway-cluster-charts/nextgen-gw \
--set opsramp_cloud_native="enable" \
--set vprobe.reginfo.API_SERVER="<API SERVER URL>" \
--set vprobe.reginfo.ACTIVATION_KEY="<ACTIVATION KEY>" \
--set proxy.ConnectionType="proxy" \
--set proxy.ProxyIp="proxy-server-ip" \
--set proxy.ProxyPort="proxy-server-port" \
-n <NAMESPACE>
Option 3: Registering NextGen Gateway by using yaml config file
Specifying multiple flags during Gateway registration can be cumbersome, especially for users with complex setups.
- To simplify the process, OpsRamp offers an alternative method: registering the NextGen Gateway using a YAML configuration file.
- This YAML file allows users to define all necessary registration parameters in one place, reducing the need to pass multiple command-line flags.
In addition to basic registration details, users can also customize advanced settings such as:
- Memory limits for the Gateway pod
- SNMP trap v3 credentials
- Other environment-specific configurations
To complete the registration process using the YAML method, follow these steps:
- Create a YAML file using the sample provided below, incorporating the necessary modifications as required. Sample YAML
#To set gateway hostname
gatewayName: "nextgen-gw"

#Enable this for helm-based deployment
#By default, it is disable
opsramp_cloud_native: "enable"

#Enable squid proxy for gateway as a proxy service
squidproxy: "disable"

#Enable thirdPartyApp for 3rd Party SDK Apps
thirdPartyApp: "disable"

#Provide Repository to pull images
imageRepository: "us-docker.pkg.dev"
global:
  imageRegistry: "us-docker.pkg.dev"
  storageClass: ""

#Provide storage class name if not using default storageclass
storageClassName:

#Pass the snmp_v3 credentials in below format. Put 2 spaces under the "snmp_trap_v3_credentials" and pass the keys after those spaces (spaces are for yaml indentations)
#snmp_trap_v3_credentials: |-
#  key1
#  key2
#  key3
# Refer https://docs.opsramp.com/platform-features/feature-guides/monitoring-using-snmp-traps/#configure-snmp-v3-traps for more details on configuring SNMP credentials.

snmp_trap_v3_credentials: |-

#Provide Api Server URL and Registrations Token for gateway registration
vprobe:
  reginfo:
    API_SERVER:
    ACTIVATION_KEY:

#Memory limits for vprobe container
#Vprobe should have a minimum of 4GB Memory
  resources:
    limits:
      memory: "4096Mi"

#Provide proxy details if gateway should connect to opsramp cloud via external proxy
#Set ConextionType as  proxy if connecting via external proxy
#Set Proxy IP, Port, Username and password
proxy:
    ConnectionType: direct
    ProxyIp:
    ProxyPort:
    ProxyUsername:
    ProxyPassword:
    Protocol: http

#Set service annotation for exposing load balancer
#Example annotations for AWS EKS:
  #service.beta.kubernetes.io/aws-load-balancer-internal: "true"
#Example annotations for GCP:
  #cloud.google.com/load-balancer-type: "Internal"
#Example annotations for Azure AKS:
  #service.beta.kubernetes.io/azure-load-balancer-internal: "true"
service:
  annotations:
    tcp: {}
    udp: {}
    squidProxy: {}

#Memory limits for nativebridge container
#Native Bridge should have a minimum of 500 MB Memory
nativebridge:
  resources:
    limits:
      memory: "500Mi"

#Memory limits for Squid Proxy container
#Squid Proxy should have a minimum of 500 MB Memory
squid:
  resources:
    limits:
      memory: "500Mi"

#Memory limits for postgres container
#Postgres should have a minimum of 1GB Memory
postgres:
  resources:
    limits:
memory: "1024Mi" - Save above YAML file with registration.yaml.
- Specify the path to the registration.yaml file in the following command to complete the Gateway registration.
helm install nextgen-gw oci://us-docker.pkg.dev/opsramp-registry/gateway-cluster-charts/nextgen-gw \
-f registration.yaml \
-n <NAMESPACE>
Note
If the–namespace (-n) flag is not specified, the chart will be installed in the default namespace. The Helm release name must be nextgen-gw to ensure compatibility with post-deployment workflows.Step 3: Verify for Successful Gateway Registration
After a successful deployment, the Gateway runs as one or more pods within the Kubernetes cluster. To check the status of the Gateway pod, run the following command:
kubectl get pods -n <namespace>Note
- If the Gateway is deployed in the default namespace, specifying the namespace in the
kubectlget pods command is optional. - If the Gateway is deployed in a custom namespace, you must include the
-n < namespace >flag when running the command to check the pod status.
Sample Response:
root@node1:/home/gateway-admin# kubectl get pods
NAME                        READY   STATUS    RESTARTS   AGE
nextgen-gw-0                3/3     Running   0          2m52s
nextgen-gw-redis-master-0   1/1     Running   0          2m52s
opsramp-agent-49dx4         1/1     Running   0          3m1s
Note
After deployment, ensure that all Gateway pods reach the Running state and that all containers within each pod show a Ready status (e.g., 3/3, 1/1).
- It may take 3 to 5 minutes for the pods to enter the Running state, depending on your network bandwidth, as Kubernetes will pull the required Docker images from the OpsRamp registry. These images can be several gigabytes in size, depending on your cluster setup.
- Once the pod is running, it may take an additional 1 to 2 minutes for all containers within the pod to reach the Ready state. Monitoring pod and container status ensures the Gateway is fully operational before proceeding with further configuration.
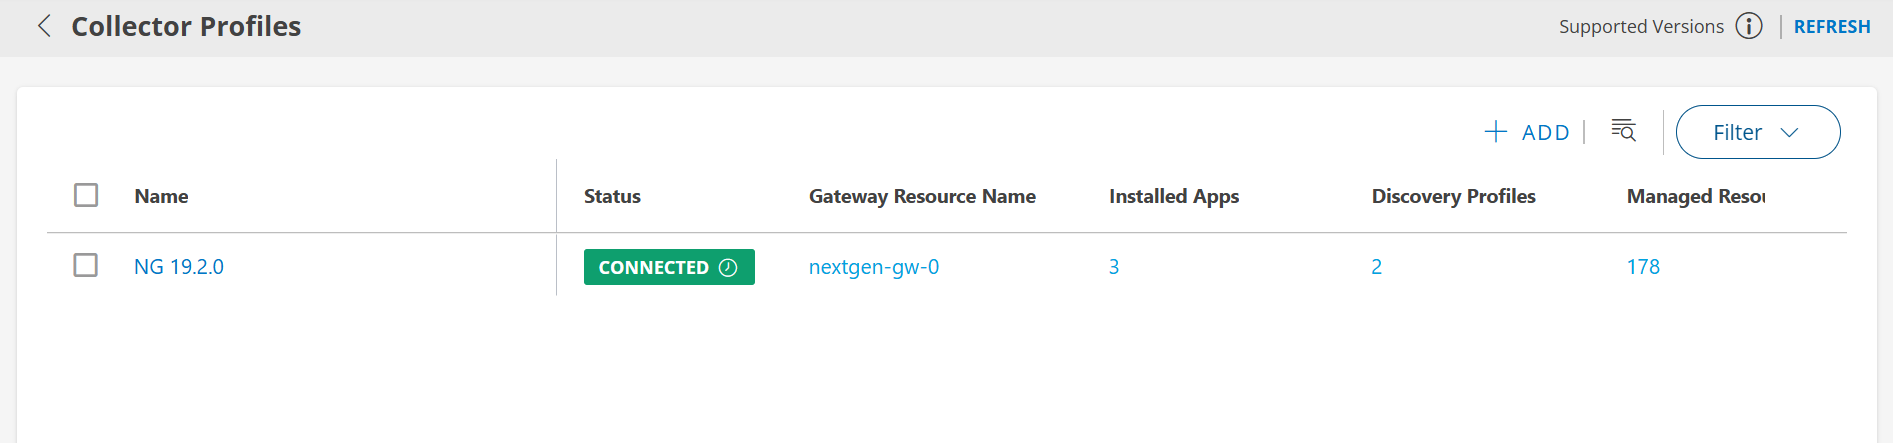
Once the gateway-related pods are deployed in your Kubernetes cluster and all pods are in the Running and Ready state, the gateway establishes a secure connection to the OpsRamp Cloud.
To verify the gateway connectivity status:
- Log in to the OpsRamp Portal.
- Navigate to Setup > Account > Collector Profiles.
- Confirm that your gateway is listed and shows as connected.