Overview
In enterprise environments where internet access is controlled through a corporate proxy, you must configure proxy settings to allow external communication for both Kubernetes clusters and OpsRamp Gateways. This guide explains how to:
- Set proxy variables at the node level (system-wide)
- Apply proxy settings at the Kubernetes cluster level
- Update proxy settings post-deployment of the OpsRamp Gateway
- Perform verification and troubleshooting
Note
This guide applies exclusively to deployments using the OpsRamp-provided ISO/OVA.Proxy Configuration at Node Level
Proxy settings at the system level ensure that OS-level utilities (such as container runtime, curl, wget) can communicate externally via the proxy server.
Update Host Proxy
- Run the following command to open the Terminal UI:
opsramp-collector-start terminal-ui - Use Update Host Proxy to configure operating-system-level proxy settings.
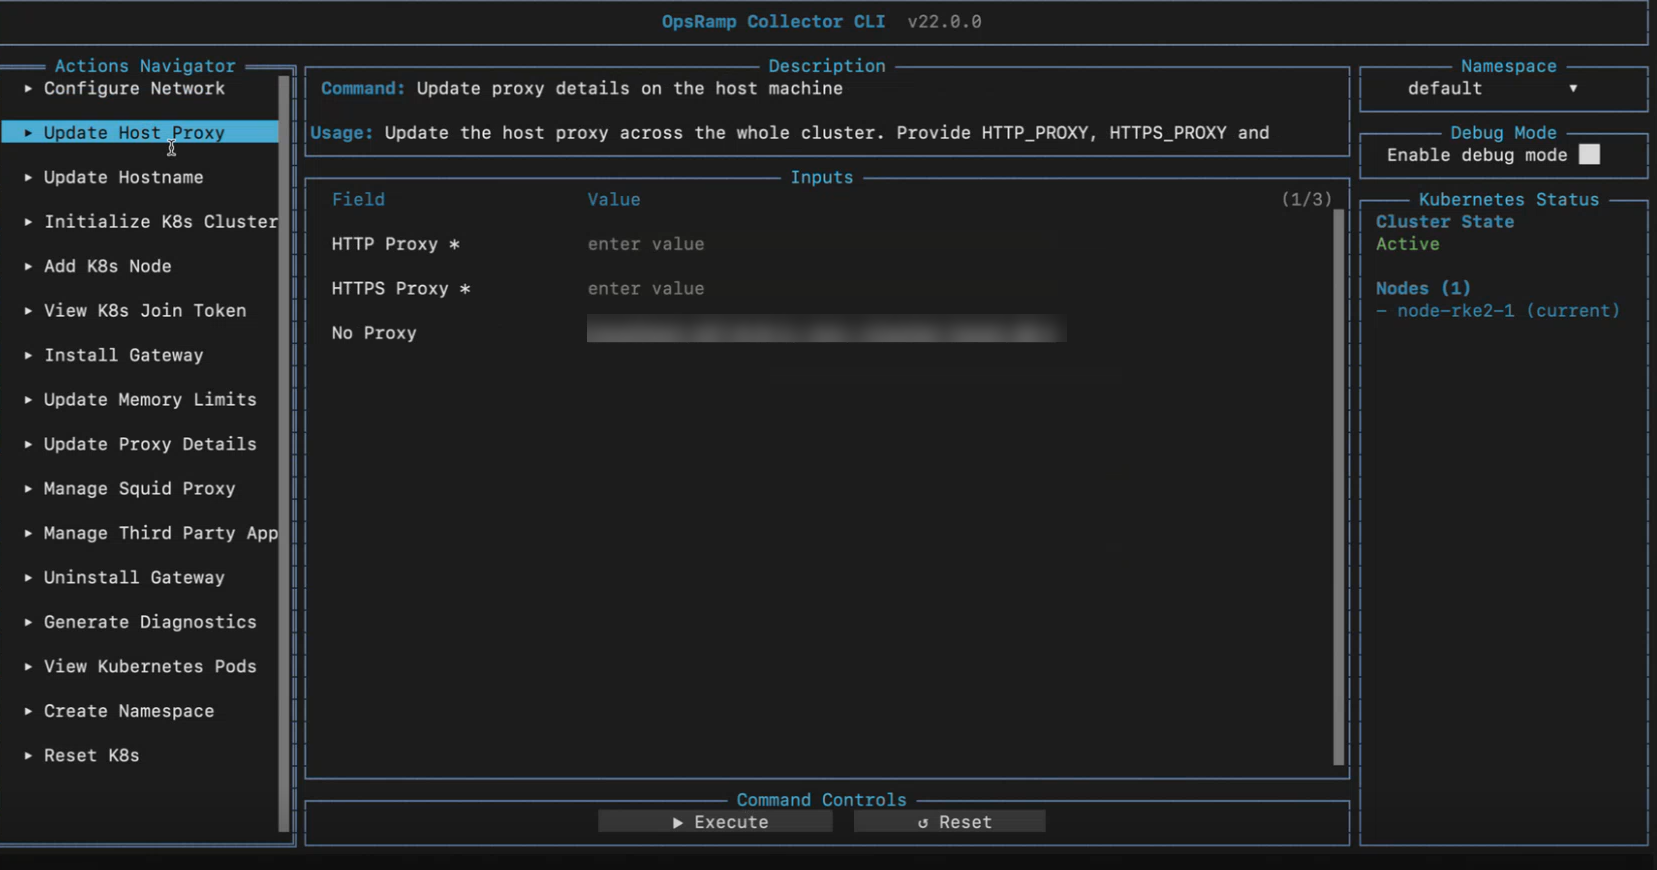
Select Execute to save the entered information.Field Description HTTP Proxy HTTP proxy server address. For example, "http://your.proxy.server:proxy_port" HTTPS Proxy HTTPS proxy server address. For example, "https://your.proxy.server:proxy_port" No Proxy Hosts and domains that bypass the proxy. For example, "localhost,127.0.0.1,10.42.0.1/8,10.43.0.1/8, , ,..." - Press
ESCto close the Terminal UI.
Notes
- In a Kubernetes cluster, proxy settings are propagated to all nodes.
- On a standalone host, settings are applied only to the local system.
Step 1: Add Proxy Environment Variables
Edit the /etc/environment file on each Kubernetes node:
sudo vi /etc/environmentAdd the following lines:
HTTP_PROXY="http://your.proxy.server:proxy_port"
HTTPS_PROXY="https://your.proxy.server:proxy_port"
NO_PROXY="localhost,127.0.0.1,10.42.0.1/8,10.43.0.1/8,<NODE_IP_1>,<NODE_IP_2>,..."- Replace
your.proxy.serverandproxy_portwith your proxy details. - Add all node IPs and service IPs to
NO_PROXYto prevent internal traffic from routing through the proxy.
Tip
You can also include hostnames likekubernetes.default, *.svc, etc., in NO_PROXY if needed.Step 2: Apply Changes
Log out and log back in, or source the file:
source /etc/environmentStep 3: Proxy Configuration at Kubernetes Cluster Level
Scenario A: Proxy Set Before Kubernetes Installation
If proxy settings are configured before installing Kubernetes, the installer automatically picks up the proxy environment variables defined in . Now install the Kubernetes using opsramp bootstrap tool.
Reference: Install Kubernetes
After installing Kubernetes, validate that the proxy variables were correctly applied by checking the systemd environment file:
For Gateway 22.0.0 and later:
cat /etc/systemd/system/rke2.service.envFor Gateway below 22.0.0:
cat /etc/systemd/system/k3s.service.envEnsure the following entries appear (with your actual proxy values):
HTTP_PROXY=http://your.proxy.server:proxy_port
HTTPS_PROXY=https://your.proxy.server:proxy_port
NO_PROXY="localhost,127.0.0.1,10.42.0.1/8,10.43.0.1/8,<NODE_IP_1>,<NODE_IP_2>,..."
Scenario B: Proxy Set After Kubernetes Installation
If you installed Kubernetes before defining proxy variables at the system level, you need to manually update the Kubernetes configuration.
Step 1: Edit the Kubernetes Environment File
Open the systemd environment file used by the Kubernetes service:
For Gateway 22.0.0 and later:
sudo vi /etc/systemd/system/rke2.service.envFor Gateway below 22.0.0:
sudo vi /etc/systemd/system/k3s.service.envAdd or modify the following entries:
HTTP_PROXY=http://your.proxy.server:proxy_port
HTTPS_PROXY=https://your.proxy.server:proxy_port
NO_PROXY="localhost,127.0.0.1,10.42.0.1/8,10.43.0.1/8,<NODE_IP_1>,<NODE_IP_2>,..."
Replace <NODE_IP_1> <NODE_IP_2> and other with the actual IP addresses of your cluster nodes or internal service IP ranges that should bypass the proxy.
Step 2: Reload and Restart Kubernetes
Apply the updated environment variables by restarting the Kubernetes service:
For Gateway 22.0.0 and later:
sudo systemctl daemon-reload
sudo systemctl restart rke2-server
For Gateway below 22.0.0:
sudo systemctl daemon-reload
sudo systemctl restart k3s
Step 3: Verify Cluster Status
Confirm that the cluster and nodes are running correctly:
kubectl get nodesScenario C: Updating Proxy Settings After Gateway Registration
If you didn’t configure the proxy during OpsRamp Gateway setup, or if proxy settings change later, you can update them using Helm. These settings apply to the containers required for the NextGen Gateway.
Step 1: Check the Installed Gateway Helm Chart Version
helm list -n <namespace>Locate your release (e.g., nextgen-gw) and note the CHART version.
Step 2: Update the Gateway with New Proxy Details
Without Authentication:
helm upgrade nextgen-gw oci://us-docker.pkg.dev/opsramp-registry/gateway-cluster-charts/nextgen-gw \
  --version <VERSION> \
  --set proxy.ConnectionType=proxy \
  --set proxy.ProxyIp=<PROXY_IP> \
  --set proxy.ProxyPort=<PROXY_PORT> \
  -n <NAMESPACE> \
  --reuse-values
With Authentication:
helm upgrade nextgen-gw oci://us-docker.pkg.dev/opsramp-registry/gateway-cluster-charts/nextgen-gw \
  --version <VERSION> \
  --set proxy.ConnectionType=proxy \
  --set proxy.ProxyIp=<PROXY_IP> \
  --set proxy.ProxyPort=<PROXY_PORT> \
  --set proxy.ProxyUsername=<USERNAME> \
  --set proxy.ProxyPassword=<PASSWORD> \
  -n <NAMESPACE> \
  --reuse-values
Replace placeholders (<VERSION>, <NAMESPACE>, <PROXY_IP>, etc.) with actual values.
Step 3: Verify the Secret
Confirm that proxy values are stored in the Secret:
kubectl get secret vprobe-proxy-secret -n <NAMESPACE> -o jsonpath="{.data['config\.properties']}" | base64 --decodeReplace <namespace> with your gateways namespace. If you don’t have a custom namespace, use default.
Look for entries under the proxy section.
Step 4: Restart Gateway Pod
To apply the changes:
kubectl delete pod nextgen-gw-0 -n <NAMESPACE>Kubernetes will automatically restart the pod with updated settings.
Step 5: Restart Squid Proxy Pod (Optional)
If the Squid proxy is enabled, restart the Squid proxy pod:
kubectl delete pod <squid-proxy-pod-name> -n <NAMESPACE>Proxy Configuration at Gateway (Helm chart) Level
If you didn’t configure the proxy during OpsRamp Gateway setup, or if proxy settings change later, you can update them using Helm. These settings apply to the containers required for the NextGen Gateway.
Update Gateway Proxy
- Run the following command to open the Terminal UI:
opsramp-collector-start terminal-ui - Use Update Gateway Proxy to configure proxy settings for the Gateway deployment.
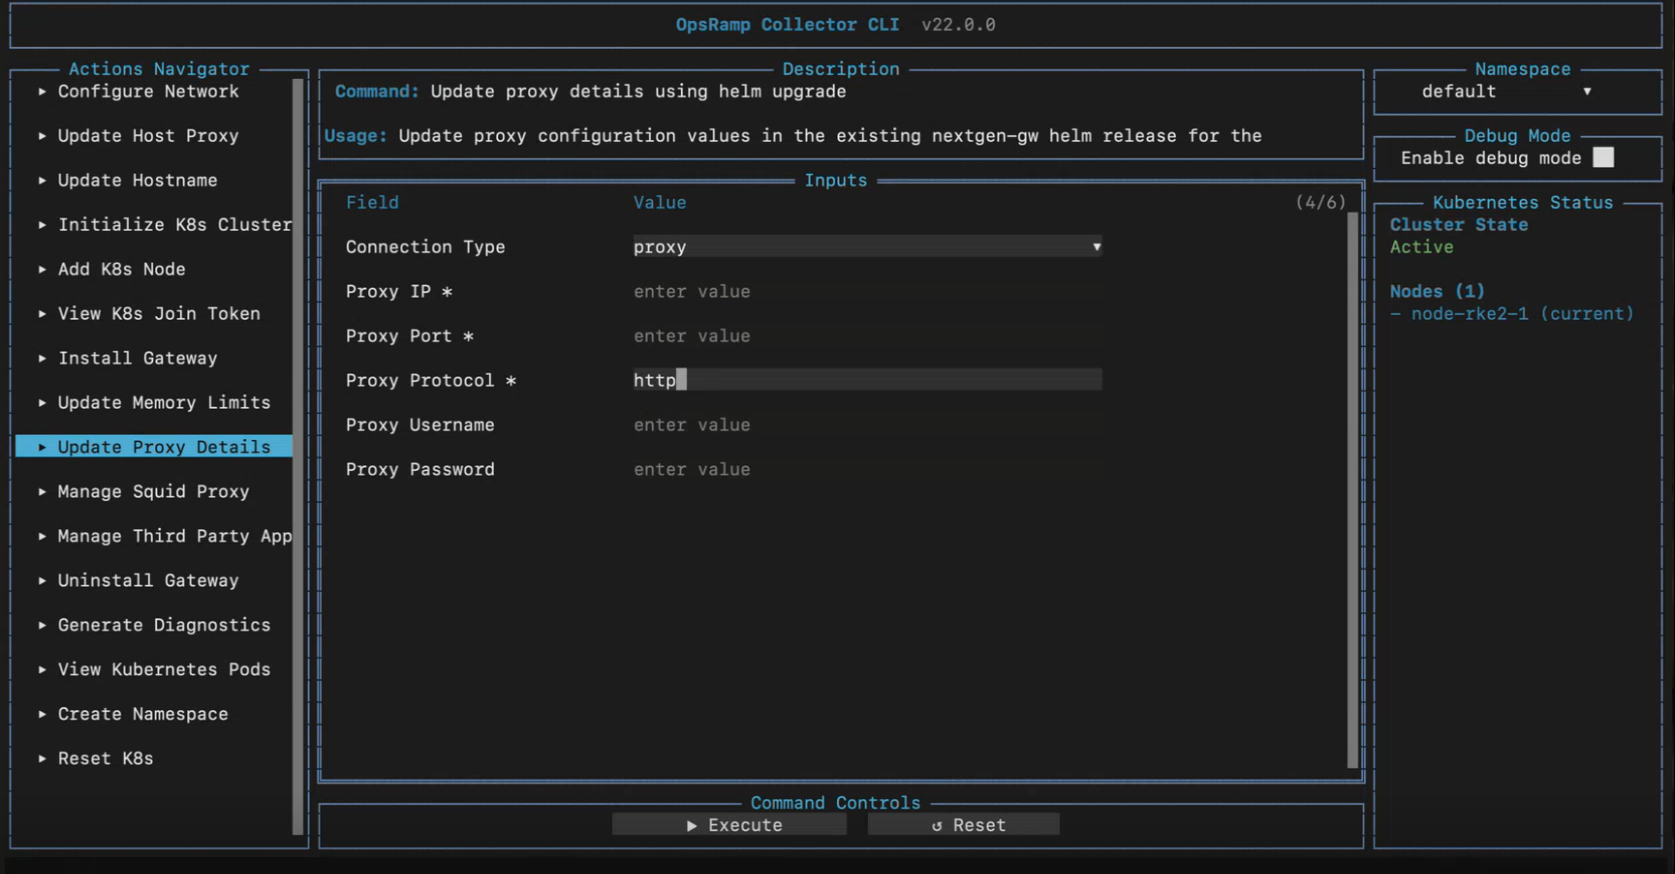
Select Execute to save the entered information.Field Description Connection Type Direct or proxy connection. Proxy Protocol HTTP or HTTPS proxy protocol. Proxy IP Proxy server address. Proxy Port Proxy server port. Proxy Username Proxy authentication username. Proxy Password Proxy authentication password. - Press
ESCto close the Terminal UI.
Note
Proxy fields are disabled when Direct connection is selected.Step 1: Check the Installed Gateway Helm Chart Version
helm list -n <namespace>Locate your release (e.g., nextgen-gw) and note the CHART version.
Step 2: Update the Gateway with New Proxy Details
Without Authentication:
helm upgrade nextgen-gw oci://us-docker.pkg.dev/opsramp-registry/gateway-cluster-charts/nextgen-gw \
  --version <VERSION> \
  --set proxy.ConnectionType=proxy \
  --set proxy.ProxyIp=<PROXY_IP> \
  --set proxy.ProxyPort=<PROXY_PORT> \
  -n <NAMESPACE> \
  --reuse-values
With Authentication:
helm upgrade nextgen-gw oci://us-docker.pkg.dev/opsramp-registry/gateway-cluster-charts/nextgen-gw \
  --version <VERSION> \
  --set proxy.ConnectionType=proxy \
  --set proxy.ProxyIp=<PROXY_IP> \
  --set proxy.ProxyPort=<PROXY_PORT> \
  --set proxy.ProxyUsername=<USERNAME> \
  --set proxy.ProxyPassword=<PASSWORD> \
  -n <NAMESPACE> \
  --reuse-values
Replace placeholders (<VERSION>, <NAMESPACE>, <PROXY_IP>, etc.) with actual values.
Step 3: Verify the Secret
Confirm that proxy values are stored in the Secret:
kubectl get secret vprobe-proxy-secret -n <NAMESPACE> -o jsonpath="{.data['config\.properties']}" | base64 --decodeReplace <namespace> with your gateways namespace. If you don’t have a custom namespace, use default.
Look for entries under the proxy section.
Step 4: Restart Gateway Pod
To apply the changes:
kubectl delete pod nextgen-gw-0 -n <NAMESPACE>Kubernetes will automatically restart the pod with updated settings.
Step 5: Restart Squid Proxy Pod (Optional)
If the Squid proxy is enabled, restart the Squid proxy pod:
kubectl delete pod <squid-proxy-pod-name> -n <NAMESPACE>Verification Checklist
- Proxy variables are defined in
/etc/environmenton all nodes - Kubernetes environment file (
k3s.service.env) is updated NO_PROXYincludes all internal node/service IPs- Kubernetes service restarted successfully
- Gateway pod restarted with updated proxy settings
- Internet access is functional through the proxy
Additional Notes
Ensure DNS and routing configurations allow the proxy server to be reachable from all nodes.
If your proxy requires authentication, include it in the URL: http://username:password@your.proxy.server:port
Use caution with
NO_PROXYentries to avoid unintended traffic redirection.