| Edit | Edit resource details like Resource Type, Alias Name, Description, IP Address, Alternate IP, Serial Number, Purchase Date, Warranty Expiration Date, Keyboard Type, Encoding Type.
Some fields like Host Name, Resource Name, Make, Model, DNS Name, Operating System, Site cannot be modified. These are read-only fields. |
| Re-Sync | This option will re-discover the resource attributes in the background. |
| Assign Custom Attribute | Allows you to assign custom attribute(s) to the resource.
Follow these steps to assign custom attribute(s):
- Click Action → Assign Custom Attribute.
- Select name and corresponding value from the dropdowns.
- Click ASSIGN CUSTOM ATTRIBUTE.
|
| Assign Credential | Allows you to assign credential(s) to the resource.
Follow these steps to assign credential(s):
- Click Action → Assign Credential.
- Select credential(s) in ASSIGN CREDENTIALS window and click SUBMIT.
To learn how to add a credential, see Credentials. |
| Unmanage | This option will unmanage the device. Alerts associated with the device will become Obsolete and Suppressed and will be available in alert dashboard for a period of 3 months from current date.
Agents on the device will be uninstalled.
To unmanage the device:- Click Action → Unmanage.
- Click YES.
|
| Add Note | You must have the appropriate permissions assigned to your user role to perform note operations.
Administration privileges are not required.
The same permission requirements apply to both Partner users and Client users.
Following are the permissions required to perform various actions:
| Action | Required Permission |
|---|
| View device notes | Device_View | | Create a device note | Device_Edit | | Edit a device note | Device_Edit | | Delete a device note | Device_Edit |
Note: If you receive a You do not have permission. Please contact the Account Management Team error, contact your Administrator to verify that the required permission is assigned to your role.
To add a note:- Click Action → Add Note.
- From the Add Note popup window that shows the selected resource, enter the subject for the note and the description.
Set the validity for the note from the calendar.
- Click ADD NOTE.
The new note appears at the top of the notes list with your username and timestamp. The NOTES count is updated and displayed.
You can click the NOTES count to add, edit, or remove note(s).
To add a note:- Click +NOTE and follow the steps mentioned above to add a note.
To edit a note:- Click EDIT.
- In the EDIT NOTE window, edit the required fields and click SAVE. The updated note appears with the revised timestamp.
To remove a note:- Click REMOVE. Confirm the deletion in the confirmation dialog. The note is removed from the list.
Data Display Scenarios
The following table describes how notes are displayed based on user permissions and data availability:| Scenario | Condition | Display |
|---|
| Notes exist, user has view permission | Device_View permission assigned | Full list of notes with author and timestamp. | | No notes exist | User has Device_View permission | No notes available message appears. | | User lacks view permission | Device_View permission is not assigned | Notes tab is not visible or returns permission error. | | User has view but not edit permission | Only Device_View permission is assigned | Notes are displayed and are read-only; Add/Edit/Delete buttons are hidden. | | User has only Administration privilege | No Device_View assigned | Add/Edit/Delete buttons are not displayed; Administration alone is insufficient. |
|
| Copy ID | This option will copy the Resource UUID to the clipboard. |
| Delete | This option will delete the selected resource.
- After removal, resource must be on-boarded again.
- Device mapped to Master Agent will not be deleted if there is a management profile assigned to it.
- Alerts associated with the device will become Obsolete and will be available in alert dashboard for a period of 3 months from current date.
- For resources that have an agent installed, this will remove the agent from the host machine in addition to removing the resource from OpsRamp.
To delete resource:- Click Action → Delete.
- Click YES.
|
| Execute Command | This option appears only if Agent/Gateway is installed on the resource.
To execute a command:- Click Actions → Execute Command.
- From the Execute Command popup, select a command from the Command Name dropdown and provide the required information in the fields (based on the command name selected the fields that populate differ).
- Click Execute Command.
|
| Launch Remote Session | This option appears only if Agent/Gateway is installed on the resource. It is applicable for Classic Gateway, Windows and Linux devices.
To launch remote session:- Click Action → Launch Remote Session.
- Enter all the mandatory information in the Launch Remote Session popup window:
- Select a console from the existing list.
(or)
Add a new console. - Enter the Ticket Id/Alert ID.
- Activity Log Notes: Enter the activity log notes information. This is a mandatory field.
- Enable upload or download: Select to upload or download a file to the console.
- Protocol Security: Select the protocol security: NLA or TLS.
- Select an existing credential or enter the credentials.
- Click LAUNCH and execute the file that is downloaded on your local computer.
|
| Add Maintenance Window | This option allows you to schedule maintenance window on a resource.
To schedule a maintenance window:- Click Action → Add Maintenance Window.
The Add Maintenance Window popup dialog box appears. - For more information on how to schedule a maintenance window, see Scheduled Maintenance.
|
| View Network Performance | This option allows you to view network performance for the resource selected.
To view resource network performance:- Click Action → View Network Performance.
The Network Performance Management page appears with top conversations and other information.
See Network Performance Management for more information. |
| View Topology | This option allows you to view topology map for the resource selected.
To view topology map:- Click Action → View Topology. The Topology Explorer appears with the resource and its connected nodes.
For more information on topology maps, see Topology Maps. |
| View Network Topology | This option allows you to view network topology for the device selected.
To view network topology:- Click Action → View Network Topology. The Network Topology Explorer appears with the network device and its neighboring devices.
For more information on Network Topology, see Network Topology Management - Beta. |
| View Rule Logs | View rule logs from all policies applicable on the device, including Device groups, Service groups, Sites/Locations, Custom attributes, Credentials, Jobs, KB articles, Availability Rule, and Monitoring Templates.
To view rule logs:- Click Action → View Rule Logs.
The LOGS page appears.

The LOGS page displays logs information like Log generated time, status of the Log, resource name, and message.
To view Log Details:- Click anywhere in the row to view the LOG DETAILS slide-out.
The slide-out contains details including Resource Name, Policy Name, Template Name, Resource UUID, Filter Criteria.
It also displays information related to attributes like FilterCriteria, Values, isSuccess, resourceName, resourceUuid.
You can filter logs based on their status: Success, Failed, and Info.- Click the filter dropdown and select the desired status to view the logs.
You can filter logs for a specific time period.- Click the calendar icon and select the time range.
- Click APPLY. The logs are filtered and displayed.
|
| View Matched Rules | Lists all the matching policies or rules applied to a device. These policies include Device groups, Service groups, Sites/Locations, Custom attributes, Credentials, Jobs, KB articles, Availability Rule, and Monitoring Templates.
To view matched rules:- Click Action → View Matched Rules.
The MATCHED RULES page appears.
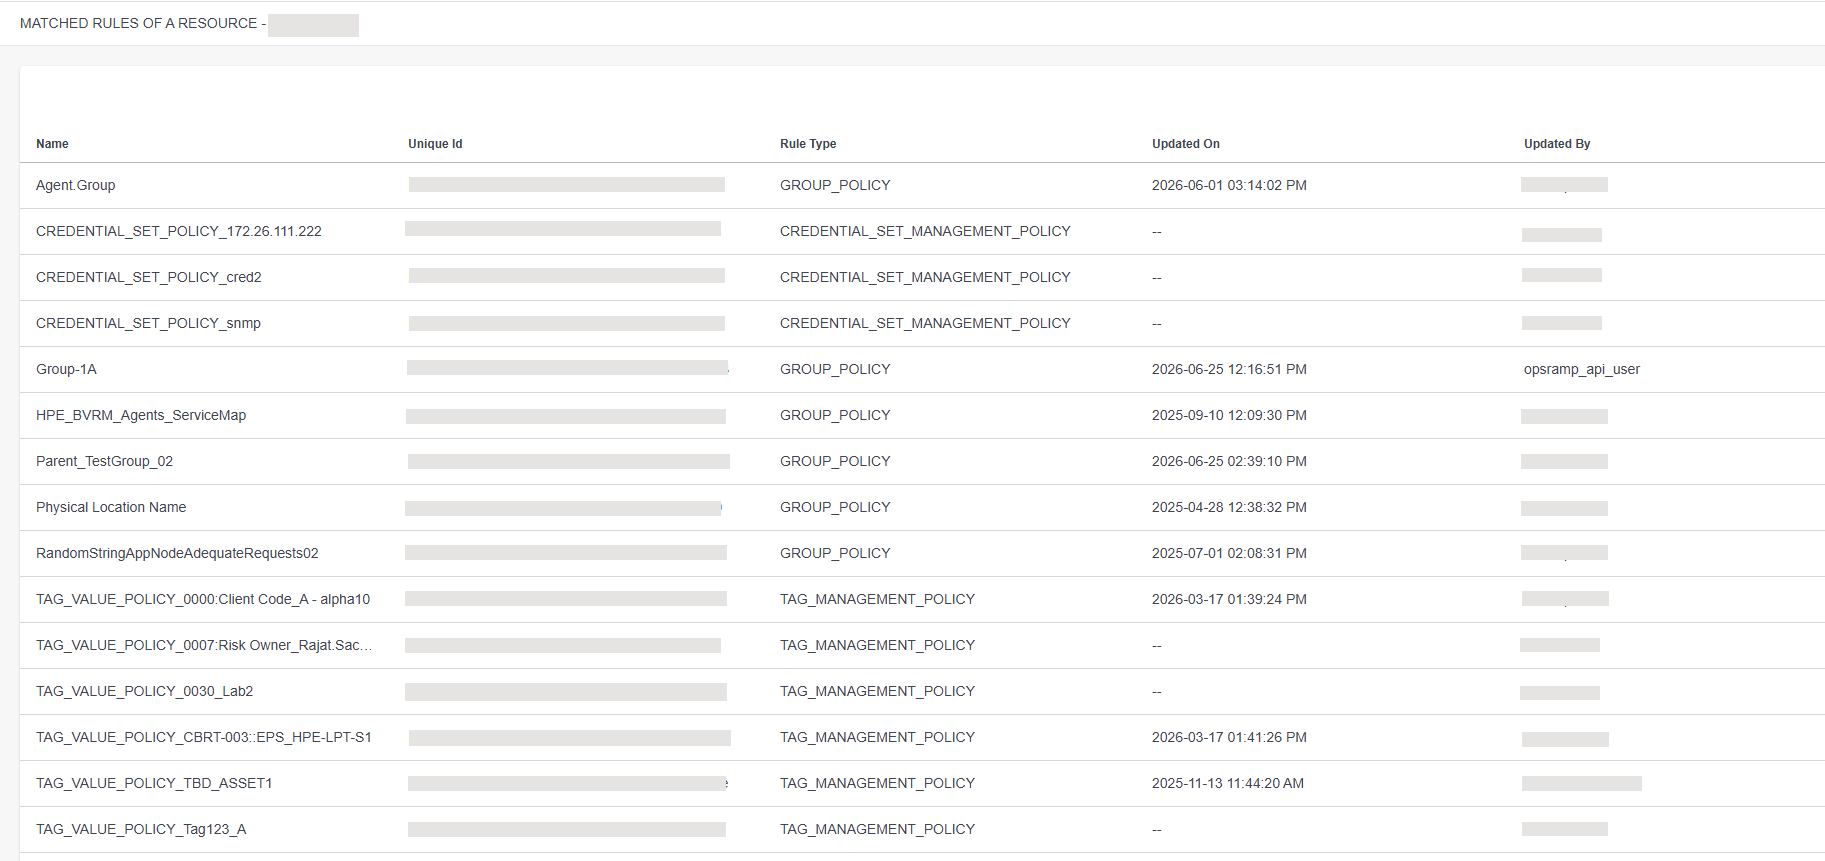
The MATCHED RULES page displays information like Rule Name, Unique Id, Rule Type, Updated On, and Updated By.
To view Rule details:- Click anywhere in the row to view the RULE DETAILS slide-out.
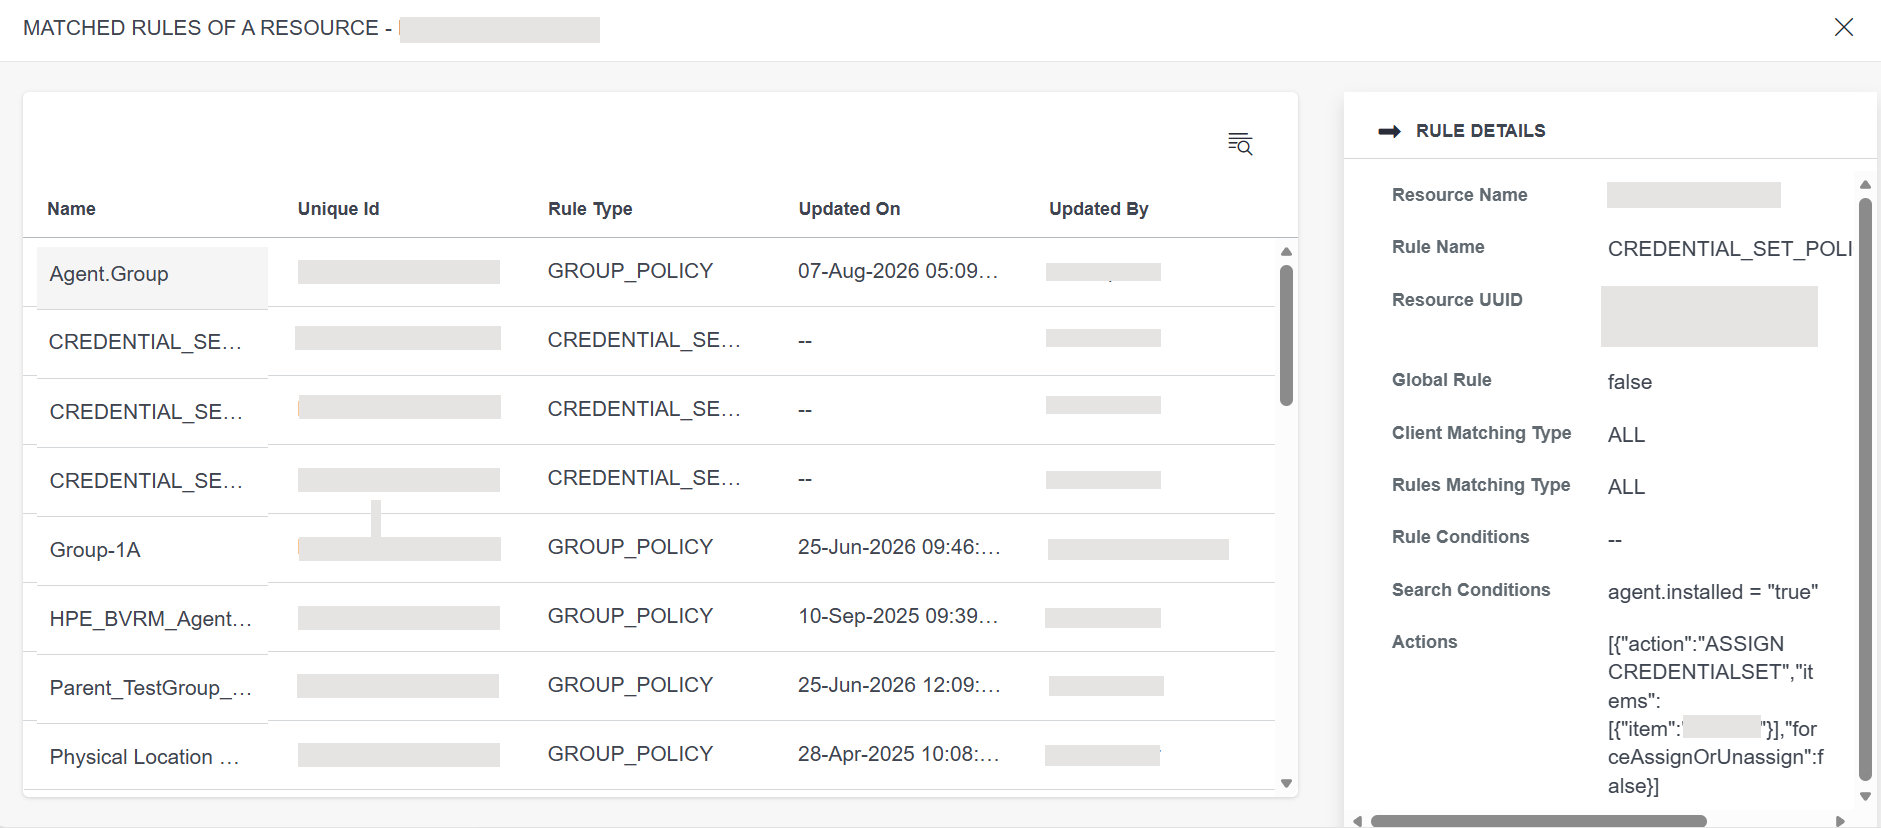
The Rule Details slide-out displays detailed information about a selected rule. It provides a comprehensive view of rule and configuration.| Column | Description |
|---|
| Resource Name | Name of the resource. | | Rule Name | Identifies the specific rule being viewed.
Note: The system displays the rule type together with the created rule name.
Examples:
CREDENTIAL_SET_POLICY_credential name
TAG_VALUE_POLICY_custom attribute_value | | Resource UUID | Unique identifier (UUID) for the resource. | | Global Rule | Determines if the rule applies globally across all clients or is client-specific. | | Client Matching Type | Specifies how clients are matched against this rule. | | Rules Matching Type | Determines evaluation logic (ALL rules must match, ANY rule matches, etc.) | |
| Rule Conditions | Detailed conditions that must be met for the rule to apply. | Search Conditions | Query conditions used to search and match resources. | | Actions | The actions to be executed when rule conditions are met. |
|
