Introduction
Resource Groups feature is designed to help you manage and monitor your IT environment efficiently. These groups can include a wide range of resources such as servers, desktops, applications, network devices, and cloud infrastructure.
Using Resource Groups, you can logically organize resources by resource attributes to perform actions collectively. You can create multiple resource groups or nested resource groups.
For example, group all the resources with the same attributes or belonging to different categories and apply device management policies or assign templates.
Following are the permissions required to perform various tasks.
| Type of user | Permission | User action |
|---|---|---|
| Service Provider (SP) | Devices_View | Create and manage resource groups for Managed Service Providers (MSPs) and clients. |
| MSP | Devices_View | Create and manage resource groups for a client or self. |
| Client | Devices_View | Create and manage resource groups for self. |
| SP | Knowledge Base_View, Credentials_View, Custom Attributes_View, Jobs_View | To assign KB articles, credentials, custom attributes, and jobs for an MSP or a client. |
| MSP | Knowledge Base_View, Credentials_View, Custom Attributes_View, Jobs_View | To assign KB articles, credentials, custom attributes, and jobs for a client or self. |
| Client | Knowledge Base_View, Credentials_View, Custom Attributes_View, Jobs_View | To assign KB articles, credentials, custom attributes, and jobs for self. |
Create a resource group
An MSP or a Partner user with the above permissions can create and manage a resource group.
Note
One device can be added to more than one group.Follow these steps to create a resource group:
To select your client, navigate to All Clients, and click the Client/Partner dropdown menu.
Note: You may either type your client’s name in the search bar or select your client from the list.Navigate to Infrastructure > Groups.
From Infrastructure Home Tab, click the Resource Categories dropdown available on the left pane.
Select Groups.
Click on menu (three dots) icon available beside search icon and click Add Group. The ADD GROUP screen is displayed.

Enter the following details on the Add Group screen:

Resource Group Details
Field Name Field Type Description Name String Provide a group name. Parent Group Dropdown Default value is None(Top Level).
Note: If you select a group from the dropdown, a subgroup is created under the group selected.Description String Provide a description about the group. ASSIGNED RESOURCES: - Filter Criteria
- Click anywhere in the Filter Criteria box and click +QUERY.
- Build a query using OpsQL. The matching results are displayed. The list has Name, Resource Type, IP Address, and Operating System columns.
- Click APPLY SELECTION.
The resources are added.
Note: The maximum number of regex terms that can be used is 5.
Selection
To add resources using Filter Criteria:- Manually Assigned Resources
Dropdown To manually add resources: - Click anywhere in the Manually Assigned Resources dropdown and select the resources.
You can also click ADVANCED SEARCH to build a query using OpsQL.- Click ADVANCED SEARCH option available in the dropdown.
- Click +QUERY in RESOURCE FILTER window.
- Build a query using OpsQL. The matching results are displayed.
The list has Name, Resource Type, IP Address, and Operating System columns. - Select the resources and click APPLY SELECTION.
Resources are added.
ARTICLES Tab You can assign articles to the group.
To assign articles:- Click +ASSIGN in the ARTICLES section. The ASSIGN ARTICLE window is displayed.
- Select the checkboxes to choose multiple articles.
You can also use the search box to search for an article. - Click ASSIGN. The articles are assigned and displayed in the ARTICLES section.
UNASSIGN: To unassign article(s), select article(s) and click Unassign.

JOBS Tab You can assign jobs to the group.
To assign jobs:- Click +ASSIGN in the JOBS section. The ASSIGN JOBS window is displayed.
- Select the checkboxes to choose multiple jobs.
You can also use the search box to search for a job. Note: You can select only one job for each job type. - Click ASSIGN. The jobs are added and displayed in the JOBS section.
UNASSIGN: To unassign job(s), select job(s) and click Unassign.

- Unassign jobs from resources not belonging to this group
- It will force Un-assign jobs - If resources not selected in this group have jobs assigned to them, the assigned jobs will be removed. This means that devices/resources out of filter criteria/manually assigned are also affected.
Note: If there is another group or policy assigning the same jobs on not-selected resources, the assigned jobs will not be removed.
Selection
If you do not select this option, the jobs that are assigned at the resource level will remain unaffected, even if the resource is removed from the group due to some property change or manual intervention.CREDENTIALS Tab You can assign credentials to the group.
To assign credentials:- Click +ASSIGN in the CREDENTIALS section. The ASSIGN CREDENTIALS window is displayed.
- Select the checkboxes to choose multiple credentials.
You can also use the search box to search for a credential. Note: The Cloud account type credentials (such as AWS, Alibaba, Azure, Google Cloud, etc.) are not listed to ensure that your Cloud Account-level credentials remain secure and are not unintentionally removed or replaced by unrelated credential sets. - Click ASSIGN. The credentials are assigned and displayed in CREDENTIALS section.
UNASSIGN: To unassign credential(s), select credential(s) in the CREDENTIALS section and click Unassign.

- Unassign credentials from resources not belonging to this group
- It will force Un-assign credentials - If resources not selected in this group have credentials assigned to them, the assigned credentials will be removed. This means that devices/resources out of filter criteria/manually assigned are also affected.
Note: If there is another group or policy assigning the same credentials on not-selected resources, the assigned credentials will not be removed.
Selection
If you do not select this option, the credentials that are assigned at the resource level will remain unaffected, even if the resource is removed from the group due to some property change or manual intervention.CUSTOM ATTRIBUTES Tab You can assign custom attributes to the group.
To assign custom attributes:- Click +ASSIGN in the CUSTOM ATTRIBUTES section. The ADD CUSTOM ATTRIBUTE popup window is displayed.
- Select custom attribute from the Custom Attribute dropdown.
- Select custom attribute value from the Value dropdown.
- Click ASSIGN. The custom attributes are assigned and displayed in CUSTOM ATTRIBUTES section.
UNASSIGN: To unassign custom attribute(s), select custom attribute(s) in CUSTOM ATTRIBUTES section and click Unassign.

- Unassign custom attributes from resources not belonging to this group
Selection - It will force Un-assign custom attributes - If resources not selected in this group have custom attributes assigned to them, the assigned custom attributes will be removed. This means that devices/resources out of filter criteria/manually assigned are also affected.
Note: If there is another group or policy assigning the same custom attributes on not-selected resources, the assigned custom attributes will not be removed.
If you do not select this option, the custom attributes that are assigned at the resource level will remain unaffected, even if the resource is removed from the group due to some property change or manual intervention.Click SAVE. The resource group is created and listed under Groups.
Manage resource groups
Effectively manage resources with tasks like editing, scheduling maintenance, monitoring activities through logs, removing unnecessary resource groups. This approach ensures effective resource allocation and optimal performance and monitoring of resources.
You can perform the following actions on a resource group:
View resource group details
Note: A user who has permission to view limited resources can view only the group(s) associated with those resources.
To view the resource group details:
- Search for the group and click the resource group name. The group details are displayed.
The group details screen shows the following information:
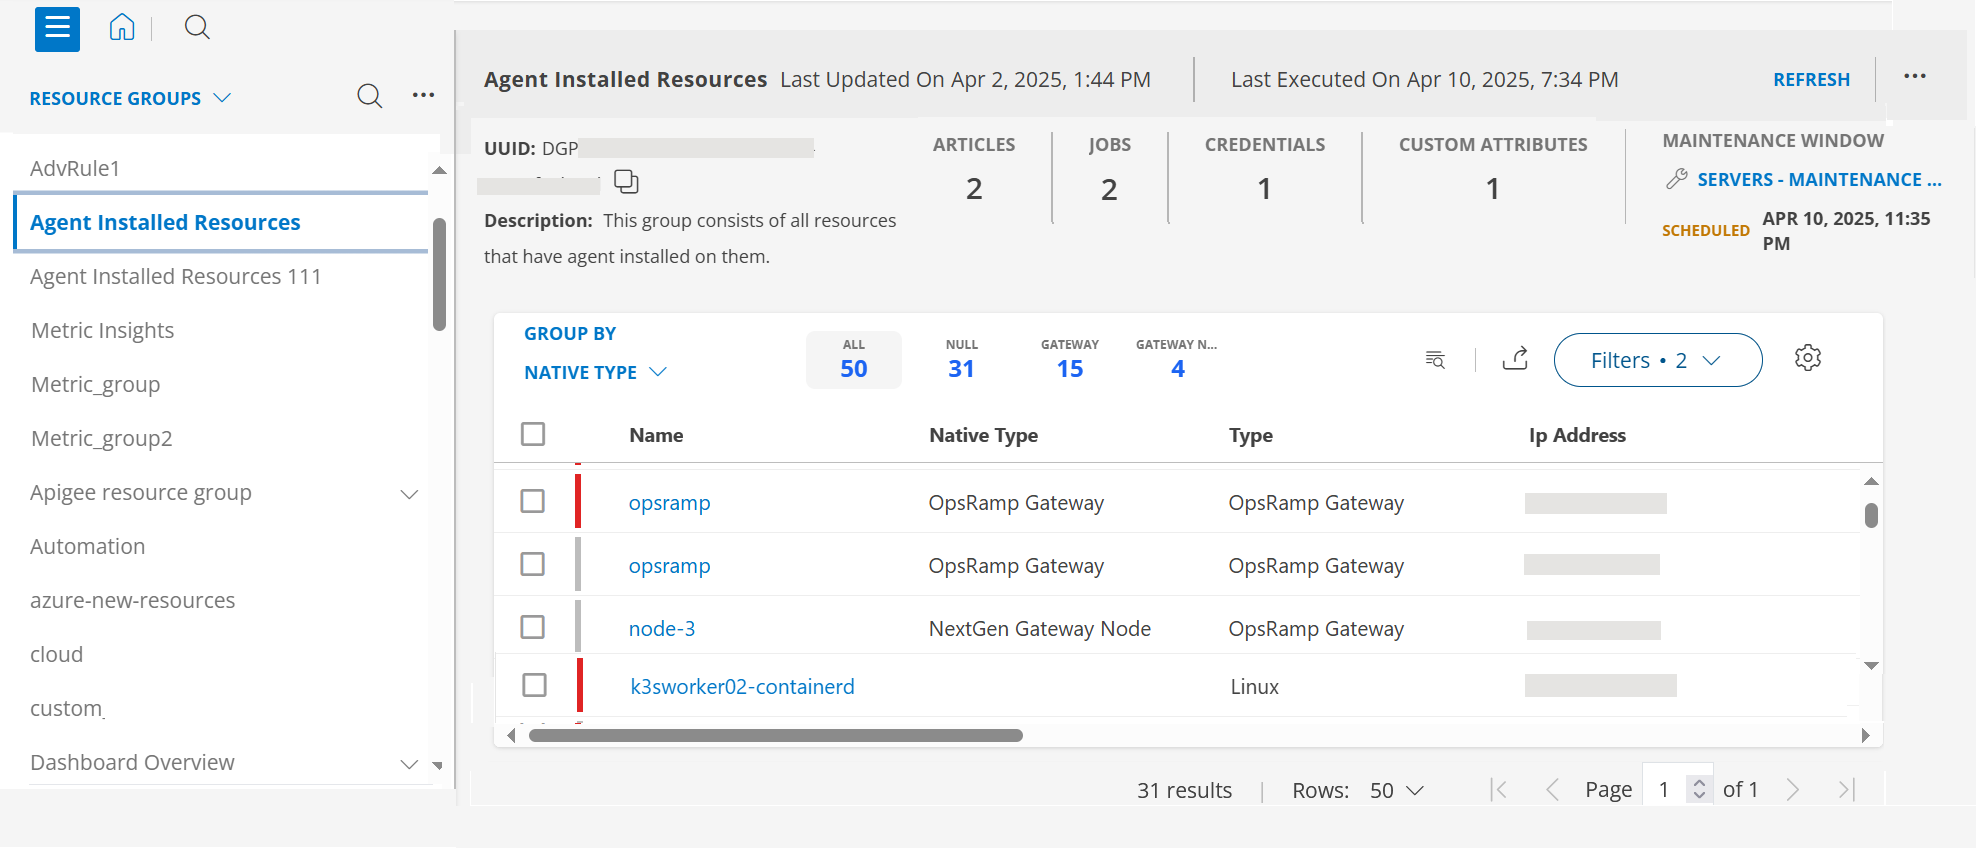
Header: Displays resource group name, Last Updated date and time, Last Executed date and time, resource group UUID, Description, the number of ARTICLES, JOBS, CREDENTIALS, CUSTOM ATTRIBUTES assigned to the group.
- Created date and time: Displays the date and time when the group is created.
- Last Updated date and time: Displays the date and time for any updates made in the group.
- Last Executed date and time: Displays the date and time of the most recent change to the group, like any addition or removal of devices, or actions performed like assigning credentials, jobs, etc.
Displays scheduled maintenance window information including maintenance window name, date, and time.
- To view and update the window details, click the maintenance window name.
- REFRESH: Refreshes the resource listing to reflect the latest data, including any newly added or removed resources or changes in their attributes.
Body: Displays the resources that are, by default, grouped by Availability State. The resource groups listing page allows you to group resources in the following ways:
- By Availability State. Groups resources based on their current availability states (Down, Up, Unknown, Undefined, Unmonitored). This view helps you quickly identify resources by their state.
- By Native Type. Resources are grouped by their native types (VMware Virtual Machine, K3s Master, etc.). By default, if native type is not available for a resource, it is listed as NULL native type.
- By Installed App Name. Resources are grouped based on installed applications. This view shows counts across categories (ALL, NULL, VMware Virtual Machine, VMware host, etc.) and allows you to see which apps are installed on different resources with their associated counts.
- By State. Groups resources based on their current states (Managed, Unmanaged, Discovered).
- By Metric. The top 50 and bottom 50 resources are shown for metrics (CPU, Disk, Memory) within a group or site. This grouping allows you to focus on the best and worst performing resources, CPU, Disk and Memory usage percentage.
The page also has Search, Filter, Export, and column Settings options.
See Infrastructure Search for more information on these features.
To view resource summary:- Use search option to search for the resource.
- Click anywhere in the row. A slide-out is displayed that has all the information related to the resource including resource name, IP Address, number of alerts, tickets, notes, schedule maintenance details, Overview, Related resources, custom attributes, related service groups and resource groups.
You can perform actions like assign credentials and custom attributes, add maintenance window or a note, edit attributes, assign templates, unmanage, and delete.
The actions are displayed based on the resource type.
Refer the above link for more details.
To view complete resource details:
- Click the resource name. The infrastructure resource details screen is displayed.
See New Resources screen for more information.
Edit resource group
Follow these steps to edit an existing resource group:
Navigate to Infrastructure > Groups.
From Infrastructure Home Tab, click the Resource Categories dropdown available on the left pane.
Select Groups. All groups under the tenant are listed.
Click search icon and enter the group name.
Hover the mouse over the group name and click action (three dots) icon.
Select Edit. The EDIT GROUP screen is displayed.

Update the details on EDIT GROUP screen:
RESOURCE GROUP DETAILSField Name Field Type Description Name String Update the group name, if required. Parent Group Dropdown This field is not editable. Description String Update description of the group. ASSIGNED RESOURCES: - Filter Criteria
- Click anywhere in the Filter Criteria box and modify the query in the advanced search box, if required. The matching results are displayed.
- Click APPLY SELECTION.
The updated OpsQL query is displayed in the Filter Criteria box. Resources are added.
Note: The maximum number of regex terms that can be used is 5.
Selection
To add resources using Filter Criteria:- Manually Assigned Resources
Dropdown To manually add resources: - Click anywhere in the Manually Assigned Resources dropdown and select the resources.
- Select the resources and click APPLY SELECTION.
Resources are added.
Note: You can add a maximum of 100 resources. To delete a resource, click x next to resource name.ARTICLES Tab You can add or unassign articles to the group.
For more information on how to add articles,
see Create a resource group.
To unassign article(s), select articles in the ARTICLES section and click Unassign.JOBS Tab You can add or unassign jobs to the group.
For more information on how to add jobs,
see Create a resource group.
To unassign job(s), select jobs in the JOBS section and click Unassign.- Unassign jobs from resources not belonging to this group
- It will force Un-assign jobs - If resources not selected in this group have jobs assigned to them, the assigned jobs will be removed. This means that devices/resources out of filter criteria/manually assigned are also affected.
Note: If there is another group or policy assigning the same jobs on not-selected resources, the assigned jobs will not be removed.
Selection
If you do not select this option, the jobs that are assigned at the resource level will remain unaffected, even if the resource is removed from the group due to some property change or manual intervention.CREDENTIALS Tab You can add or unassign articles to the group.
For more information on how to add credentials, see Create a resource group.
To unassign credential(s), select credentials in the CREDENTIALS section and click Unassign.- Unassign credentials from resources not belonging to this group
- It will force Un-assign credentials - If resources not selected in this group have credentials assigned to them, the assigned credentials will be removed. This means that devices/resources out of filter criteria/manually assigned are also affected.
Note: If there is another group or policy assigning the same credentials on not-selected resources, the assigned credentials will not be removed. - Unassign custom attributes from resources not belonging to this group
- It will force Un-assign custom attributes - If resources not selected in this group have custom attributes assigned to them, the assigned custom attributes will be removed. This means that devices/resources out of filter criteria/manually assigned are also affected.
Note: If there is another group or policy assigning the same custom attributes on not-selected resources, the assigned custom attributes will not be removed.
Selection
If you do not select this option, the credentials that are assigned at the resource level will remain unaffected, even if the resource is removed from the group due to some property change or manual intervention.CUSTOM ATTRIBUTES Tab You can add or unassign custom attributes to the group.
For more information on how to add custom attributes, see Create a resource group.
To unassign custom attributes(s), select custom attributes in the CUSTOM ATTRIBUTES section and click Unassign.Selection
If you do not select this option, the custom attributes that are assigned at the resource level will remain unaffected, even if the resource is removed from the group due to some property change or manual intervention.Click SAVE. The resource group is saved.
Add resource subgroup
Follow these steps to add a subgroup under a group:
- Navigate to Infrastructure > Groups.
- From Infrastructure Home Tab, click the Resource Categories dropdown available on the left pane.
- Select Groups. All the groups under the tenant are listed.
- Click search icon and enter the group name.
- Hover the mouse over the group name and action (three dots) icon.
- Select Add Subgroup. The ADD GROUP screen is displayed.
You can change the Parent Group, if required.
For more information on how to add group, see Create a resource group. - Click SAVE. The Subgroup is created and is displayed under the parent group.
- A down arrow indicates a group that has a subgroup. Click the down arrow to view the created subgroup.
- You can create a subgroup for a child resource group.
Create scheduled maintenance
You can create scheduled maintenance on a resource group.
Follow these steps to create scheduled maintenance:
- Navigate to Infrastructure > Groups.
- From Infrastructure Home Tab, click the Resource Categories dropdown available on the left pane.
- Select Groups. All the groups under the tenant are listed.
- Click search icon and enter the group name.
- Hover the mouse over the group name and action (three dots) icon.
- Select Scheduled Maintenance. The ADD SCHEDULED MAINTENANCE screen is displayed.
- See Scheduled Maintenance for information on how to create scheduled maintenance.
- Click SAVE. The maintenance window is saved and a confirmation message appears.
View Activity Log
The View Activity Log functionality allows you to access logs related to resource groups. It allows you to monitor all activities and modifications made to groups.
Follow these steps to view activity logs:
- Navigate to Infrastructure > Groups.
- From Infrastructure Home Tab, click the Resource Categories dropdown available on the left pane.
- Select Groups. All the groups under the tenant are listed.
- Click search icon and enter the group name.
- Hover the mouse over the group name and action (three dots) icon.
- Select View Activity Log. The Logs window is displayed.
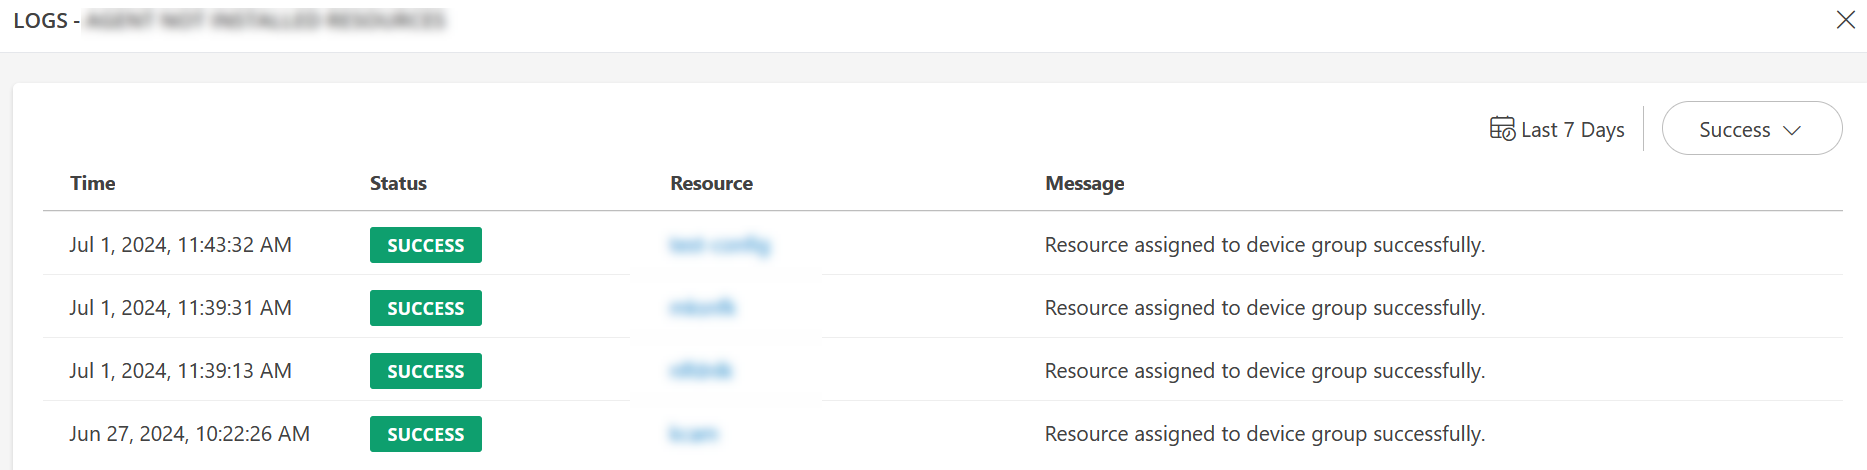
- Click on a log. The LOG DETAILS slide-out is displayed with additional information on the log.
To display logs based on date range:
- Click the date picker icon and select the desired range.
By default, logs are displayed for the last 7 days. - Click APPLY.
- Click the date picker icon and select the desired range.
To filter logs based on status:
- Click the dropdown next to the date picker.
- Select a status. By default, all success logs are displayed.
Note: Logs are generated based on rules. If resources are added manually, then logs do not appear.
Remove a resource group
Follow these steps to remove a resource group:
- Navigate to Infrastructure > Groups.
- From Infrastructure Home Tab, click the Resource Categories dropdown available on the left pane.
- Select Groups. All the groups under the tenant are listed.
- Click search icon and enter the group name.
- Hover the mouse over the group name and action (three dots) icon.
- Select Remove. A confirmation popup is displayed.
Note:- The group and its subgroups will be removed. Any resources assigned to this group will remain intact and will not be deleted.
- Verify the deletion to prevent accidental removal of critical groups.
- The group and its subgroups will be removed. Any resources assigned to this group will remain intact and will not be deleted.
- Click REMOVE.
Note: You can also use the component menu (three dots) on the right-top corner of the page to perform all the above actions.
Troubleshooting
The following are known permission-related issues you may encounter while creating or editing resource groups, along with the causes and resolutions:
You might encounter an Access denied error while creating or editing a resource group. Despite this error, you will still be able to create the resource group. However, you will not be able to view the ARTICLES tab.
Reason: You do not have the Knowledge Base – View permission.
Resolution: Add Knowledge Base – View Permission. This will prevent the Access denied error and allow you to view or add the list of KB articles.
You might encounter an Access denied error while creating or editing a resource group. Despite this error, you will still be able to create the resource group. However, you will not be able to view the CREDENTIALS tab.
Reason: You do not have the Credentials – View permission.
Resolution: Add Credentials – View Permission. This will prevent the Access denied error and allow you to view or add the list of credentials.
You might encounter an Access denied error while creating or editing a resource group. Despite this error, you will still be able to create the resource group. However, you will not be able to view the
CUSTOM ATTRIBUTES tab.Reason: You do not have the Custom Attributes – View permission.
Resolution: Add Custom Attributes – View Permission. This will prevent the Access denied error and allow you to view or add the list of custom attributes.
You might encounter an Access denied error while creating or editing a resource group. Despite this error, you will still be able to create the resource group. However, you will not be able to view the JOBS tab.
Reason: You do not have the Jobs – View permission.
Resolution: Add Jobs – View Permission. This will prevent the
Access denied error and allow you to view or add the list of jobs.
See Manage Permission Sets for information on modifying your permission sets,