Introduction
A user group refers to a set of users who can access different resource groups with different permissions. You can also assign roles to user groups to allow or disallow specific actions.
Permissions
Permissions required to view the User Groups List:
| Type of user | Permissions |
|---|---|
| MSP | Users_View |
| Client | Administration and Users_View |
Following are the permissions required to Manage (Add, Update, Delete) User Groups:
| Type of user | Permissions |
|---|---|
| MSP | Users_Manage |
| Client | Administration and Users_Manage |
Note
In addition to the above permissions, the user must be added to All User Groups. To do this, navigate to Setup > Account > Users and Permissions > Users. Verify if the All user groups option is selected in the user details page. If not, select the All user groups option from the Assigned User Groups section.
If the user has access to No user groups or to restricted user groups, i.e., if None or Specified user groups is selected from the Assigned User Groups section, then the user cannot Add or Remove user groups.
Create a User Group
Follow these steps to create a user group:
Navigate to Setup > Account. The Account Details page is displayed.
Click the Users and Permissions tile on the Account Details page. The Permission Sets page is displayed.
Click the USER GROUPS tile.
Click +ADD. The ADD USER GROUP page is displayed.
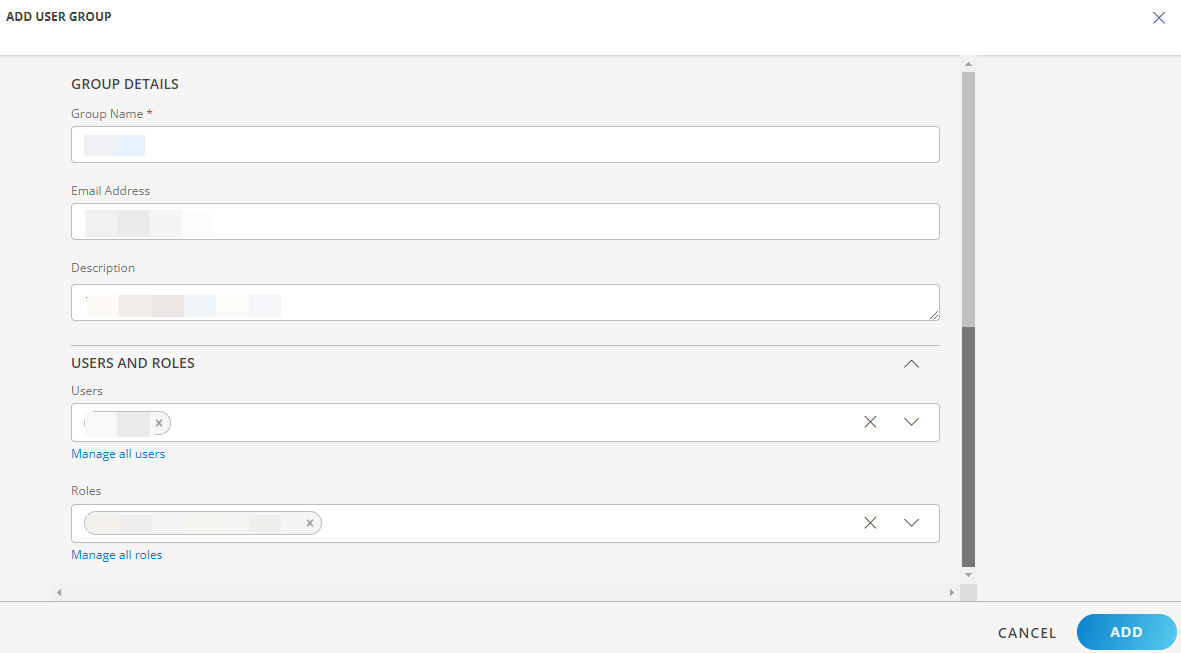
Provide the following information in the fields:
Group Name: Enter a unique Group Name.
Email Address: Enter email IDs of users. The email field is required if the user group is considered as a distribution list. This distribution list can be viewed while selecting the users for escalating alerts.
Provide a short description about the User Group in the Description field.
Select a user(s) from the Users dropdown, to assign the users to the user group. Click Select All to select all the users.
Click the Manage all users link, to add, view user details, or deactivate a user.Select a role(s) from the Roles dropdown, to assign the roles to the user group. Click Select All to select all the roles.
Click the Manage all roles link, to add, view role details, or remove a role. Note: You cannot delete a default role.
Click ADD. The User Group is created and displayed in the list.
Actions on user group
You can perform the following actions after creating a user group:
| Action | Procedure/Description |
|---|---|
| Search | To search for a user group, click the search icon on the User Groups page. Type the user group name in the search box. The search result is displayed. |
| View and Edit | To view the details of a user group, click the user group name. To edit a user group:
|
| Remove | To remove a user group:
|
You can view the number of user groups on the Users and Permissions tile on the ACCOUNT DETAILS page.