Introduction
SSO integration configuration is done with both PingOne and OpsRamp. The configuration sets up redirects to the custom branded URL.
Prerequisites
- Partners must register with OpsRamp to get OpsRamp login credentials.
- Provide your custom branding URL (such as
<yourwebsitename>.opsramp.com).
Step 1: Create a certificate
From the PingOne console, navigate to Settings > Certificates & Key Pairs > + Add > Create Key Pair.
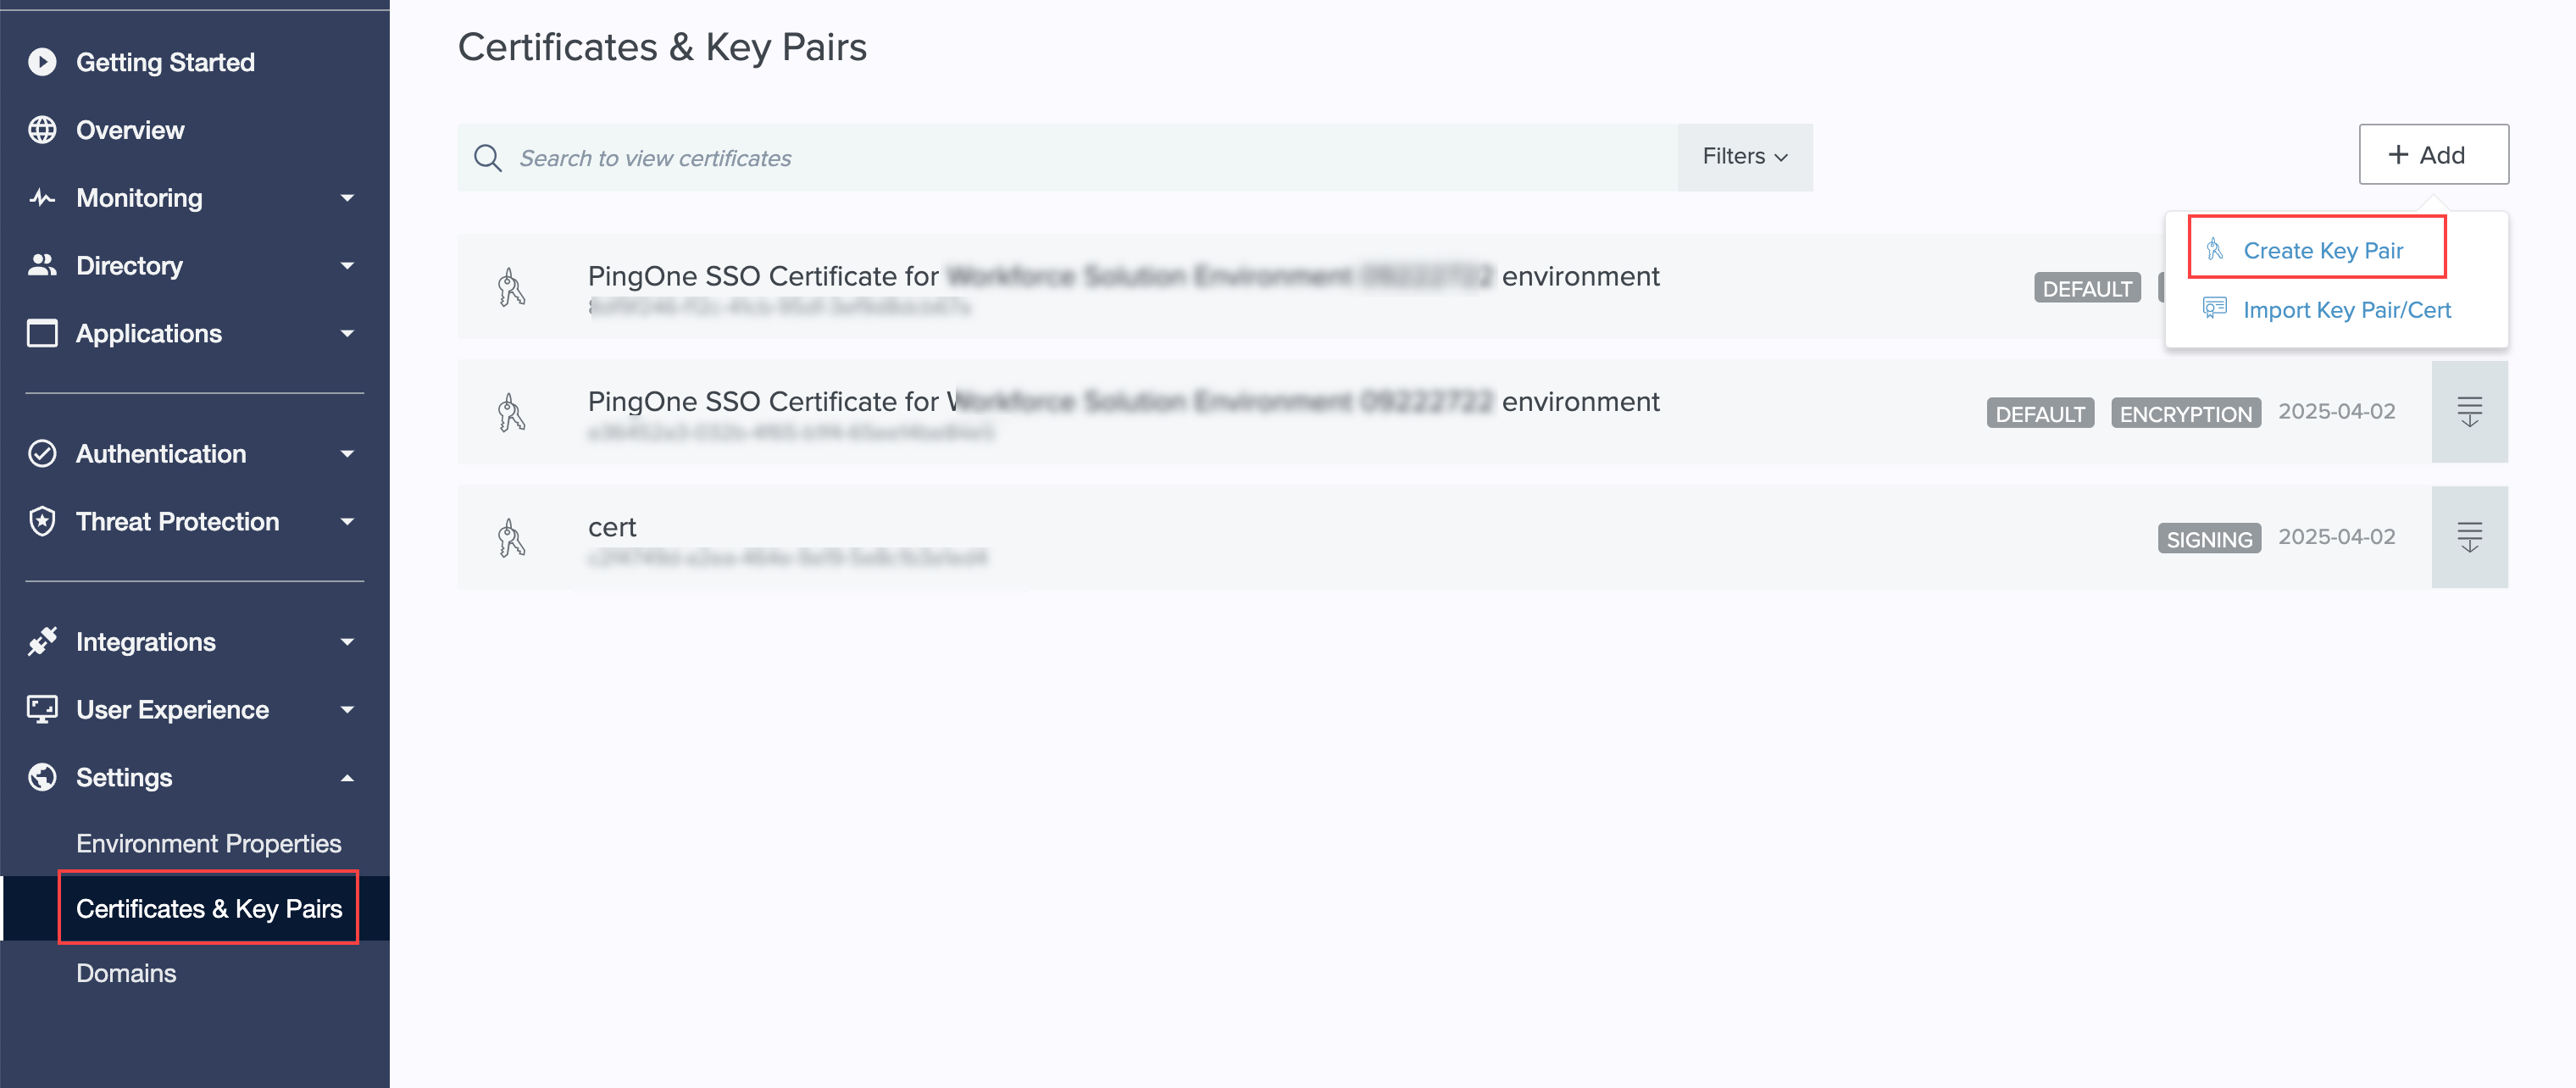
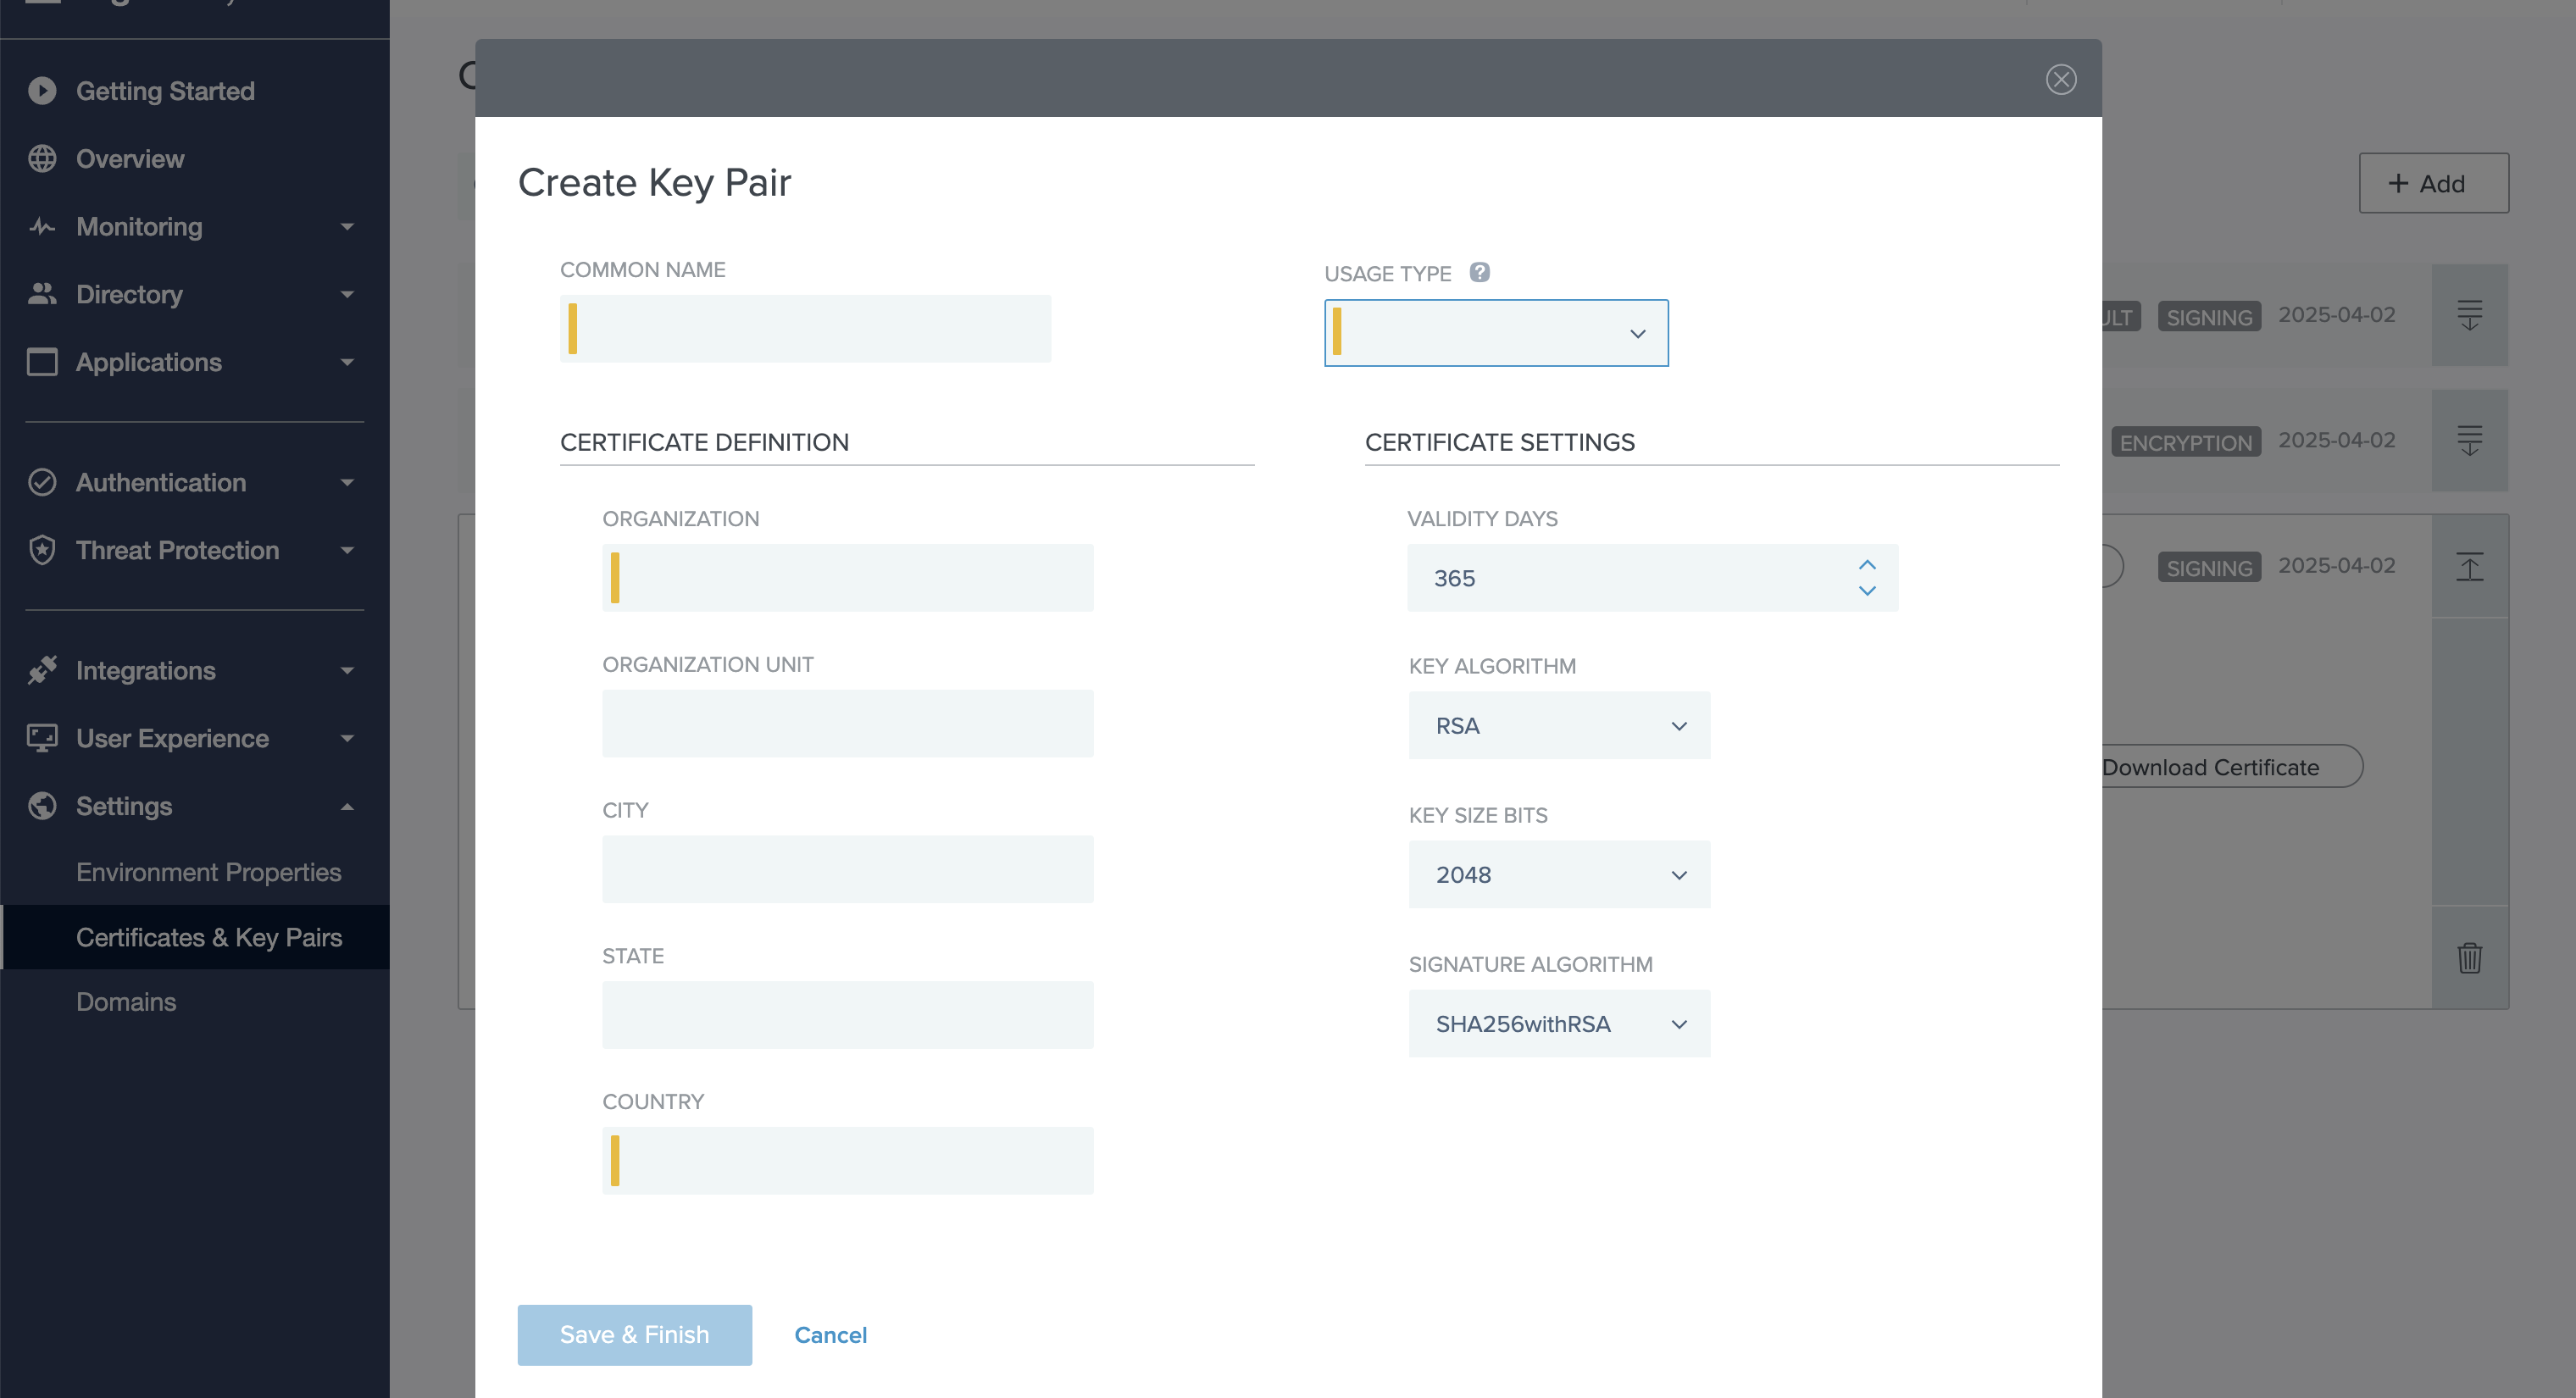
From the Create Key Pair screen, enter the required details and click Save & Finish.
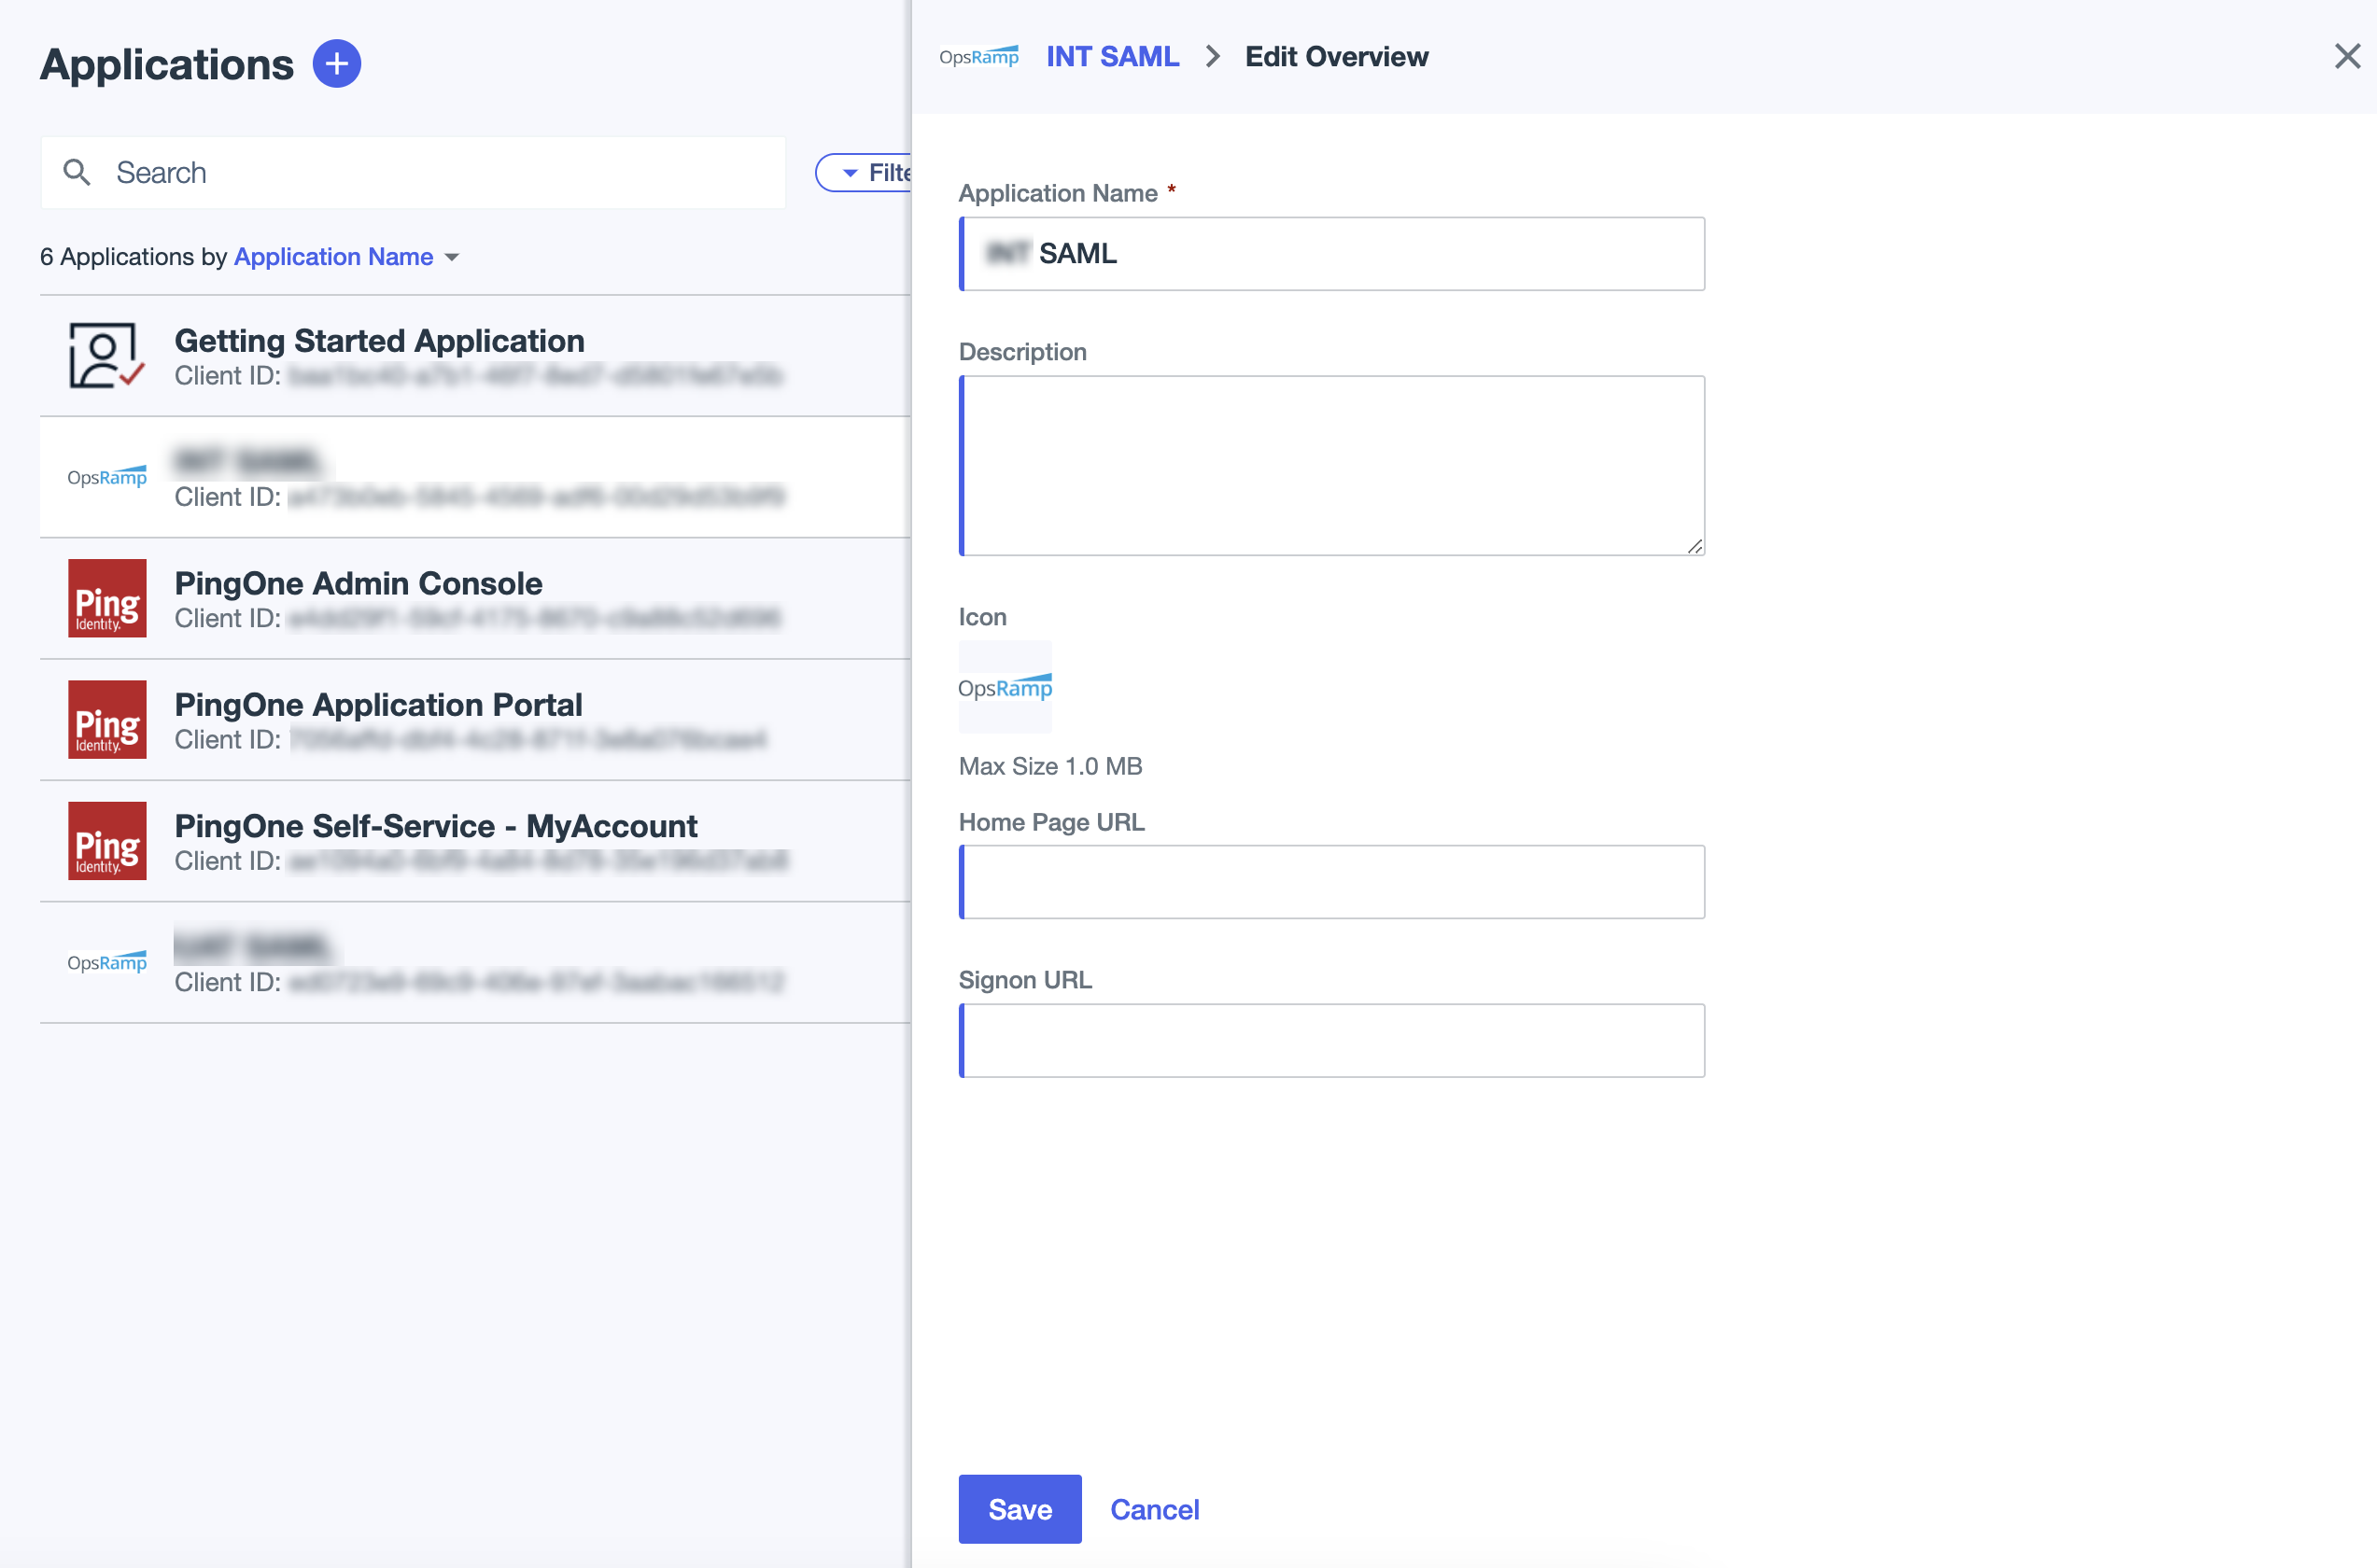
Step 2: Create a SAML application
Navigate to Applications > Applications > +.
Enter the Application Name.
Enter a description about the application in the Description field.
Select the SAML Application tile.
Click Configure.

From the Add Application page, select an option from the following in the Provide Application Metadata field:
- Import Metadata: Use this option if you have metadata for the already existing application.
- Import From URL: Provide the URL where the metadata is available.
- Manually Enter: Enter the following information:
- Assertion Consumer Service (ACS) URLs: https://
.opsramp.com/samlResponse.do. Click +Add to add more URLs. - Entity ID: https://
.opsramp.com
- Assertion Consumer Service (ACS) URLs: https://
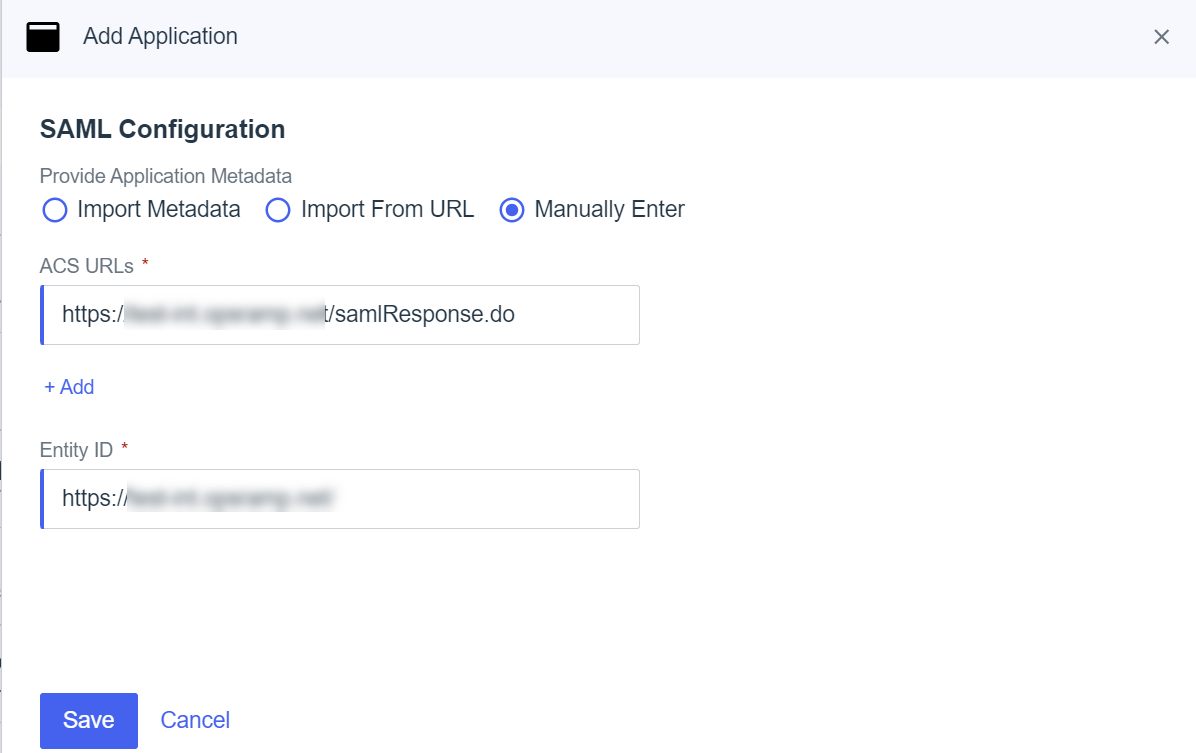
Click Save. Attribute mapping is saved by default.
In the Attribute Mappings tab, click the Edit icon and click Add to add attribute mappings.
Note: Use the newly added attributes for JIT provisioning in OpsRamp.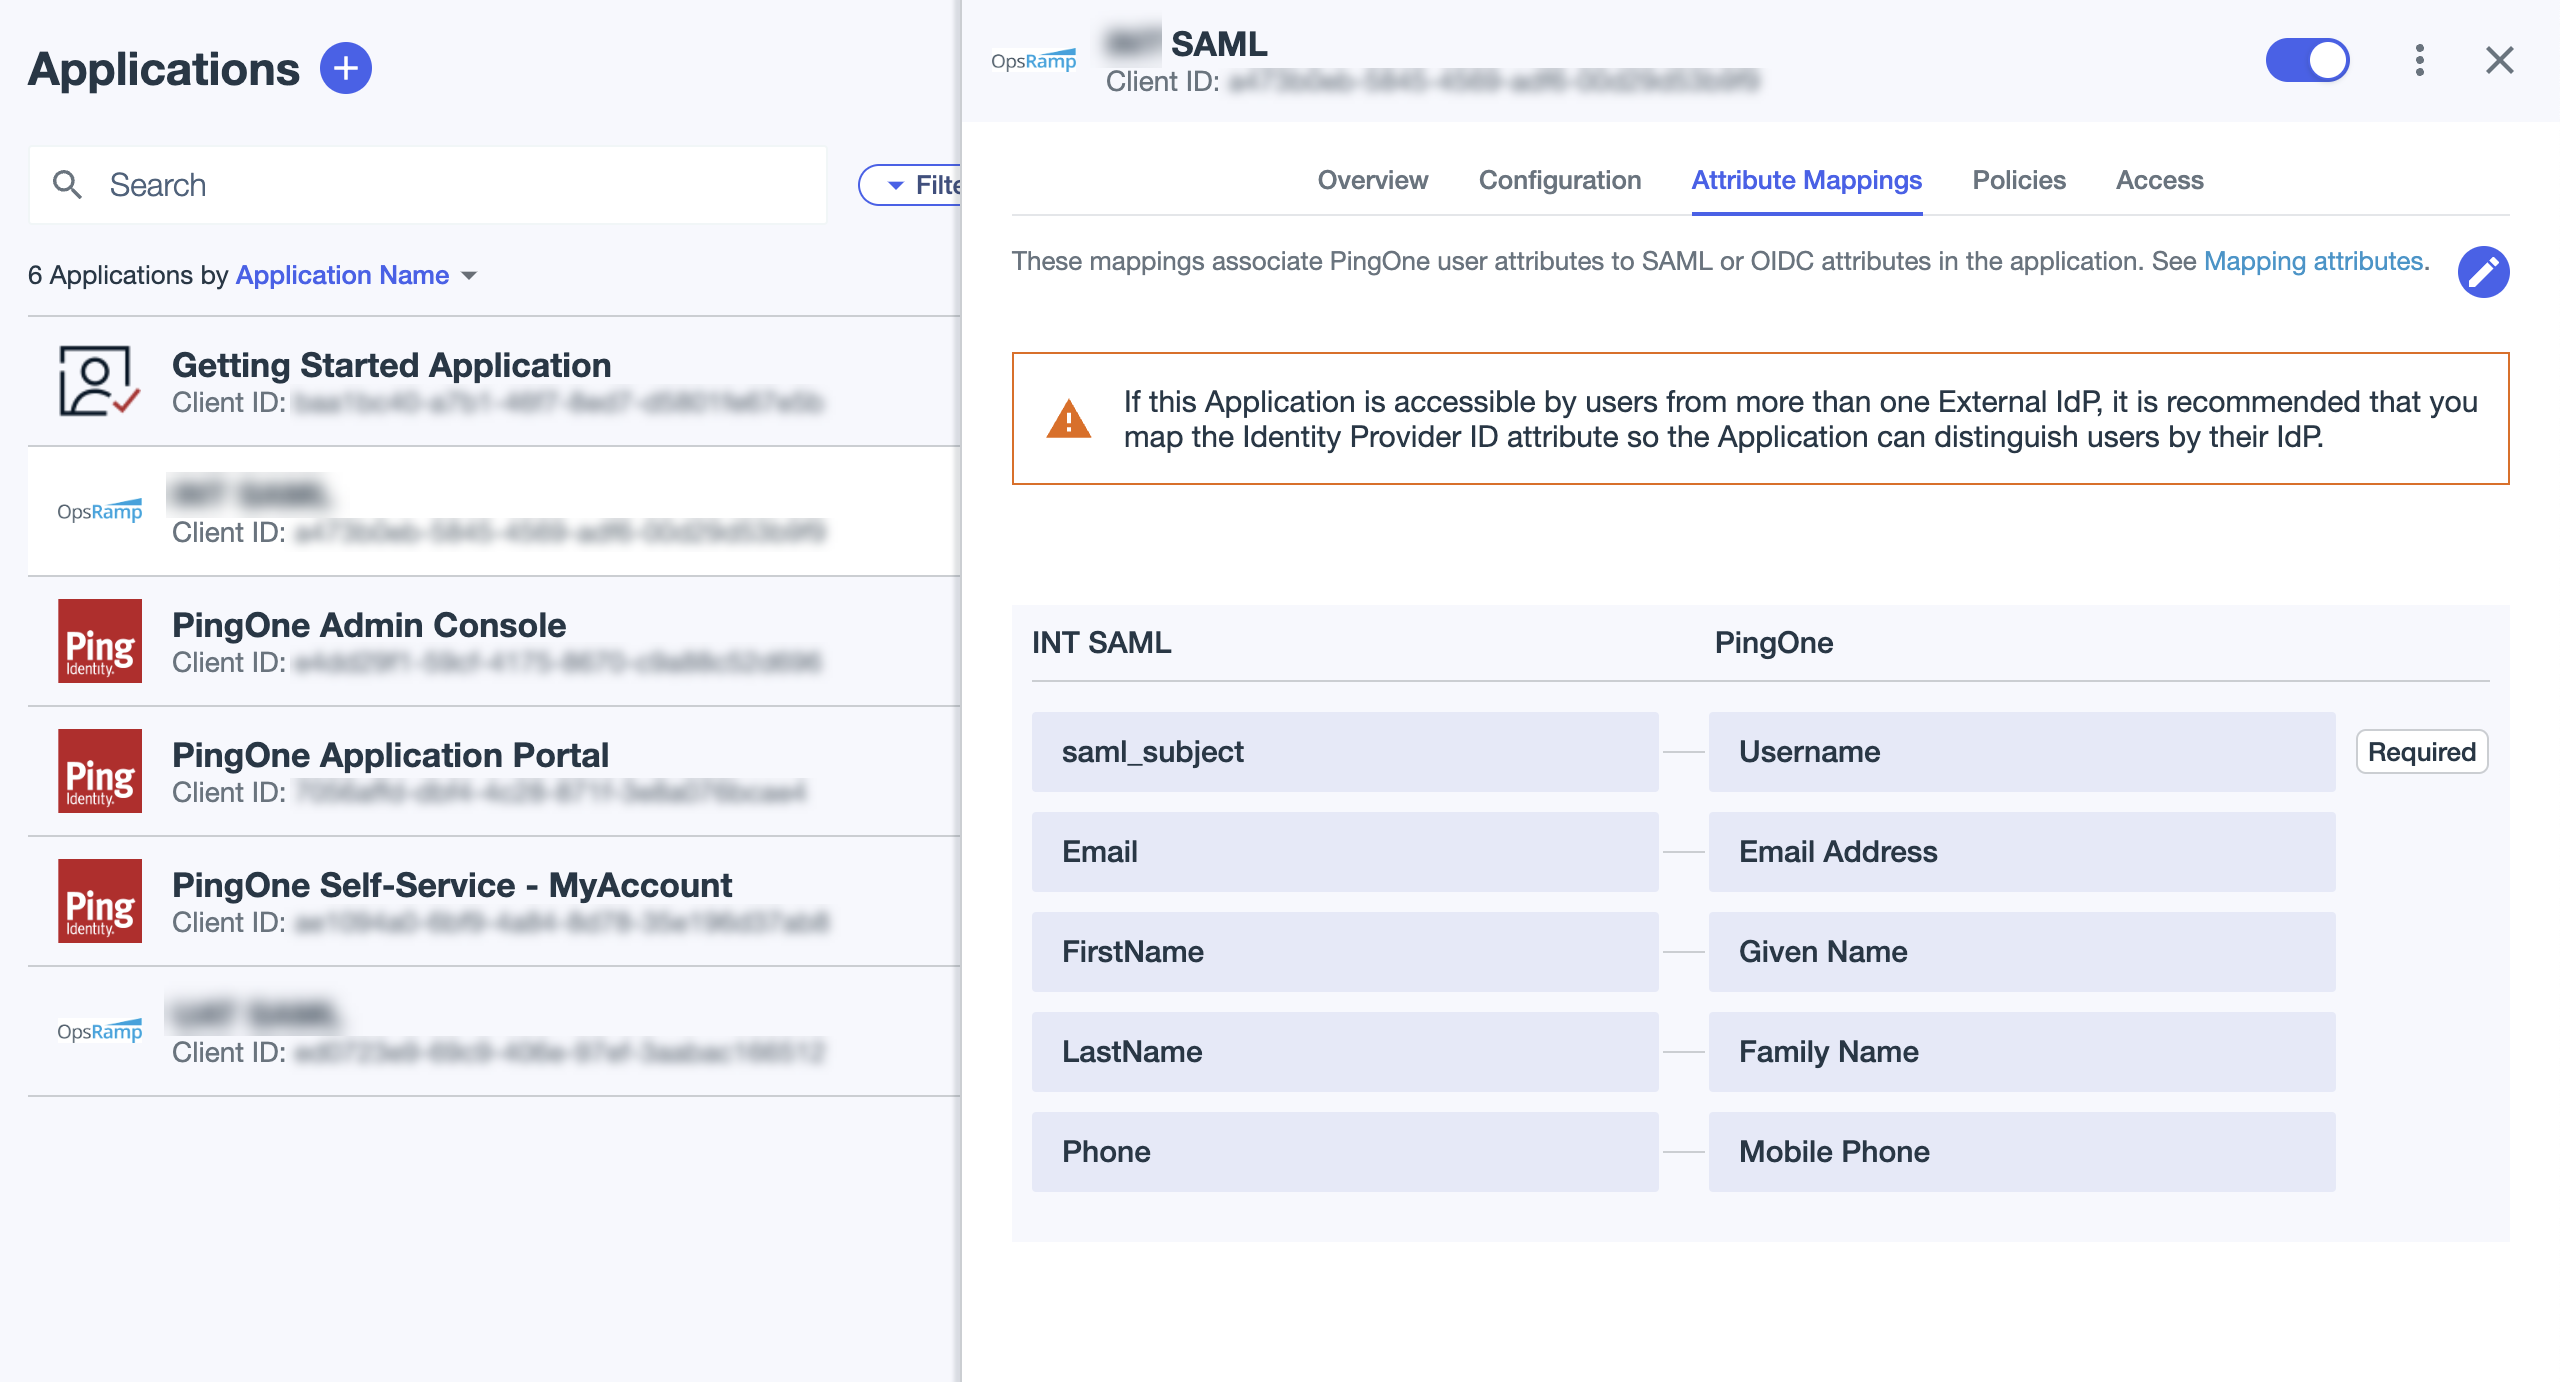
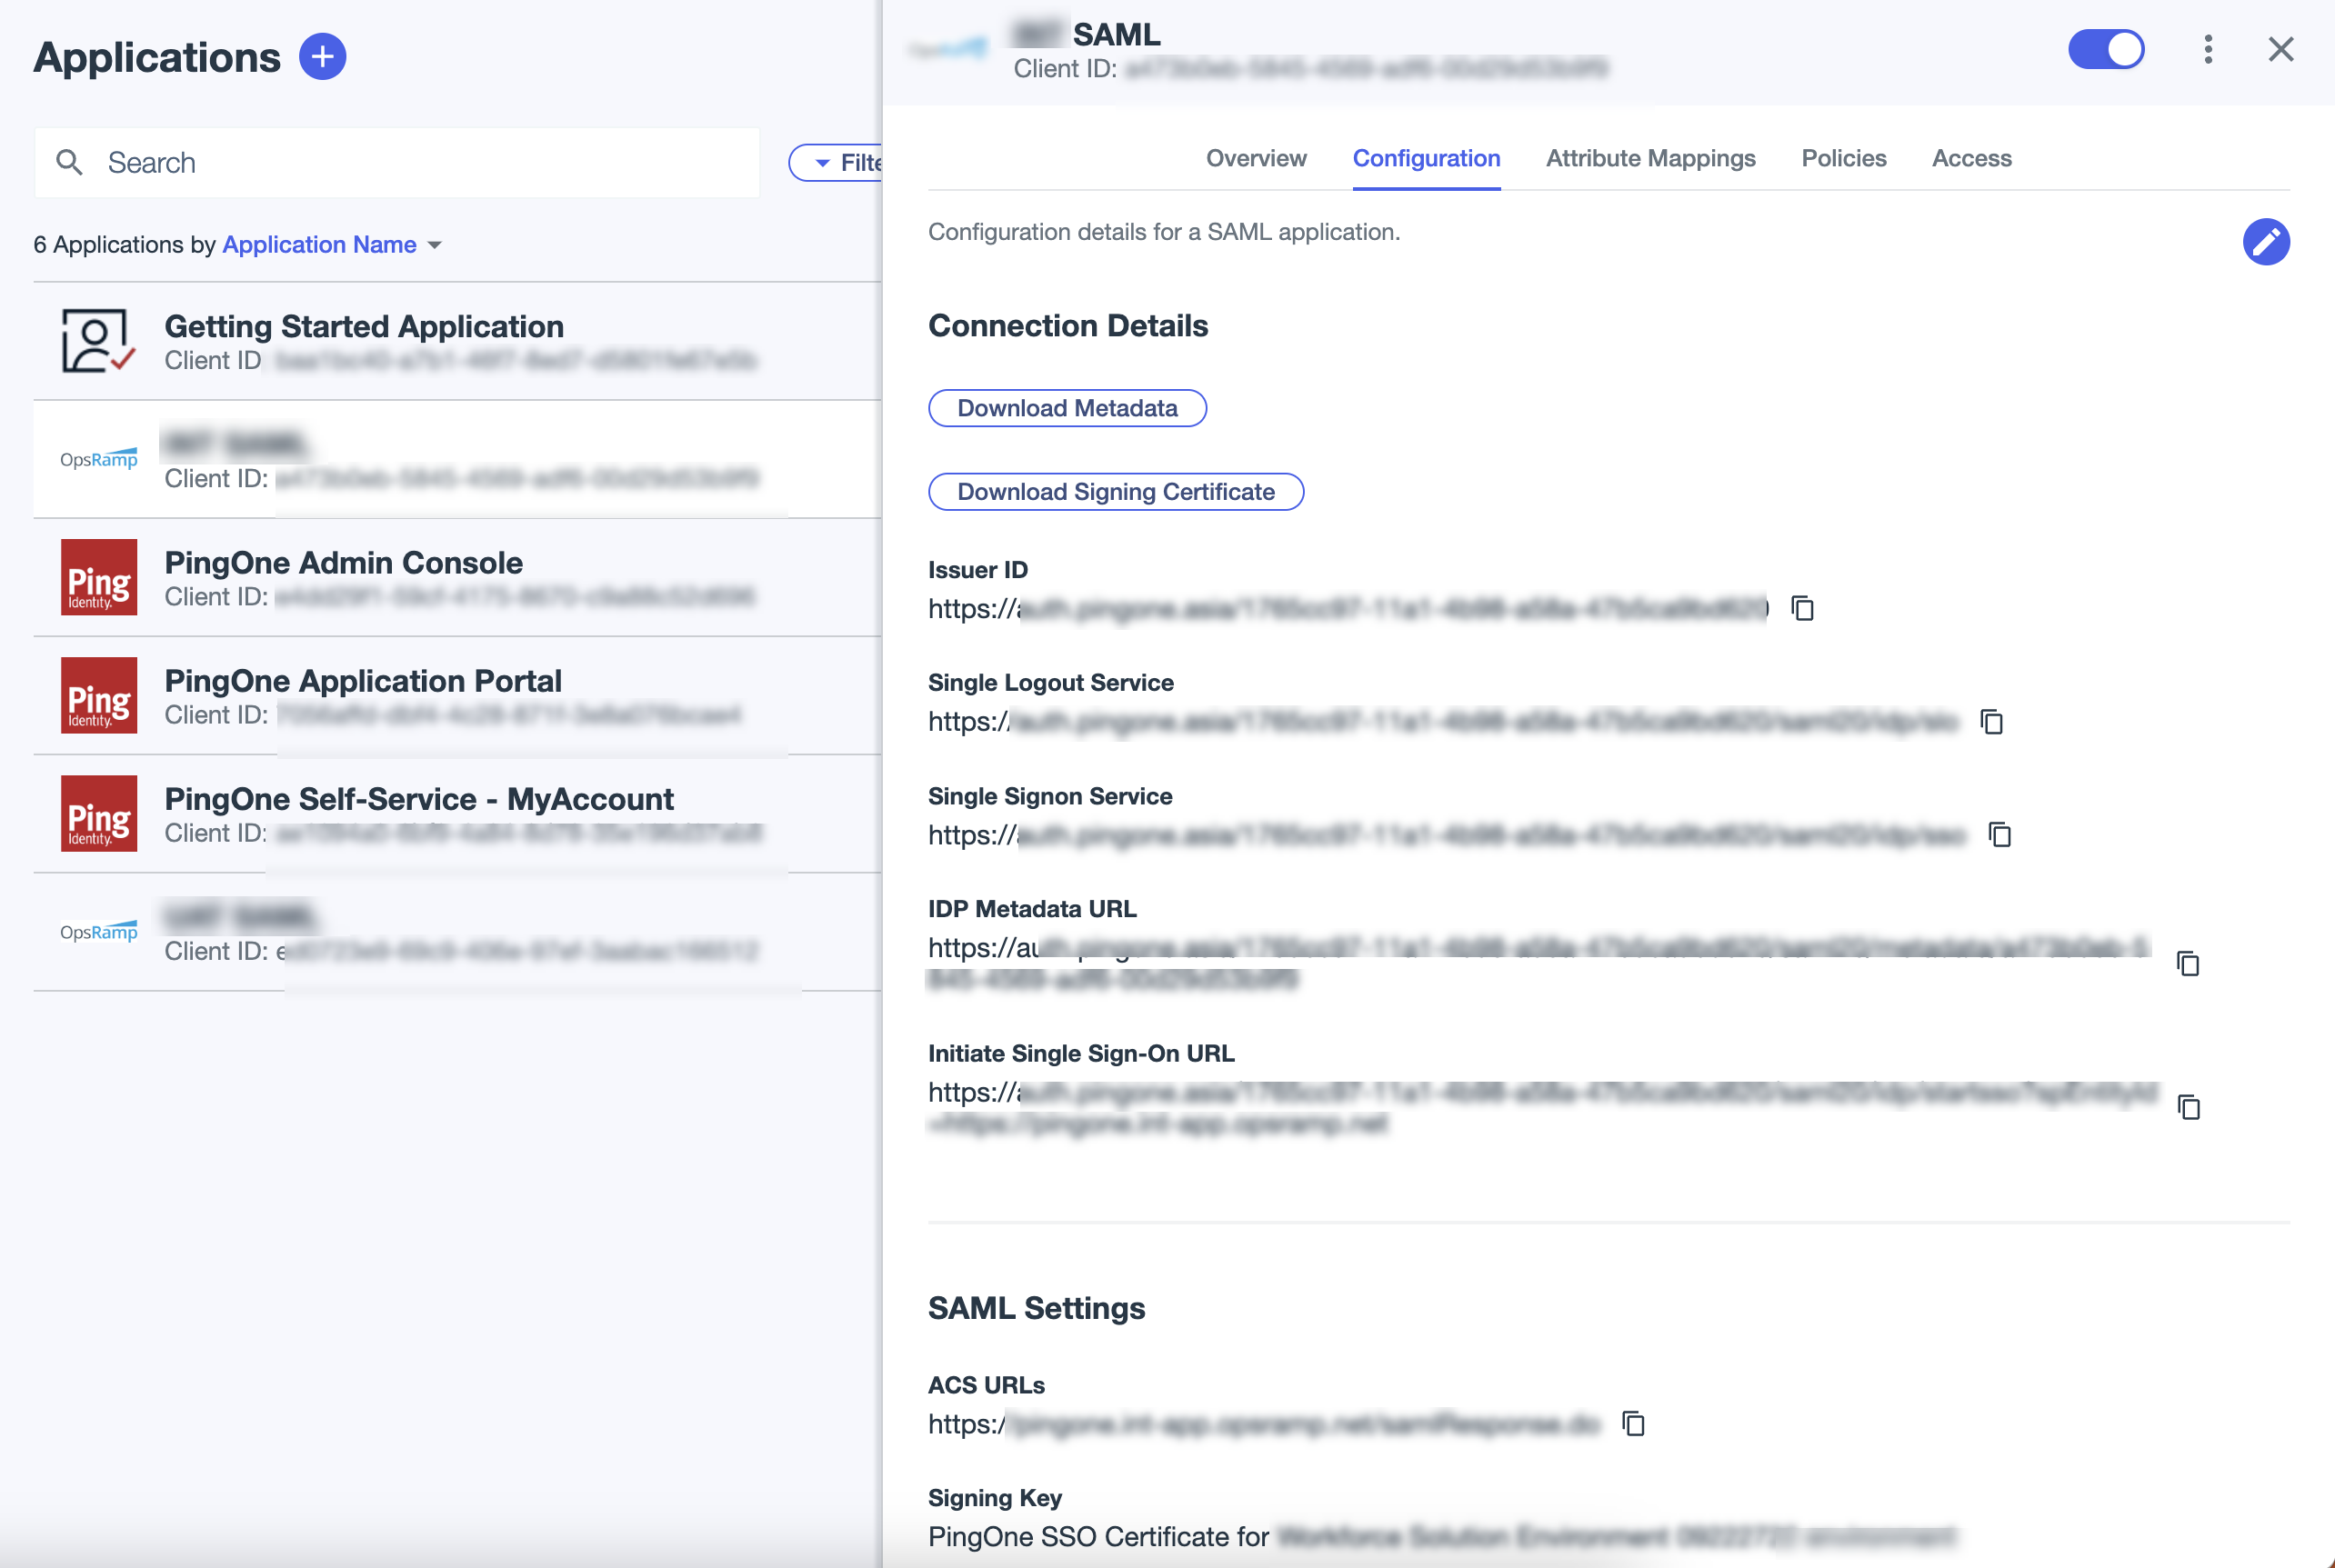
Click the Configuration tab.
Review the SAML application for Single Sing-On URL.
Download the SAML Metadata and copy the entityID URL.
Example: If the entityID URL is<md:EntityDescriptor entityID="https://auth.pingone.asia/1765cc97-11a1-4b98-a58a-47b5ca9bd620"ID="DUp57Bcq-y4RtkrRLyYj2fYxtqR" xmlns:md="urn:oasis:names:tc:SAML:2.0:metadata">, the issuer URL ishttps://auth.pingone.asia/1765cc97-11a1-4b98-a58a-47b5ca9bd620.Download the Signing Certificate and save it.
Copy the Initiate Single Sign-On (SSO) URL.
Step 3: PingOne configuration for SCIM provisioning
Follow these steps to configure SCIM provisioning:
Click Integration > Provisioning
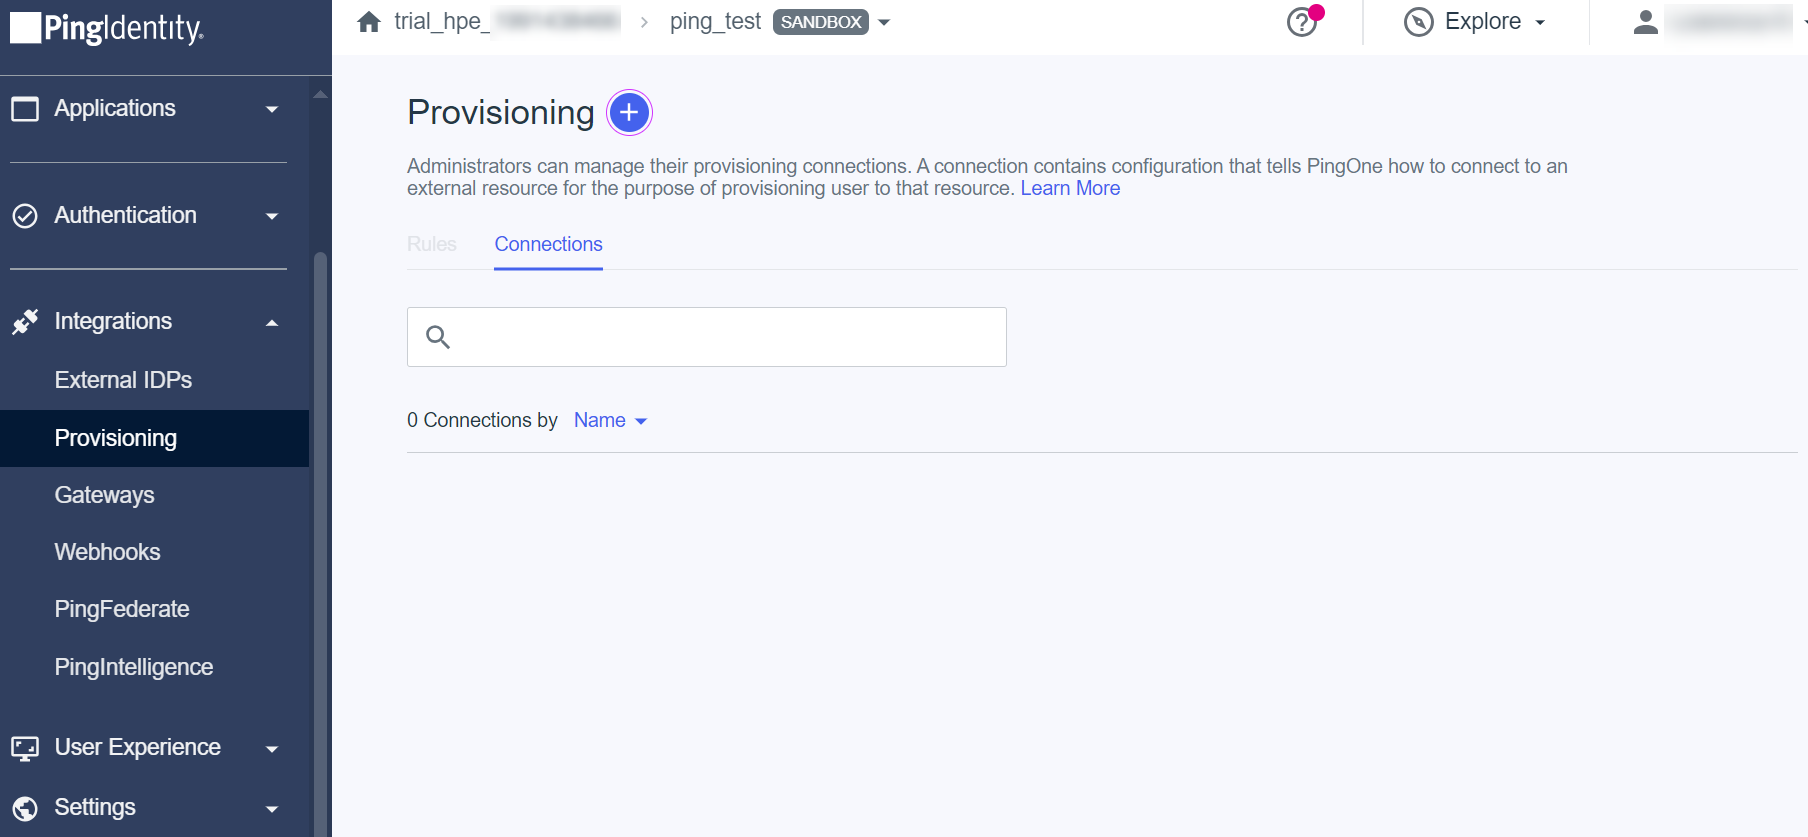
Click Provisioning + > New Connection. The Create a New Connection screen is displayed.
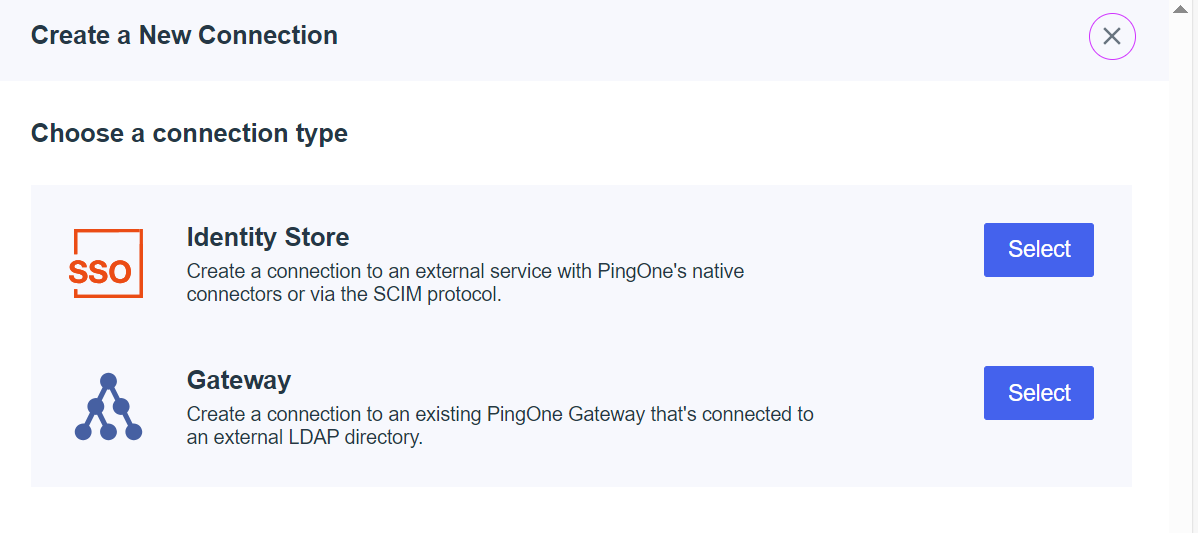
Select Identity Store. Search for SCIM Outbound and click select to select SCIM Outbound.
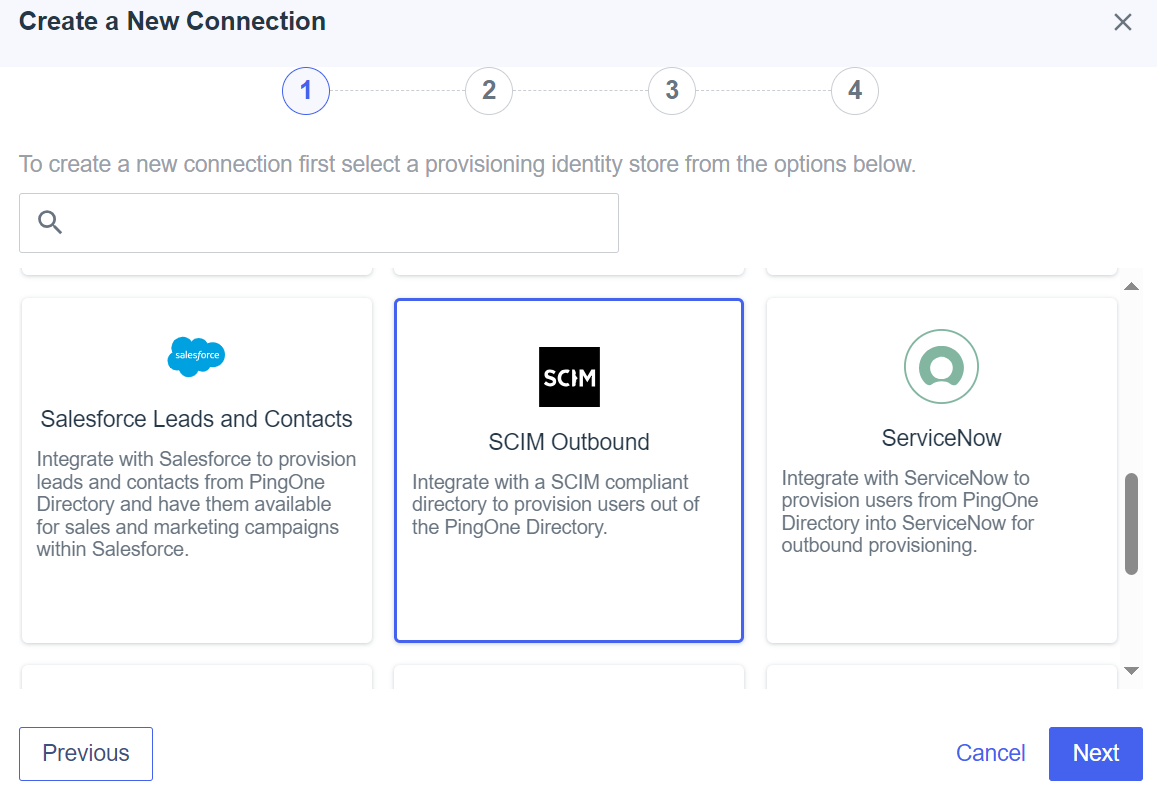
Click NEXT.
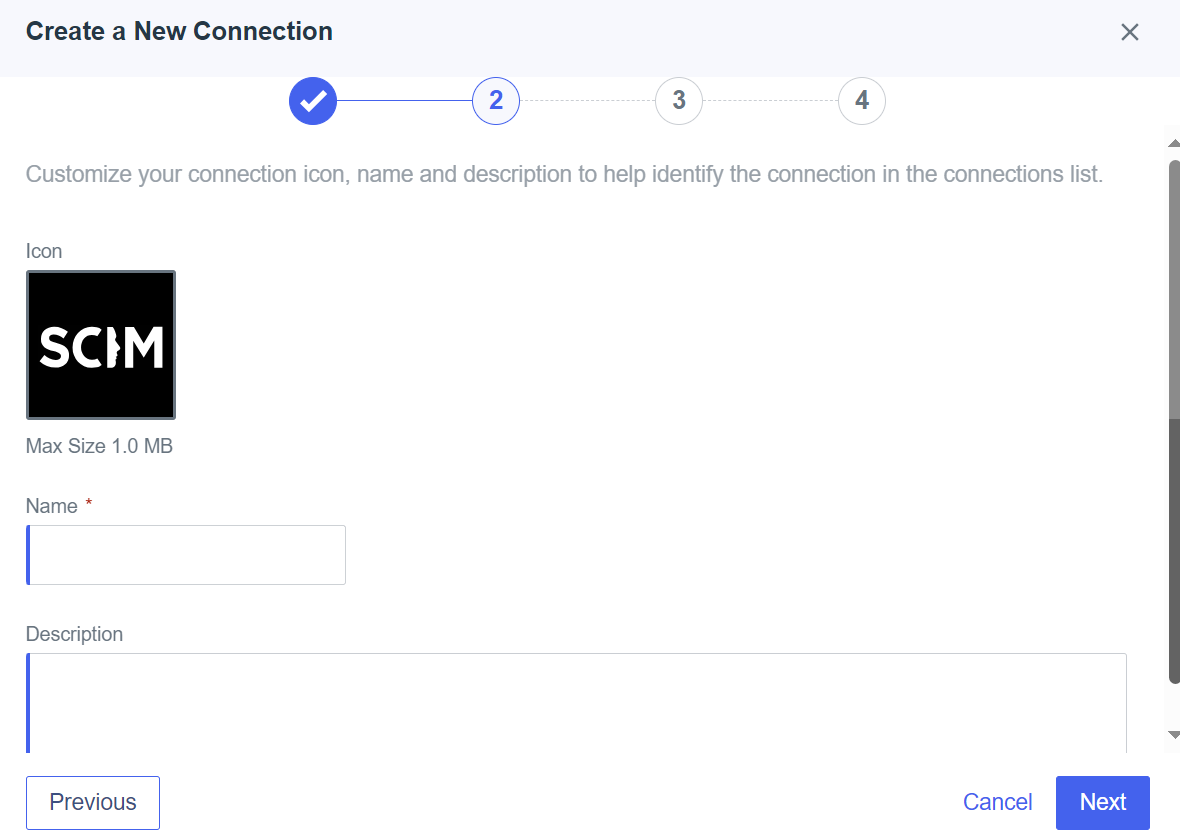
Enter the following information in the screen:
- Name: Enter the name of the connection.
- Description: Provide a description for the connection.
Click Next.
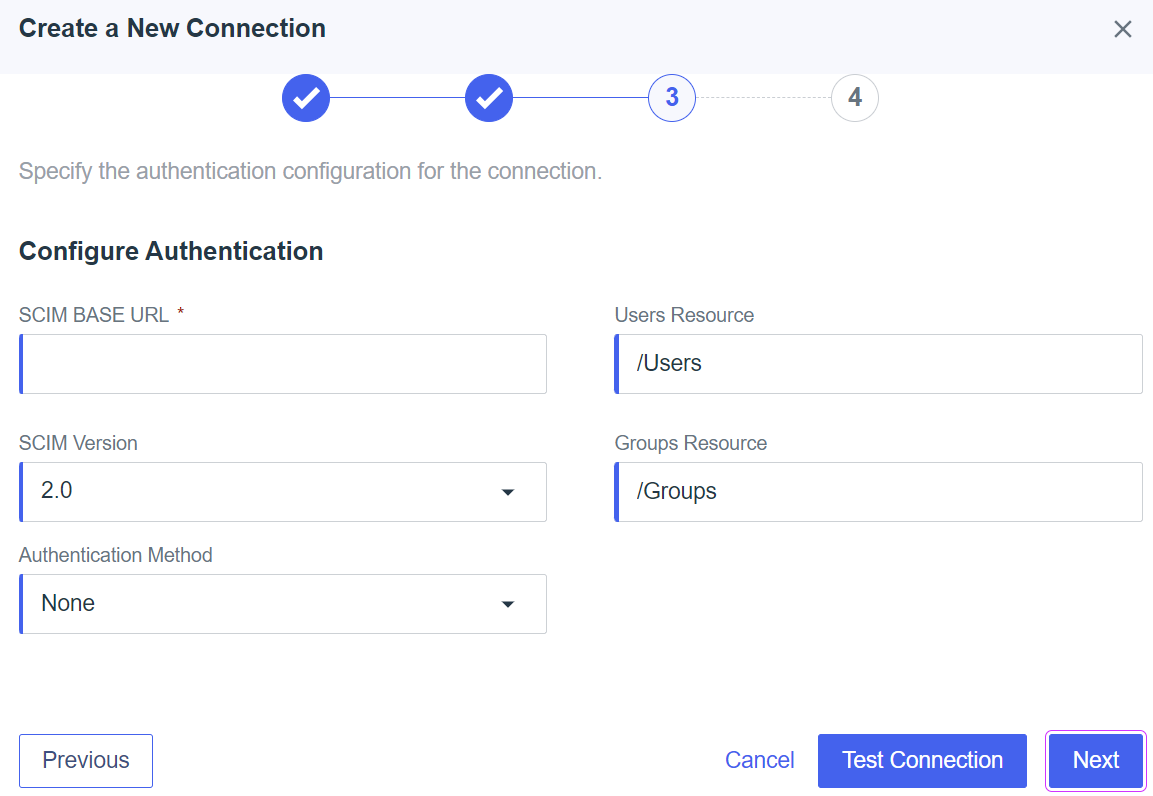
Under Configure Authentication, enter the following information:
- SCIM BASE URL: Copy the URL from OpsRamp Configuration and paste it in this field.
- SCIM Version: Select the version as 2.0.
- Authentication Method: Select OAuth 2 Bearer Token from the drop-down list.
- Oauth Access Token: Copy one-time token from OpsRamp Configuration and paste it in this field.
- Auth Type Header: Select the header as Bearer.
Click Next.
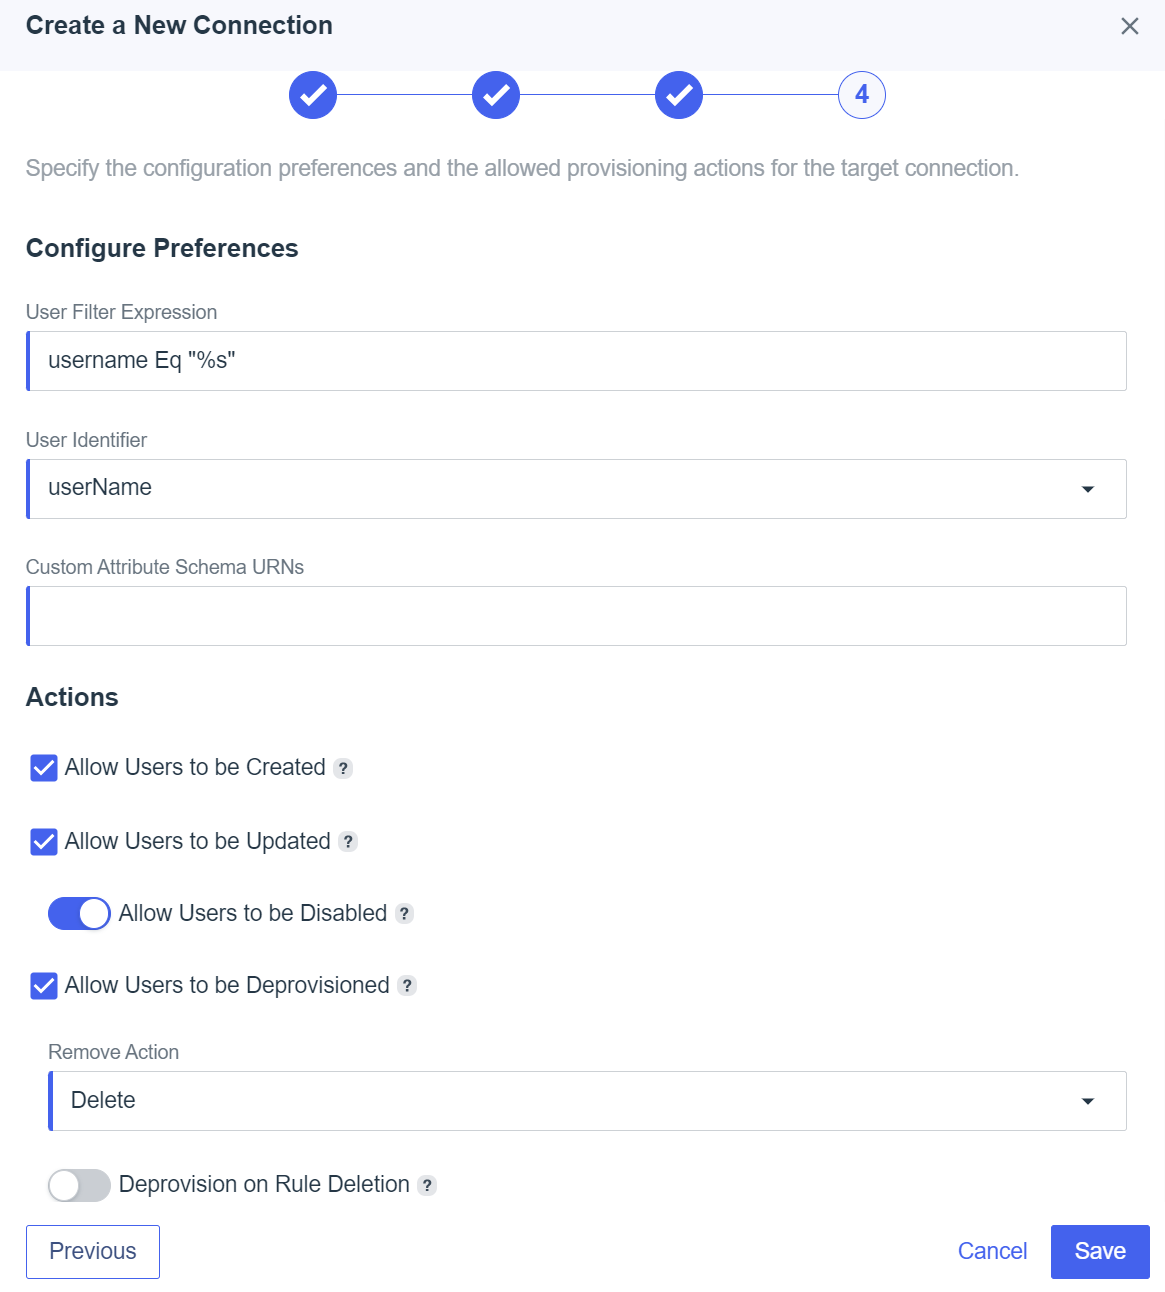
Enter the required information and click Save.
Step 4: OpsRamp configuration
From All Clients, select a client.
Navigate to Setup > Account.
Select the Integrations and Apps tab.
The Installed Integrations page, where all the installed applications are displayed. Note: If there are no installed applications, it will navigate to the Available Integrations and Apps page.
Click + ADD on the Installed Integrations page. The Available Integrations and Apps page displays all the available applications along with the newly created application with the version.
Search for Ping using the search option available. Alternatively, use the All Categories option to search.
Click +Add on the Ping tile.
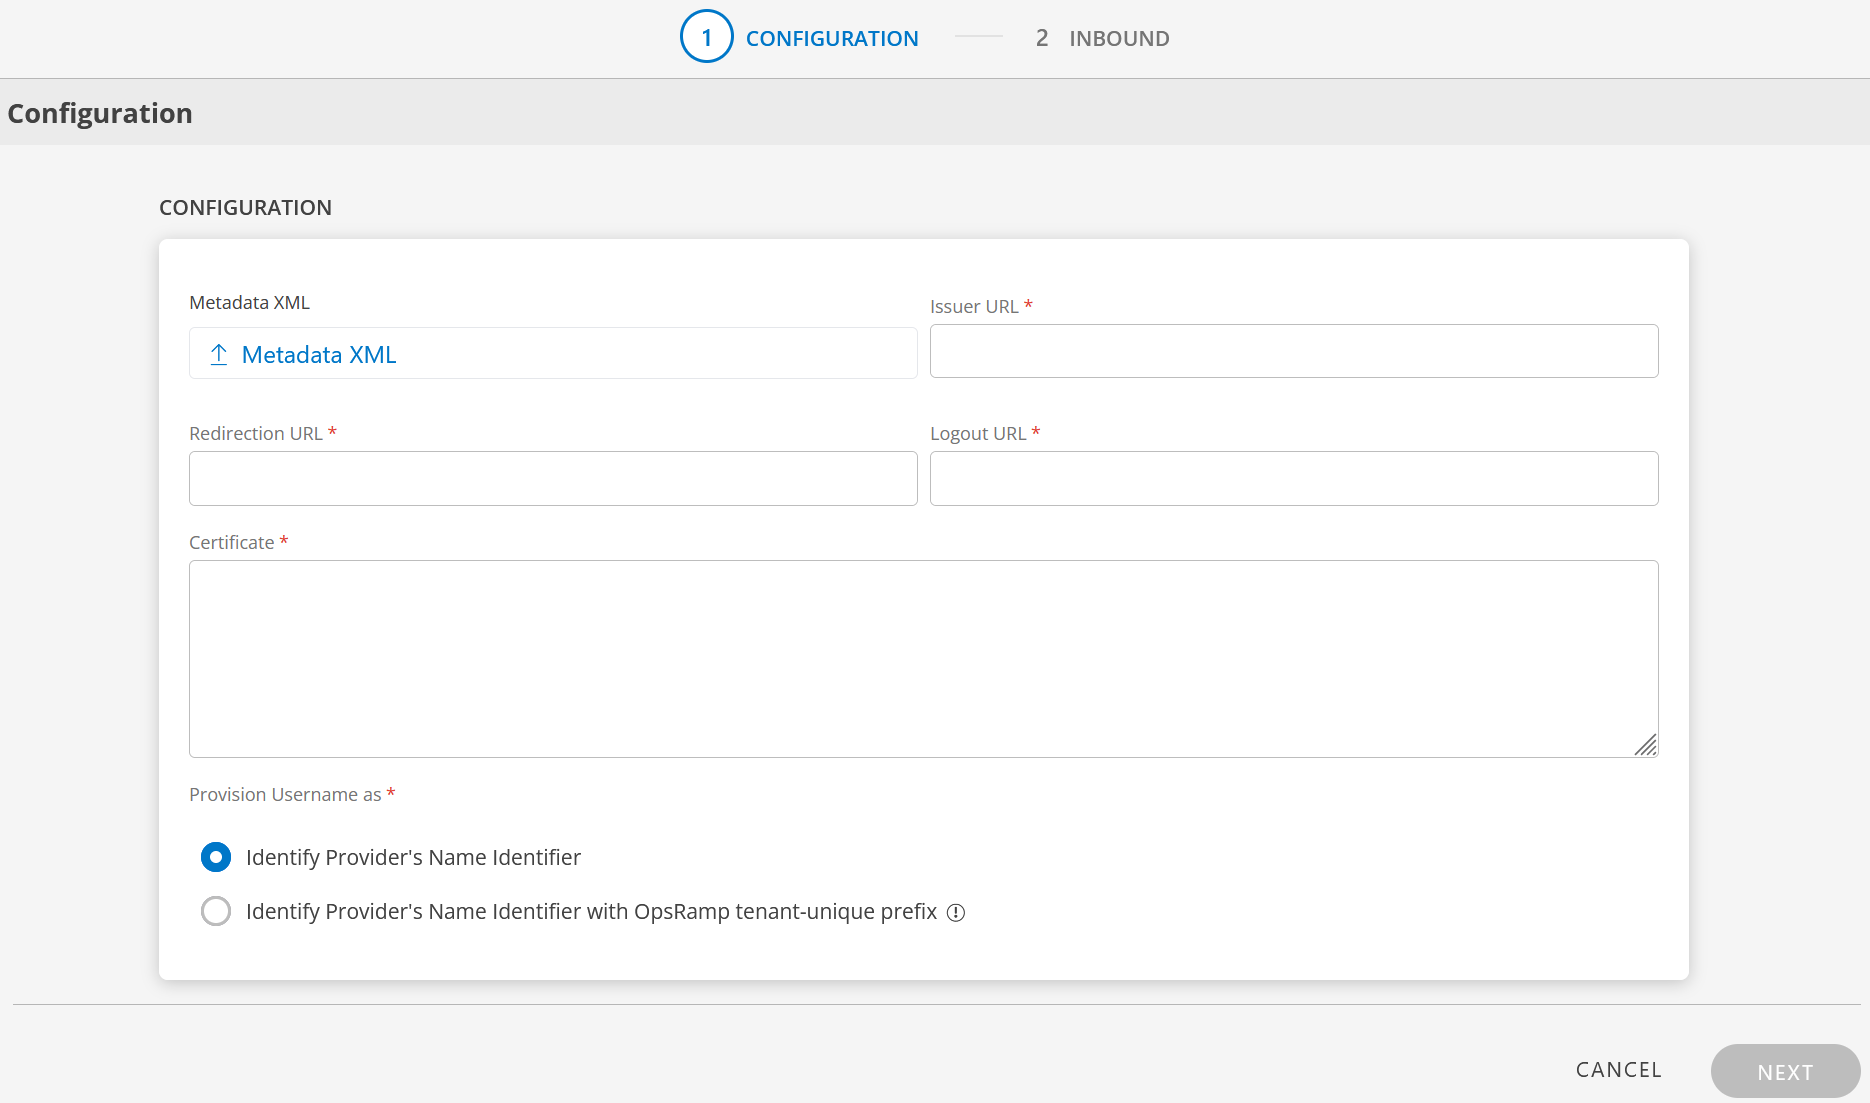
Enter the following information in the Configuration page:
- Metadata XML: Upload the XML file. This file will have all the information related to Issuer URL, Redirection URL, Logout URL, and Certificate. After you upload the Metadata XML file, these fields are automatically populated.
Alternatively, you can enter the information in the fields manually. - Issuer URL: Identity provider Issuer URL
- Redirection URL: SAML EndPoints for HTTP
- Logout URL: URL for logging out
- Certificate: x.509 Certificate
- Metadata XML: Upload the XML file. This file will have all the information related to Issuer URL, Redirection URL, Logout URL, and Certificate. After you upload the Metadata XML file, these fields are automatically populated.
Provision Username as: There are two ways to provision a user. Select the appropriate option:
Identify Provider’s Name Identifier option is selected by default. The user which is created in the SSO portal will reflect in OpsRamp.
Identify Provider’s Name Identifier with OpsRamp tenant-unique prefix: This option allows you to:
- Create usernames with a unique 3-digit alphanumeric prefix, that is generated automatically by the system.
- Install the same identity provider across multiple OpsRamp tenants.
Note: Once you enable this option and install the integration, you cannot revert your changes.
Example: There are three partners, Partner P1, P2, and P3. Each partner has usernames created with unique 3-digit alphanumeric prefix, like g0z.username1 for partner P1, p0w.username1 for partner P2, and t9q.username1 for partner P3.
Click Next.
In the Inbound page, there are two sections: USER PROVISION and MAP ATTRIBUTES.
USER PROVISION
OpsRamp supports two user provisioning methods to onboard users from identity providers like Ping:
SCIM
Following section describes SCIM provisioning in detail.
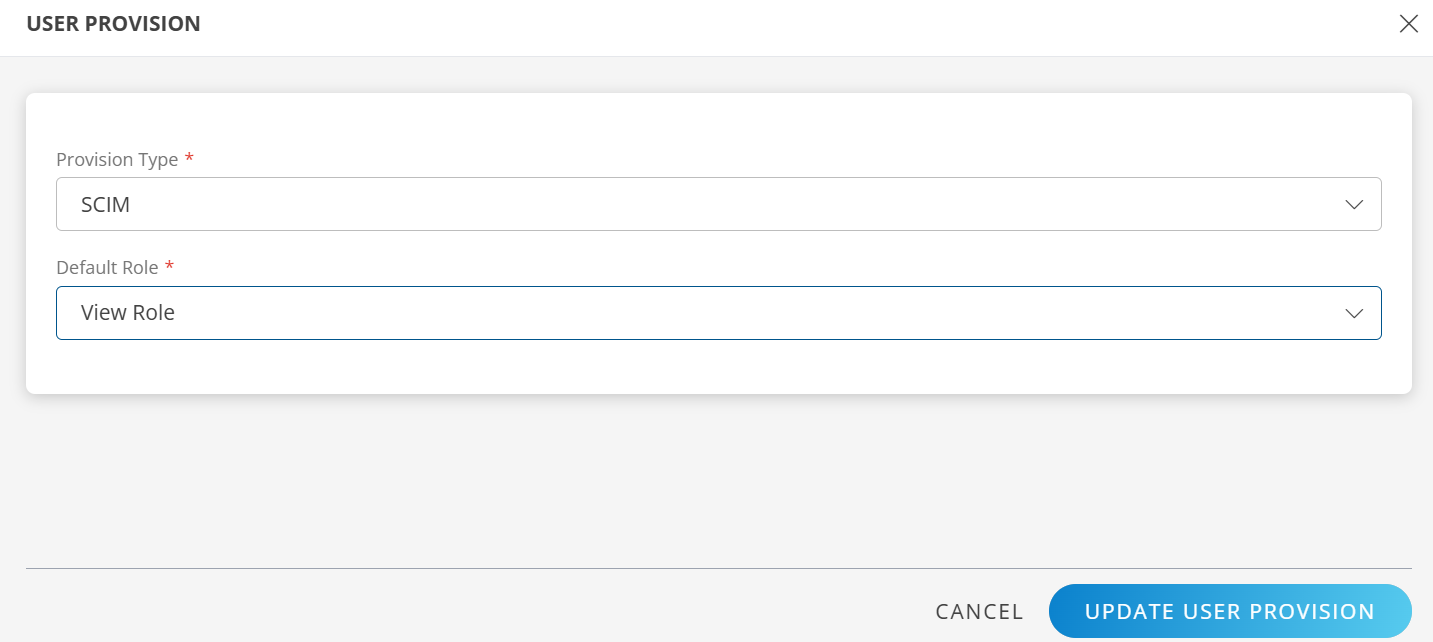
Click Edit icon and select the following details and click UPDATE USER PROVISION:
- Provision Type: SCIM. When configuring the integration it is necessary to select the Provision Type - SCIM to synchronize users and groups when provisioning occurs.
- Default Role: The required user role.
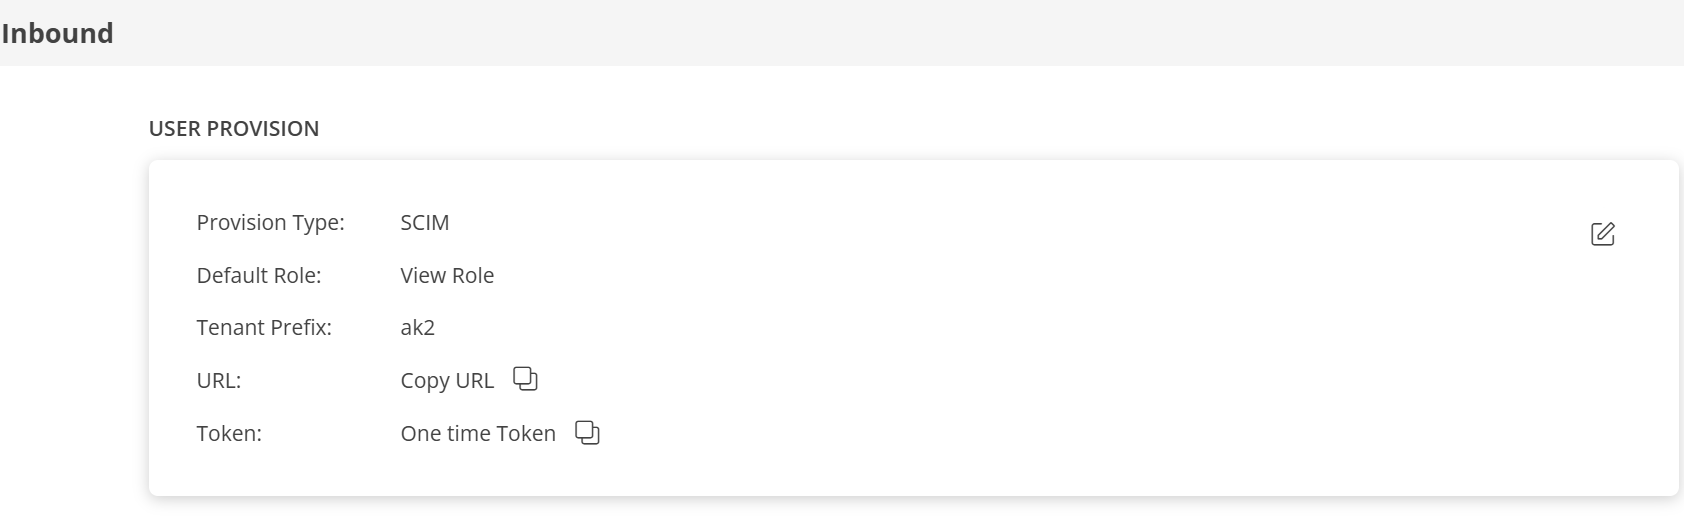
The details are updated and the USER PROVISION section displays the unique Tenant Prefix, URL and Token information.
Copy the URL and Token information. These details are used when configuring Ping Provisioning settings.
MAP ATTRIBUTES
Define the following Map Attributes:
Note:
- For SCIM: The Role OpsRamp property is required.
- For JIT: The OpsRamp properties like Primary Email, First Name, Last Name, and Role are required.
- Click +Add in the Map Attributes section.
- From the Add Map Attributes window, enter the following information:
User:
- Select OpsRamp Entity as User and OpsRamp Property as Role.
Role mapping is required for User and User Group.
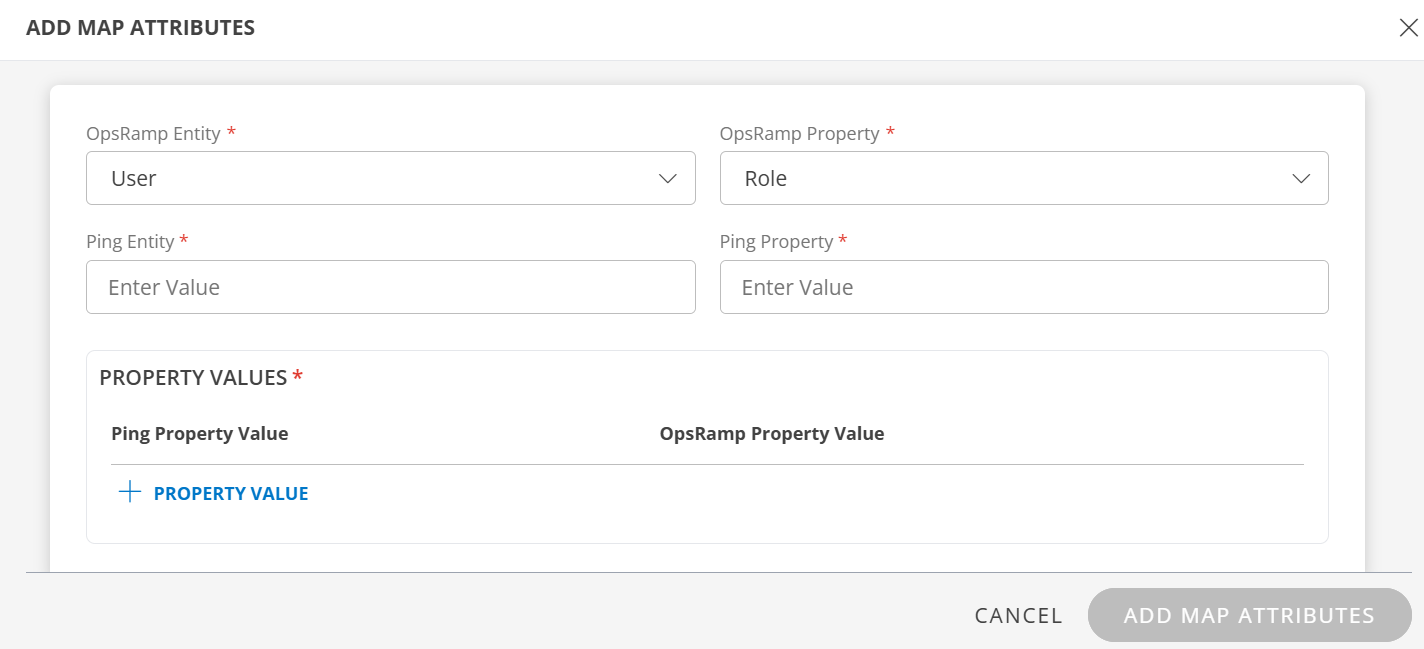
- Ping Entity: Enter the value.
- Ping Property: Enter the value.
In PROPERTY VALUES section: - Ping Property Value: The user details in the request payload received by OpsRamp contains the field information. Ensure that you provide the value of the field in this box.
- Example payload:
{ "schemas": [ "urn:ietf:params:scim:schemas:core:2.0:User" ], "userName": "user.name1@opsramp.com", "name": { "givenName": "user", "familyName": "name1" }, "emails": [ { "primary": true, "value": "user.name1@opsramp.com", "type": "work" } ], "phoneNumbers": [ { "primary": true, "value": "1234567890", "type": "work" } ], "addresses": [ { "primary": true, "country": "IN" } ], "timezone": "india", "externalId": "00upcikgqpH6esdAN0h7", "groups": [], "password": "o6p5MVRK", "active": true } - OpsRamp Property Value: Select the appropriate role corresponding to the Ping Property Value.
- Click Save. The mapping is saved and displayed.
To add more property values click +Property Value.
User the Filter option to filter the map attributes.
Similarly, map attributes for other entities.
Note: If mapping for Time Zone is not provided, then organization timezone is considered by default.
User Group:
- Select OpsRamp Entity as User Group and OpsRamp Property as Role.
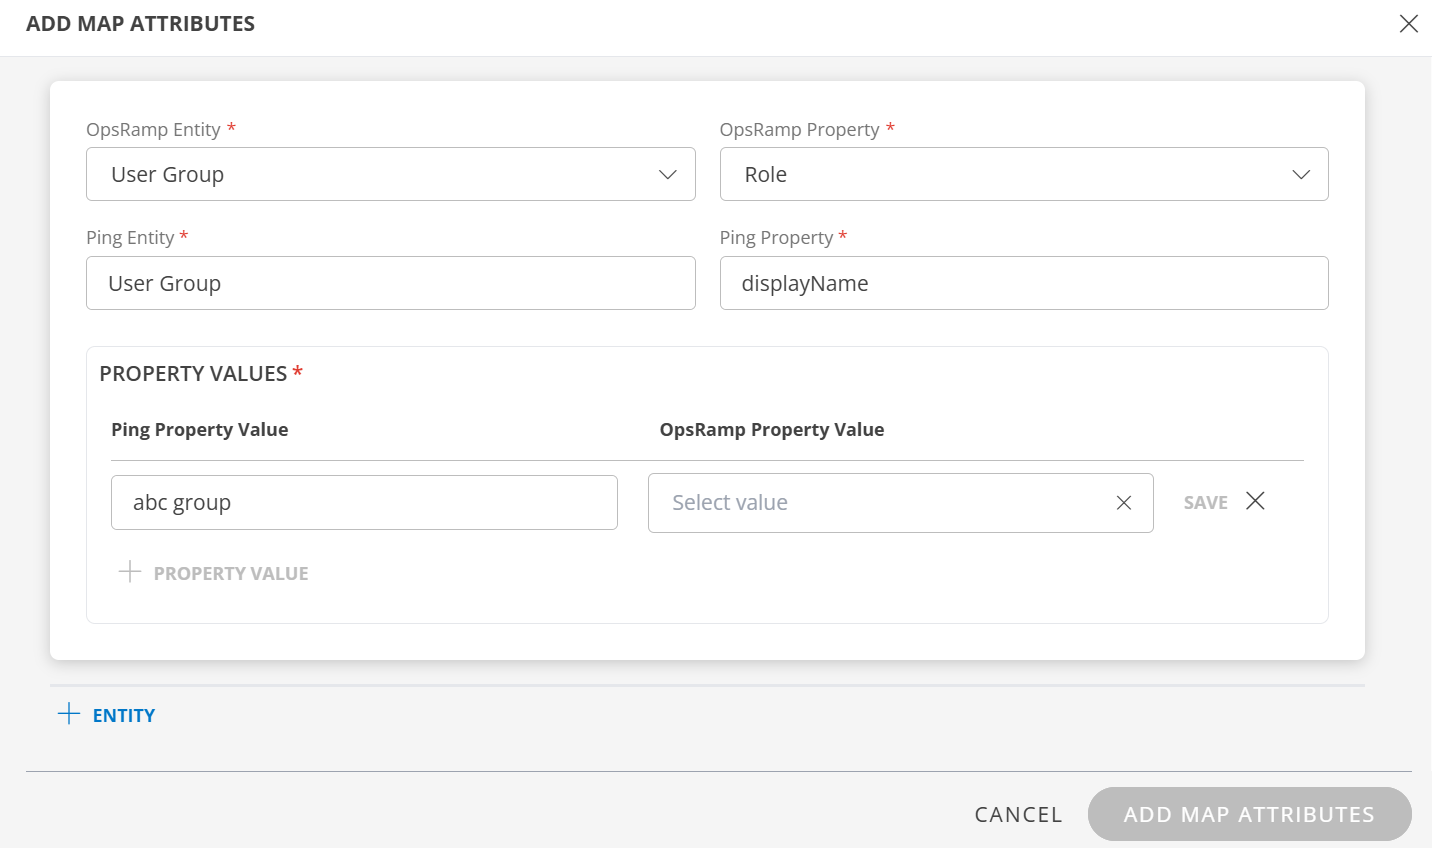
- Ping Entity: Enter the value.
- Ping Property: Enter the value.
In PROPERTY VALUES section: - Ping Property Value: The user group details in the request payload received by OpsRamp contains the field information. Ensure that you provide the value of the field in this box.
- Example payload:
     {
         "schemas": [
             "urn:ietf:params:scim:schemas:core:2.0:Group"
         ],
         "displayName": "abc group",
         "members": [
             {
                 "value": "USR0002265918",
                 "display": "user.name1@opsramp.com"
             },
             {
                 "value": "USR0002398463",
                 "display": "user.name2@opsramp.com"
             }
         ]
     }
In this case, you enter abc group as value. If there is a match, OpsRamp provisions the user group accordingly.
- OpsRamp Property Value: Select the appropriate role corresponding to the Ping Property Value.
- Click Save. The mapping is saved and displayed.
To add more property values click +Property Value. - Click Add Map Attributes.
- Click the three dots (menu icon) available at the end of each row to edit or delete a map attribute.
If the Role is not configured in Map Attributes section, the Default Role provided in the User Provision section is considered for SSO.
JIT
Following section describes JIT provisioning in detail.
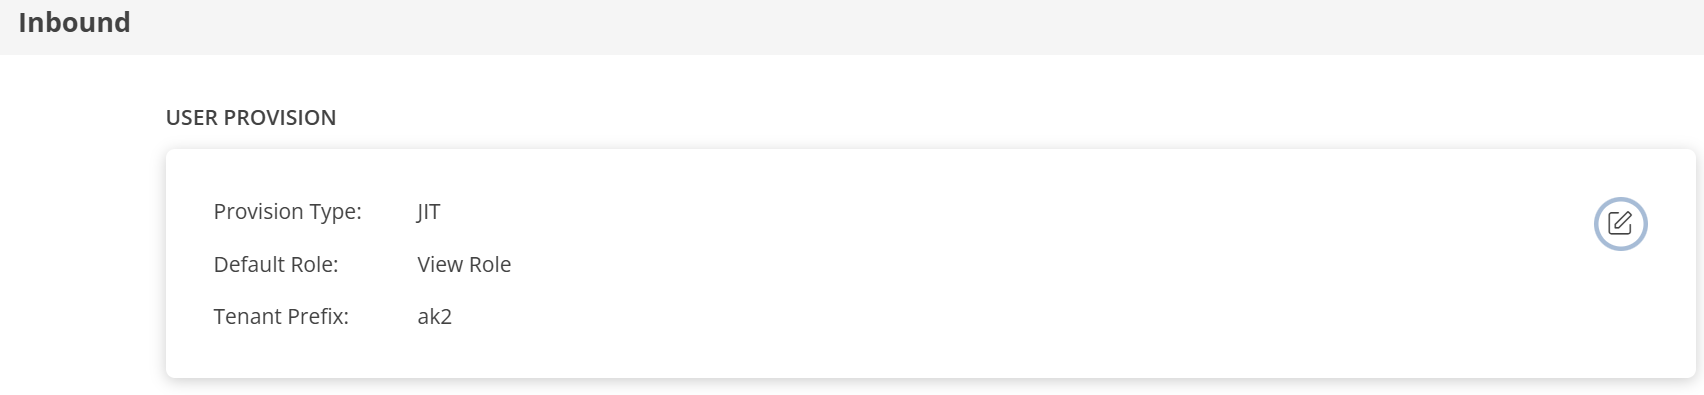
In the Inbound page:
- Click Edit icon and select the following details and click UPDATE USER PROVISION:
- Provision Type: JIT. When configuring the integration it is necessary to select the Provision Type - JIT to synchronize users when provisioning occurs.
- Default Role: The required user role.

The details are updated and the USER PROVISION section displays the unique Tenant Prefix. These details are used when configuring Ping Provisioning settings.
Follow the steps mentioned in the MAP ATTRIBUTES section above, to define the Map Attributes.
Click Finish. The integration is installed.
Actions on Integration
You can perform actions like View Logs, Export, Edit, and Uninstall on the integration.
- See Actions on Integration for more information.
Audit Logs
View Inbound logs from the View Logs option for the integration. You can view if the event was successful or not.
See Audit Logs for more information.