Micro Focus Operations Manager i acts as a single pane of glass, allowing you to be in control of your IT environment. It enables you to automate continuous discovery and IT event monitoring so you can sense the state of IT resources and how it impacts your business. OpsRamp integration supports to accept events from OMi as alerts.
OpsRamp configuration
Step 1: Install the integration
- From All Clients, select a client.
- Go to Setup > Account.
- Select the Integrations and Apps tab.
- The Installed Integrations page, where all the installed applications are displayed. Note: If there are no installed applications, it will navigate to the Available Integrations and Apps page.
- Click + ADD on the Installed Integrations page. The Available Integrations and Apps page displays all the available applications along with the newly created application with the version.
Note: You can even search for the application using the search option available. Also yu can use the All Categories option to search. - Click ADD in the Micro Focus Operations Manager i application and click Install.
- Select authentication type as WEBHOOK and click Save.
- Make a note of Tenant ID, Token and Webhook URL.
These details are used while creating an HTTP Request template during Micro Focus Operations Manager i configuration. - Click Save.
Step 2: Configure the integration
- From the API tab, enter:
- Authentication: Copy Tenant Id, Token and Webhook URL for configuration. These settings are used for creating a HTTP Request template.
- Map Attributes: Enter the mapping information for the third-party.
- From the Monitoring of Integration tab, click Assign Templates.
- From the Audit Logs, set up audit log criteria and time frame.
Configuring the map attributes
- Select the required OpsRamp property from the drop-down.
- Click Add Mapping Attributes to map attributes for the specific OpsRamp alert property.
- Click + to define the mappings.
- From Create Alert Mappings on Status, define the mappings, parsing conditions, and default values, and Save.
The following tables shows the attribute mappings and a sample payload. The sample payload with OMi event details that is displayed in OpsRamp after the integration. Depending on the mapping of properties, data is displayed in OpsRamp.
| OMi payload | OMi Attributes | OpsRamp Attributes | |||||||||||
|---|---|---|---|---|---|---|---|---|---|---|---|---|---|
{
 "event": {
  "subject": "Memory utilization is high",
  "description": "Memory utilization is high",
  "createdTime": "2018-01-10 07:58:42",
  "receivedTime": "2018-01-10 07:58:42",
  "id": "13492360-f5dc-71e7-0c4e-ac1a6f660000",
  "ciInfo": {
   "ciId": "ed363fe71d376d23febcd5ee2938b51a",
   "ciName": "omi",
   "ciDNS": "omi.or.com"
  },
  "category": "OS",
  "subCategory": "",
  "application": "a",
  "object": "o",
  "severity": "critical",
  "state": "open",
  "priority": "medium",
  "policyName": "opcmsg_test(1.0)"
 }
} | event.id | External Alert ID | |||||||||||
| event.severity | Alert state
| ||||||||||||
| event.subject | Alert subject | ||||||||||||
| event.description | Alert description | ||||||||||||
| event.createdTime | Alert time | ||||||||||||
| event.category - $event.subCategory | Alert metric | ||||||||||||
| event.ciInfo.ciName | Alert resource name |
OMi configuration
The Connected Servers Manager is used to configure the target servers. These server receive forwarded events and subsequent event changes.
Step 1: Configure OpsRamp server
In this step, OpsRamp is configured as a target connected server in OMi Connected Servers Manager. OMi events and subsequent event changes are posted to OpsRamp.
OpsRamp supports the integration using the Call Script Adapter.
To configure OpsRamp as a connected server:
Log in to OMi.
Go to Administration > Setup and Maintenance.
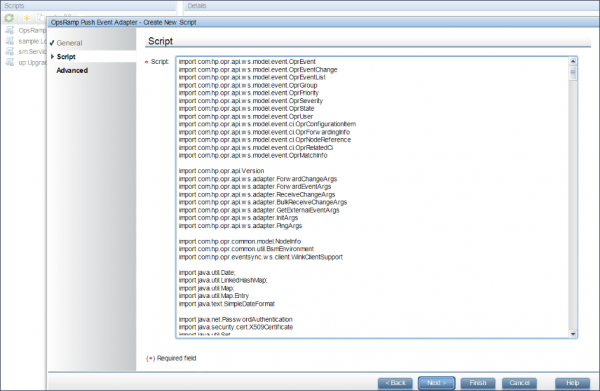
From the Connected Servers pane, click the New Script icon to create new script and enter:
- In General section:
- Display Name: Enter a name for the script. The script would be identified with this name. Example: OpsRamp Push Event Adapter.
- Description: Enter a summary describing the script. Example: Push OMi events to OpsRamp using groovy script.
- Click Next.
- In the Script section: Enter the script and click Next.
Click here to view the script
import com.hp.opr.api.ws.model.event.OprEvent import com.hp.opr.api.ws.model.event.OprEventChange import com.hp.opr.api.ws.model.event.OprEventList import com.hp.opr.api.ws.model.event.OprGroup import com.hp.opr.api.ws.model.event.OprPriority import com.hp.opr.api.ws.model.event.OprSeverity import com.hp.opr.api.ws.model.event.OprState import com.hp.opr.api.ws.model.event.OprUser import com.hp.opr.api.ws.model.event.ci.OprConfigurationItem import com.hp.opr.api.ws.model.event.ci.OprForwardingInfo import com.hp.opr.api.ws.model.event.ci.OprNodeReference import com.hp.opr.api.ws.model.event.ci.OprRelatedCi import com.hp.opr.api.ws.model.event.OprMatchInfo import com.hp.opr.api.Version import com.hp.opr.api.ws.adapter.ForwardChangeArgs import com.hp.opr.api.ws.adapter.ForwardEventArgs import com.hp.opr.api.ws.adapter.ReceiveChangeArgs import com.hp.opr.api.ws.adapter.BulkReceiveChangeArgs import com.hp.opr.api.ws.adapter.GetExternalEventArgs import com.hp.opr.api.ws.adapter.InitArgs import com.hp.opr.api.ws.adapter.PingArgs import com.hp.opr.common.model.NodeInfo import com.hp.opr.common.util.BsmEnvironment import java.util.Date; import java.util.LinkedHashMap; import java.util.Map; import java.util.Map.Entry import java.text.SimpleDateFormat import java.net.PasswordAuthentication import java.security.cert.X509Certificate import java.util.Set import com.hp.opr.eventsync.ws.client.WinkClientSupport import org.apache.wink.client.ClientRequest import org.apache.wink.client.ClientResponse import org.apache.wink.client.ClientWebException import org.apache.wink.client.Resource import org.apache.wink.client.RestClient import org.codehaus.groovy.util.Finalizable import javax.ws.rs.core.Cookie import javax.ws.rs.core.MediaType import javax.ws.rs.core.MultivaluedMap import javax.xml.bind.JAXBElement import groovy.json.JsonBuilder import groovy.json.JsonSlurper class OpsRampPushAdapter { // Important to use "def" here, otherwise a cast exception will be thrown and the mLogger is set to <null> def mLogger = null private String mConnectedServerId = null private String mConnectedServerName = null private String mConnectedServerDisplayName = null private X509Certificate mConnectedServerCertificate = null private Integer mTimeout = null private RestClient mClient = null private NodeInfo mLocalhostInfo = null private Resource mResource = null private String mProtocol = 'http' private String mNode = 'localhost' private Integer mPort = 48015 private Integer mOprVersion = 0 //Event fields and constants private static final String EVENT_SUBJECT = "subject" private static final String EVENT_DESC = "description" private static final String EVENT_CREATED_TIME = "createdTime" private static final String EVENT_RECEIVED_TIME = "receivedTime" private static final String EVENT_SEVERITY = "severity" private static final String EVENT_ID = "id" private static final String EVENT_CI_INFO = "ciInfo" private static final String EVENT_CI_NAME = "ciName" private static final String EVENT_CI_DNS_NAME = "ciDNS" private static final String EVENT_CI_ID = "ciId" private static final String EVENT_CATEGORY = "category" private static final String EVENT_SUB_CATEGORY = "subCategory" private static final String EVENT_APPLICATION = "application" private static final String EVENT_OBJECT = "object" private static final String EVENT_STATE = "state" private static final String EVENT_PRIORITY = "priority" private static final String EVENT_ASSIGNEE = "assignee" private static final String EVENT_ASSIGNEE_GROUP = "assigneeGroup" private static final String EVENT_POLICY_NAME = "policyName" private static final String EVENT_IGNORE_RECOVERY_NOISE = "ignoreRecNoise" private static final String ALERT_TIME_FORMAT = "yyyy-MM-dd HH:mm:ss"; private static final String UTC_TZ = "UTC"; private static final String EVENT = "event" /** * Replace below parameter with actual values * {tenantId} � Replace with OpsRamp client unique id. To do this use this path Setup >> Integrations >> Integrations >> Select client >> My Integrations >> Micro Focus OMi >> Inbound >> Webhook tab >> Copy Tenant ID. {token} � Replace with OpsRamp token. To do this use this path Setup >> Integrations >> Integrations >> Select client >> My Integrations >> Micro Focus OMi >> Inbound >> Webhook tab >> Copy Token e.g URL - /integrations/alertsWebhook/client_1/alerts?vtoken=wZjQ9V3CmGYXzmukLzPpQ6xzJVHEju5P */ private static final String OPSRAMP_ALERT_API_URL_PATH = "/integrations/alertsWebhook/{tenantId}/alerts?vtoken={token}"; // private static final String NODE_DNS_NAME_TAG = "primary_dns_name" private static final String ROOT_DRILLDOWN_PATH = "/opr-console/opr-evt-details.jsp?eventId=" private static final String EMPTY_STR = "" /** * Initialization method * @param args */ public synchronized void init(final InitArgs args) { mLogger = args.logger mLogger.info("OpsRamp adapter initalized. INSTALL_DIR=${args.installDir}") mConnectedServerId = args.connectedServerId mConnectedServerName = args.connectedServerName mConnectedServerDisplayName = args.connectedServerDisplayName mConnectedServerCertificate = args.connectedServerCertificate mTimeout = args.maxTimeout == null ? 60 : args.maxTimeout mProtocol = args.nodeSsl ? 'https' : 'http' mNode = args.node mPort = (args.port == null || args.port < 1) ? (args.nodeSsl ? 48015 : 48015) : args.port mClient = WinkClientSupport.getRestClient(mTimeout, mConnectedServerCertificate) // determine the OPR version that is running String versionString = Version.getProperty(Version.COMPONENT_VERSION) String[] version = versionString.split('\\.') mOprVersion = (Integer.valueOf(version[0]) * 100) + Integer.valueOf(version[1]) Date timestamp = new Date() if (mLogger.infoEnabled) { StringBuilder initMsg = new StringBuilder(); initMsg.append("Service Manager Adapter initialization @: ${timestamp.toString()}") initMsg.append("\n\tConnected Server ID: ${mConnectedServerId}") initMsg.append("\n\tConnected Server Name: ${mConnectedServerName}") initMsg.append("\n\tConnected Server Display Name: ${mConnectedServerDisplayName}") initMsg.append("\n\tMaximum Timeout in milliseconds: ${mTimeout}") initMsg.append("\n\tProtocol: ${mProtocol}") initMsg.append("\n\tNode: ${mNode}") initMsg.append("\n\tPort: ${mPort}") initMsg.append("\nService Manager Adapter initialized") mLogger.info(initMsg.toString()) } } /** * */ public synchronized void destroy() { mLogger.debug("OpsRamp adapter destroy.") } /** * * @param args * @return */ public Boolean ping(final PingArgs args) { args.outputDetail = "Success." return true } /** * Forwards the given event to the external process. * * @param args contains the event to forward and any other parameters needed to forward the event. * @return an OprEvent representing the external event. The id field must be set * with the id of the external event. If there is a drilldown URL path it should be * set in the drilldown UrlPath field. All other attributes are currently ignored. * If the id is set to null or null is returned it is assumed the external * process cannot be reached at this time. A retry will be made later. */ public Boolean forwardEvent(ForwardEventArgs args) { mLogger.info("\nOpsRamp push adapter's forwardEvent() called.") //args.externalRefId = logEvent(args.event, args.info, args.causeExternalRefId, args.credentials?.userName) // Make a drilldown base path to the original event as an example args.drilldownUrlPath = "${ROOT_DRILLDOWN_PATH}${args.event.getId()}" OprEvent event = args.event if(null == mResource) { // get the resource client connection to make the post mResource = createRequest(mProtocol, mNode, mPort, args.credentials) } String eventJsonStr = convertEventToJSON(event) sendEventToExternalSystem(eventJsonStr) return true } /** * Forwards the bulk events to the external process. * * @param args contains the events to forward and any other parameters needed to forward the event. * @return an OprEvent representing the external event. The id field must be set * with the id of the external event. If there is a drilldown URL path it should be * set in the drilldown UrlPath field. All other attributes are currently ignored. * If the id is set to null or null is returned it is assumed the external * process cannot be reached at this time. A retry will be made later. */ // args if of type BulkForwardEventArgs. Using "def" for backwards compatibility with 9.1x public Boolean forwardEvents(def args) { mLogger.info("\nOpsRamp push adapter's forwardEvents() called.") OprEventList events = args.events if(null == mResource) { // get the resource client connection to make the post mResource = createRequest(mProtocol, mNode, mPort, args.credentials) } mLogger.info("\n*** Begin Bulk Forward ***\n") for(OprEvent event in events.eventList) { //String causeExternalRefId = getCauseExternalId(args, event) //def externalRefId = logEvent(event, event.getForwardingInfo(mConnectedServerId), causeExternalRefId, args.credentials?.userName) // Make a drilldown base path to the original event as an example def drilldownUrlPath = "${ROOT_DRILLDOWN_PATH}${event.id}" //args.setForwardSuccess(event.id, externalRefId, drilldownUrlPath) args.setForwardSuccess(event.id) String eventJsonStr = convertEventToJSON(event) sendEventToExternalSystem(eventJsonStr) } mLogger.info("\n*** End Bulk Forward ***\n") return true } /** * Send the event updates. * * @param args contains the event changes to forward and any other parameters * needed to forward the changes. * @return true if the changes were successfully sent, otherwise false * If false is returned or an exception is thrown, a retry will be made later. */ public Boolean forwardChange(ForwardChangeArgs args) { mLogger.info("\nOpsRamp push adapter's forwardChange() called.") OprEvent event = args.event if(null == mResource) { // get the resource client connection to make the post mResource = createRequest(mProtocol, mNode, mPort, args.credentials) } String eventJsonStr = convertEventToJSON(event) sendEventToExternalSystem(eventJsonStr) return true } /** * Send the bulk event updates. * * @param args contains the event changes to forward and any other parameters * needed to forward the changes. * @return true if the changes were successfully sent, otherwise false * If false is returned or an exception is thrown, a retry will be made later. */ // args if of type BulkForwardChangeArgs. Using "def" for backwards compatibility with 9.1x public Boolean forwardChanges(def args) { mLogger.info("\nOpsRamp push adapter's forwardChanges() called.") if(null == mResource) { // get the resource client connection to make the post mResource = createRequest(mProtocol, mNode, mPort, args.credentials) } mLogger.debug("\n*** Begin Bulk Forward Change ***\n") for (OprEventChange change in args.changes.eventChanges) { //def causeExternalRefId = getCauseExternalRefId(args, args.getEvent(change.eventRef.targetGlobalId, false)) args.setForwardSuccess(change.id) OprEvent event = args.getEvent(change.eventRef.targetGlobalId, false) String eventJsonStr = convertEventToJSON(event) sendEventToExternalSystem(eventJsonStr) } mLogger.info("\n*** End Bulk Forward Change ***\n") return true } /** * Convert the external object into an OprEvent object. * Used by Event Synchronization PUT WS when event update is received. * * @param externalEvent object to convert * @return the converted OprEvent object */ public Boolean receiveChange(final ReceiveChangeArgs args) { mLogger.debug("No support of receiveChange() from OpsRamp push adapter") return true; } public Boolean receiveChanges(def args) { mLogger.debug("No support of receiveChanges() from OpsRamp push adapter") return true; } /** * Create resource object to call OpsRamp Webhooks API * @param protocol * @param node * @param port * @param credentials * @return */ private Resource createRequest(final String protocol, final String node, final Integer port, final PasswordAuthentication credentials) { final String address = "${protocol}://${node}:${port}${OPSRAMP_ALERT_API_URL_PATH}" if (mLogger.isDebugEnabled()) { mLogger.debug("Creating request for: ${address}") } // create the resource instance to interact with OpsRamp Resource resource = mClient.resource(address) // SM requires as media type application/json resource.accept(MediaType.APPLICATION_JSON).contentType(MediaType.APPLICATION_JSON) /*if(credentials != null) { // Set the username and password in the request. byte[] encodedUserPassword = Base64.encodeBase64((credentials.getUserName() + ":" + new String(credentials.getPassword())).getBytes()) resource.header("Authorization", "Basic " + new String(encodedUserPassword)) }*/ return resource } /** * Convert OprEvent object to JSON string * * @param event * @return */ private String convertEventToJSON(OprEvent event) { if (event == null) { return null } // Alert subject String title = (event.title && event.title.trim()) ? event.title.trim().replace('\r', '\n') : null String description = (event.description && event.description.trim()) ? event.description.trim() : null if (title && (title.length() > 256 || title.contains('\n'))) { // truncate the title and put it in the description if (title.contains('\n')) { title = title.split('\n')[0].trim() } if (title.length() > 256) { title = title.substring(0, 252) + "..." } if (!description) { description = event.title.trim() } else { description = event.title.trim() + "\n" + event.description.trim() } } if(description == null) { if(title != null) { description = title } } Map<String, Object> omiEvent = new LinkedHashMap<String, Object>() Map<String, Object> eventMap = new LinkedHashMap<String, Object>() //Title, Description, Time created, Time received, Id eventMap.put(EVENT_SUBJECT, title) //eventMap.put(EVENT_DESC, description) eventMap.put(EVENT_CREATED_TIME, convertDateToString(event.timeCreated)) eventMap.put(EVENT_RECEIVED_TIME, convertDateToString(event.timeReceived)) eventMap.put(EVENT_ID, event.id) //CI details final OprNodeReference nodeRef = event.node final OprRelatedCi relatedCi = event.relatedCi final String dnsName = getDnsName(event) Map<String, String> ciInfo = new LinkedHashMap<String, String>() if(relatedCi != null) { if(relatedCi.configurationItem.id) { ciInfo.put(EVENT_CI_ID, relatedCi.configurationItem.id) } if(relatedCi.configurationItem.ciName) { ciInfo.put(EVENT_CI_NAME, relatedCi.configurationItem.ciName) } } else if (nodeRef != null) { if(nodeRef.node.id) { ciInfo.put(EVENT_CI_ID, nodeRef.node.id) } if(nodeRef.node.ciName) { ciInfo.put(EVENT_CI_NAME, nodeRef.node.ciName) } } if(dnsName) { ciInfo.put(EVENT_CI_DNS_NAME, dnsName) } eventMap.put(EVENT_CI_INFO, ciInfo) //Category, Sub category, Application, Object if(event.category) { eventMap.put(EVENT_CATEGORY, event.category) } else { eventMap.put(EVENT_CATEGORY, EMPTY_STR) } if(event.subCategory) { eventMap.put(EVENT_SUB_CATEGORY, event.subCategory) } else { eventMap.put(EVENT_SUB_CATEGORY, EMPTY_STR) } if(event.application) { eventMap.put(EVENT_APPLICATION, event.application) } else { eventMap.put(EVENT_APPLICATION, EMPTY_STR) } if(event.object) { eventMap.put(EVENT_OBJECT, event.object) } else { eventMap.put(EVENT_OBJECT, EMPTY_STR) } //Severity - Available severities in omi - Critical, Major, Minor, Warning, Normal eventMap.put(EVENT_SEVERITY, event.severity) //State - Available life cycle state in omi - Open, In Progress, Resolved, Closed if(event.state) { eventMap.put(EVENT_STATE, event.state) } //Priority - Available priorities in omi - Highest, High, Medium, Low, Lowest if(event.priority) { eventMap.put(EVENT_PRIORITY, event.priority) } //Assignee, Assignee Gorup if(event.assignedUser?.id && event.assignedUser?.userName) { eventMap.put(EVENT_ASSIGNEE, event.assignedUser.userName) } if(event.assignedGroup?.id && event.assignedGroup?.name) { eventMap.put(EVENT_ASSIGNEE_GROUP, event.assignedGroup.name) } //Match info policy name final OprMatchInfo matchInfo = event.matchInfo if(matchInfo != null) { if(matchInfo.policyName) { eventMap.put(EVENT_POLICY_NAME, matchInfo.policyName) } } //Ignore recovery noise eventMap.put(EVENT_IGNORE_RECOVERY_NOISE, "true") //Prepare custom description StringBuffer customDesc = new StringBuffer(description); customDesc.append("\n<b>").append(EVENT_SUBJECT).append(":</b>").append(eventMap.get(EVENT_SUBJECT)) //.append("\n<b>").append(EVENT_DESC).append(":</b>").append(eventMap.get(EVENT_DESC)) .append("\n<b>").append(EVENT_CREATED_TIME).append(":</b>").append(eventMap.get(EVENT_CREATED_TIME)) .append("\n<b>").append(EVENT_RECEIVED_TIME).append(":</b>").append(eventMap.get(EVENT_RECEIVED_TIME)) .append("\n<b>").append(EVENT_ID).append(":</b>").append(eventMap.get(EVENT_ID)) .append("\n<b>").append(EVENT_SEVERITY).append(":</b>").append(eventMap.get(EVENT_SEVERITY)) .append("\n<b>").append(EVENT_STATE).append(":</b>").append(eventMap.get(EVENT_STATE)) .append("\n<b>").append(EVENT_PRIORITY).append(":</b>").append(eventMap.get(EVENT_PRIORITY)) .append("\n<b>").append(EVENT_CI_ID).append(":</b>").append(ciInfo.get(EVENT_CI_ID)) .append("\n<b>").append(EVENT_CI_NAME).append(":</b>").append(ciInfo.get(EVENT_CI_NAME)) .append("\n<b>").append(EVENT_CI_DNS_NAME).append(":</b>").append(ciInfo.get(EVENT_CI_DNS_NAME)) .append("\n<b>").append(EVENT_CATEGORY).append(":</b>").append(eventMap.get(EVENT_CATEGORY)) .append("\n<b>").append(EVENT_SUB_CATEGORY).append(":</b>").append(eventMap.get(EVENT_SUB_CATEGORY)) .append("\n<b>").append(EVENT_APPLICATION).append(":</b>").append(eventMap.get(EVENT_APPLICATION)) .append("\n<b>").append(EVENT_OBJECT).append(":</b>").append(eventMap.get(EVENT_OBJECT)) .append("\n<b>").append(EVENT_POLICY_NAME).append(":</b>").append(eventMap.get(EVENT_POLICY_NAME)) .append("\n") eventMap.put(EVENT_DESC, customDesc.toString()); //Get JSON string of alert payload omiEvent.put(EVENT, eventMap) JsonBuilder jsonBuilder = new JsonBuilder() jsonBuilder.call(omiEvent) String eventJson = jsonBuilder.toPrettyString() mLogger.info("\nJSON payload prepared to push to OpsRamp is:" + eventJson) return eventJson } /** * Send event to OpsRamp * * @param eventJsonStr * @return */ private def sendEventToExternalSystem(String eventJsonStr) { String response = "" if (mLogger.isDebugEnabled()) { mLogger.debug("\nSending event data to Node: ${mNode}, Port: ${mPort}, XML in request:\n${eventJsonStr}") } else { mLogger.info("\nSending event data to Node: ${mNode}, Port: ${mPort}, XML in request:\n${eventJsonStr}") } try { final ClientResponse clientResponse = mResource.post(eventJsonStr) checkResponse(clientResponse) response = clientResponse.getEntity(String.class) if(response) { if (mLogger.isDebugEnabled()) { mLogger.debug("\nResponse recieved from ${mNode}:${mPort} is : ${response}.") } } else { mLogger.warn("\n Status code: ${clientResponse.getStatusCode()}. No response returned by server ${mNode}:${mPort}.") } } catch (ClientWebException e) { String errMsg = """\nNode: ${mNode}, Port: ${mPort}, ClientWebException encountered: " + "(${e.getResponse()?.getStatusCode()}) ${e.getResponse()?.getMessage()}""" mLogger.error(errMsg) //TODO- For testing not throwing error, please un-comment this in real scenario //throw e } } /** * Check client response for error messages if any * * @param response */ private void checkResponse(final ClientResponse response) { if(response.getStatusCode() > 299) { final String message = response.getEntity(String.class) if(message) { mLogger.error("HTTP error response - ${response.getMessage()} (${response.getStatusCode()}): ${message}") } else { mLogger.error("HTTP error response - ${response.getMessage()} (${response.getStatusCode()})") } throw new ClientWebException((ClientRequest) null, response) } } /** * Get current time in GMT * * @return */ private String getCurrentTimeInGMT(){ return convertDateToString(new Date()) } /** * Convert time to String * * @param date * @return */ private String convertDateToString(Date date) { if(date == null) { return "" } SimpleDateFormat sdf = new SimpleDateFormat(ALERT_TIME_FORMAT); sdf.timeZone = java.util.TimeZone.getTimeZone(UTC_TZ); String alertTime = sdf.format(date); return alertTime } /** * Get DNS name from event CI * * @param event * @return */ private String getDnsName(OprEvent event) { OprNodeReference nodeRef = event.node OprRelatedCi relatedCi = event.relatedCi if (nodeRef?.node?.any == null || nodeRef.node.any.empty) { return (relatedCi?.configurationItem != null) ? relatedCi.configurationItem.getProperty(NODE_DNS_NAME_TAG) : null } else { if(mOprVersion > 913) { return nodeRef.node.getProperty(NODE_DNS_NAME_TAG) } else { for(def prop in nodeRef.node.any) { if(prop instanceof JAXBElement) { final JAXBElement<?> jaxbElement = (JAXBElement<?>) prop if(NODE_DNS_NAME_TAG.equals(jaxbElement.name?.localPart)) { return (jaxbElement.value ? jaxbElement.value : null) } } } } } return null } /** * * @param args * @param event * @return */ private synchronized String getCauseExternalId(def args, OprEvent event) { String causeExternalRefId = "" final String causeId = event.cause?.targetId if (!causeId) { return null } OprEvent causeEvent = args.getEvent(causeId, false) if(causeEvent) { OprForwardingInfo causeInfo = causeEvent.getForwardingInfo(mConnectedServerId) causeExternalRefId = causeInfo?.externalId } return causeExternalRefId } /** * * @param event * @param info * @param causeExternalRefId * @param userName * @return */ def logEvent(def event, def info, def causeExternalRefId, def userName) { def extId = "urn:uuid:${event.getId()}" def controlServerName = (event.controlTransferredTo) ? event.controlTransferredTo.name : "<none>" def controlServerDnsName = (event.controlTransferredTo) ? event.controlTransferredTo.dnsName : "" def controlTransferredState = (event.controlTransferredTo) ? event.controlTransferredTo.state : "<none>" def controlExternalId = (event.controlTransferredTo) ? event.controlTransferredTo.externalId : "" return extId } }- In General section:
- Use the Tenant ID and Token values from the OpsRamp comfiguration.
- For example:
/integrations/alertsWebhook/client_27/alerts?vtoken=wZjQ9V3CmGYXzmukLzPpQ6xzJVHEju5P - In the Advanced section: Enter the time-out as 60000 ms and click Finish.
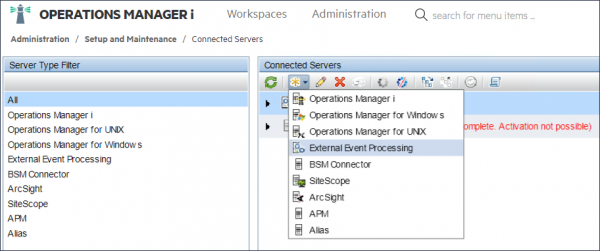
Step 2: Configure external event processing
- Go to Administration > Setup and Maintenance.
- On the Connected Servers pane, click the New Script icon and click External Event Processing.
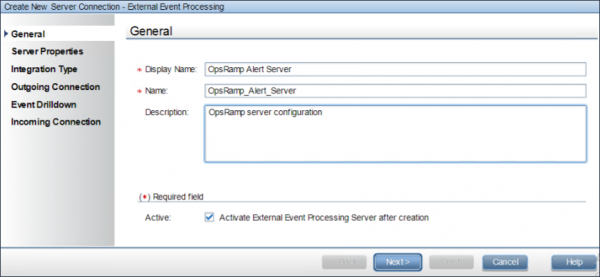
- In the General section, enter:
- Display Name: Enter a name for OpsRamp connected server.
- Name: Enter a unique internal name. You can change the internal name if you want to change the automatically generated name.
- : Enter a description of the connection.
- Select Activate External Event Processing Server after creation and click Next.
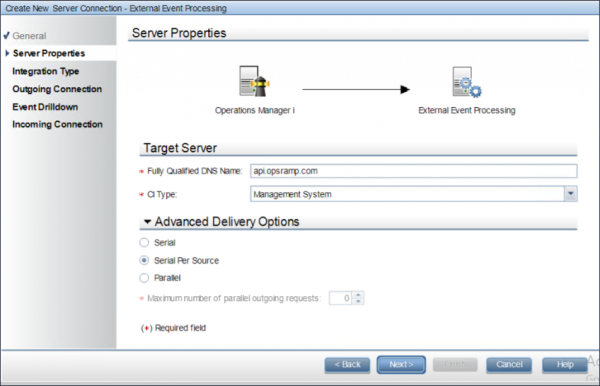
- In Server Properties section, configure the following:
- Fully Qualified DNS Name: Enter OpsRamp DNS name api.opsramp.com
- CI Type: Select Management System from the drop-down.
- Customize the way events and change notifications are delivered to OpsRamp server using Advanced Delivery Options, and click Next.
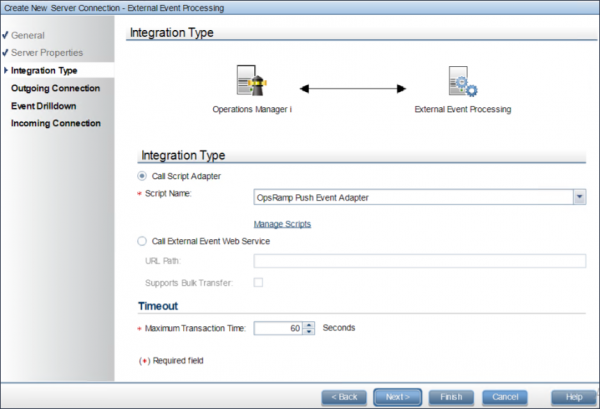
- In Integration Type section, configure the below details:
- Select Call Script Adapter, select the previously configured Script name from the drop-down.
- Enter the time limit for execution of the script and click Next. Default time limit is 60 seconds.
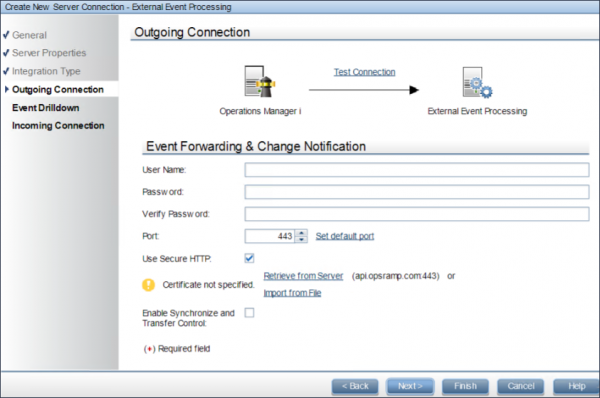
- In Outgoing Connection section, configure the following:
- Provide port number as 443. The events are forwarded to OpsRamp server.
- Select Use Secure HTTP, click Retrieve from Server to fetch OpsRamp certificate and click Next.
Username and password are optional.
- In Event Drilldown section, configure the following:
- Select Use Secure HTTP for secure communication and click Next.
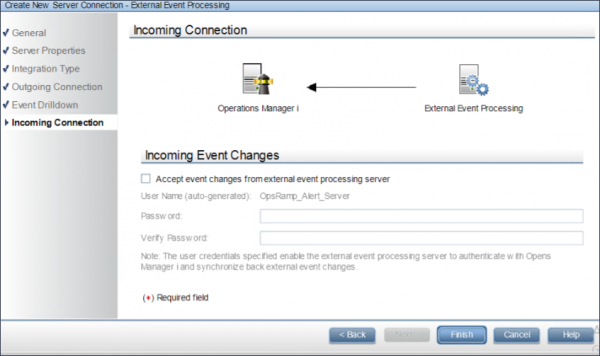
- In Incoming Connection section, the username is auto-generated. Leave this section blank and click Finish.
Step 3: Configure event forwarding rules
Configure an event forwarding rule to determine which events are forwarded to OpsRamp connected server. Events matching with the rules are pushed to OpsRamp connected server including the subsequent changes in the events. You can configure which events to forward based upon a filter, and to which connected server the events should be forwarded. You can configure filters in the Event Forwarding manager.
To configure event forwarding rules:
- Go to Administration > Event Processing.
- From Automation, click Event Forwarding and click the New Script icon to create a new event forwarding rule.
- In the General section, configure the following:
- Name for the rule.
- Rule description.
- In Condition section, configure the following:
- Click browse icon and select the filter. The filter determines which events to forward. For example, a filter can contain severity related attributes to forward only Critical or Major events.
- To create a new filter, configure the the following:
- Click the New Script icon and click New Simple Filter.
- Enter name for filter. Example: OpsRamp Push Events Forward Rule.
- Enter description of the filter.
- Configure General, Dates and Additional Event Properties as per your requirement.
- Click All events in Correlation section, and click OK.
The rule now is displayed in the Event Filter drop-down in Conditions section.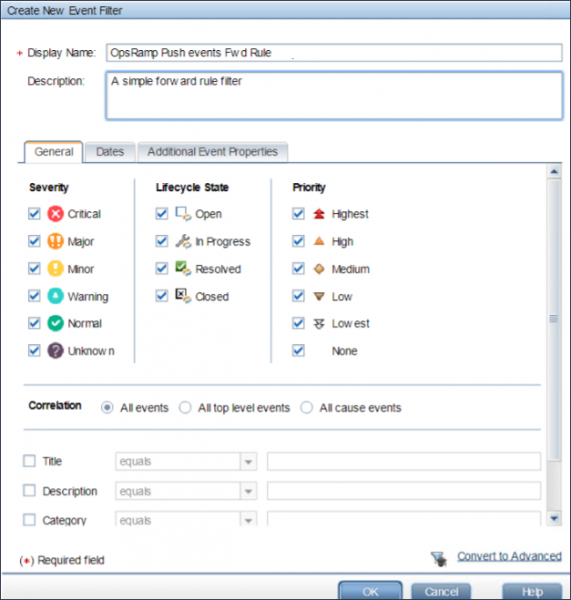
- In Target Servers section, configure the below details:
- Select the previously configured OpsRamp connected server from the drop-down.
- Click the Add multiple servers icon to view the target server details.
- Select Notify and Update in Forwarding Type drop-down and click OK.

Code Box Example
<!DOCTYPE html>
<html lang="en">
<head>
<meta charset="UTF-8">
<meta name="viewport" content="width=device-width, initial-scale=1.0">
<title>Document</title>
</head>
<body>
<h1>Hello, World!</h1>
</body>
</html>